Stormtrooper helmet build

willsyd

New Member
Long follower of this website, first time posting.

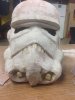
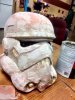
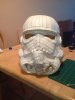
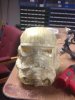
I'm currently in the middle of making a stormtrooper helmet. I'm not looking for it to be movie accurate or even perfect for that matter. I'm just trying to work my way through the process and learn, because this is my first build. So any tips/advice that you guys can provide would be greatly appreciated.
 

Attachments

  • 1st coat of bondo.JPG
    1st coat of bondo.JPG
    2.1 MB · Views: 180
  • bondo sanded.JPG
    bondo sanded.JPG
    3.1 MB · Views: 194
  • Cardstock progress.JPG
    Cardstock progress.JPG
    2.1 MB · Views: 169
  • Cardstock put together.JPG
    Cardstock put together.JPG
    2 MB · Views: 150
  • Fiberglassed & Resined.JPG
    Fiberglassed & Resined.JPG
    1.9 MB · Views: 166
Looks like you're well into the bondo stage. Just keep sanding and re-applying! You know the drill. :)
 
Ok so I lied. At first I wasn't particularly worried about details but after looking other threads and how awesome other projects have turned out I retract my last statement. LOL

Haven't been able to do too much because of work and other obligations...

When I applied my first layer of bondo I lost some of the detail lines on the back of the helmet and along the sides above the ears. I added some putty all the way around the back half to add depth. Next I'll shape it and sand it down to create the small lip that is present on an actual helmet

photo 1.JPGphoto 2.JPGphoto 3.JPG
 
Last edited:
Ok so I lied. At first I wasn't particularly worried about details but after looking other threads and how awesome other projects have turned out I retract my last statement. LOL

Haven't been able to do too much because of work and other obligations...

When I applied my first layer of bondo I lost some of the detail lines on the back of the helmet and along the sides above the ears. I added some putty all the way around the back half to add depth. Next I'll shape it and sand it down to create the small lip that is present on the actual helmet.

View attachment 259330! View attachment 259332 View attachment 259333
Images not working for me, try re-uploading them.
 
Looking good. The lip on the back is quite variable, depending on the version. My eFX is crisp and very even, but my fibreglass Cameron Oakley has just a slight ripple in comparison. They both look good, though.

By the way, might pay to wear rubber gloves if that putty is the kneading type. Back in about 1980 I used some with bare hands and it took a full ten years before the small blisters on my thumb and forefinger faded out. Seriously. I use blue nitrile gloves now and it works a charm. Just for what it's worth.

Looking forward to seeing more pictures of this build. Threads like this are what attracted me to the RPF in the first place. :thumbsup
 
I actually looked at your thread recently awesome job! Next time I make one I may take the route you did and build the slots along the nose into the mask. Right now its really difficult to apply bondo and sand such a small area.
 
Greetings! I apologize to anyone that has been actively following this thread. I'm active duty in the Air Force and have been very busy lately. I haven't done much but here are a few updates on my stormtrooper helmet

1) I found it very difficult to sand around the nose bridge so I cut it out. I plan on using putty and molding my own from scratch.


IMG_2326.JPG

2) Finally completed 1st coat sanding except the front nozzles, I find it very difficult to get in there with sand paper. Does any techniques that make it easier to get in the small crevices?

Lastly this something I'm very excited about I'm going to make a full cardboard/fiber glassed suit. I'm still very new to this and haven't been able to find much literature on it. But I figure it's the best of both worlds. Cardboard is free and not flimsy like foam and I get the stability that I want so far I've done just the front chest plate. Hope to make a lot of progress this weekend.
 
Looking forward to this project, and if I can help in any way, just sing out. I've made a full torso, chest, back and shoulder set of pep files, finished and trooped in my first set, and now I'm in the process of building a second set with some reshaping and improvements. I have all the pep files and you are most welcome to them. Cheers, Phil

I'm going to make a full cardboard/fiber glassed suit. I'm still very new to this and haven't been able to find much literature on it. But I figure it's the best of both worlds.
 
1) I found it very difficult to sand around the nose bridge so I cut it out. I plan on using putty and molding my own from scratch.

2) Finally completed 1st coat sanding except the front nozzles, I find it very difficult to get in there with sand paper. Does any techniques that make it easier to get in the small crevices?

Don't stick to sand paper alone, sand paper is not going to cut it on those sharp angles or hard to reach places instead try to use some other methods or tools like raspers utility knives or any other abrasive cutting tool that you can get your hands onto.
If I was you I would cut off those nozzles since they're only making things more difficult and you don't really need them right now then after finishing everything replace them with new nozzles.
 
Looking forward to this project, and if I can help in any way, just sing out. I've made a full torso, chest, back and shoulder set of pep files, finished and trooped in my first set, and now I'm in the process of building a second set with some reshaping and improvements. I have all the pep files and you are most welcome to them. Cheers, Phil


I appreciate the generosity!
 
Started on the armor. Was hoping to finish it but I ran out of cardboard and was too lazy to go get more. Later this week Ill start 2nd coat of bondo on the helmet and finish assembling the armor.

Here's what I was able to do so far

ImageUploadedByTapatalk1392018130.636408.jpg


Sent from my iPhone using Tapatalk

- - - Updated - - -

And yes I do realize that the two pieces on the back armor are backwards, I'll fix them later on.
 
Back
Top