You are using an out of date browser. It may not display this or other websites correctly.
You should upgrade or use an alternative browser.
You should upgrade or use an alternative browser.
Steampunk Ironman Helmet WIP - 5/31 update
- Thread starter indiefilmgeek
- Start date
Re: Steampunk Ironman Helmet WIP -updated 3/11
Hey guys what’s up, I have been lurking in the thread now for a while, now that I think of it this may actually be my second post like ever ( member since 11') but I must say overall I am very impressed with what I see going on and the ideas I hear floating back and forth sounds like you guys are geared up for some serious work") .....if I may be so bold-if you ordered one of these helmets-----what do YOU plan to do with it? I know what I’m doing but I have kept it under lock and key since November, only my Fiancé has really seen what I have been working on mainly bc whenever I try and do something a little different I get criticized from all sides by someone someplace somewhere so I started this whole thing with the idea in my head that this costume would be exactly what I wanted it to be and nothing more-something original that I could have fun in- I liked the steam punk elements but at the same time I really like lights and things that flash so I thought I would try and work elements of both into my build with the idea of a time traveler story line to help explain why it’s not 100% this way or that way but to be honest it’s just a cop out excuse to do what I want. " You can’t have digital dials on a steampunk costume" :angryyes I can bc I built this and that’s what I wanted so back off LOL. So any who what I have done is pulled elements from several different costumes and some home hand made parts from foam to build up a full suit of armor......right now I have a full wearable costume and have started working on the details a bit. ( it needs a lot of them to get it where I want it but so far I am very pleased) The helmet is the last piece for the first version of this armor. I am not very pleased with the ab section right now, it’s sort of like C3PO style with a rubber matting style back and exposed wiring so I will need to work on that (suggestions?) so that’s what I have going on and I would love to hear what you guys are cooking up
.....if I may be so bold-if you ordered one of these helmets-----what do YOU plan to do with it? I know what I’m doing but I have kept it under lock and key since November, only my Fiancé has really seen what I have been working on mainly bc whenever I try and do something a little different I get criticized from all sides by someone someplace somewhere so I started this whole thing with the idea in my head that this costume would be exactly what I wanted it to be and nothing more-something original that I could have fun in- I liked the steam punk elements but at the same time I really like lights and things that flash so I thought I would try and work elements of both into my build with the idea of a time traveler story line to help explain why it’s not 100% this way or that way but to be honest it’s just a cop out excuse to do what I want. " You can’t have digital dials on a steampunk costume" :angryyes I can bc I built this and that’s what I wanted so back off LOL. So any who what I have done is pulled elements from several different costumes and some home hand made parts from foam to build up a full suit of armor......right now I have a full wearable costume and have started working on the details a bit. ( it needs a lot of them to get it where I want it but so far I am very pleased) The helmet is the last piece for the first version of this armor. I am not very pleased with the ab section right now, it’s sort of like C3PO style with a rubber matting style back and exposed wiring so I will need to work on that (suggestions?) so that’s what I have going on and I would love to hear what you guys are cooking up
Hey guys what’s up, I have been lurking in the thread now for a while, now that I think of it this may actually be my second post like ever ( member since 11') but I must say overall I am very impressed with what I see going on and the ideas I hear floating back and forth sounds like you guys are geared up for some serious work
.....if I may be so bold-if you ordered one of these helmets-----what do YOU plan to do with it? I know what I’m doing but I have kept it under lock and key since November, only my Fiancé has really seen what I have been working on mainly bc whenever I try and do something a little different I get criticized from all sides by someone someplace somewhere so I started this whole thing with the idea in my head that this costume would be exactly what I wanted it to be and nothing more-something original that I could have fun in- I liked the steam punk elements but at the same time I really like lights and things that flash so I thought I would try and work elements of both into my build with the idea of a time traveler story line to help explain why it’s not 100% this way or that way but to be honest it’s just a cop out excuse to do what I want. " You can’t have digital dials on a steampunk costume" :angryyes I can bc I built this and that’s what I wanted so back off LOL. So any who what I have done is pulled elements from several different costumes and some home hand made parts from foam to build up a full suit of armor......right now I have a full wearable costume and have started working on the details a bit. ( it needs a lot of them to get it where I want it but so far I am very pleased) The helmet is the last piece for the first version of this armor. I am not very pleased with the ab section right now, it’s sort of like C3PO style with a rubber matting style back and exposed wiring so I will need to work on that (suggestions?) so that’s what I have going on and I would love to hear what you guys are cooking up
Last edited by a moderator:
Re: Steampunk Ironman Helmet WIP -updated 3/11
It's time I contributed something to this project. First, my disclaimer: I am as much a mold maker as I am an astronaut. I love the idea of both but either one could end very badly since I have no formal training in them. So don't judge me on the quality or technique of my mold making. My motto is, "As long as it works."
Having said that, Indie wanted me to cast the curved tube piece that goes on the side of the helmet. We need two of these and they need to be more durable than the constructed piece. So sure, give it to the guy who doesn't do this for a living! :eek
The first thing I had to do was figure out how I was going to cast this. I could have done a fiberglass jacket and try to be all fancy, but this is really a waste mold so I didn't see the point (and I didn't have any fiberglass). So I figured out where my mold would seam together and clayed up one side of the piece, cutting it roughly in half.

Again, not the cleanest mold by any stretch, but ready my disclaimer above.
Around that I bent some foam core and hot glued the #$&! out of it. Nothing is more disheartening than to check on your mold 30 minutes later and find all the silicone spread out in a nice puddle. Not that that has ever happened to me. I just hear that sometimes happens. The blue thing you see in the photo is actually a 3mm piece of plastic that I attached to the end of the piece (which curves up) to help avoid air bubbles being trapped when I pour the resin later.

I failed to take any photos of the poured silicone on the first half, but it looked a lot like the second half, which is pictured below. I did remember to use mold release before pouring the second half. The LAST thing I wanted was to lock this piece in the mold and have to tell Indie he needed to make another.

This morning, I said a short prayer to the mold making gods that I used enough mold release as I started to take the mold apart. Clearly they exist, because the mold came apart pretty easily. I have some cleaning up to do on it, but I've done worse. It's a chunk of silicone, to be sure, but I believe it will work just fine! I'll know this evening (or at lunch) when I go to pour the resin.

I'll post pics of the resin piece once I get that done. That will get passed off to Indie so he can do more cleanup on the piece that the original would not have endured.
It's time I contributed something to this project. First, my disclaimer: I am as much a mold maker as I am an astronaut. I love the idea of both but either one could end very badly since I have no formal training in them. So don't judge me on the quality or technique of my mold making. My motto is, "As long as it works."
Having said that, Indie wanted me to cast the curved tube piece that goes on the side of the helmet. We need two of these and they need to be more durable than the constructed piece. So sure, give it to the guy who doesn't do this for a living! :eek
The first thing I had to do was figure out how I was going to cast this. I could have done a fiberglass jacket and try to be all fancy, but this is really a waste mold so I didn't see the point (and I didn't have any fiberglass). So I figured out where my mold would seam together and clayed up one side of the piece, cutting it roughly in half.
Again, not the cleanest mold by any stretch, but ready my disclaimer above.
Around that I bent some foam core and hot glued the #$&! out of it. Nothing is more disheartening than to check on your mold 30 minutes later and find all the silicone spread out in a nice puddle. Not that that has ever happened to me. I just hear that sometimes happens. The blue thing you see in the photo is actually a 3mm piece of plastic that I attached to the end of the piece (which curves up) to help avoid air bubbles being trapped when I pour the resin later.
I failed to take any photos of the poured silicone on the first half, but it looked a lot like the second half, which is pictured below. I did remember to use mold release before pouring the second half. The LAST thing I wanted was to lock this piece in the mold and have to tell Indie he needed to make another.
This morning, I said a short prayer to the mold making gods that I used enough mold release as I started to take the mold apart. Clearly they exist, because the mold came apart pretty easily. I have some cleaning up to do on it, but I've done worse. It's a chunk of silicone, to be sure, but I believe it will work just fine! I'll know this evening (or at lunch) when I go to pour the resin.
I'll post pics of the resin piece once I get that done. That will get passed off to Indie so he can do more cleanup on the piece that the original would not have endured.
Last edited by a moderator:
indiefilmgeek
Sr Member
Re: Steampunk Ironman Helmet WIP -updated 3/11
SO, glad the casting worked out! I can't wait to get these tubes cleaned up, painted and then bolted onto the helmet!:thumbsup
LordGaga: I'm actually very pleased that you're going in a completely different direction on your build! I think the most exciting part of this for me is seeing all of the variations you all create from the casts we did. The casts are in such a raw form, I think there's a lot of ways to use a piece like this. And since you have your suit done already, you can really go WAY outside 'the box' with altering and modifying the helmet to fit your need. I actually can't WAIT to see it.
Do you have a picture of the suit you've worked up? Feel free to post it here if you want.
SO, glad the casting worked out! I can't wait to get these tubes cleaned up, painted and then bolted onto the helmet!
:thumbsupLordGaga: I'm actually very pleased that you're going in a completely different direction on your build! I think the most exciting part of this for me is seeing all of the variations you all create from the casts we did. The casts are in such a raw form, I think there's a lot of ways to use a piece like this. And since you have your suit done already, you can really go WAY outside 'the box' with altering and modifying the helmet to fit your need. I actually can't WAIT to see it.
Do you have a picture of the suit you've worked up? Feel free to post it here if you want.
Re: Steampunk Ironman Helmet WIP - 3/14 update
THANKS MAN!!!!! Yes I do have quite a few pics......when I leave work this evening I will see about putting some up. Im actually very excited about "presenting" it to someone to have a look at so I suppose this is a great place to start I have changed mid build several times I am actually getting a different pair of shins already bc I made the arms very bulky it ( second set of arms I was not happy with the first set) felt a bit top heavy so I wanted bulkier legs to sort of even it out? I have borrowed elements FROM EVERYWHERE. So its a bit of a hodge podge......its also not in traditional "steampunk" colors......its a blue that changes to purple depending on the light (colorshift paint) silver with brass highlights, havnt done much brass work yet bc that is the phase I am on now. I sort of built this one backwards bc I kept chaniging my mind but hey thats how things evolve, my original sketches looked like a subzero mixed with Iron man and now it looks like some weird robot thing LOL. So ya stay tuned pics to come..........Moetron 1.0 not to be confused with motrin.
Let me go ahead and tell you how what I have working on came to be.
The Chest and back piece, butt, cod and upper and lower legs are from a tall clone trooper kit. The lower legs are being replaced by a different set so for now they still have an overall Clone feel to the lower half that will change soon. The arms are custom, shoulders and biceps are from the newest IM custom built foam and the guantlets are custom made from 4 inch PVC some toy guns a resin rocket and some other nonsense I slapped together...I think I broke apart an old cell phone and used some parts also. The ab is a rubberized ribbed floor mat with wires zip tied on and it has a very C3PO feel that as of now I am not really feeling. I bought the arc reactor off Ebay made the shoulder straps from and old bucket and a few different old leather and nylon belts.Last night I added some belts on the sides to "pull" the front and back together. Just posted 2 lil ones I had here-----the lower one is a comparison pic where you can see I bulked up the shoulder strapping with the belts. Over the top I used old leather belts that just happened to fit perfect in the groove of the bucket( i may add some "rivets" to that top leather strap) and I used a tactical nylon belt from my Umbrella soldier get up......the other picture is after the first night I started working on the second set of guantlets so these are them in the rough form.......so yall BE NICE LOL
THANKS MAN!!!!! Yes I do have quite a few pics......when I leave work this evening I will see about putting some up. Im actually very excited about "presenting" it to someone to have a look at so I suppose this is a great place to start
I have changed mid build several times I am actually getting a different pair of shins already bc I made the arms very bulky it ( second set of arms I was not happy with the first set) felt a bit top heavy so I wanted bulkier legs to sort of even it out? I have borrowed elements FROM EVERYWHERE. So its a bit of a hodge podge......its also not in traditional "steampunk" colors......its a blue that changes to purple depending on the light (colorshift paint) silver with brass highlights, havnt done much brass work yet bc that is the phase I am on now. I sort of built this one backwards bc I kept chaniging my mind but hey thats how things evolve, my original sketches looked like a subzero mixed with Iron man and now it looks like some weird robot thing LOL. So ya stay tuned pics to come..........Moetron 1.0 not to be confused with motrin.Let me go ahead and tell you how what I have working on came to be.
The Chest and back piece, butt, cod and upper and lower legs are from a tall clone trooper kit. The lower legs are being replaced by a different set so for now they still have an overall Clone feel to the lower half that will change soon. The arms are custom, shoulders and biceps are from the newest IM custom built foam and the guantlets are custom made from 4 inch PVC some toy guns a resin rocket and some other nonsense I slapped together...I think I broke apart an old cell phone and used some parts also. The ab is a rubberized ribbed floor mat with wires zip tied on and it has a very C3PO feel that as of now I am not really feeling. I bought the arc reactor off Ebay made the shoulder straps from and old bucket and a few different old leather and nylon belts.Last night I added some belts on the sides to "pull" the front and back together. Just posted 2 lil ones I had here-----the lower one is a comparison pic where you can see I bulked up the shoulder strapping with the belts. Over the top I used old leather belts that just happened to fit perfect in the groove of the bucket( i may add some "rivets" to that top leather strap) and I used a tactical nylon belt from my Umbrella soldier get up......the other picture is after the first night I started working on the second set of guantlets so these are them in the rough form.......so yall BE NICE LOL
Attachments

Last edited:
Re: Steampunk Ironman Helmet WIP - 3/14 update
I just poured the first (and probably only) casting from the mold and I have to say I'm pretty pleased! Since it is a waste mold, I'm not going to be very picky. There is maybe 60 seconds worth of cleanup on the piece pictured below, since Indie is going to do a lot of work on it. I've pictured it with the original just for comparison.
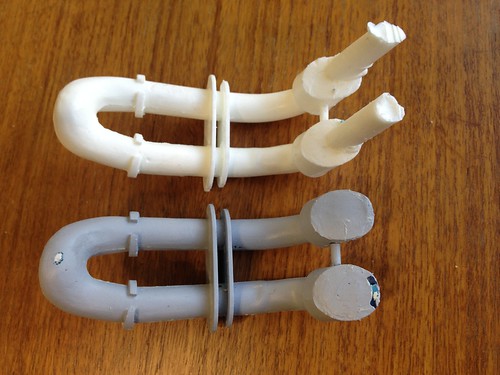
I just poured the first (and probably only) casting from the mold and I have to say I'm pretty pleased! Since it is a waste mold, I'm not going to be very picky. There is maybe 60 seconds worth of cleanup on the piece pictured below, since Indie is going to do a lot of work on it. I've pictured it with the original just for comparison.
electraflier
Well-Known Member
Re: Steampunk Ironman Helmet WIP - 3/14 update
You know that looks great!! I was worried about the thin veins,but they come out fantastic!
You know that looks great!! I was worried about the thin veins,but they come out fantastic!
SandmanWs7
New Member
Re: Steampunk Ironman Helmet WIP - Final Eye Set-up Video
What printer is that? What was the cost?
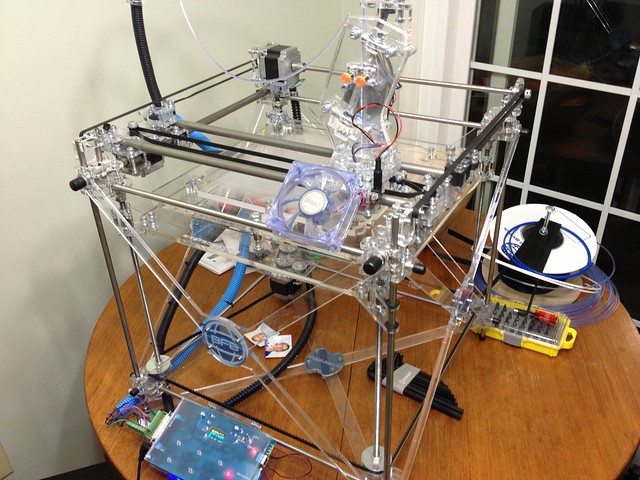
I've been lurking the thread, since Indie has been doing the work. Today's acquisition warrants a post, however. I finally got my 3D printer setup at home! While Indie is very much the scratch-build-with-whatever-he-can-find kind of guy, I'm going to use this to make whatever other parts we don't want to scratch build. :love
What printer is that? What was the cost?
SandmanWs7
New Member
Re: Steampunk Ironman Helmet WIP - 3/14 update
Wow. Just read all 20 pages. Amazing work, can't wait to see it done.
Wow. Just read all 20 pages. Amazing work, can't wait to see it done.
Re: Steampunk Ironman Helmet WIP - Final Eye Set-up Video
That's the RapMan 3.1 printer. It lists for between $1700 and $2200, depending on how you get it configured. I paid nowhere near that amount, since I bought it from my previous employer. They had no use for it after I left! :lol
The price isn't really the biggest hurdle. It's 100% assembly required! The acrylic comes as laser cut sheets, flat in a box with some rods, a boatload of bolts, and a PDF on how to put it all together. It took me three full days to assemble it. It is, in my opinion, one of the better ones out there though. It has a huge print surface, and each layer can be as thin as .1mm.
What printer is that? What was the cost?
That's the RapMan 3.1 printer. It lists for between $1700 and $2200, depending on how you get it configured. I paid nowhere near that amount, since I bought it from my previous employer. They had no use for it after I left! :lol
The price isn't really the biggest hurdle. It's 100% assembly required! The acrylic comes as laser cut sheets, flat in a box with some rods, a boatload of bolts, and a PDF on how to put it all together. It took me three full days to assemble it. It is, in my opinion, one of the better ones out there though. It has a huge print surface, and each layer can be as thin as .1mm.
SandmanWs7
New Member
Re: Steampunk Ironman Helmet WIP - Final Eye Set-up Video
Ok I noticed all the acrylic. I've been looking to see if there are plans to make that. I work at a sign shop and we have 3 laser cutters (1/4"acrylic material Max) and 2 CNC tables that can cut aluminum. It looks like I'd be able to cut all the pieces then I'd just have to order the mechanics and electronics.
What's the max size that one will print? Most of the affordable ones only have a 5x5 work area.
That's the RapMan 3.1 printer. It lists for between $1700 and $2200, depending on how you get it configured. I paid nowhere near that amount, since I bought it from my previous employer. They had no use for it after I left! :lol
The price isn't really the biggest hurdle. It's 100% assembly required! The acrylic comes as laser cut sheets, flat in a box with some rods, a boatload of bolts, and a PDF on how to put it all together. It took me three full days to assemble it. It is, in my opinion, one of the better ones out there though. It has a huge print surface, and each layer can be as thin as .1mm.
Ok I noticed all the acrylic. I've been looking to see if there are plans to make that. I work at a sign shop and we have 3 laser cutters (1/4"acrylic material Max) and 2 CNC tables that can cut aluminum. It looks like I'd be able to cut all the pieces then I'd just have to order the mechanics and electronics.
What's the max size that one will print? Most of the affordable ones only have a 5x5 work area.
Re: Steampunk Ironman Helmet WIP - Final Eye Set-up Video
PM sent!
Ok I noticed all the acrylic. I've been looking to see if there are plans to make that. I work at a sign shop and we have 3 laser cutters (1/4"acrylic material Max) and 2 CNC tables that can cut aluminum. It looks like I'd be able to cut all the pieces then I'd just have to order the mechanics and electronics.
What's the max size that one will print? Most of the affordable ones only have a 5x5 work area.
PM sent!
Rysjin7717
Well-Known Member
Re: Steampunk Ironman Helmet WIP - 3/14 update
Great work you guys and LordGaga, nice original building brah keep up th' good work
Sent from my SGH-T989 using Xparent Skyblue Tapatalk 2
Great work you guys and LordGaga, nice original building brah keep up th' good work
Sent from my SGH-T989 using Xparent Skyblue Tapatalk 2
indiefilmgeek
Sr Member
Re: Steampunk Ironman Helmet WIP - 3/14 update
That chest armor looks GREAT, LordGaga! I love your use of the 'bucket' - I'm a big fan of using found-objects for cool costuming!
The gauntlet looks cool too! Can't wait to see it come together (including the helmet). It's certainly going to be one of a kind!)
That chest armor looks GREAT, LordGaga! I love your use of the 'bucket' - I'm a big fan of using found-objects for cool costuming!
The gauntlet looks cool too! Can't wait to see it come together (including the helmet). It's certainly going to be one of a kind!
)Re: Steampunk Ironman Helmet WIP - 3/14 update
So hey yall........Got my helmet on Friday and it consumed my weekend. I got the whole bucket primed and ready to paint ( the paint has to be ordered online so it will be a while) meanwhile I went shopping @ Home depot and raided the plumbin section for all kinds of greeblies I could use and had some great luck. My large canister should be dry and ready to install on the back piece today and I can start adding lights to the back. Some hoses a few wires and the large canister and the back will be finished.....well until I get the smoke machine installed behind the back plate that is...
Pool, sprinkler and plumbing parts ( faucets, drains etc had great luck finding things to repurpose.
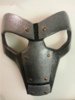
So hey yall........Got my helmet on Friday and it consumed my weekend. I got the whole bucket primed and ready to paint ( the paint has to be ordered online
so it will be a while) meanwhile I went shopping @ Home depot and raided the plumbin section for all kinds of greeblies I could use and had some great luck. My large canister should be dry and ready to install on the back piece today and I can start adding lights to the back. Some hoses a few wires and the large canister and the back will be finished.....well until I get the smoke machine installed behind the back plate that is...Pool, sprinkler and plumbing parts ( faucets, drains etc had great luck finding things to repurpose.
Attachments
indiefilmgeek
Sr Member
Re: Steampunk Ironman Helmet WIP - 3/14 update
I love the work you did on the back armor! And the texture of the paint is pretty cool - I like the two-tone faceplate!)
I love the work you did on the back armor! And the texture of the paint is pretty cool - I like the two-tone faceplate!
)Similar threads
- Replies
- 10
- Views
- 354
- Replies
- 3
- Views
- 943
- Replies
- 10
- Views
- 1,334
- Replies
- 4
- Views
- 1,733