You are using an out of date browser. It may not display this or other websites correctly.
You should upgrade or use an alternative browser.
You should upgrade or use an alternative browser.
Steampunk Bane (TDKR)/WIP - Con pics on last page
- Thread starter LordCaharin
- Start date
")
PrimoOptimoso
Sr Member
Re: Steampunk Bane (TDKR)/First WIP -Updated Pics 12.23.12 Bottom of pg. 2-
Caharin - that mask looks really fantastic so far! Those side pieces are HUGE - what are they made from?
Wait, I see goggle halves there (what a way to turn the whole "steampunk goggles" thing on its ear!) but what else?
Caharin - that mask looks really fantastic so far! Those side pieces are HUGE - what are they made from?
Wait, I see goggle halves there (what a way to turn the whole "steampunk goggles" thing on its ear!) but what else?
LordCaharin
Active Member
Re: Steampunk Bane (TDKR)/First WIP -Updated Pics 12.23.12 Bottom of pg. 2-
Thanks for the compliments everyone.
Primo, you are spot on. The missus is starting a steampunk build for an upcoming event and I was going to make her some goggles just to start and when I laid out the pieces for design and paint next to my mask, I ended up messing around with the frames and it just went from there.
The "canisters" are just lamp finals (decorative pieces that go on the top of lamps and sometimes bed frames, for those that don't know what finals are) that I got at hobby lobby for 1.35 a piece. Then I found two pens with interesting tops, I painted those and hot glued them to the top of the final.
Still debating how to keep the final on the mask because where the final and the mask connect, there is very little surface area on the mask for glue and the final weights in at about a half a pound or more. Probably do some foam work on the inside to create more surface area on both ends.
I included a couple pictures of the finals to get a better idea of what I am talking about.
Caharin - that mask looks really fantastic so far! Those side pieces are HUGE - what are they made from?
Wait, I see goggle halves there (what a way to turn the whole "steampunk goggles" thing on its ear!) but what else?
Thanks for the compliments everyone.
Primo, you are spot on. The missus is starting a steampunk build for an upcoming event and I was going to make her some goggles just to start and when I laid out the pieces for design and paint next to my mask, I ended up messing around with the frames and it just went from there.
The "canisters" are just lamp finals (decorative pieces that go on the top of lamps and sometimes bed frames, for those that don't know what finals are) that I got at hobby lobby for 1.35 a piece. Then I found two pens with interesting tops, I painted those and hot glued them to the top of the final.
Still debating how to keep the final on the mask because where the final and the mask connect, there is very little surface area on the mask for glue and the final weights in at about a half a pound or more. Probably do some foam work on the inside to create more surface area on both ends.
I included a couple pictures of the finals to get a better idea of what I am talking about.
PrimoOptimoso
Sr Member
Re: Steampunk Bane (TDKR)/First WIP -Updated Pics 12.23.12 Bottom of pg. 2-
Idea: Run a screw/bolt through the breather wall from the inside, through the center of the goggle lens (drill first) and then into the finial. If it's metal it should be threaded, if wood just use a big wood or drywall screw. Put a washer at the head end so it doesn't pull through or sag, if possible.
Awesome mask so far though; can't wait to see the finished costume.
LordCaharin
Active Member
Re: Steampunk Bane (TDKR)/First WIP -Updated Pics 12.23.12 Bottom of pg. 2-
Excellent idea Primo. I have added a pic of the wall in the center of the lens frame so you could see what I am seeing. With that in mind, I was thinking cut out the hippie symbol, take two washers with a piece of foam in the middle, run a screw through all three and screw the final on.
Small update as well, I cut out the armor and kidney plate tonight. The cuts weren't perfect but good enough. Also I had an idea. I cut out a few additional piece to go on top of the armor to simulate the extra pieces on Bane's vest (The two brown shoulder pieces and the chest/stomach piece). Please ignore the piece below the throat/neck area, I was using that to see what it would look like if I removed that area to extend it. Of course it would look like added armor riveted on for extra protection.
Thoughts?
Idea: Run a screw/bolt through the breather wall from the inside, through the center of the goggle lens (drill first) and then into the finial. If it's metal it should be threaded, if wood just use a big wood or drywall screw. Put a washer at the head end so it doesn't pull through or sag, if possible.
Awesome mask so far though; can't wait to see the finished costume.
Excellent idea Primo. I have added a pic of the wall in the center of the lens frame so you could see what I am seeing. With that in mind, I was thinking cut out the hippie symbol, take two washers with a piece of foam in the middle, run a screw through all three and screw the final on.
Small update as well, I cut out the armor and kidney plate tonight. The cuts weren't perfect but good enough. Also I had an idea. I cut out a few additional piece to go on top of the armor to simulate the extra pieces on Bane's vest (The two brown shoulder pieces and the chest/stomach piece). Please ignore the piece below the throat/neck area, I was using that to see what it would look like if I removed that area to extend it. Of course it would look like added armor riveted on for extra protection.
Thoughts?
PrimoOptimoso
Sr Member
Re: Steampunk Bane (TDKR)/First WIP -Updated Pics 12.23.12 Bottom of pg. 2-
sounds just about perfect for the job at hand!
armor looks good thus far too - just be sure to give it a bit of a handcrafted finish for good measure.
Excellent idea Primo. I have added a pic of the wall in the center of the lens frame so you could see what I am seeing. With that in mind, I was thinking cut out the hippie symbol, take two washers with a piece of foam in the middle, run a screw through all three and screw the final on.
sounds just about perfect for the job at hand!
armor looks good thus far too - just be sure to give it a bit of a handcrafted finish for good measure.
LordCaharin
Active Member
Re: Steampunk Bane (TDKR)/First WIP -Updated Pics 12.23/26.12 Bottom of pg. 2 and pg.
No update tonight..just a pic of me messing around since I found out the clothes I want aren't selling them in my size and I was playing around with some of the fashions I had around the house.
I got ericqueen's bane mask template today and I am going to attempt to put it together tonight and pray this scale fits me. Already made one today at work and it was pretty small. That was at 250% and now I am going with 325%.
LordCaharin
Active Member
Re: Steampunk Bane (TDKR)/First WIP -Updated Pics 12.23/26.12 Bottom of pg. 2 and pg.
Minor Update: Decided to finish cutting the foam top plates for the breastplate before bed. I placed them where I wanted them and I am thinking it looks pretty good. I picked up some decorative tacks (looks like riveting) from hobby lobby while I was getting paint and brushes for the mask final painting and I think they will set those plates off. I also extended the neck/throat area down about an inch and a half, it appears to look better that way.
Also after eyeballing and putting the mask template in order, the 325% scale is way too big. I am thinking 285-300% should be my number. Hopefully...
And as always, feedback is ALWAYS appreciated. I am happy that over the course of a few short weeks I got over 3k views but very little feedback. There is a lot of talent and ideas on this forum and everyone's input can help me make this build great.
zodiac
Well-Known Member
Re: Steampunk Bane (TDKR)/First WIP -Updated Pics 12.23/26.12 Bottom of pg. 2 and pg.
Looks awesome so far!
I wish I'd caught this sooner in the build to suggest this, but it's another idea if the finials end up being too heavy.
my first thought when you mentioned possibly using a pack with hoses was an OBA(Oxygen Breathing Apparatus) style pack.
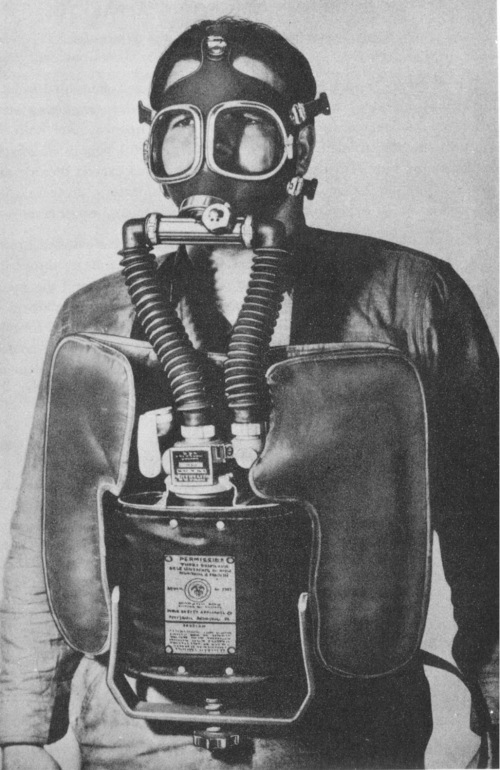
Obviously you could go smaller on the pack and add some clockworks to it, but it's a rebreather device that has been used for decades in firefighting.
We just retired them in the Coast Guard about 6 years ago and the Navy ditched them in '01 haha.
Just another idea to toss around, but you're doing great so far as is.
Looks awesome so far!
I wish I'd caught this sooner in the build to suggest this, but it's another idea if the finials end up being too heavy.
my first thought when you mentioned possibly using a pack with hoses was an OBA(Oxygen Breathing Apparatus) style pack.
Obviously you could go smaller on the pack and add some clockworks to it, but it's a rebreather device that has been used for decades in firefighting.
We just retired them in the Coast Guard about 6 years ago and the Navy ditched them in '01 haha.
Just another idea to toss around, but you're doing great so far as is.
LordCaharin
Active Member
Re: Steampunk Bane (TDKR)/First WIP -Updated Pics 12.23/26.12 Bottom of pg. 2 and pg.
Thanks zodiac for the kind words and awesome idea. I am already thinking of a version 2.0 and 3.0 for the future and that rebreather is going to fit in on one of the two. Terrific find and I appreciate you sharing that will me.
And thanks for your service, I am USMC man myself...
Looks awesome so far!
I wish I'd caught this sooner in the build to suggest this, but it's another idea if the finials end up being too heavy.
my first thought when you mentioned possibly using a pack with hoses was an OBA(Oxygen Breathing Apparatus) style pack.
Obviously you could go smaller on the pack and add some clockworks to it, but it's a rebreather device that has been used for decades in firefighting.
We just retired them in the Coast Guard about 6 years ago and the Navy ditched them in '01 haha.
Just another idea to toss around, but you're doing great so far as is.
Thanks zodiac for the kind words and awesome idea. I am already thinking of a version 2.0 and 3.0 for the future and that rebreather is going to fit in on one of the two. Terrific find and I appreciate you sharing that will me.
And thanks for your service, I am USMC man myself...
LordCaharin
Active Member
Re: Steampunk Bane (TDKR)/First WIP -Updated Pics 12.23/26.12 Bottom of pg. 2 and pg.
Small Update: It has been a unproductive weekend for me in costuming. Time with my boys and the missus ate of most of it but I made some progress in a few areas.
I found the scale of the mask template that worked for me. I did a posterboard mock up on friday and cut the mask out of 6mm foam yesterday. A little gluing later, I got a rough mask made. I also used 6mm to re-cut out the over plate for the breastplate instead of craft foam. To save on waste, I re-cut the craft foam and made a "banded" border to the over plates.
Primo gave me an idea the other day to maybe do designs on the over plates. You know, vines, battle scenes and the like. I decided to use an aluminum pattern plate I found at hobby lobby (but couldn't buy today because they are closed on sundays), stencil the design on the plate and use a woodburning tool to engrave it. I hoping the work will be worth it.
I included a pic of how most of the stuff sits as is. The respirator is behind the top plate and yes, I stripped the paint and parts off it because I was unhappy with the paint.
LordCaharin
Active Member
Re: Steampunk Bane (TDKR)/First WIP -Updated Pics 12.23/26.12 Bottom of pg. 2 and pg.
Again, I am not Seth but I appreciate the kind words.
Again, I am not Seth but I appreciate the kind words.
The Armorer
Well-Known Member
Re: Steampunk Bane (TDKR)/First WIP -Updated Pics 12.23/26.12 Bottom of pg. 2 and pg.
Okay seriously. IT"S NOT ME MAKING BANE. I gave some ideas, but those are just ideas, Caharin is doing all of the work, he needs the credit first. Sorry for taking away from your outstanding work Caharin... I'm just going to go hide in a dark corner of this thread and watch this thing unfold.
Okay seriously. IT"S NOT ME MAKING BANE. I gave some ideas, but those are just ideas, Caharin is doing all of the work, he needs the credit first. Sorry for taking away from your outstanding work Caharin... I'm just going to go hide in a dark corner of this thread and watch this thing unfold.
PrimoOptimoso
Sr Member
Re: Steampunk Bane (TDKR)/First WIP -Updated Pics 12.23/26.12 Bottom of pg. 2 and pg.
And rotate ya pics Caharin! My neck hurts from having to crane it to see them!
And rotate ya pics Caharin! My neck hurts from having to crane it to see them!
LordCaharin
Active Member
Re: Steampunk Bane (TDKR)/First WIP -Updated Pics 12.23/26.12 Bottom of pg. 2 and pg.
Working on it. LOL...
more pics!!!
Working on it. LOL...
LordCaharin
Active Member
Re: Steampunk Bane (TDKR)/First WIP -Updated Pics 12.23/26.12 Bottom of pg. 2 and pg.
They come out sideways on my phone and I don't know how to right them when I post them. LOL...
And rotate ya pics Caharin! My neck hurts from having to crane it to see them!
They come out sideways on my phone and I don't know how to right them when I post them. LOL...
Similar threads
- Replies
- 3
- Views
- 413