Stargate SG-1 Atanik Armband (Upgrades S04E03)

Scifideity

Active Member
RPF PREMIUM MEMBER
After reading all the cool and interesting prop discussions in the RPF I've become inspired to take on a project that I've had in my head for about 2 years now.

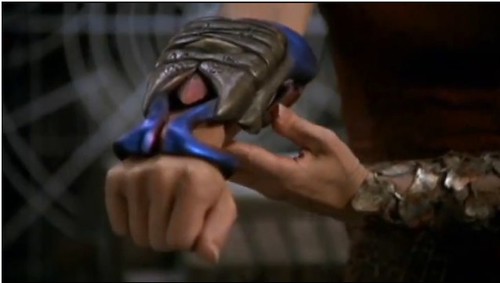
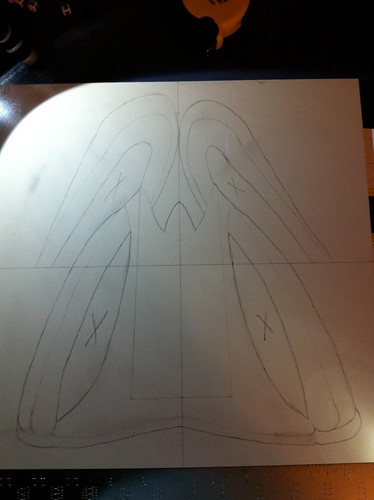
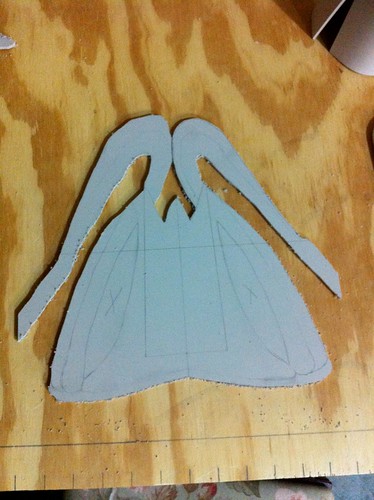
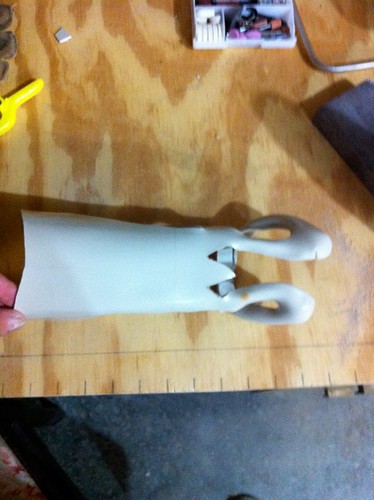
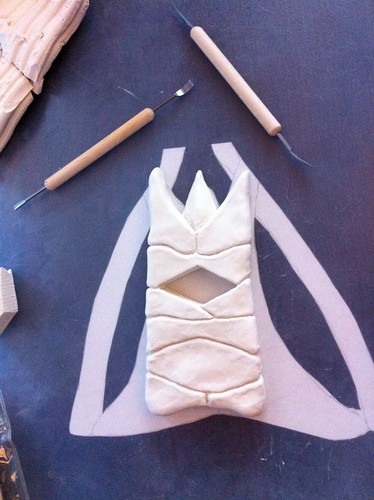
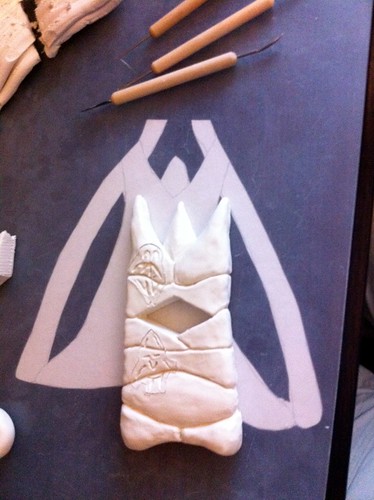
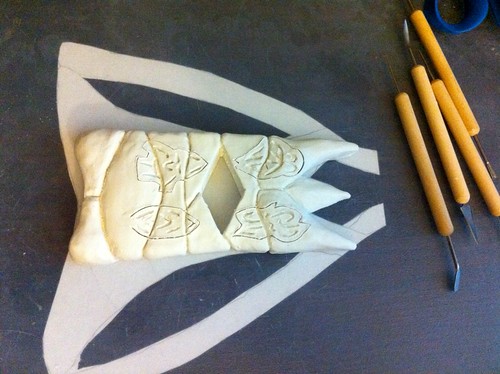
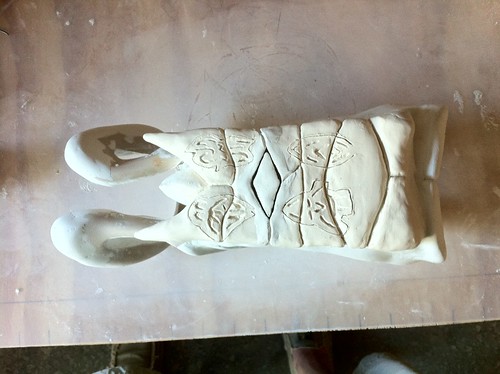
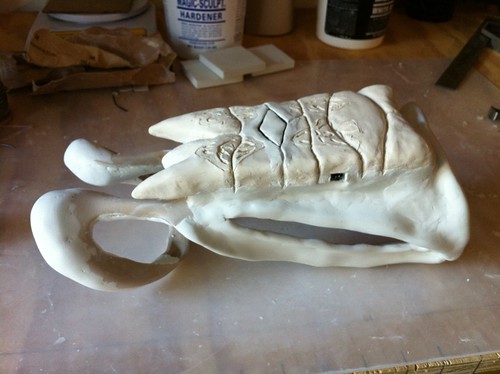
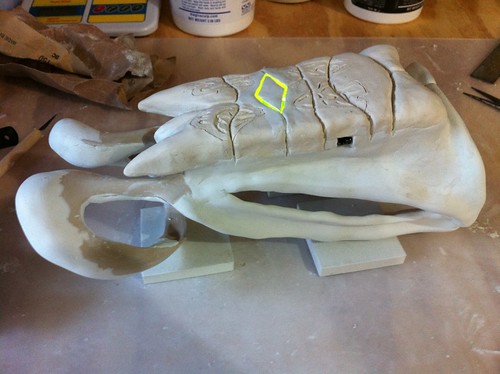
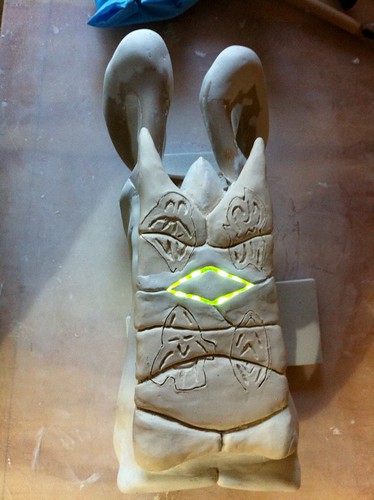
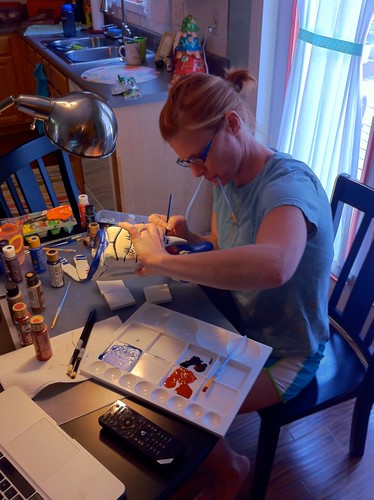
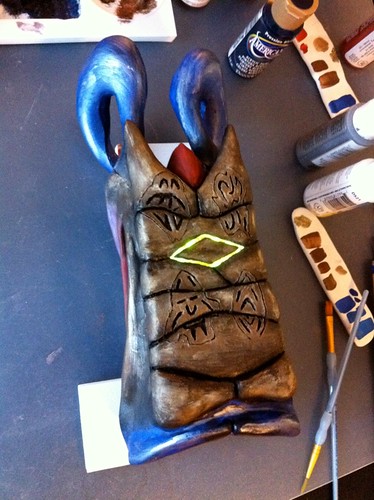
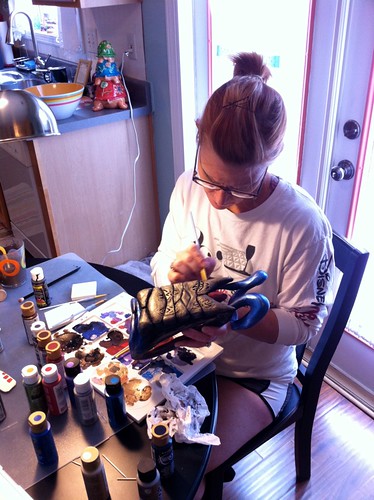
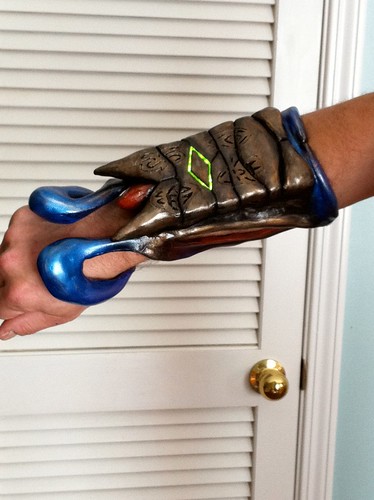
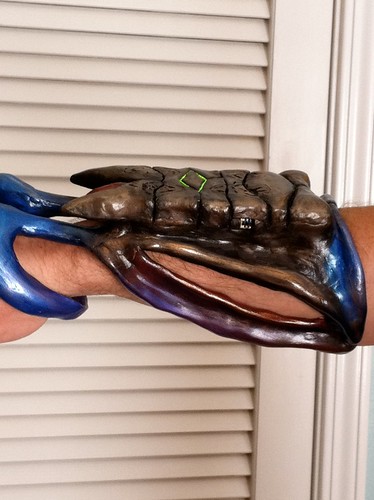
The Atanik Armband from Stargate SG-1 episode "Upgrades" S04E03

I've been going to Dragon*Con for years and have never seen this prop on anybody so I figured why not give it a try.

DISCLAIMER: I have never attempted any sort of prop replica before and outside of being a fairly competent "jack of all trades" type of handyman around the house (think Tim Taylor with a little bit of Bob Vila mixed in) I have no experience with prop or model making. There's a first time for everything right? :cool

I welcome any and all suggestions and will probably be throwing out many questions w/ obvious answers to the experienced prop maker so please be kind :)
 
The first thing I noticed when I started this project was that the Armband from the Stargate Wiki is NOT a good representation of the Screen Used prop. Its more of a 3D Model of what they planned to make is my guess.

The screen used prop is more blue than purple and the carvings are even different (slightly)
6087179343_8d48e4a35f.jpg


I thought about what to make the support structure out of and came up with Kydex since I once tore a razor knife through my right extensor tendon (halloween project, story for another time) and had a brace made of it. I found its heat moldable feature quite interesting and that popped into my head when I was thinking of this project.

I drew it out on a sheet of 1/8" (hindsight is this was too thick) 12" x 12" tan Kydex I got off of ebay for about $7.00

6087178279_ea58788825.jpg


Then I cut it out using a coping saw (don't yet have a bandsaw, its on the "To Get" list)

6087716706_84e4445bd0.jpg


After that I used my heat gun to mold the Kydex around my arm (Note to self: GET A MANNEQUIN ARM)

6087717000_a004e0ec30.jpg
 
Next came the part I was dreading. The carving. I have a very talented friend that has offered to help but since I was, rather stupidly, trying to meet the Dragon*Con 2011 deadline (5 days from now) he wasn't able to free his schedule enough to help me. (totally my fault for being such a slacker and waiting til the last minute. stupid stupid habit of mine to get a fire under my arse at the last minute)

Again, I am new to this so hold your laughter to a minimum at my choice of products to use.

I decided to use Sculpey to make the top portion. My thinking was that I needed something that I could screw up repeatedly and rework as needed THEN make it permanent. (Note to self: LEARN TO CARVE AND CAST MOLDS)

Phase 1 of the carving: The basic shape and look

6087717384_7fc65bd17a.jpg


Phase 2: the Runes

6087717676_22ce279ebd.jpg


6087172749_c493252802.jpg
 
Last edited:
Next came the lighting.
I went shopping at Fry's and RadioShack for a few parts and got the following:

1x 10 Pack Linrose Super Bright LED (2.15V 20mA) (Fry's)
1x 2 Pack High Brightness Rectangular LED (1.9-2.4V 20mA) (RS Part# 276-0009)
1x 5 Pack 22 Ohm resistors (RS Part# 271-1103)
1x 9V Battery
1x 9V Battery plug/lead (had plenty laying around)
1x 1.25"x2.5" drilled board (Fry's)

Using a tool I found in another thread: LED series parallel array wizard I came up with the following solution (I had to go back for the 22 Ohm resistors after doing this part)

6087232395_8e025aa0a7.jpg


I laid the LEDs and Resistors out on the board after marking the diamond shape as a guide

6087718112_ea50d11182.jpg


Then I marked and hollowed out the recessed hole for the LEDs and Board

6087718718_9df2c1933a.jpg


And finally carved out a wire channel, switch port, and battery compartment

6087173837_9f2ba18985.jpg
 
Once I had the top part pretty much ready to bake and harden (a task set for tomorrow) I went to work on rounding out the, now molded to my arm shape, Kydex frame.

I dug around online looking for a product that would suffice for my needs. I couldn't use Sculpey because I wouldn't be able to bake it to harden with the heat sensitive Kydex frame so I stumbled upon Magic Sculp. Yeah, I know, it hardens like granite. Did I mention this is my first attempt at this? :lol

I found a place online and ordered some Magic Sculp and got to work when it arrived. I was amazed at how easy it was to work with and that it smoothed down very easily with water. It's really neat stuff. It's just not ideal for a wearable prop project that requires flexibility when putting the prop on. Oh well, due to my time crunch I'm stuck with my decision and going with it. My hope is that after Dragon*Con I can use my prototype to make molds or something. I'll probably end up just labeling this one the Mark I and starting over from scratch with other materials for the Mark II :cool

Here is what the Kydex frame looks like currently

6087718506_42eca2c8bc.jpg


It's hard and stiff as a rock and I've had to do a bit of tweaking and modification (aka breaking an area loose from the kydex) to get it to go on and come off of my right arm. Through painful discovery I have finally found and sanded down all the pointy and rough parts. My hand looks like I lost a fight with a cat but hopefully it'll heal by next Friday. :lol
 
That's it for the project post flood (for now)

Still "To Do":

1) Bake the top part (first thing tomorrow)
2) Cut a battery access door in the Kydex frame
3) Cut the top "window" out of plastic and mold the covering diamond shape
4) Use Magic Sculp to fill the gaps and mount the top to the frame plus mount the plastic window
5) Paint the base and top
6) Figure out some thin, light cloth to line the arm side

I'll post more pics and progress reports as I get closer to completion. Due to time constraints I can't start this project over for Dragon*Con but I welcome any and all suggestions on doing this prop "right" once Dragon*Con is over. I definitely plan on taking a Mark II to Dragon*Con 2012, hopefully made out of more proper materials :)
 
Last edited:
Very Nice!! Looking forward to see how it turns out.

There are most deff a lot of cool Stargate props that have not been Done yet .!
 
Assembly update

Today I bit the bullet and baked the Sculpey top part. I've been putting it off because I was just sure I was forgetting something and after stewing over it for a day I decided to just do it.

After it cooled I cut out the plastic diamond for the window and then made a diamond center out of Magic Sculp. I just put the window in using my dremel and a sanding bit to make it fit just right then covered the edges with more Magic Sculp to hold it in place.

6090619883_d3ce4e8a6c.jpg


Underneath I just put a few dots of it at the corners for support. Then came time for the LED switch and battery assembly. I put the circuit board in place (just like shown above) and wired in the switch. I then used more Magic Sculp (yeah, i know, beating a dead horse but this is some very versatile stuff) and filled in the corners to hold the board in place and hold the wires down.

Sorry, forgot to snap a pic of the underneath side but it looks like above with just a bit more white holding everything in place.

Since I didn't have a curved surface to mold the piece on, it was flat on the bottom. I had to make up the difference with more Magic Sculp and smoothing.

6091163888_0a66770518.jpg


Once everything was coming together I decided to see how it looked with the LEDs going.

6090620311_28c73d98c9.jpg


6091162892_9927d3f7b8.jpg


I'm letting the Magic Sculp set up over night then my lovely wife is going to give it some color. (I suck at painting)

More pics and updates later

T-Minus 4 days until Dragon*Con :eek
 
Painting Update

I suck at painting. My lovely wife is the one with the painting skills so she offered to paint the armband rather than hear me cuss, *****, and scream at it then throw it across the room in anger ;)

6096068879_4831bd525e.jpg


She spent most of the day yesterday working on it and came up with this:

6096065823_dbef77a21b.jpg


Another with the LEDs lit

6096610508_e3da46b274.jpg


Much like myself, she's nit picking her work and is back at it today tweaking and adjusting some of the blending and areas she doesn't like. I've already found an area that I didn't sculpt correctly but i'm out of time to add more Magic Sculp and make it right. Oh well, notes made and I'll fix it on the Mark II for Dragon*Con 2012 :D

I'll post up some final pics once she's done with her tweaking.
 
The paint job on that is stunning. The way the colours contrast like, and dare I say nicer than, the original is beautiful :thumbsup
 
My lovely wife spent the morning doing her tweaks and adjustments to the paint job.

6097059871_22e9bfcb0e.jpg


And here is it is:

The Stargate SG-1 Atanik Armband (Mark I)

6097567012_e1f441ea7d.jpg


6097022873_54ee310ebe.jpg


Neither of us are 100% satisfied with the end result. We're both picky about our own work and already have a laundry list of things to do differently on the Mark II for Dragon*Con 2012.

If you're at Dragon*Con this weekend say Hi if you see me. I'll be hanging during the day at the Art of Akira Exhibit in Artist Alley helping with that and wandering here and there during the nights in either SG-1 Offworld outfit or the Atanik mission outfit.
 
Fantastic work!! I've always loved the look of this prop and so it's great seeing someone attempt this project...nice job! :) I love the paint job as well......

I'll look out for you this weekend at DragonCon, will be great to say hi

Chris
 
Additional Self Critique Notes:

Its stiff as granite and a bloody pain to put on and take off (so if you see me at Dragon*Con, No I won't take it off so you can try it on, sry ;) )

Definitely needs to be made out of lighter and more flexible (yet firm and shape holding) materials

Scale is almost right on as far as overall length goes but the top portion is a bit off

Front points (left and right of the center red one) should wrap around the sides of the forward arms that lead to the curves over the back of the hand

Those same front arms should curve in more and be closer together when heading up the back of the hand.


I'm looking for any and all suggestions and critiques you may have so please throw them my way. :D
 
That is one of the coolest and most unique props I have ever seen anyone here tackle, especially as a first attempt. You should be extremely proud of it, and of yourself! (and of your wife :lol)
 
Props for you mate. Turned out awesome - Great work on the light, it looks amazing & brings the prop out.

Can you please tell me - where you got this stuff you got from? and also is it possible to sand this stuff down?
 
Props for you mate. Turned out awesome - Great work on the light, it looks amazing & brings the prop out.

Can you please tell me - where you got this stuff you got from? and also is it possible to sand this stuff down?

I got the Kydex heat moldable support structure on ebay, just search for Kydex and there will be many hits. I was originally looking at the Kydex makers site but they wanted way too much and required a larger size purchase than I needed. On ebay you can get it precut to certain measurements. I just got 2 12" x 12" pieces so I had a backup if needed. Each one was $7.50.

The Sculpey I got at my local Hobby Lobby. They had a sale and I just snagged a 3.5lb box of it for pretty cheap (I think it was $10-15 with the sale). I still have most of it, the top piece of this project only took maybe a pound tops.

The Magic Sculpt was harder to find. I ended up ordering it through Amazon since none of the Craft Stores in my area or Art Supply places had it. I found a seller offering the Magic Sculpt 5lb White Epoxy Clay for the same price as 2 1lb containers so I went with the 5lb to save money and make sure I had plenty on hand. I still have a ton left. I probably could have gotten by on a 1lb order but just as sure as I had done that Murphy's Law would strike and I'd need just a bit more than 1lb. I always plan for Murphy's arrival and try to hold him at bay as best I can. :lol

The Magic Sculpt can be smoothed very well with wet fingers as or just after you work with it. You've got about an hour tops to mess with it once you mix up the batch. The cooler it is the longer the working time. My garage isn't cool at all so I was working fast to stay ahead of the hardening.

For the areas you didn't get smooth enough you can definitely sand it. I used my Dremel to sand down areas where I wanted to take larger sections off/down and then switched to finer grit by hand to finish the job.

Also, the Magic Sculpt recommends, just like with clay, that you rough up the areas you're building on so I used a wire brush and my Dremel to score the Kydex before building onto it. I just used the wire brush on the hardened Sculpey areas that I was adding Magic Sculpt to.

Both materials seemed to paint the same too. Just to be sure though, I made a 1" x 6" test strip of each for my wife to use to test paint on.
 
Great Thanks for the Info - This technique seems simple and efficient :)

Many Thanks for sharing. Look forward to what else you can come up with all that extra material on your hand ;)
 
This thread is more than 12 years old.

Your message may be considered spam for the following reasons:

  1. This thread hasn't been active in some time. A new post in this thread might not contribute constructively to this discussion after so long.
If you wish to reply despite these issues, check the box below before replying.
Be aware that malicious compliance may result in more severe penalties.
Back
Top