STAR WARS (Samurai Boba Fett)

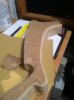
So I went with a different color had to hand paint it cause I couldn't find any spray that matched the color, for the most part I'm content with it but not sure if I'm completely satisfied with it some feed back on this would be great. I can never make up my mind with the final color....
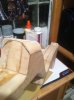
Also finished the side ear panels and attached them on. As you can tell from the crappy paint job its only the first coat I didn't want to put a second coat on until I was sure this is the color I'm sticking with. Almost done with the range finder just need to assemble and then attach.

photo 1 (1).JPGphoto 2 (1).JPGphoto 3 (1).JPG
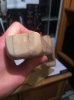
Also did a little test piece for the mod podge mmhnc and to tell you the truth the texture does come out differently when applied over the paint, it gives it a smoother sealed surface. So good for sealing as for the look not much a change, maybe a little shinier but it didn't give it that metal armor outcome like I had hoped. Though I think I will still give it a coat of Mod podge after the final paint details are given cause the texture is really cool.
 
Last edited by a moderator:
The color is pretty close to the figure, I think once it is wathered it should be spot on.
 
Any suggestions from anyone on the weathering? The top coat of paint is an acrylic and I noticed not much weathering just the one blaster dent on the right temple of his helmet. I was more or less thinking of just making a darker shade of spearmint, the color I have on now and filling in the lines cause that's the only weathering I see is this rusty green yellowish color lining the indentures made in the helmet? Any tips and suggestions are welcomed hoping to have this paint job done tonight.
 
Looking at the pictures it appears that there isn't much wathering, just darkening up the seam lines and joints. Before I would do anything I would clear coat all the hard work you have already put in. That way when you go over the seams with your darker color you can simply wipe off the high areas leaving the darker color in the recesses. Since the paint you used is water soluble it needs to be cleared or when you attemp to wipe off the darker color it will take the lighter color with it.

Here is the before and after wethering I just did on a battle droid costume. All weathering was done with acrylics just brushed on and wiped off, if it was to much I just used a little wet paper towel and took it off and tried again. But you can only do that if the base color is something not water soluble (ie clear coat)
image.jpgimage.jpg
 
I was looking into this method an armor friend had mentioned clear coat in conversation, and his stuff looks great. Also great battle droid I definitely see how the weathering really gave it more character.
 
Okay so quick update this morning, so I made some progress last night. I finished the 2nd coat of acrylic and applied 3 coats of the clear coat, it came out great better than I had expected. It also gave it the same hard texture as mod podge but with out having to hand paint it over all clear coat was definitely the way to go thanks again mmhnc!
photo 1.JPGphoto 2.JPGphoto 3.JPG

But with my victory short lived, there always seems to be a set back. so I also got around to finish painting and detailing the back flaps that wrap around the back a side of the helmet. I decided to go ahead and attach them on last night to see how they looked. Least to say I was not very satisfied, My fiancé said I should bend them in more, but personally I feel that they are just to thick and didn't realize it until just now. Which is a major disappointment for me because it was a waist of time and material, all that 550 cord :facepalm....
Anyways I'm not completely sure if I can salvage these pieces or not so please if anyone has any suggestion I could definitely use them. Here is a look at the finished product when I attached them.
photo (1).JPGphoto 4.JPGphoto 5.JPG

I'm not sure if its just all in my head, and maybe my fiancé is right I just have to fold the upper panels in more, some feedback would be great though. If worst comes to worst I have some 5 mm foam lying around or hell maybe even find a real samurai helmet that has these features haha, I'm really disparate after last nights disappointment.
 
Last edited by a moderator:
My advise would be to tape it down in the right position and then look at it a lot, from all angles, then walk away from it and look at it again later. If it still looks wonky than its best to remake it or it will always bug you. The good news is that since you have already made this one it will go much faster the second time.
 
OK wow so a lot took place this weekend, I didn't really have a chance to update over the weekend so here it goes.

I decided after looking at the current back flap for 3 more seconds I was really just unsatisfied with, and told myself this could look so much more accurate. I sat down a started thinking what I could make it out of and realized what left over material I had, well I had a **** ton of worbla and 3mm foam which together was the perfect thickness so I started drawing up plans for that, I was a lot easier to cut and assemble than the thick floor matt foam. @mmhnc you where right, second time goes much faster
AmOy02JBw1EF_DSXiE2ShHf-krBwqjdf93rb5izN95I2pr-fbl31iwtEaSQ99SSQafCV0pbNd-q7Kly7Fs4OgUZ1_Egjm9XkRrgsxOB1=s0-d-e1-ft
!

Also managed to pick up a motorcycle visor that was a the right size, took awhile but after some dremmeling and tinting as able to have fit the helmet and gave it some weathering.
View attachment 552815View attachment 552816

Also a buddy of mine happened to stop by @VinXero helped me out with the new flaps, gave me some tips and suggestions in coating them in primer filler after the plastidip, and they look amazing. I found a matching color for the spearmint acrylic in can form done by krylon, not a big fan more of rustoleum guy but cant be picky with such a specific color. Anyways was a perfect match and will be clear coating it so don't have to worry about that krylon cracking. Next step is 550 cord and mounting.
photo 3.JPGphoto 4.JPG
 
Last edited:
WOW... the colors are fantastic! They really pop!

Its the Primer Filler, this stuff is like magic on foam. I thought plasti dip was the best route to go but this stuff fills every little pour and crack. It also makes the color of whatever paint your using show much clearer.
 
OK wow so a lot took place this weekend, I didn't really have a chance to update over the weekend so here it goes.

I decided after looking at the current back flap for 3 more seconds I was really just unsatisfied with, and told myself this could look so much more accurate. I sat down a started thinking what I could make it out of and realized what left over material I had, well I had a **** ton of worbla and 3mm foam which together was the perfect thickness so I started drawing up plans for that, I was a lot easier to cut and assemble than the thick floor matt foam. @mmhnc you where right, second time goes much faster https://ci3.googleusercontent.com/p...therpf.com/images/styles/smilies/thumbsup.png!

Also managed to pick up a motorcycle visor that was a the right size, took awhile but after some dremmeling and tinting as able to have fit the helmet and gave it some weathering.
View attachment 552815View attachment 552816

Also a buddy of mine happened to stop by @VinXero helped me out with the new flaps, gave me some tips and suggestions in coating them in primer filler after the plastidip, and they look amazing. I found a matching color for the spearmint acrylic in can form done by krylon, not a big fan more of rustoleum guy but cant be picky with such a specific color. Anyways was a perfect match and will be clear coating it so don't have to worry about that krylon cracking. Next step is 550 cord and mounting.
View attachment 552826View attachment 552827

Wow that really did come out great... PRIMER FILLER BABY!
 
Okay so I am pleased to say after some minor setbacks, the back flap is complete and attached. Quite honestly I am much more pleased this time
photo 1.JPGphoto 2.JPGphoto 3.JPG
Once I weather the flap a little it should match the color of the rest of the helmet, and plan on filling in the gaps in between the ear buds and helmet. Also have to get some work done on that dreaded range finder/antenna. The balsa wood was a little to flimsy for my liking so I removed it, maybe a thicker piece of wood will do the trick but I have my fingers crossed on this as well.
 
Very cool, it looks really good. Brass or aluminum would also work for the range finder stalk, you can buy diffrent sized widths and thickness at hobby stores, it would be much more ridged, but a nice hard wood like an oak could work as well.
 
Very cool, it looks really good. Brass or aluminum would also work for the range finder stalk, you can buy diffrent sized widths and thickness at hobby stores, it would be much more ridged, but a nice hard wood like an oak could work as well.

Wow I totally left out the idea of using aluminum :facepalm, haha I've been slacking on research into my options lately. From now on I swear the half-assing will cease!!
 
Yeah stop slacking, sure you accurately made a real life object based on some pictures of a toy in 3 weeks, but yeah totally slacking. :lol
 
So Sorry for being away form this thread for so long I promise as soon as I finish the Samurai Darth Vader helmet I will move along further on this project and start with each torso piece by the end of the month. Slowly but surely me and my lovely fiancé are hoping to have this done by next October (fingers crossed). But don't think I forgot about you guys, just wanted to give a quick update on both helmets, hope you like. Feel free to give any feedback, as we love to hear from fellow RPF'ers.
photo 5.JPG
 
Hey guys so another quick update on everything, I filled in the gaps between the ear buds and helmet with some filler and painted it this weekend, also will be starting and hopefully finishing the range finder so the helmet will be complete. and stated to make sketch out the EE-3 blaster/ musket. If it comes out the way I hope I will be making a mold and casting them.
So anyways this is more or less an update for both helmets which are coming out as good as I hoped. Just some minor details on both and they will be complete.
photo 1 (1).JPGphoto 2 (1).JPGphoto 3.JPGphoto 4.JPG
 
So started to make the EE-3 blaster/ musket as I like to call it started with some templates and drew them out on mdf wood last night I started carving and dremeling the bevels and what have you. This is my first time ever working with wood so hopefully I don't screw this up along the way to much haha. Anyways only got the one side down but let me know what you guys think. If it comes out good I may make a box mold and start casting them.
photo 1.JPGphoto 2.JPGphoto 3.JPGphoto 4 (1).JPGphoto 5.JPG

Going to finish the other side and bondo the whole thing cause there are so many places that need it. Looking to get that done tonight with an update tomorrow.
 

Attachments

  • photo 2.JPG
    photo 2.JPG
    47.4 KB · Views: 99
  • photo 3.JPG
    photo 3.JPG
    51.7 KB · Views: 94
  • photo 4 (1).JPG
    photo 4 (1).JPG
    37.8 KB · Views: 99
Back
Top