You are using an out of date browser. It may not display this or other websites correctly.
You should upgrade or use an alternative browser.
You should upgrade or use an alternative browser.
Star Lord Map Gun FINISHED Video on 1st post
- Thread starter Cameron
- Start date
Re: Star Lord Map Gun - WIP
You've beaten me to it.
I've been taking photos of my build up and was going to start a thread.
Good luck with your build, Joe did a great job modeling up the Map scanner.
You've beaten me to it.
I've been taking photos of my build up and was going to start a thread.
Good luck with your build, Joe did a great job modeling up the Map scanner.
Re: Star Lord Map Gun - WIP
Time to make some internal support for the high power Blue Leds and the lasers.
The Blue transparency makes a good template after cleaning the flash.


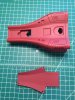
I cut out a support from styrene.

Its slides back nicely. Test fit 1 LED....Good to go.

Time to make some internal support for the high power Blue Leds and the lasers.
The Blue transparency makes a good template after cleaning the flash.
I cut out a support from styrene.
Its slides back nicely. Test fit 1 LED....Good to go.

Re: Star Lord Map Gun - WIP
Any particular reason for moving the switch?
Seems like an awkward stretch around the prop to turn the LEDs on.
It looks like the power button was in the rectangular recesses in the narrower end of the map scanner judging by Starlord's thumb angle in the screencaps.
Quick update. I decided to located the power switch in the square area. I cut out the space for the switch. Since this area is two layers I puttied the inside to avoid the switch sticking.
View attachment 478617
Any particular reason for moving the switch?
Seems like an awkward stretch around the prop to turn the LEDs on.
It looks like the power button was in the rectangular recesses in the narrower end of the map scanner judging by Starlord's thumb angle in the screencaps.
Re: Star Lord Map Gun - WIP
Looking good so far.
Is that filler-primer or regular primer? You'll have a much faster result with the former. Also, any reason why you put the power switch that far forward? The rearward rectangle was made specifically to house a circuit-breaker, either by adding a pin to hinge it (in that little indentation) or just by using the flex of the plastic to click a panel switch.
This is kinda how I see it working:

Note that this diagram shows BOTH possible variants. You either hinge the plate and add a spring OR you glue the back part of the plate and use the natural flex of the plastic to depress the circuit. If you do the latter, you will need a panel switch with VERY little travel, such as this:
http://www.alibaba.com/product-detail/6mm-right-angle-round-button-panel_60072565144.html
You should also position the switch so that it just barely touches the underside of the plate is "off" position. I did this with my Dredd lawgiver, hiding two switches underneath the serial number plate on the side. This allows me to control ammo and firing modes on the gun while not having any visible switches.
Looking good so far.
Is that filler-primer or regular primer? You'll have a much faster result with the former. Also, any reason why you put the power switch that far forward? The rearward rectangle was made specifically to house a circuit-breaker, either by adding a pin to hinge it (in that little indentation) or just by using the flex of the plastic to click a panel switch.
This is kinda how I see it working:
Note that this diagram shows BOTH possible variants. You either hinge the plate and add a spring OR you glue the back part of the plate and use the natural flex of the plastic to depress the circuit. If you do the latter, you will need a panel switch with VERY little travel, such as this:
http://www.alibaba.com/product-detail/6mm-right-angle-round-button-panel_60072565144.html
You should also position the switch so that it just barely touches the underside of the plate is "off" position. I did this with my Dredd lawgiver, hiding two switches underneath the serial number plate on the side. This allows me to control ammo and firing modes on the gun while not having any visible switches.
Re: Star Lord Map Gun - WIP
I may reconsider placement. I couldn't find a small enough push on push off for the lower area. Are you thinking of using a momentary?
I may use the square to power up the LEDs and the rocker with a momentary to activate the Lasers.
I may reconsider placement. I couldn't find a small enough push on push off for the lower area. Are you thinking of using a momentary?
I may use the square to power up the LEDs and the rocker with a momentary to activate the Lasers.
Last edited:


Re: Star Lord Map Gun - WIP
Looks good. The only thing I'd mention is that you could have used some more spray filler on the buttons if you want them glass-smooth. Contrary to the advice you usually get about spray painting, it's OK to use a nice thick coating of spray filler-primer. I try to model prints in a way so that detail's don't get filled in by it.
Quick update. A few more black areas to paint up and then ready for weathering.
Some experimenting with some lasers and filters.
Looks good. The only thing I'd mention is that you could have used some more spray filler on the buttons if you want them glass-smooth. Contrary to the advice you usually get about spray painting, it's OK to use a nice thick coating of spray filler-primer. I try to model prints in a way so that detail's don't get filled in by it.

Re: Star Lord Map Gun - WIP
REALLY cool! Oh, when will I ever ave time to get started on my own build, haha. (I'm struggling like crazy with another 3d model that I can't talk about yet. It's one of those situations where getting it to be more accurate than similar builds is a real challenge.)
LEDs up and running and 3 lasers installed.
REALLY cool! Oh, when will I ever ave time to get started on my own build, haha. (I'm struggling like crazy with another 3d model that I can't talk about yet. It's one of those situations where getting it to be more accurate than similar builds is a real challenge.)


Re: Star Lord Map Gun - WIP
Nice! That's a LOT of wiring.
Nice! That's a LOT of wiring.


Re: Star Lord Map Gun - WIP
Beautiful work! Especially the cleanup of the print.
Note though (just in case you missed it), that the clear blue front goes BEHIND the bezel. You might need to file or trim the inside of the bezel just a tad for it to go in.
I've at least gotten so far as to cover mine in spray filler, along with a bunch of other parts.
Switch istalled and front finished.
Beautiful work! Especially the cleanup of the print.
Note though (just in case you missed it), that the clear blue front goes BEHIND the bezel. You might need to file or trim the inside of the bezel just a tad for it to go in.
I've at least gotten so far as to cover mine in spray filler, along with a bunch of other parts.
Re: Star Lord Map Gun - WIP
Thanks Joe! For this build I will keep the blue bezel double sided taped to the front. The lasers can't get through the blue and I don't want to ruin the blue plastic so it will be on for static display and removed for lighted demo.
Note though (just in case you missed it), that the clear blue front goes BEHIND the bezel. You might need to file or trim the inside of the bezel just a tad for it to go in.
Thanks Joe! For this build I will keep the blue bezel double sided taped to the front. The lasers can't get through the blue and I don't want to ruin the blue plastic so it will be on for static display and removed for lighted demo.
Similar threads
- Replies
- 0
- Views
- 472
- Replies
- 6
- Views
- 1,491
- Replies
- 44
- Views
- 5,862
- Replies
- 1
- Views
- 187