-
Welcome to the Project Runs Forum!
This forum is intended for interest gauging and active runs. Due to the transient nature of this forum, please keep all research and ongoing discussion in one of our main forums so your information is not lost.
Only Premium Members can start a new run.
You are using an out of date browser. It may not display this or other websites correctly.
You should upgrade or use an alternative browser.
You should upgrade or use an alternative browser.
Interest Star Lord Helmet and Map Projector **UPDATE 3-3-15 FINISH PROCESS page 7**
- Thread starter MDuckett
- Start date
hazardjsimpson
Active Member
Re: Star Lord Helmet and Map Projector **UPDATE 12-3 RUN #2 TAKING DEPOSITS**
I'm even willing to perform a minor sacrifice,")
I'm even willing to perform a minor sacrifice,
Interested in a helmet, but I'd need it slightly bigger for my noggin, possible?
grudgehammer
Well-Known Member
Re: Star Lord Helmet and Map Projector **UPDATE 12-3 RUN #2 TAKING DEPOSITS**
Finally got it separated and on my huge head! Fits perfectly (24 inch head).

Finally got it separated and on my huge head! Fits perfectly (24 inch head).
M Constantine
Well-Known Member
Re: Star Lord Helmet and Map Projector **UPDATE 12-3 RUN #2 TAKING DEPOSITS**
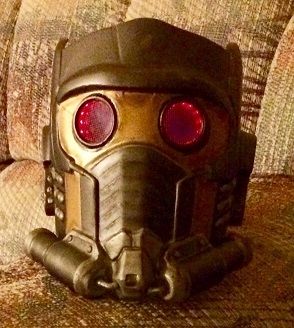
Got my helmet today! Now I need to actually do some work on this costume... haha
Got my helmet today! Now I need to actually do some work on this costume... haha
jrenemtz321
Sr Member
Re: Star Lord Helmet and Map Projector **UPDATE 12-3 RUN #2 TAKING DEPOSITS**
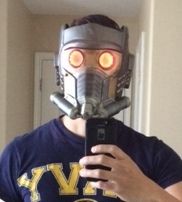
Nearly finished with my helmet. I used magnets and Risu's lens kit. I love this thing. Thanks, Matt.
Nearly finished with my helmet. I used magnets and Risu's lens kit. I love this thing. Thanks, Matt.

green ranger jr
New Member
Re: Star Lord Helmet and Map Projector **UPDATE 12-3 RUN #2 TAKING DEPOSITS**
PM Sent
Edit:
Paid full
PM Sent
Edit:
Paid full
Last edited:
Re: Star Lord Helmet and Map Projector **UPDATE 12-3 RUN #2 TAKING DEPOSITS**
I’m very grateful to everyone that helped me go through a couple runs of my Star Lord helmet. It’s exciting to check out how people are approaching finishing my casts (when I manage to make it back here with free time to browse). Things have been super busy around here, but after finishing the latest batch of finished helmets, I wanted to take a few minutes to share a bit about my my process. I’m definitely not a definitive authority on prop making, but I am pretty familiar with my casts, so I thought folks who were interested in one or who have one of my casts might like to see how I go about it.
I haven't even had time to think about starting a new run, but I've had a few inquiries. If there were enough interest I would be open to it. Feel free to PM if you're interested.
To start off, here are the tools I use:
Dremel, with cutting discs and bits, grinding/sanding/grouting/routing bits, drill bits and pretty much anything I have in the box.
Spiral wax saw blades in a coping saw frame. I was using a friends metal shop to cut up some helmets and he recommended these for the fine seam along the sides of the helmet. I was skeptical at first but they are absolutely perfect for the job. They cut through the plastic quickly and easily, and because they are spirally-toothed, you can cut in any direction and not have to worry about the blade binding along corners, like a coping saw or hack saw blade can. They come in many sizes and break easy but are quite cheap. HIGHLY RECOMMENDED!
Sandpaper - grits from 150 to 2000 and both dry and wet sand, but for this cast I use mostly 220 and 300 dry, and 400 and 1000 wet.
Bondo - I may use filler if it needs it but the regular body filler is a bit coarse and takes a lot of working. I normally only use this for sculpting the master.
Bondo spot putty - This is pretty brittle stuff if used too thickly, but I will probably only use it for small repairs or fills. It dries quickly and smoothly and sands very easily. When using this I will usually fill and sand in layers until the spot is smoothed out.
Needle files - these are cheap and usually found at any hardware store in packs of 6-10 or so. I have about 3 packs because I buy them whenever I see a deal on them. They come in handy at every step of the sculpting process. They come in a variety of shapes, most of which I don't know how to use.
Apoxie Sculpt - Great for larger fills or for building up support areas. Also great as an adhesive and for connecting magnets which would otherwise be too strong for CA/super glue and other glues.
Magnets - I usually use 8mm x 3mm neodymium disc magnets. Occasionally I will use some slightly smaller ones if needed to fit smaller spaces.
Hot glue - Great for holding parts in place that won’t be bearing much weight or stressed very much. Think greeblies.
CA glue - aka super glue, useful for the same uses as hot glue but less massive and easier to hide.
Primer, spraypaint, acrylic paint, magic sponge, paintbrushes, and lot and lots of painters tape. For the finishing touches.
That’s about all the tools I can think of, and I consider them all necessities. Luckily they’re all pretty cheap, the most expensive (and probably most critical) tool being the dremel.
-----
So on to the process. Here are a few helmets stacking up, getting ready to get chopped up.

First, I use the dremel to cut off the top of the helmet and the brittle, flaky flash along the bottom. Then I use a sanding bit, a needle file or some 220 sandpaper to clean up the cuts and shape the edges. I also sand the bottom surfaces where there might be some roughness from any bubbles. 220 cuts through the plastic very easily so it doesn’t take very long.


Then using various sanding drums and grinding drums and cones I knock off burrs which resulted from small voids in the mold. These can be very sharp so watch your fingers, but they are easily removed. Then I sand any rough spots smooth with more 220.

To cut the eye holes out, I first cut an asterisk like shape in the plastic with a dremel cutting wheel. Then I use a grout cutting bit or similar cutting bit and trace the inside contour of the eye socket, being very careful not to go too far. It’s easy to go back and cut more but pretty dang tough to undo a bad cut.

Next, I shape the back side of the eye sockets so that I can later set a lens in there. I use a dremel grinding drum again, and use the bottom edge to basically rout a rabbet into the plastic. That’s just a little L-shapedshelf for the lens to sit on. I continually check the sizing and shape with a lens until it fits rather snugly in place.

Now I clean up the mold seam along the back of the helmet. Because there is SO MUCH detail on this prop, there’s no great place for a mold seam. But the back of the head is much less interesting and will be looked at less closely by all your adoring fans, and the fluting is visually busy enough to hide any irregularities. Luckily, hover, the seam is very easy to clean up. I first use some sand paper to smooth it into roughly the right shape, then use the spot putty to fill any uneven spots. Then I use the square needle file as a sort of chisel, and chisel the fluted areas smooth. Works like a charm.

Then I hit the whole thing with a fine sandpaper, say about 300, and spray a coat or two of primer. This lets me see if there are any other spots that need touching up before moving to the paint. If need be, I can throw down some more putty, sand and prime again. Repeat until shmoove.

Then I paint it with a few coats of gunmetal. I use Tamiya TS-38 gunmetal. It’s a great realistic metallic color that has a nice sheen. It really shines in the light and is about as reflective as the movie helmet seems to be.

Oh, and while I’m sanding I also cut the greeblies to size and sand the ends to the right angle for mounting. Then sand them down, fill if necessary, and hit with a coat of primer. Here they are after cutting them to size.

Okay, that's part one. Let me get part two wrapped up and I'll have it posted soon.
Next time: Painting and finishing.
I’m very grateful to everyone that helped me go through a couple runs of my Star Lord helmet. It’s exciting to check out how people are approaching finishing my casts (when I manage to make it back here with free time to browse). Things have been super busy around here, but after finishing the latest batch of finished helmets, I wanted to take a few minutes to share a bit about my my process. I’m definitely not a definitive authority on prop making, but I am pretty familiar with my casts, so I thought folks who were interested in one or who have one of my casts might like to see how I go about it.
I haven't even had time to think about starting a new run, but I've had a few inquiries. If there were enough interest I would be open to it. Feel free to PM if you're interested.
To start off, here are the tools I use:
Dremel, with cutting discs and bits, grinding/sanding/grouting/routing bits, drill bits and pretty much anything I have in the box.
Spiral wax saw blades in a coping saw frame. I was using a friends metal shop to cut up some helmets and he recommended these for the fine seam along the sides of the helmet. I was skeptical at first but they are absolutely perfect for the job. They cut through the plastic quickly and easily, and because they are spirally-toothed, you can cut in any direction and not have to worry about the blade binding along corners, like a coping saw or hack saw blade can. They come in many sizes and break easy but are quite cheap. HIGHLY RECOMMENDED!
Sandpaper - grits from 150 to 2000 and both dry and wet sand, but for this cast I use mostly 220 and 300 dry, and 400 and 1000 wet.
Bondo - I may use filler if it needs it but the regular body filler is a bit coarse and takes a lot of working. I normally only use this for sculpting the master.
Bondo spot putty - This is pretty brittle stuff if used too thickly, but I will probably only use it for small repairs or fills. It dries quickly and smoothly and sands very easily. When using this I will usually fill and sand in layers until the spot is smoothed out.
Needle files - these are cheap and usually found at any hardware store in packs of 6-10 or so. I have about 3 packs because I buy them whenever I see a deal on them. They come in handy at every step of the sculpting process. They come in a variety of shapes, most of which I don't know how to use.
Apoxie Sculpt - Great for larger fills or for building up support areas. Also great as an adhesive and for connecting magnets which would otherwise be too strong for CA/super glue and other glues.
Magnets - I usually use 8mm x 3mm neodymium disc magnets. Occasionally I will use some slightly smaller ones if needed to fit smaller spaces.
Hot glue - Great for holding parts in place that won’t be bearing much weight or stressed very much. Think greeblies.
CA glue - aka super glue, useful for the same uses as hot glue but less massive and easier to hide.
Primer, spraypaint, acrylic paint, magic sponge, paintbrushes, and lot and lots of painters tape. For the finishing touches.
That’s about all the tools I can think of, and I consider them all necessities. Luckily they’re all pretty cheap, the most expensive (and probably most critical) tool being the dremel.
-----
So on to the process. Here are a few helmets stacking up, getting ready to get chopped up.
First, I use the dremel to cut off the top of the helmet and the brittle, flaky flash along the bottom. Then I use a sanding bit, a needle file or some 220 sandpaper to clean up the cuts and shape the edges. I also sand the bottom surfaces where there might be some roughness from any bubbles. 220 cuts through the plastic very easily so it doesn’t take very long.
Then using various sanding drums and grinding drums and cones I knock off burrs which resulted from small voids in the mold. These can be very sharp so watch your fingers, but they are easily removed. Then I sand any rough spots smooth with more 220.
To cut the eye holes out, I first cut an asterisk like shape in the plastic with a dremel cutting wheel. Then I use a grout cutting bit or similar cutting bit and trace the inside contour of the eye socket, being very careful not to go too far. It’s easy to go back and cut more but pretty dang tough to undo a bad cut.
Next, I shape the back side of the eye sockets so that I can later set a lens in there. I use a dremel grinding drum again, and use the bottom edge to basically rout a rabbet into the plastic. That’s just a little L-shapedshelf for the lens to sit on. I continually check the sizing and shape with a lens until it fits rather snugly in place.
Now I clean up the mold seam along the back of the helmet. Because there is SO MUCH detail on this prop, there’s no great place for a mold seam. But the back of the head is much less interesting and will be looked at less closely by all your adoring fans, and the fluting is visually busy enough to hide any irregularities. Luckily, hover, the seam is very easy to clean up. I first use some sand paper to smooth it into roughly the right shape, then use the spot putty to fill any uneven spots. Then I use the square needle file as a sort of chisel, and chisel the fluted areas smooth. Works like a charm.
Then I hit the whole thing with a fine sandpaper, say about 300, and spray a coat or two of primer. This lets me see if there are any other spots that need touching up before moving to the paint. If need be, I can throw down some more putty, sand and prime again. Repeat until shmoove.
Then I paint it with a few coats of gunmetal. I use Tamiya TS-38 gunmetal. It’s a great realistic metallic color that has a nice sheen. It really shines in the light and is about as reflective as the movie helmet seems to be.
Oh, and while I’m sanding I also cut the greeblies to size and sand the ends to the right angle for mounting. Then sand them down, fill if necessary, and hit with a coat of primer. Here they are after cutting them to size.
Okay, that's part one. Let me get part two wrapped up and I'll have it posted soon.
Next time: Painting and finishing.
jrenemtz321
Sr Member
This kit takes a lot of work, but it's definitely worth it. I'm in the home stretch.

green ranger jr
New Member
Similar threads
- Replies
- 0
- Views
- 215
- Replies
- 61
- Views
- 6,784
- Replies
- 53
- Views
- 7,587
- Replies
- 2
- Views
- 749
- Replies
- 47
- Views
- 7,228