Some V3 modifications, pics...

This is looking great. I am interested to hear ideas on a different type of wing mounting block system. Do you think the lower hero wings were farther extended than the pyro's because they were on the armature? I went back and double checked the pyro i have here and the angle and distance between the wings matches the blocks on the kit, however I added the internal stops to mimic the hero look, I am wondering if my blocks only really work if they are flush against the body like the pyro. The other change i made was adding about 2mm to the bottom bracket, the intention was that the wing would still be mounted all the way down on the bracket, like yours appears to be, and that the extra 2mm would reveal between the top of the inside of the wing and the midsection of the block. That is different from the pyro but I think I got the idea to do it by the Red 3 pic here. If you look past that glue glob I think I estimated about 2mm space between the wing and the midsection there....but now i am wondering if I emluated a mistake...

Any insight would be appreciated, you guys have such a keen eye...
thanks
mike

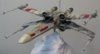
Mike, hi. For a pretty nice hero look we only really need to get the top cans tighter in on the fuse - in such a way as not to change the wing angle as I have it here. Here's an account of my work on the wing alignment and how I see the block needs a little tweaking.

On Day One I decided that the wingblocks had to be flush with the lower fuselage not the upper (REL had done this and I 'd liked his wing angle best of the V3 builds). I also saw that if I stuck the upper wings on flush with the top of the wingblock, the guns and the engines were just gonna sit too high for the fuselage. So then I decided - and this is what forced my top cans out from the fuse - to glue my upper wings on lower down so that they were not flush with the top edge of the wingblock, but were almost flush with the lower - as in the Red 3 pic! But to do this I had to glue my top cans to the wingblock. My cans don't hover above the wingblock, they're glued to it. But this moved my cans out from the fuse by 2mm, creating an ugly visible line of wingblock which I knew I just had to live with, as my priority was wing position. The problem, I think, was caused by the upper wingmount being simply too tall. I checked the ref and this does appear to be the case (see pics below). It comes up too high against the fuselage. I wanted to file off 2 or 3 mm, so that my cans could be moved in and hover over the wingblock, but I didn't rate my chances of keeping the plane smooth and parallel, so I chickened out. However, even if I had done this, the block still needs to get a little closer in on the fuse, but I don't know how I'd do that short of building a whole new wingblock from scratch.

So that's a summary of how I see the block could be changed to attain a better hero look, not forgetting that some shimming would be required somewhere; my blocks are currently rocked out slightly from the lower fuse to get the 'X' shape in line. Also, there is extra 'smoke and mirrors' in my build in that I've tilted the lower wings down slightly from what they would be if they were glued straight onto the block. This tilting was done with razor thin styrene shims, and hours and hours of maddening sanding!

But yes, that Red 3 pic! I had kinda worked out my strategy, and then saw that ILM had done the same thing. You can clearly see a conscious decision by ILM modellers to stick the upper wings on at a different point on the block to where the lower wings are stuck on. They really wanted those upper wings lower down on the wing mounts, making them almost flush with the bottom edge, and they wanted the lower wings lower down too, leaving that step of 2 or 3 mm. I can't see any reason for this other than an aesthetic decision to get the wings, guns and engines low in relation to the fuselage. Thankfully you spotted that and added those mm, otherwise I'd never have got those lower wings on where I wanted them!

Meanwhile, the business about the lower cans being so low on that Red 5 frontal shot is a geometrical curio that I've not been able to properly work out. I'd like to see a front shot of Red 2 to compare, cos I reckon Red 5's wings are more open than 2, and 2 is the wing angle I'm trying to base mine on here. But it may after all even be related to the old issue of the ILM fuselage being a tad thinner. Damnit, the geometry of this thing is so perplexing!!
 
Last edited:
I feel pretty vindicated in my decision in this build to extend the nose by 3mm or so. Both of the production-lineage Cerney pyro kit nosepieces are longer than the V3 nosepiece by approximately this amount!
 
It feels good to show that I'm not a total raving lunatic! I've spent a great deal of my life making eyeballed hand-drawn copies of forms - portraits mostly, and also copies of old master drawings. Which means I'm constantly anally engaged in line analysis, curve analysis, proportional analysis, looking for the slightest difference between my drawing and the object. It's given me a kind of hyper-alertness to differences between forms which are meant to be the same. Just hope folk find it's been of some use here in the quest for the perfect x-wing. Or at least not too annoying!
 
Well to be fair: you MAY still be a total raving lunatic...just not for this reason. :p

As a chronic perpetrator of X-wing rhinoplasty I can say it's not annoying. At least not to me. :)
 
Mate thanks to you there's a whole new emphasis put on the nose of these birds , which has led me to rethink a few things. My v3 now has a few extra mm and looks much better for it. Hopefully Mike will incorporate this into his new bird which can only be a good thing.

As we strive for accuracy, every new picture that leads to a new conclusion , leads to a better x -wing.

Keep it coming man.
 
Hey buddy, you got the idea from me, lol! (I completely redid the nose of my CC kit, years ago.)

Of course the irony there is it'll never see the light of day, I didn't finish the CC and am now going to replace it with my modified spare Eaves/Cerney nose. :)
 
Hey buddy, you got the idea from me, lol! (I completely redid the nose of my CC kit, years ago.)

Of course the irony there is it'll never see the light of day, I didn't finish the CC and am now going to replace it with my modified spare Eaves/Cerney nose. :)

Similarly, I created my own nose for the Hasbro conversion, using the toy nose as a base. I intend on using a cast of this for my V3.
 

Attachments

  • XW002.jpg
    XW002.jpg
    28.8 KB · Views: 5,054
More production X vindication for some of the more lunatic antics in this thread. I'm sure folk thought I was nuts to extend the wings - to their detriment panelwise etc. ( the wings, not the folks). I did it because the fuse felt too fat for them around the cockpit/ droid area. The Red 3 hero plan view, the Red 5 plan view, the red 12 bottom view, in fact every single relevant ref photo all cried out that something was off here. Lo and behold, the production casting is proportionally considerably narrower than the V3 in this area. A discrepancy of at least a cm or more in total. Measuring from the centre of the starboard droid shoulder to the outer edge of the side mount panel, I get an approx. value of 25 mm for the casting, and 32mm for the V3. What seems to happen is the production casting angles in after the wingblock more acutely than the V3, while the V3 kinda waits a while before coming in.
 
When I first read your post I read the last part as "...production casting angles in after the wingblock more accurately than the V3..." To which my reply was going to be, of course it is its THE production part. lol. I've been staring at the Maxi Brute fuselage for way too long... so I'm actually surprised how well the V3 matches up to our Pyros. Which we shouldn't be because Mike already told us he referenced one directly but had to make some minor changes. Like you said off a bit here and there... but your mods will proportionately correct nearly all of the discrepancies. I am really glad you are so thorough with your analysis so we can carry over educated mods to our liking.
 
^ Didn't see that before. Cheers for the nice words.

Here are some pics with the guns on finally ( some of the 'C' pieces on the gun tips are not fixed yet, though). I tried to make the photos roughly imitate certain ref photos to really show off the beauty of the kit. Fuselage is still held together with elastic bands, so the wings are pulling it open slightly. Next step will be to glue the fuse together, which will pull the wings up a little into perfect alignment, though I like the position of the upper wings as they are now - very hero-like. After that it's on to the actual nose modification proper...
 
Appreciate the comments. Cheers!

Just to sum up, for anyone wishing to get a similar hero-like wing placement, it boils down to placing the wings LOW on each mounting block. Low on the top block and low on the bottom. This raises the fuselage height in relation to the guns. I also tilted the lower wings down slightly, and extended all wings by 3 - 5mm depending on the wing (one of my wings was 2mm shorter than the others). To do all this, it was necessary to leave the wingblocks loose in the fuselage until final assembly, as their optimum final position couldn't be determined until all the mods were done. I needed to adjust them constantly. Even now, I'll probably fix them externally, using shims between the lower engines and lower fuse where they won't be seen, once the fuselage is glued.
 
Good man. Hey, and did you like the high-threshold 'Death Star surface' in that photo in the first pic? It's a photo I took of Athens, with the sky photoshopped out and replaced with black. Instant 'Death Star'. I've always been fascinated by the DS-like texture of this city from the air with its vast carpet of uniform-height apartment blocks...
 
Back
Top