chrisnupp
Member
So this past weekend I was snowed in, roads were considered "Black condition" and only emergency vehicles were technically allowed to be out and about, so what do makers do when they get bored? Make something. I had just been watching Ocarina of Time gameplay since my gf had never played it and she was interested in learning the story line and the references I make about it and it came to me. I have extra small sheets of craft foam, glue, paints, foamcore, and boredom on my hands why not make a small scale replica of the deku shield. So I got about it and (kind of) documented the process.
Materials:
4 sheets of 1mm craft foam (color doesn't matter since painting)
tacky glue
2 paper clips (and many more to clamp for gluing)
scrap felt
acrylic paints (I used melted chocolate, egg white, brown oxide)
foamcore (to make the stand)
chrome sharpie
INSTRUCTIONAL TIME WOO!
1) grab that craft foam and glue 2; 1mm sheets together twice. so you have 2; 2mm sheets.
2) on one of the glued together sheets draw the outline of the shield, and cut it out. I used a scalpel blade because I'm an entomologist and have plenty on hand, but any sharp knife works best.
3) trace the outline onto the other sheet, but don't cut it out just yet. now outline the squiggly bit onto the next sheet and cut that out first, then cut the shield out again. now this is where I decided to start documenting what I did to write about here.
4) this is where it gets a bit complicated, I used paper clips and made like wire inserts in between the sheets at the top and bottom of the shield to form it (curve) it later without a heat gun.
5) line them up and with copious amounts of tacky glue, sammich those pieces together and clamp (I used paperclips) with the other paper clips sandwiched in between the layers.

In blue is where the paperclip wire frame type things sit, sandwiched between the two layers
6) when the glue dries, it's time to shape. I used a knife to cut angles into the edges, and sandpaper to make wood grain and battle scrapes.
7) after that, coat everything in glue to seal the foam to get ready for paint.
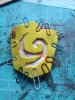
8) when it's all dry and sticking together where you want it; It's time to paint.

conveniently my spare foam for the back section was orange, so I didn't have to paint the squiggly symbol.
9) Add more paints and washes until you are pleased with how it looks. I mixed different shades of browns and tans to get multiple layers look of bark and wood.
10) when the acrylics dry, I added two coats of semi-gloss clear just to protect everything.
11) as the clear dries, cut up very small bits of felt to make the forearm straps. and when the clear has dried glue those on and the shield is done, but I decided to make a stand for mine too so next up is the instructions on the stand
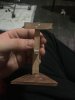
I decided to make my stand look similar to the signs in Kokiri forest. Replicated a stand buried and staked into the ground in like a T to hold the shield with the forearm straps.
1.5) cut your stand in any shape. I made the base a triangle (oh yea, like that) then cut two pieces to make the "T" shape.
2.5) I cut a slit in my foamcore to home the bottom of the T to really adhere to the base. and I built up hot glue to mimic dirt being piled on and patted down like one would a mailbox or other sign.
3.5) After the glue dried I added a small piece to where the bottom of the shield would be so it would stand more upright and not angle.
4.5) PAINT, mixing some paints I did my best to replicate planks of wood for the sign and a dark muddy dirt to mimic where it wouldve been buried in the ground. also used a chrome sharpie to put dots for "nails" on the T

FINAL STEP: put it all together and admire your handiwork. This was a project done with limited supplies since I couldn't go out to get anything.
here is everything put together.


hope you enjoyed, and boredom is cured by making stuff.
Materials:
4 sheets of 1mm craft foam (color doesn't matter since painting)
tacky glue
2 paper clips (and many more to clamp for gluing)
scrap felt
acrylic paints (I used melted chocolate, egg white, brown oxide)
foamcore (to make the stand)
chrome sharpie
INSTRUCTIONAL TIME WOO!
1) grab that craft foam and glue 2; 1mm sheets together twice. so you have 2; 2mm sheets.
2) on one of the glued together sheets draw the outline of the shield, and cut it out. I used a scalpel blade because I'm an entomologist and have plenty on hand, but any sharp knife works best.
3) trace the outline onto the other sheet, but don't cut it out just yet. now outline the squiggly bit onto the next sheet and cut that out first, then cut the shield out again. now this is where I decided to start documenting what I did to write about here.
4) this is where it gets a bit complicated, I used paper clips and made like wire inserts in between the sheets at the top and bottom of the shield to form it (curve) it later without a heat gun.
5) line them up and with copious amounts of tacky glue, sammich those pieces together and clamp (I used paperclips) with the other paper clips sandwiched in between the layers.
In blue is where the paperclip wire frame type things sit, sandwiched between the two layers
6) when the glue dries, it's time to shape. I used a knife to cut angles into the edges, and sandpaper to make wood grain and battle scrapes.
7) after that, coat everything in glue to seal the foam to get ready for paint.
8) when it's all dry and sticking together where you want it; It's time to paint.
conveniently my spare foam for the back section was orange, so I didn't have to paint the squiggly symbol.
9) Add more paints and washes until you are pleased with how it looks. I mixed different shades of browns and tans to get multiple layers look of bark and wood.
10) when the acrylics dry, I added two coats of semi-gloss clear just to protect everything.
11) as the clear dries, cut up very small bits of felt to make the forearm straps. and when the clear has dried glue those on and the shield is done, but I decided to make a stand for mine too so next up is the instructions on the stand
I decided to make my stand look similar to the signs in Kokiri forest. Replicated a stand buried and staked into the ground in like a T to hold the shield with the forearm straps.
1.5) cut your stand in any shape. I made the base a triangle (oh yea, like that) then cut two pieces to make the "T" shape.
2.5) I cut a slit in my foamcore to home the bottom of the T to really adhere to the base. and I built up hot glue to mimic dirt being piled on and patted down like one would a mailbox or other sign.
3.5) After the glue dried I added a small piece to where the bottom of the shield would be so it would stand more upright and not angle.
4.5) PAINT, mixing some paints I did my best to replicate planks of wood for the sign and a dark muddy dirt to mimic where it wouldve been buried in the ground. also used a chrome sharpie to put dots for "nails" on the T
FINAL STEP: put it all together and admire your handiwork. This was a project done with limited supplies since I couldn't go out to get anything.
here is everything put together.
hope you enjoyed, and boredom is cured by making stuff.