Simon Tam's Alliance Baton

I currently have two projects ahead of this, though.

:D

....and Obi-wan said, "those aren't the projects you want to complete! You want to complete the baton..." lol!! :lol Thanks for the update!

what other projects do you have going?

KH
 
I'm in the middle of the Audrey 2 project that's in the Junkyard. I'm also ready to begin casting Space 1999 commlocks. I have a new master and new molds and this version will be the best yet!

:)
 
Ugh. Between my 2 kids birthdays (one is today!) and Christmas, I've not been able to complete the baton mold. I have the shaft in a mold box, ready to go. I just need to order more rubber and actually pour it.

:rolleyes
 
The molds are done! I have the resin in hand and will pour a few batons later this week.

Stay tuned!
 
Here are a couple of teaser pics:

simon_staff1.jpg


simon_staff2.jpg


That's my screen used stunt Bouncing Betty on top.

The staff is cast in black resin so painting isn't necessary. I've already cast about a dozen of the staff sets today. I'll still need to cast a bunch of Bettys, too.
 
Here are a couple of teaser pics:

simon_staff1.jpg


simon_staff2.jpg


That's my screen used stunt Bouncing Betty on top.

The staff is cast in black resin so painting isn't necessary. I've already cast about a dozen of the staff sets today. I'll still need to cast a bunch of Bettys, too.


Awesome!!! I am so in when these babies hit the JY!!!:love
 
Lookin' good! My Serenity shelf is kinda empty compared to my Firefly shelf... which is sort of ironic seein' as there's basically no official Firefly stuff to be had!
 
the pics are giving me 404 errors... but i'm definitely interested to see what these end up going for as kits. i'd love to have on in my serenifly case!
 
<Groan>

There seems to be a problem with my domain name, so the photos aren't showing any longer.

I'll see what I can do about that.

:D
 
I finally finished my first one...
...and I'm beyond happy with it!

Simonbatonpolished.jpg


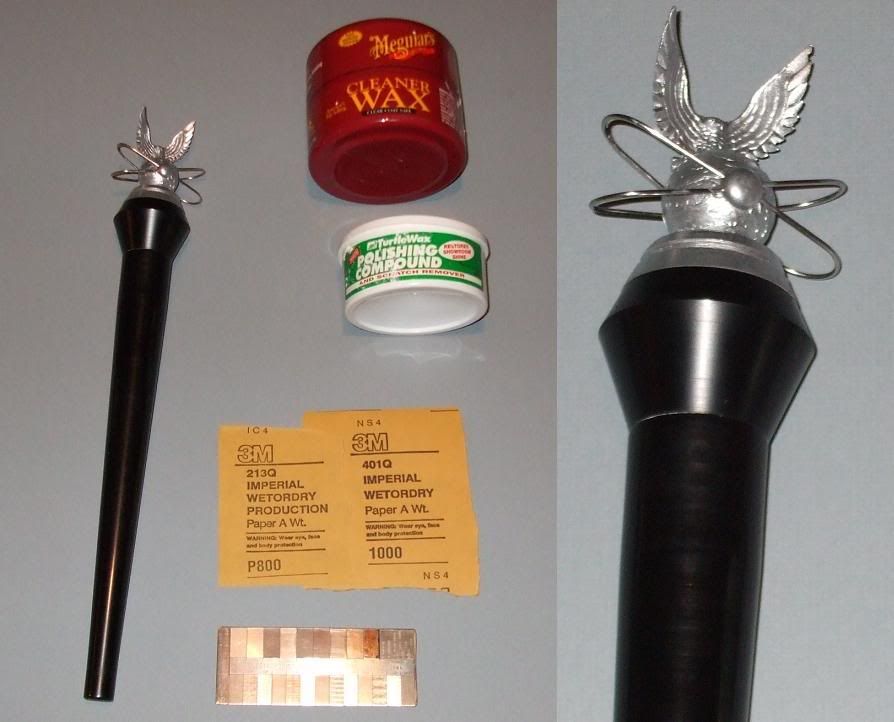
When I first turned the master for these, I thought it looked pretty good;
about a 63 finish by my surface comparitor.

But when blufive cast the first ones, the machining marks just seemed to leap out at you.
And I knew it wasn't the casting, that was the original finish perfectly duplicated. ...nuts.....

Well, you know, lemons from lemonade, so I was hoping it would polish OK.
I started with 800 grit paper from the automotive store and sanded lightly along the length of it to knock the high points off.
Only a few times with the 800.
I then did the same thing with the 1000 grit.
But I purposely did NOT remove the turning marks completely gone.
I then used the rubbing compound; first end to end, then around the diameter.
Last, I used the cleaner wax only going around the diameter, never end-to-end.

and, WOW! The faint turning marks under the deep polish make it look like turned, anodized aluminum rather than a simple piece of shiny plastic!

I cleaned up the Alliance hawk using the usual assortment of knives, files, sanding sticks, sand paper and some automotive bondo to fill in a couple of low spots.
I then glued in the rings and painted it with bumper chrome (tho' I masked off the rings to keep the original stainless steel finish.

I drilled and tapped mine so that it screws together, but epoxy would work just fine, I'm sure.

All in all, this is a satisfying project that turned out as good or better than I hoped it would.
 
Back
Top