Vix
New Member
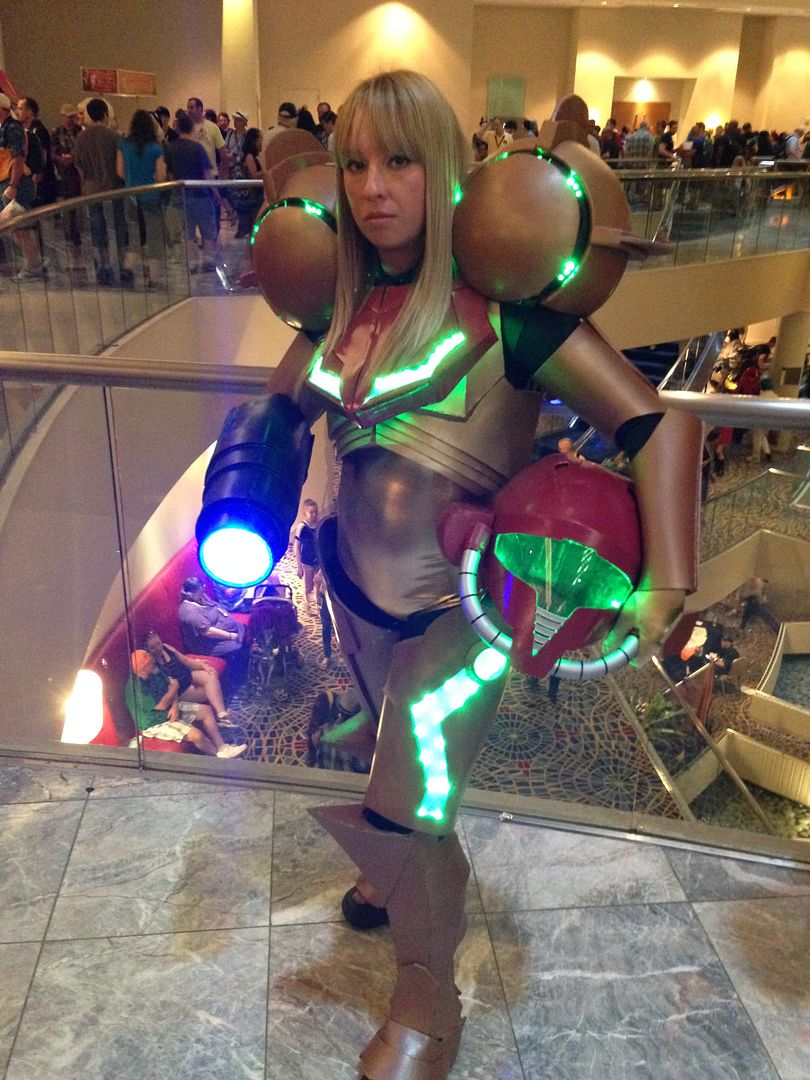
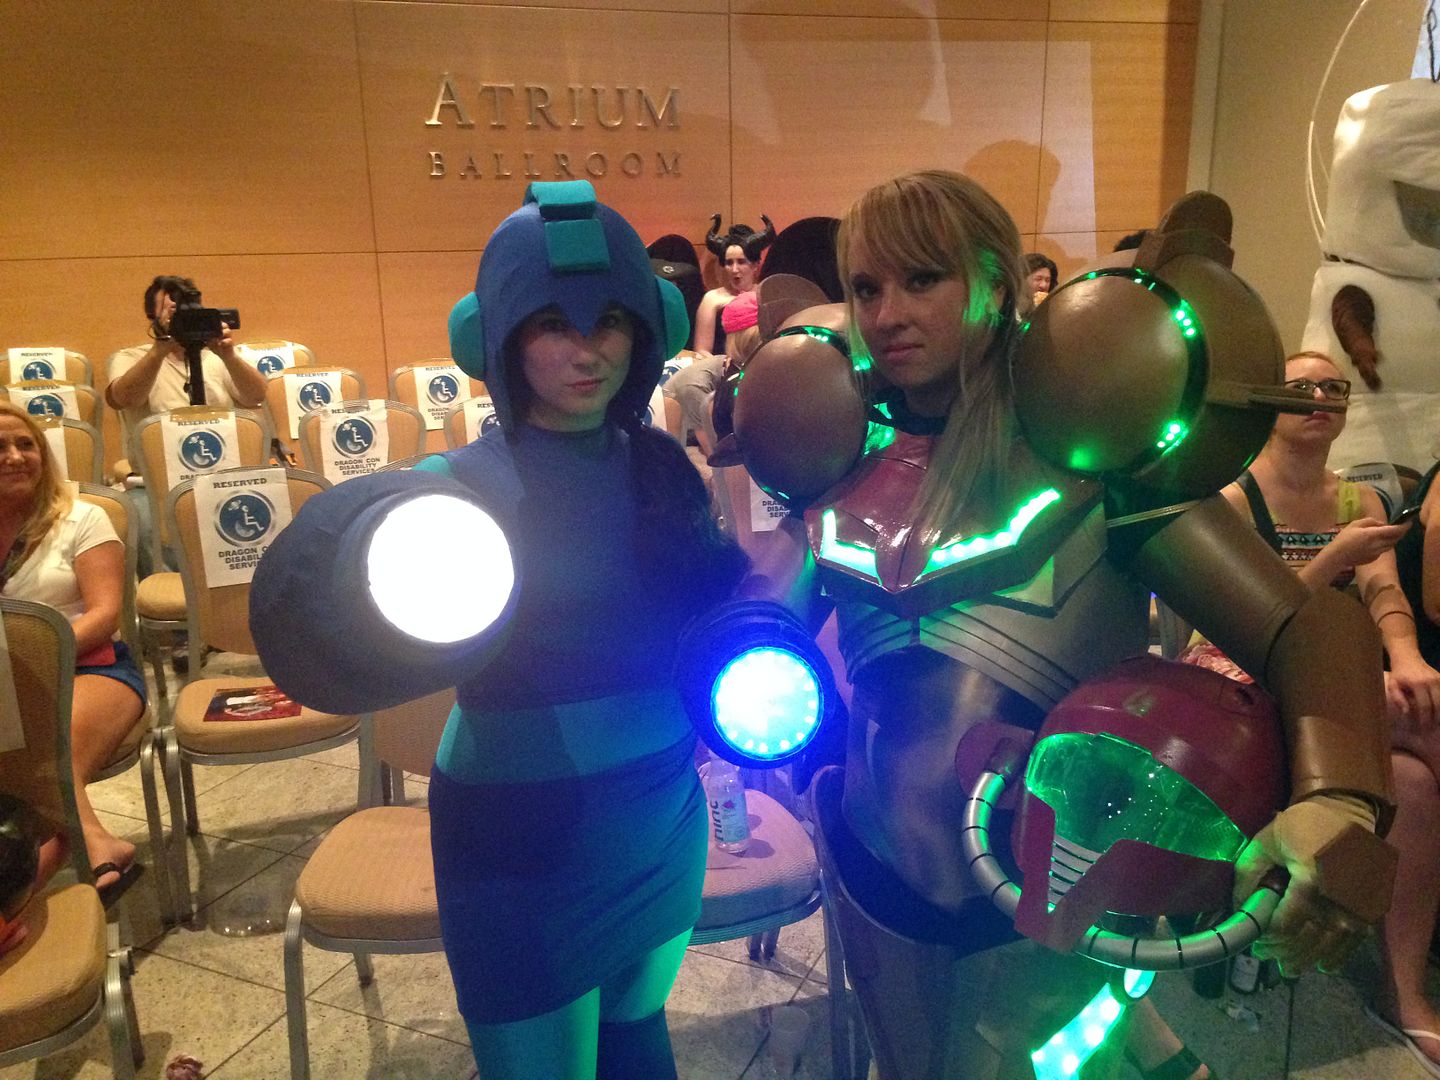
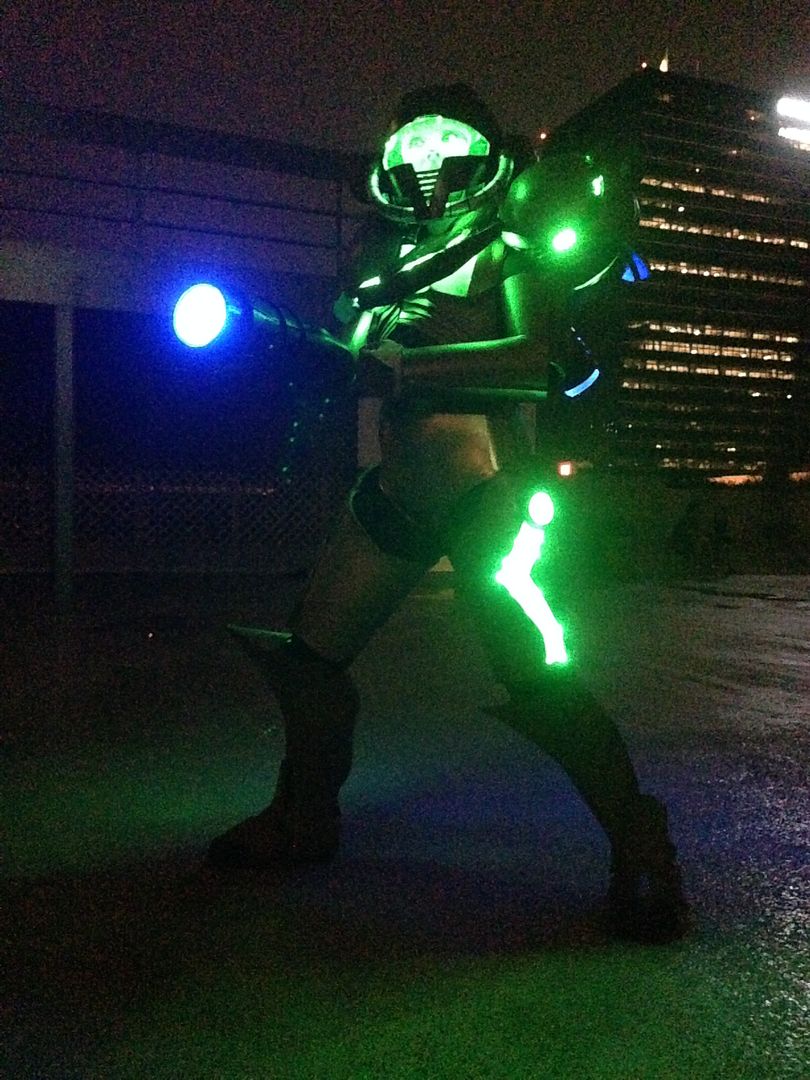
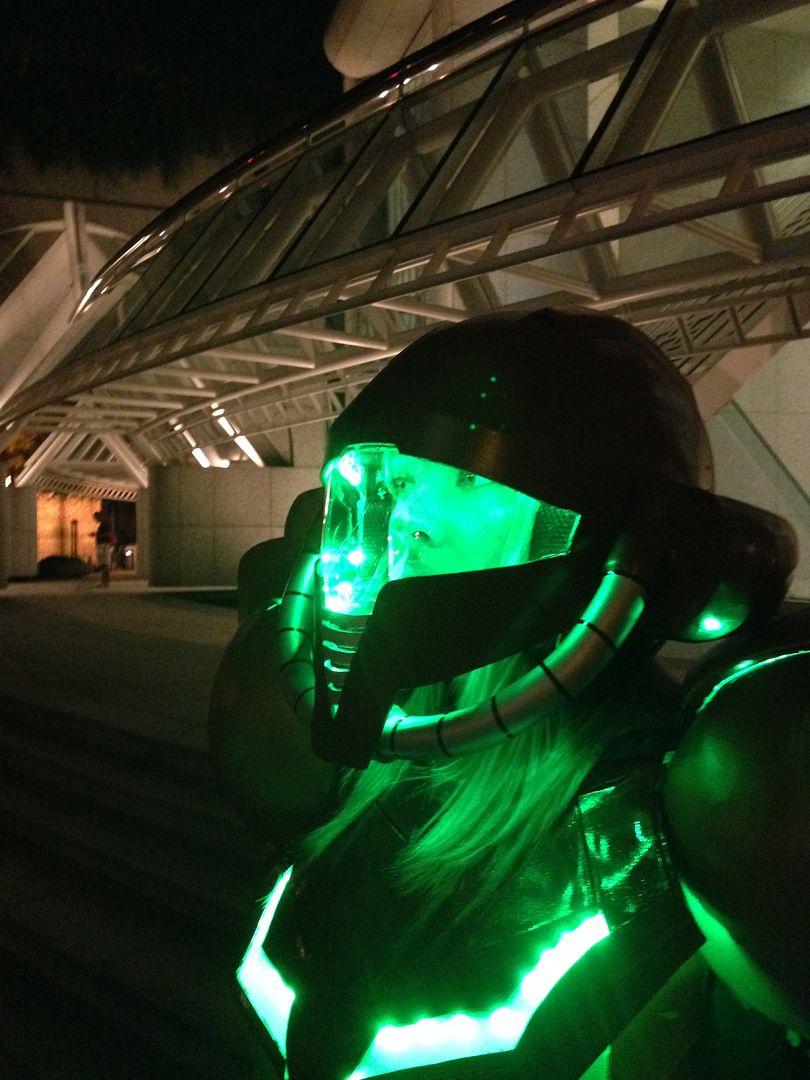
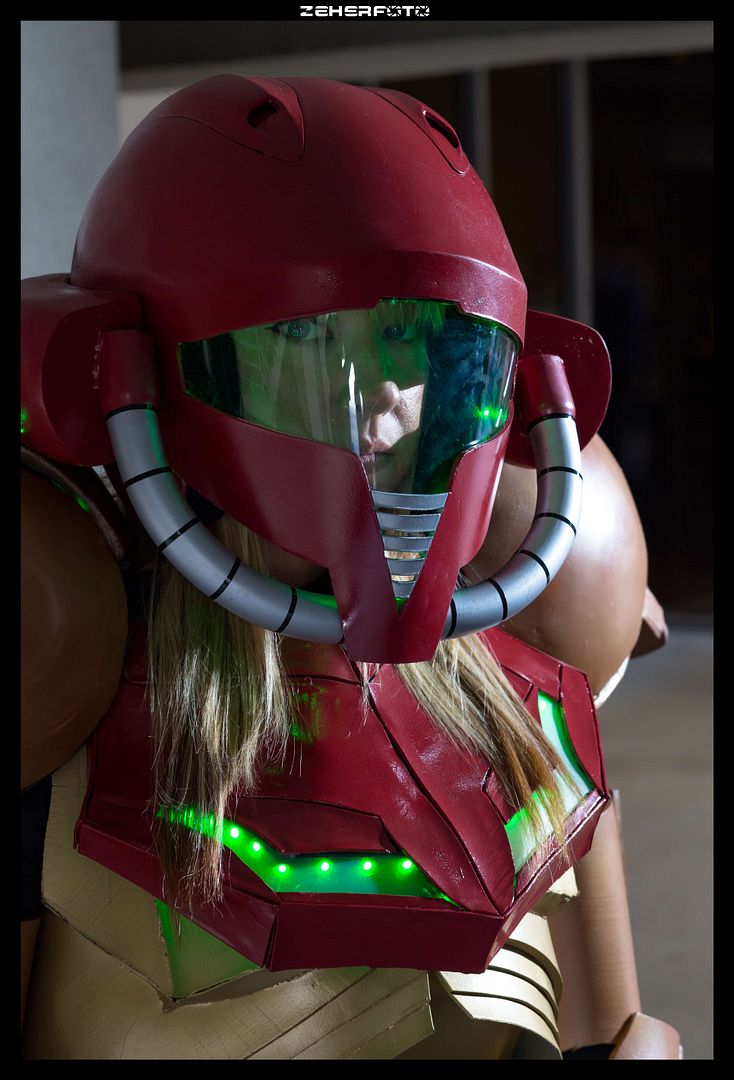
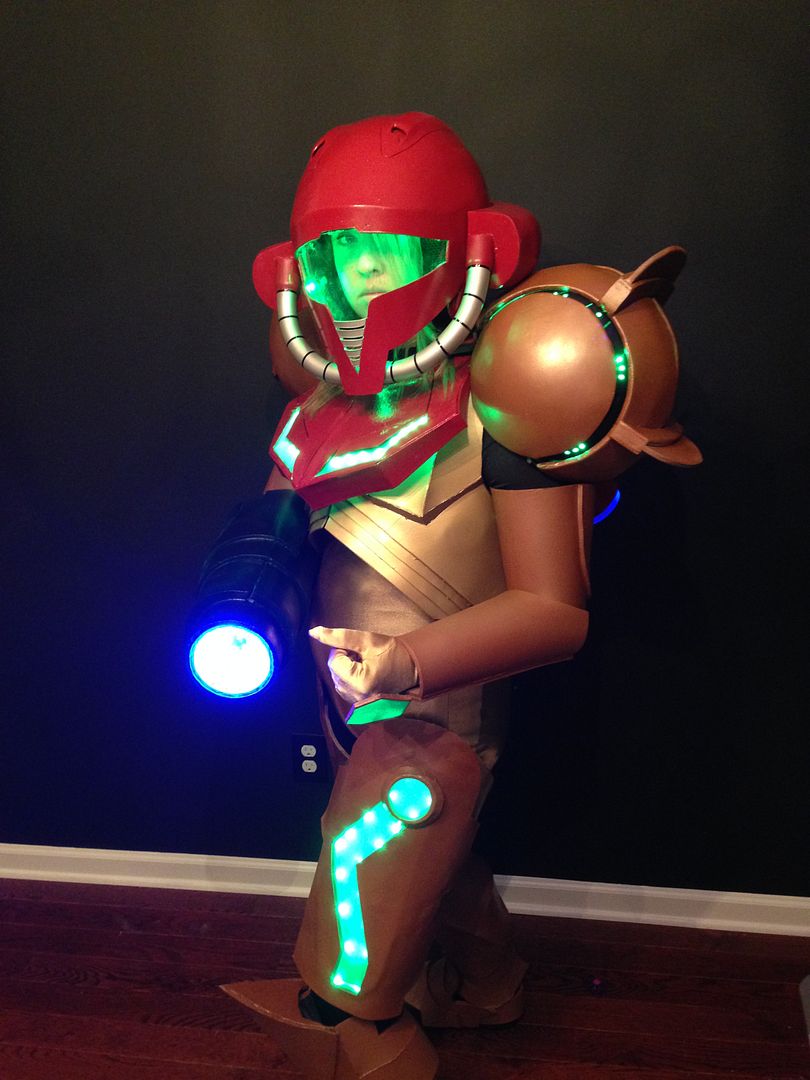
Version 1.0 COMPLETE*
*As we all know, a costume is never truly done as we are always upgrading, tinkering, modding, etc.
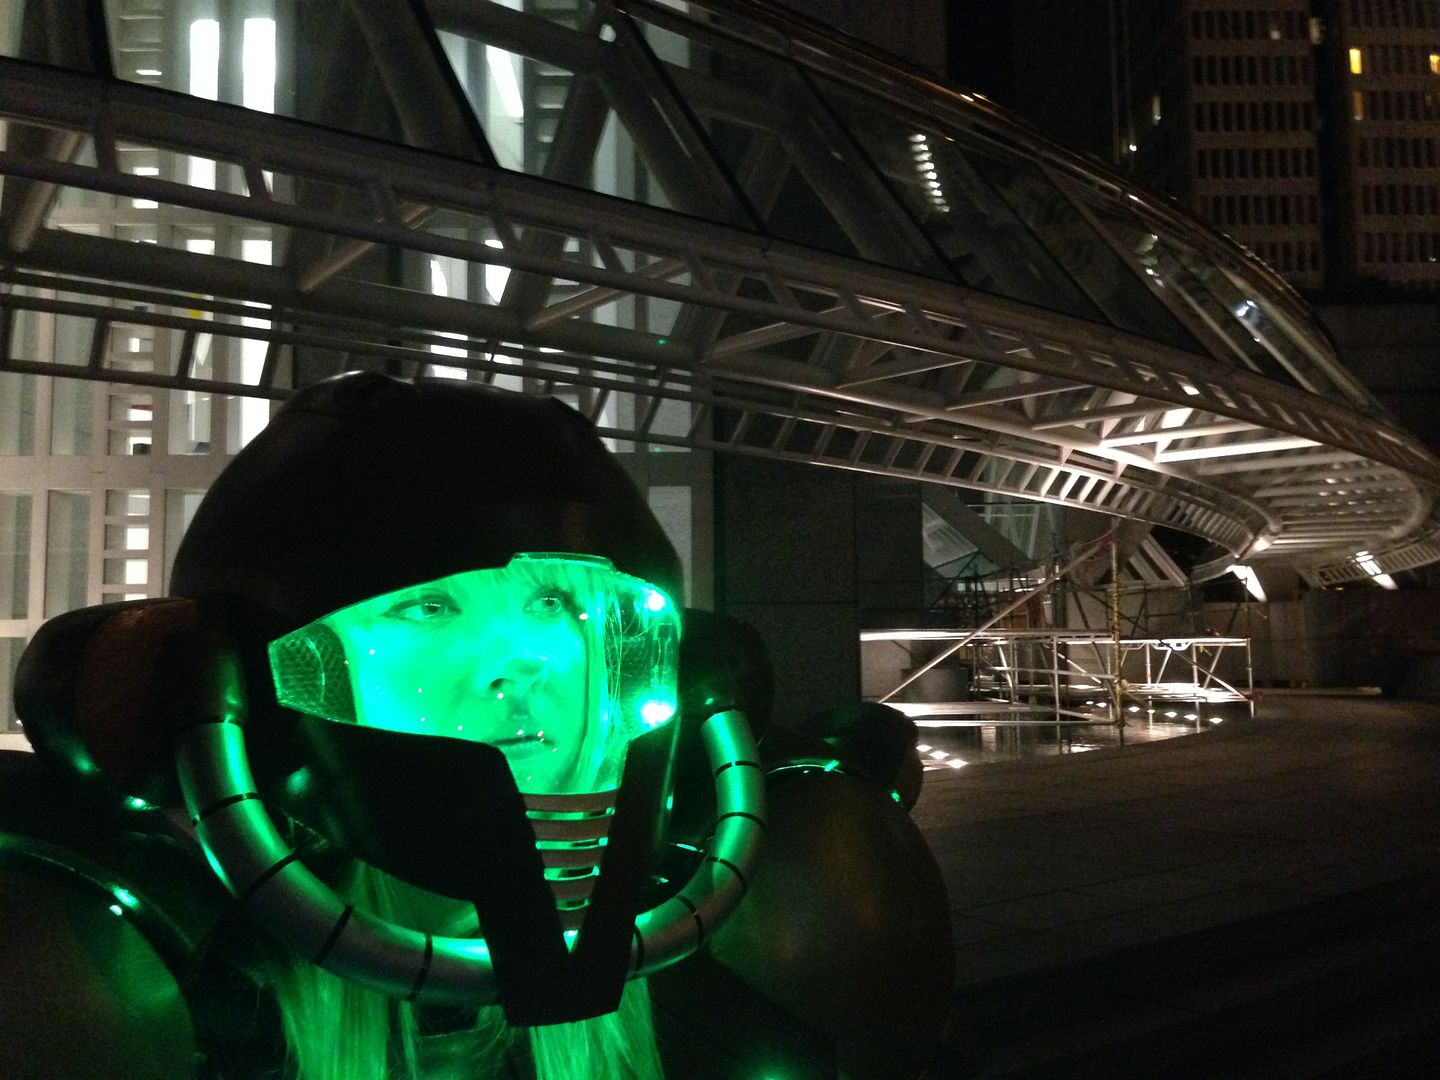
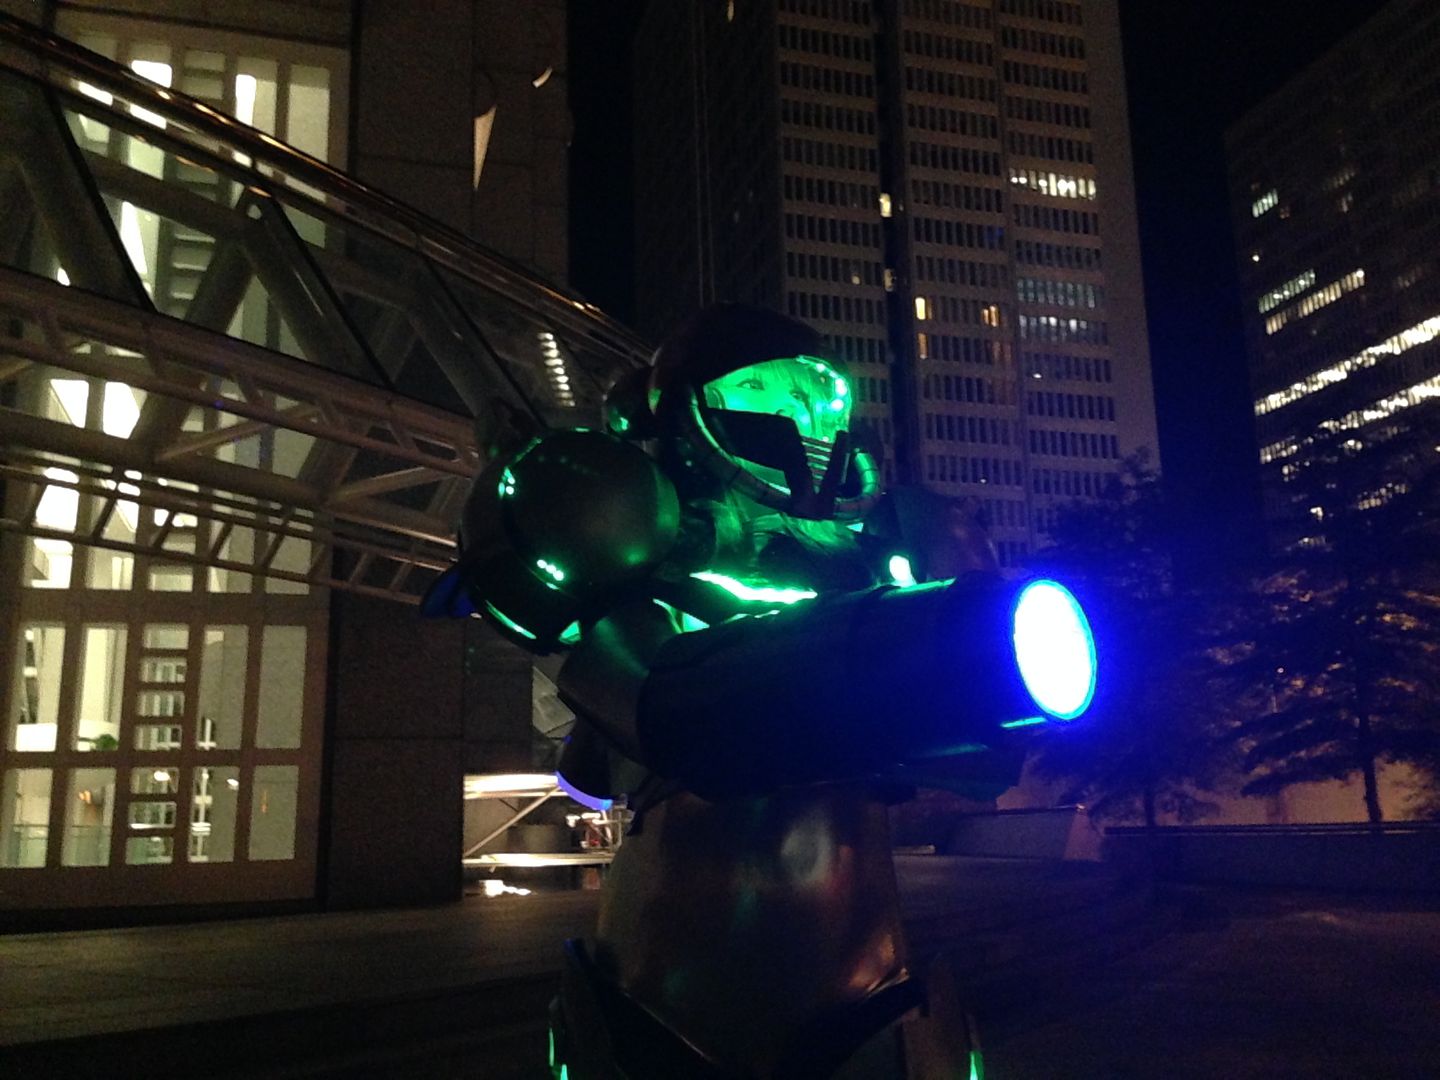
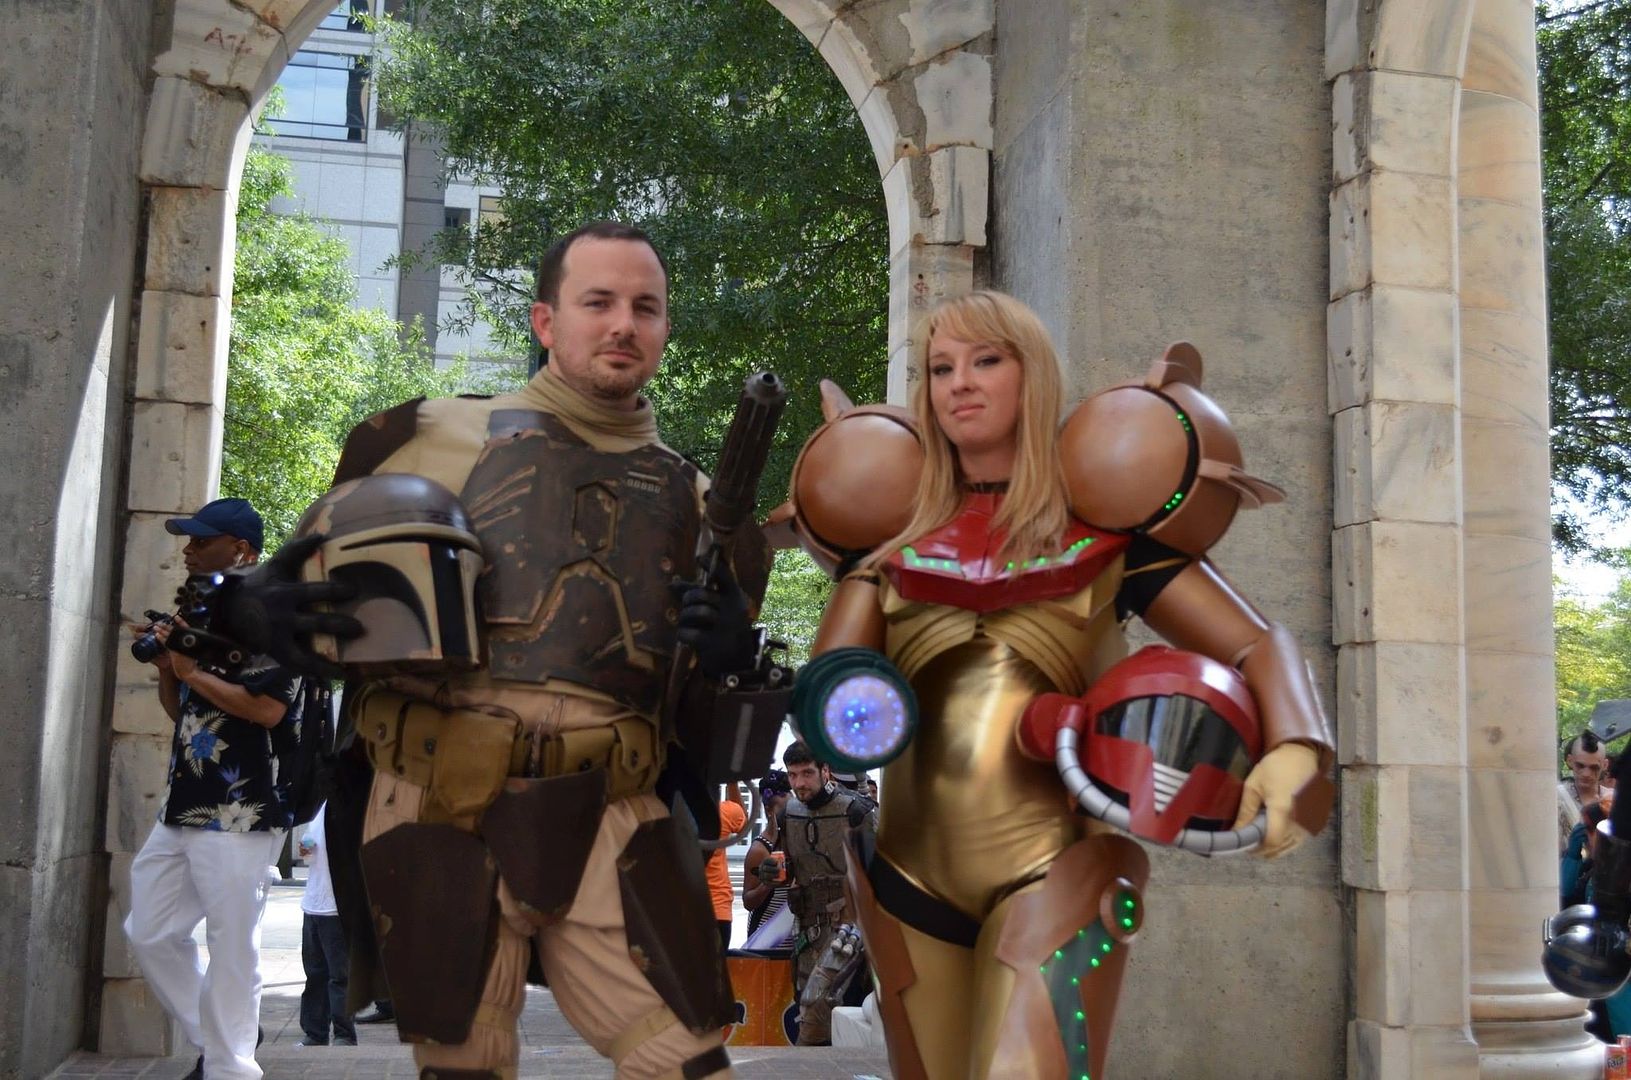
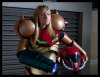
Photos by Matt Zeher of ZEHERFOTO - Dragon Con 2014


BUILD JOURNAL
Since making my SWG Mando Armor took so much time, my wife made me promise her that the next project I did would be to make her a metroid suit. We decided to do this build together as a husband-wife team. We have been working on this for over a year and have been keeping a WIP on another site. We have decided to move it here as this community is not focused on one particular subset of cosplay.
That means, rather than making dozens of posts you will get one large wave of posts that shows our progress as of 8/4/2014. Thus this will be very pic heavy.
With that said, let's get this WIP started.
:::Concept & Planning:::
So we surfed the internet and, initially, did not like the costumes we saw out there. However, we came across a more simplistic costume that appeared easier to wear than the majority.
We LOVED both of Jenni Kallberg's Metroid Suits. You can view all of her cosplay costumes on her website including a nice WIP gallery).


We like that it appears to be a “simple” build. We love the grunge/industrial look of her first suit as well as the foam work done on the second suit. The helmet appears to be a motorcycle helmet covered with heat shrinking film (rather than Bondo or fiberglass). The shoulders, biceps, legs, shins, etc. appear to be plastic or some sort of hardened foam (demonstrated on her WIP for her other Metroid suits). We've never worked with that kind of foam before so we will go with what we know (Sintra, bondo, fiberglass, resin, etc.).
As for the body suit, we needed an undersuit and did not want to break the bank. Solution? A $25 morph suit from eBay. We will cut the head off (which wil help with the creepy factor).

:::The Helmet:::
We bought a motorcycle helmet off amazon for $50. We LOVE the vents at the top and back (not pictured) of the helmet but we are not sure if we can/should use them. We want the helmet to look "metroid-y" and not "hey you modded a motorcycle helmet."
There is took much padding inside the helmet. While the padding inside the helmet is necessary for driving a motorcycle, it does not work for cosplay. We gutted it.
We really liked the length of the faceplate and the overall shape of the helmet. We took the top vents off and taped one high up and the helmet and one lower down. We believe that we can still use the vents...somehow.
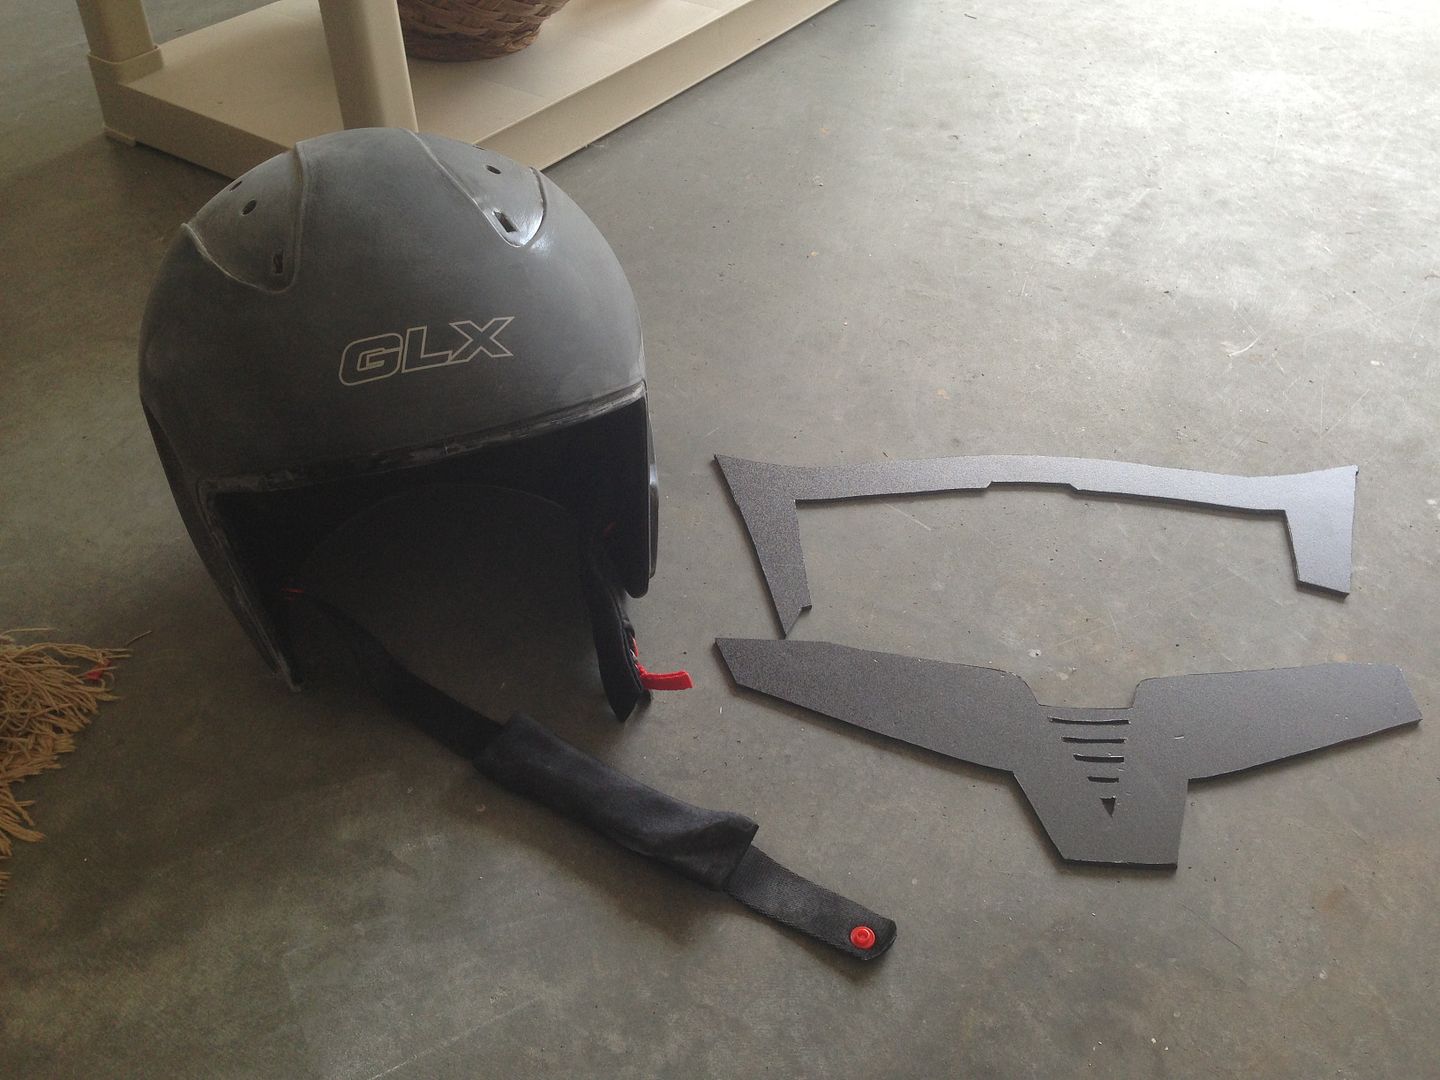
Next, we took the faceplate off the helmet and traced its outline onto posterboard and cutout a visor.
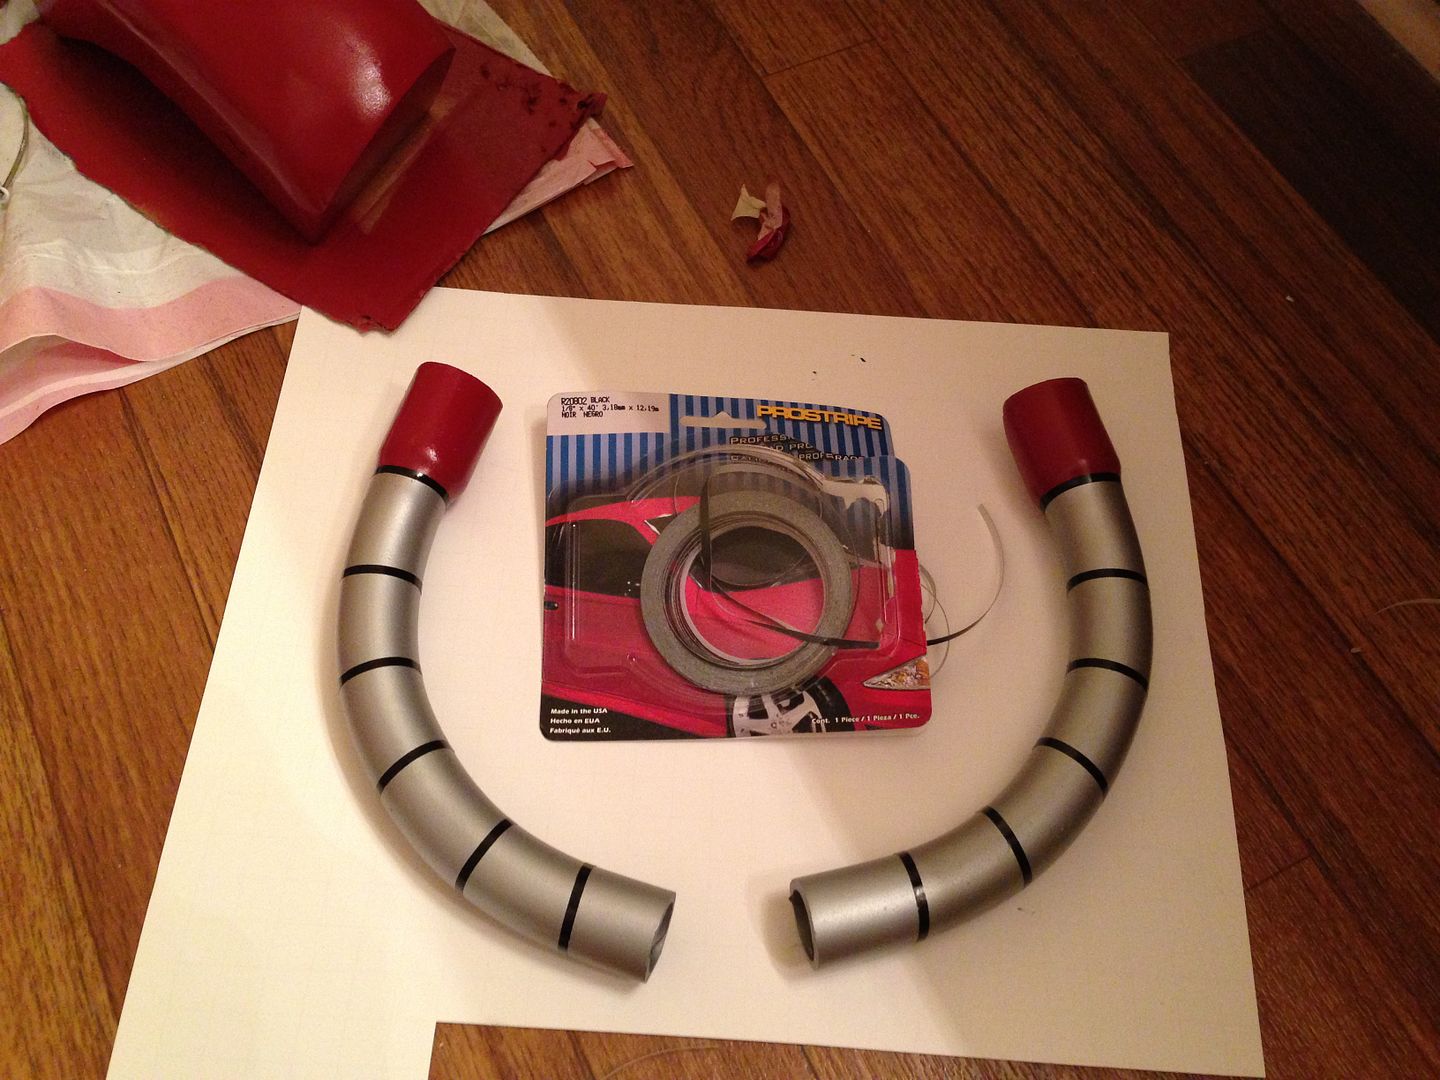
We taped the poster board visor to the helmet, tape the vents to the sides and held up a PVC elow. We like how this is turning out. Not sure if we will stick with the PVC or use something else (washing machine hose? electrical conduit cable?).
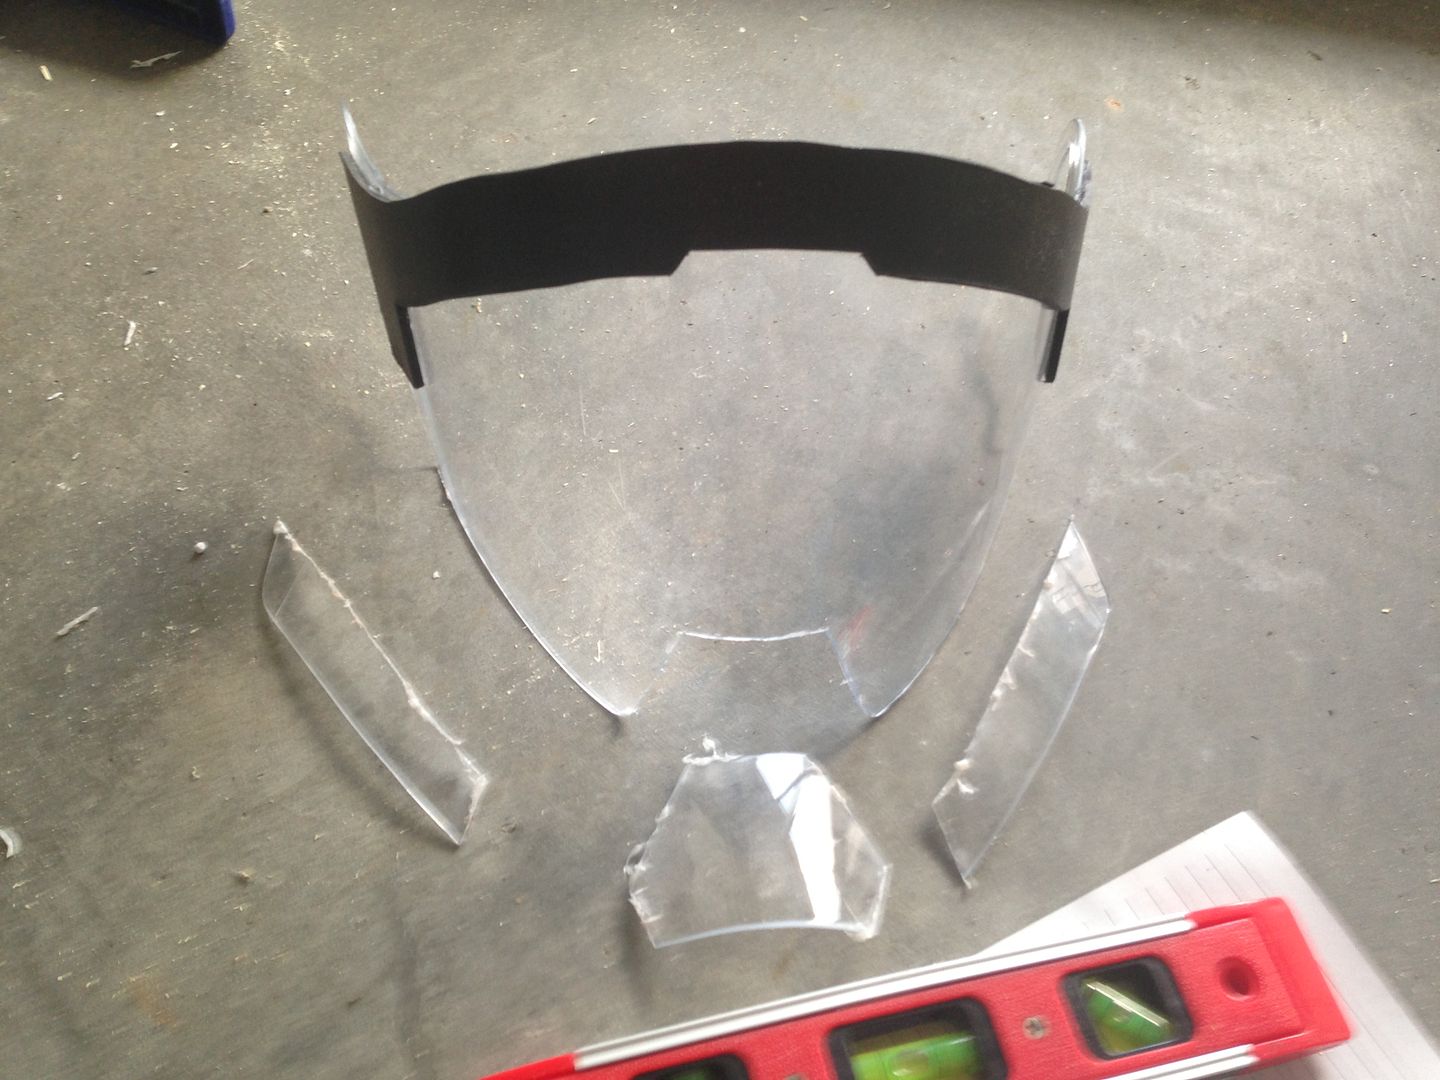
When Julie put them helmet on, we noticed that the visor was too tall. We shortened it by about 1.25 inches.
We sanded the helmet with 100 grit sandpaper. Next we cut out pieces of 1/8" thick PVC particle foam board (aka Sintra). PROTIP: For 1/8" thick sintra, only use an Exacto Knife and/or razor blade (box cutter) if you want precision cut lines. Using a hand jig or hacksaw....sucks.
When then taped those pieces to the helmet, traced them to reveal the excess, and then used a dremmel to cut the visor.
We used a heat gun to warm up the sintra and carefully shaped it. Since sintra is so soft, you can't get it too warm or you will dent it. We used Loctite professional grade super glue as it "sets in 5 seconds."
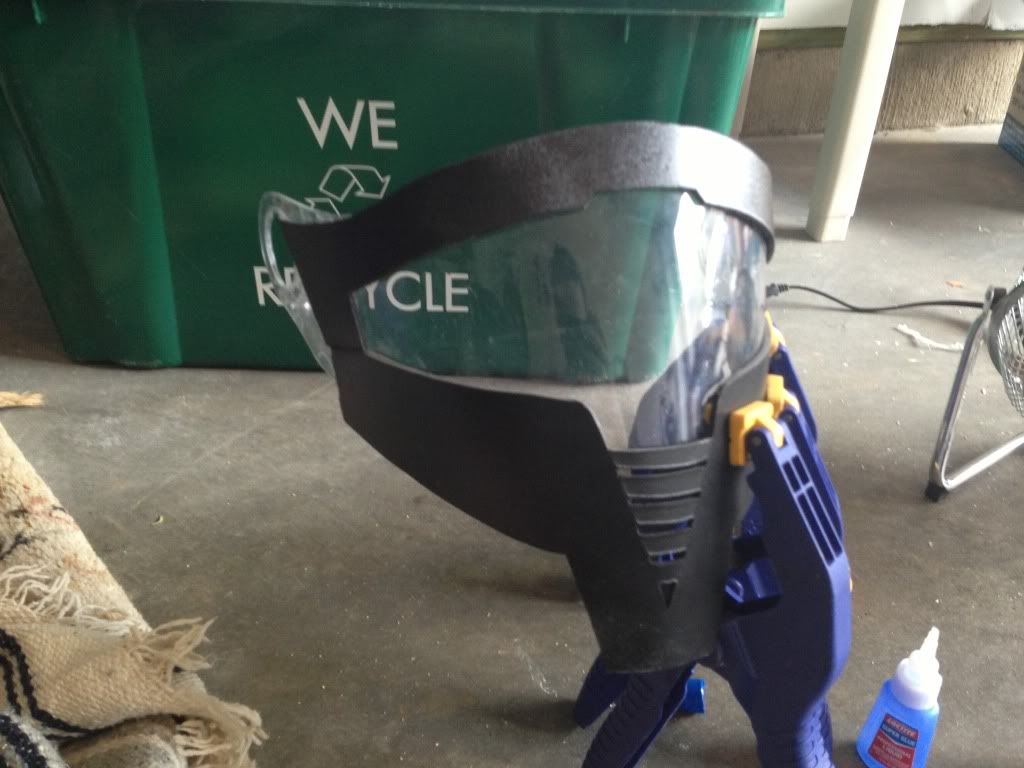
We then put the face shield back on. Looking good.

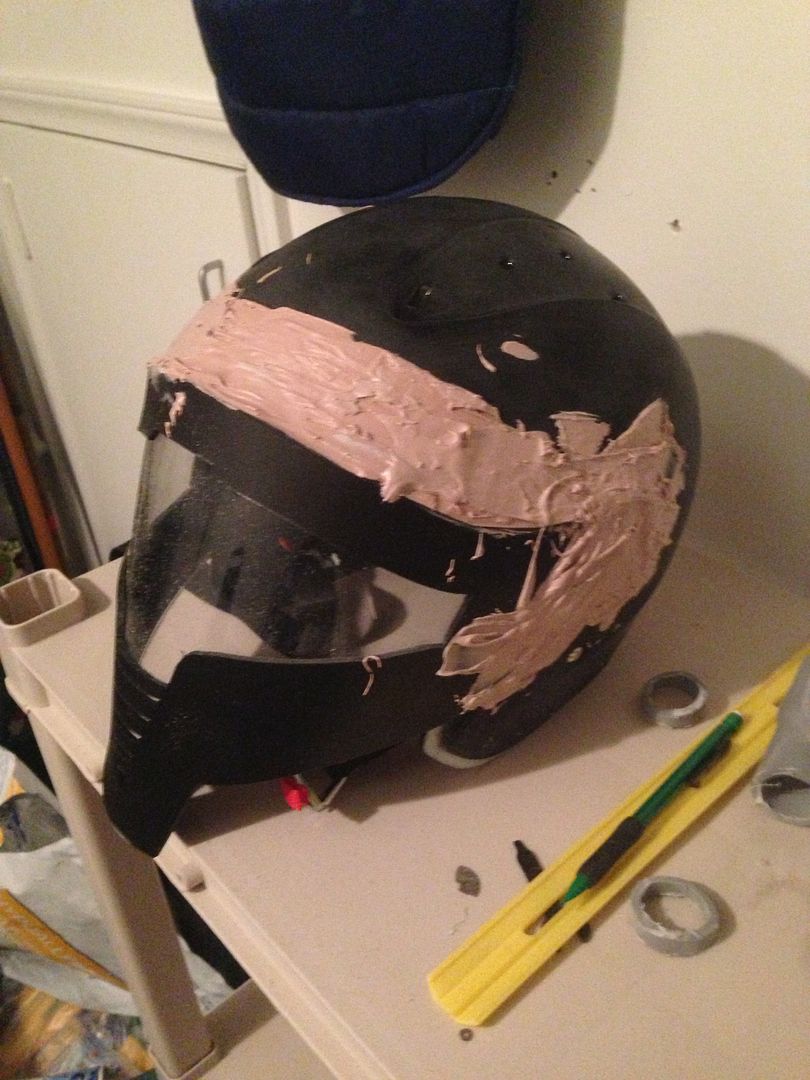
To make it look like one piece (and not like a motorcycle helmet) we put on a ton of Bondo.
While that was drying, we decided we might as well experiment with foam. We bought some of that foam you put in flower pots to stick fake flowers into. We used the Locite to glue two bricks together (gotta love 5 second dry times) and then cutout the "ears." I think the vents that came with the helmet are too "flat" so we may have to go with making out own ears out of foam.
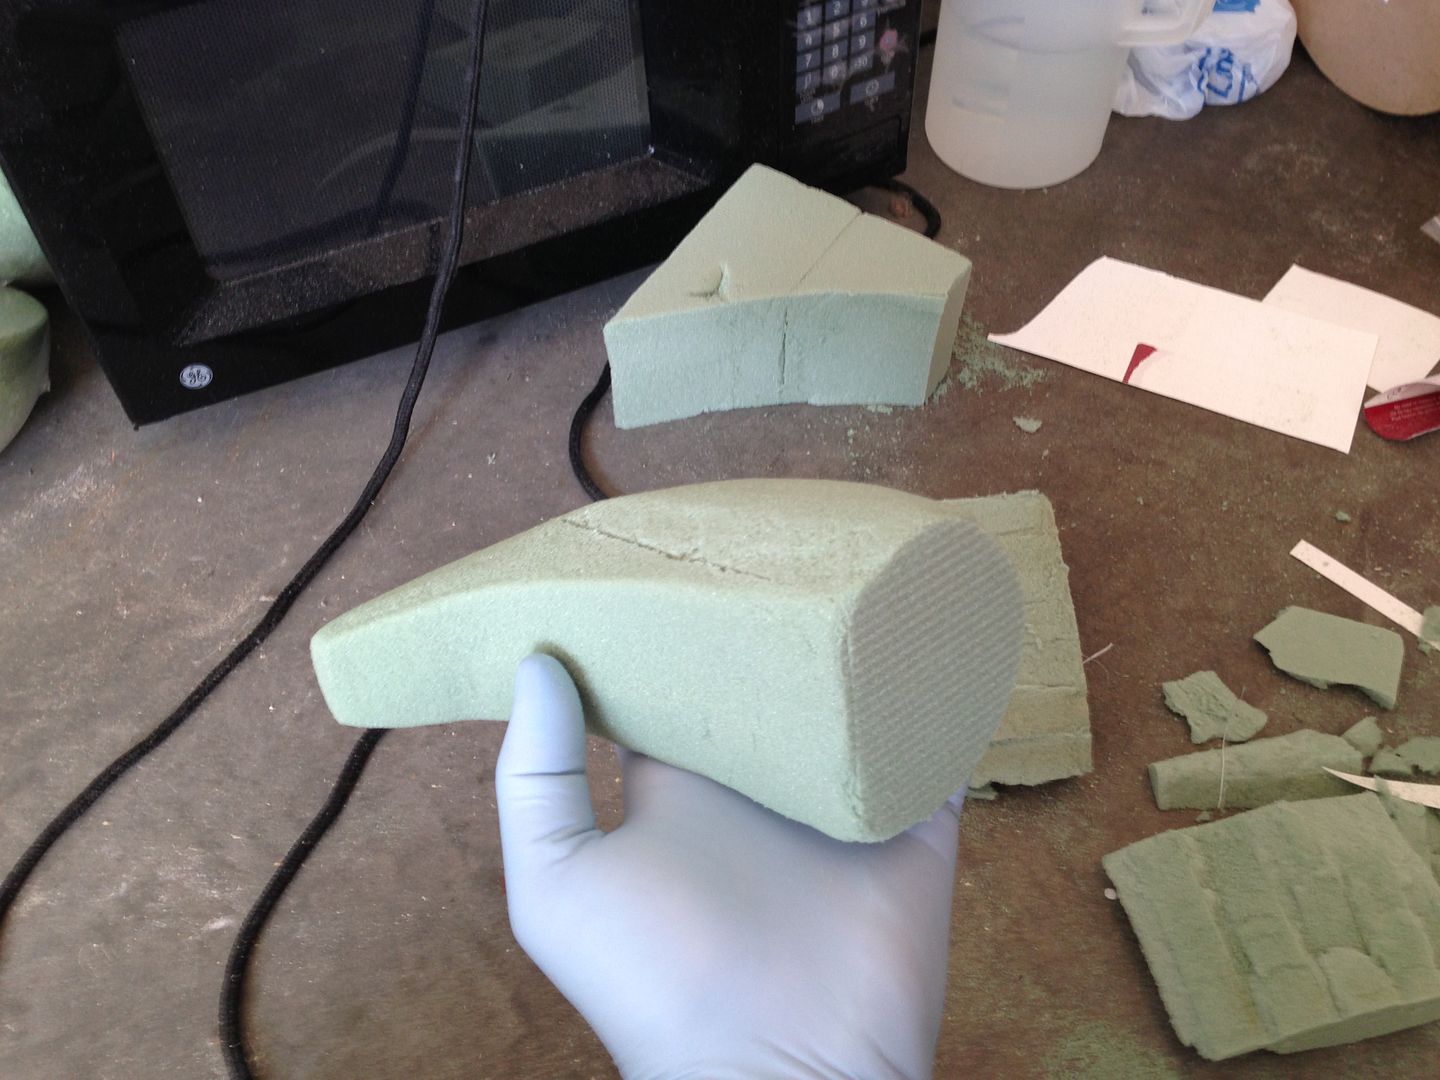
We took the foam "ears," put a coat of resin down, wrapped them in a fiberglass cloth, and then put another coat of resin on top. Next We cut off the excess that remained and did some light sanding using a dremmel and random orbital sander. We repeated this step once more as we wanted to add a lot of structural stability to the foam ears. PRO TIP: When sanding fiberglass keep in mind that you will be showering yourself, your clothes, your uncovered skin, your hair, your workspace with "glass" that is "fiber" sized (hence the name fiberglass). If you do not want extremely itchy skin for the next 24 hours make sure to wear pants, gloves, long sleeve shirt, a hat, goggles, and a facemask. I had to learn the hard way not to sand fiberglass in shorts, flip flops, and a t-shirt.
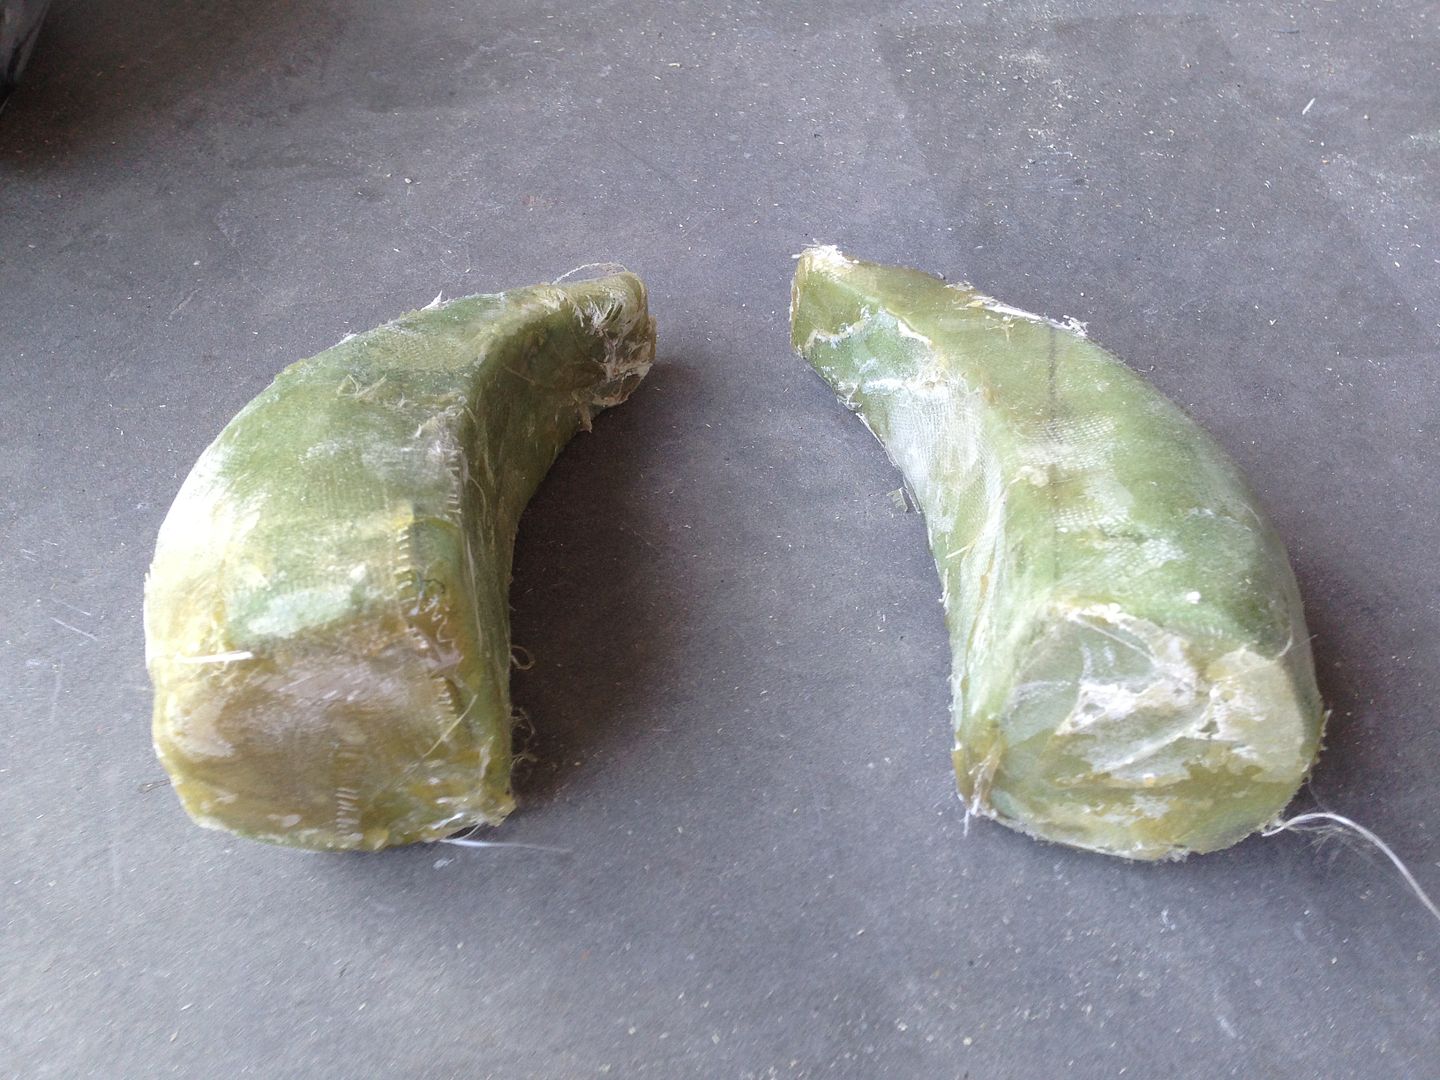
Here is a pic with the ears laid next to the helmet.
Thinking ahead, I was curious as to how I would actually mount the ears to the helmet. I essentially had 2 problems: 1) the fiberglass layer was thin and the inside was just foam...thus screwing into the ears would not create a solid hold. 2) While the ears are about the right shape they are not flush with the sides of the helmet...thus gluing them in place would also not give a solid hold.
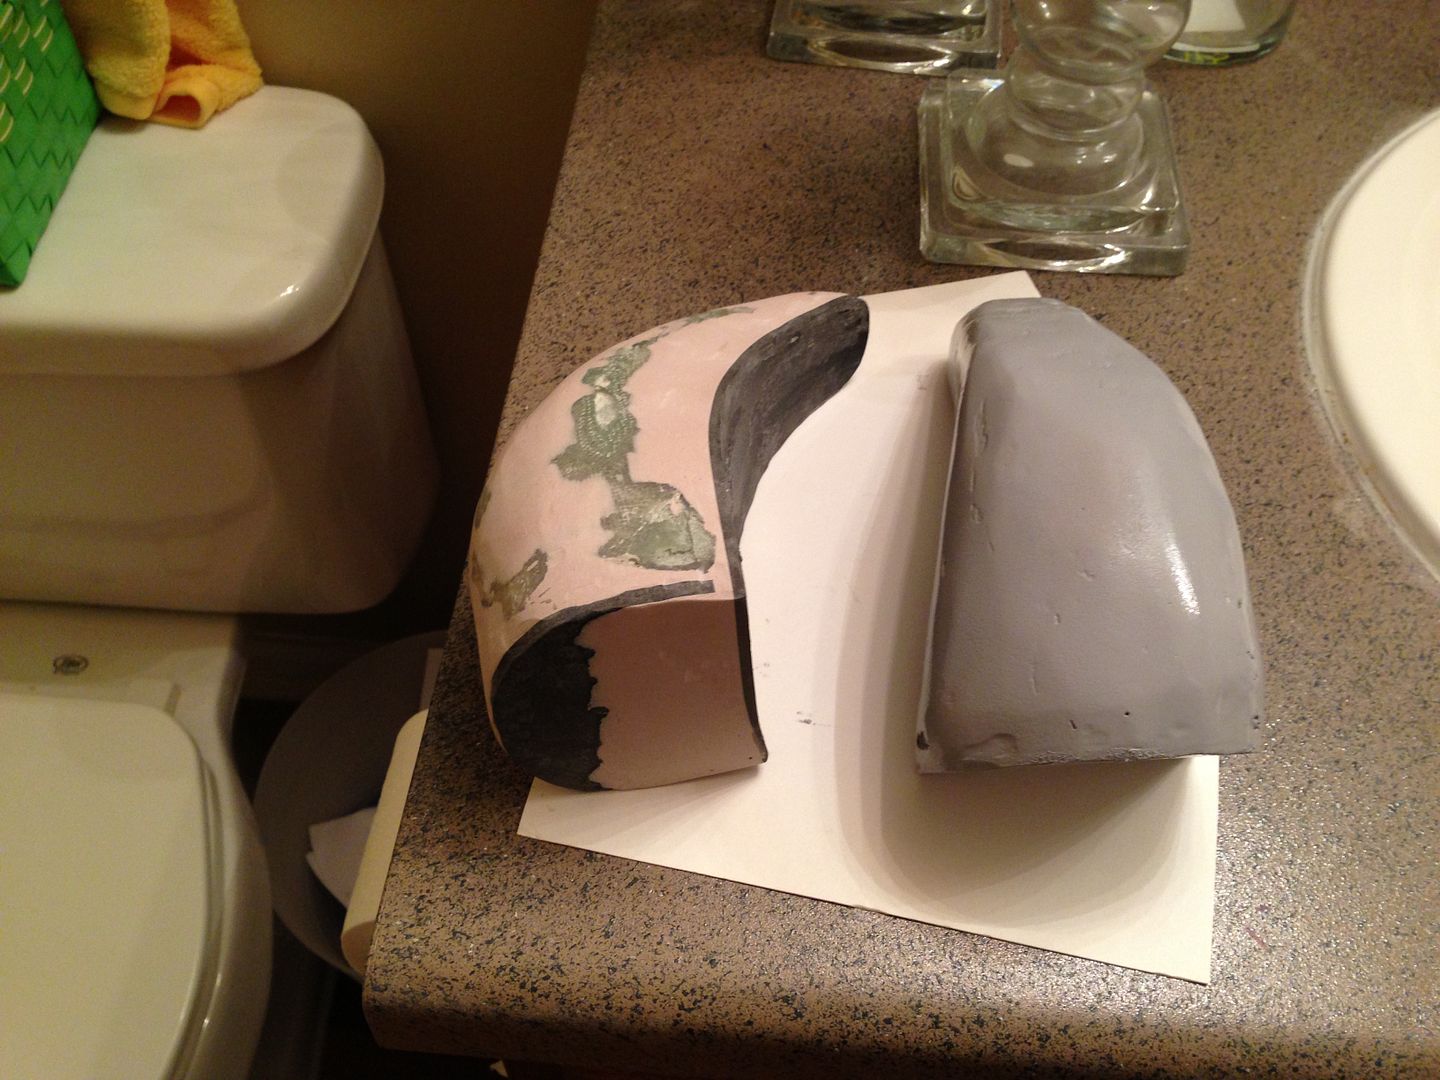
My solution was to cut out pieces of sintra, use a heat gun to soften them up so that they laid flush to the side of the helmet. This ensures a snug fit, added structural stability, and a spot to both screw into and put glue down. I then put bondo down to fill in the gaps between the sintra and the ears. Finally I sanded them down and put down a coat of primer to show m where all I needed to go over again with the bondo.
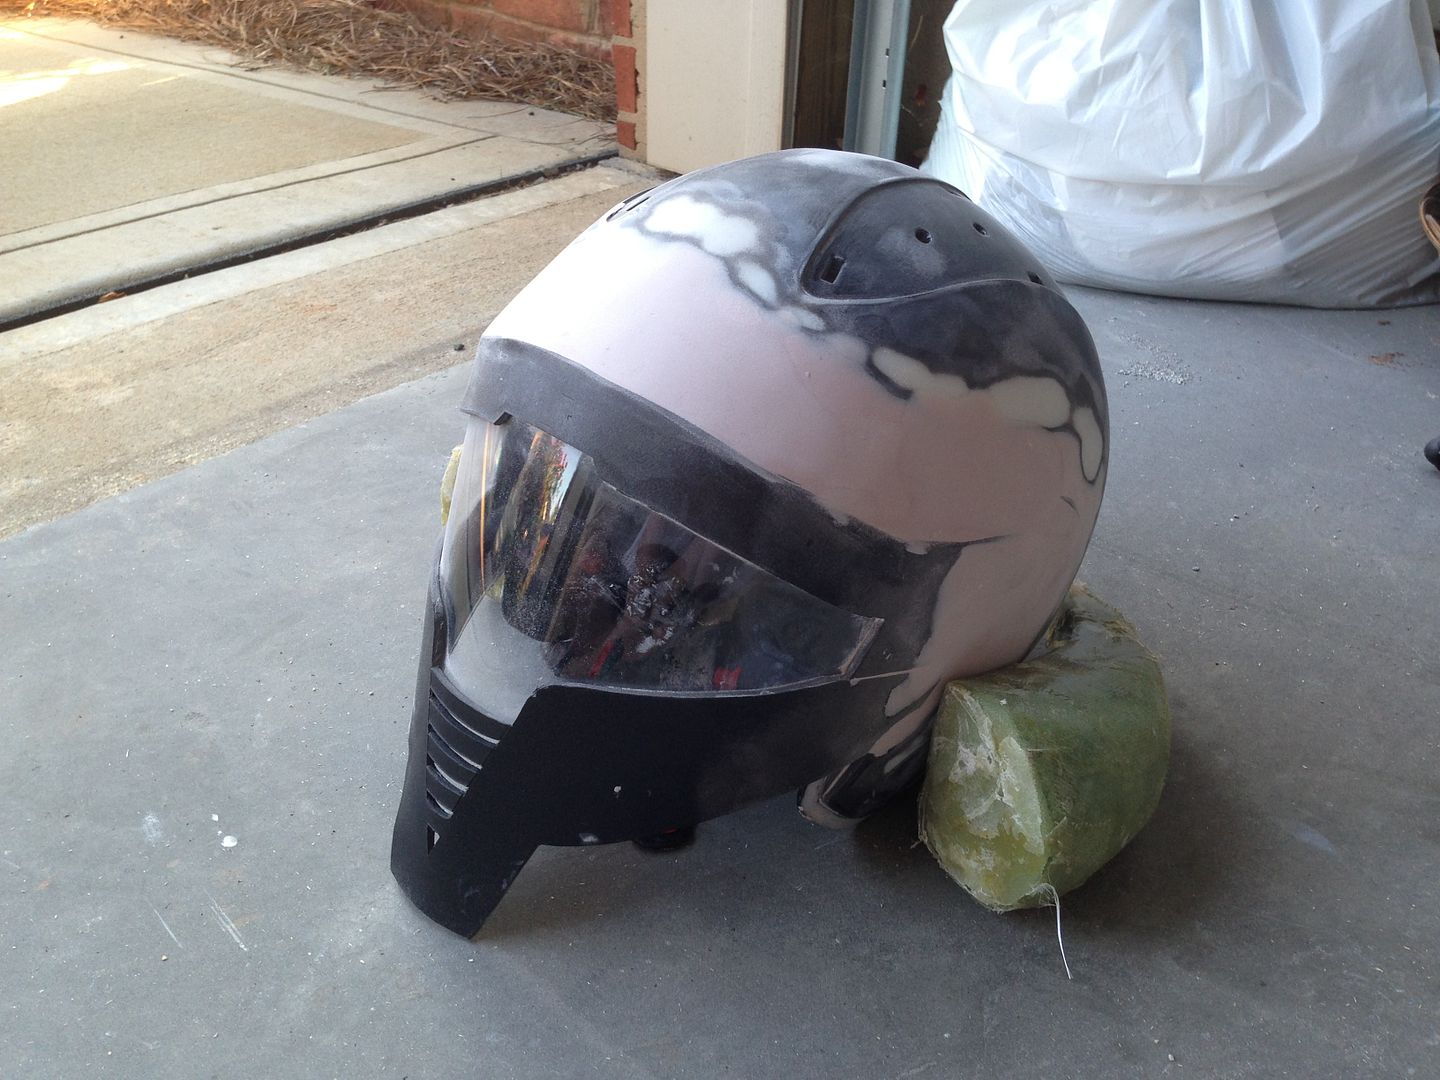
Both Primered and put up to the helmet. See how flush they are? Yay.
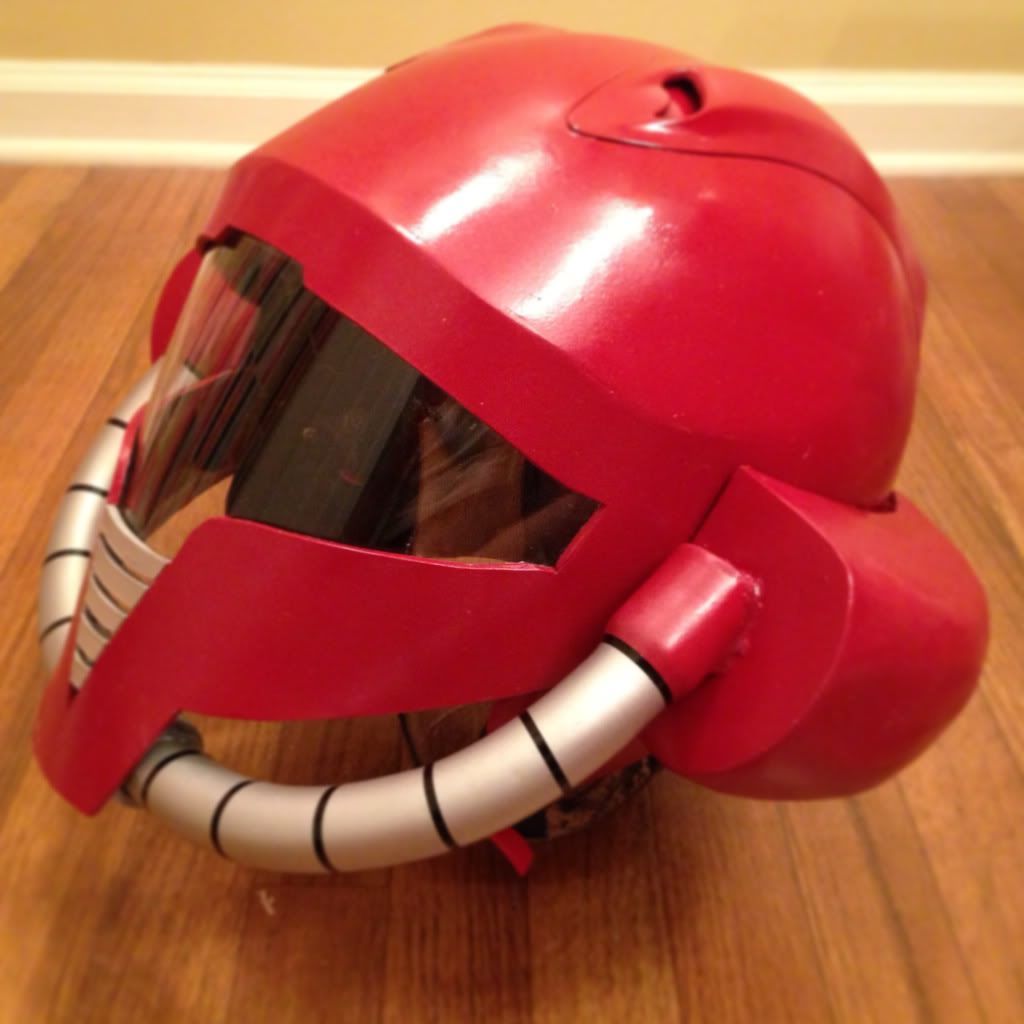
We glued the ears in place, lightly sanded (2000 grit) washed everything, primered everything, and then...finally...PAINTED! What a beautiful red.
We used automotive pinstripe (the same one on Vix's mando bucket) for the "breathers."
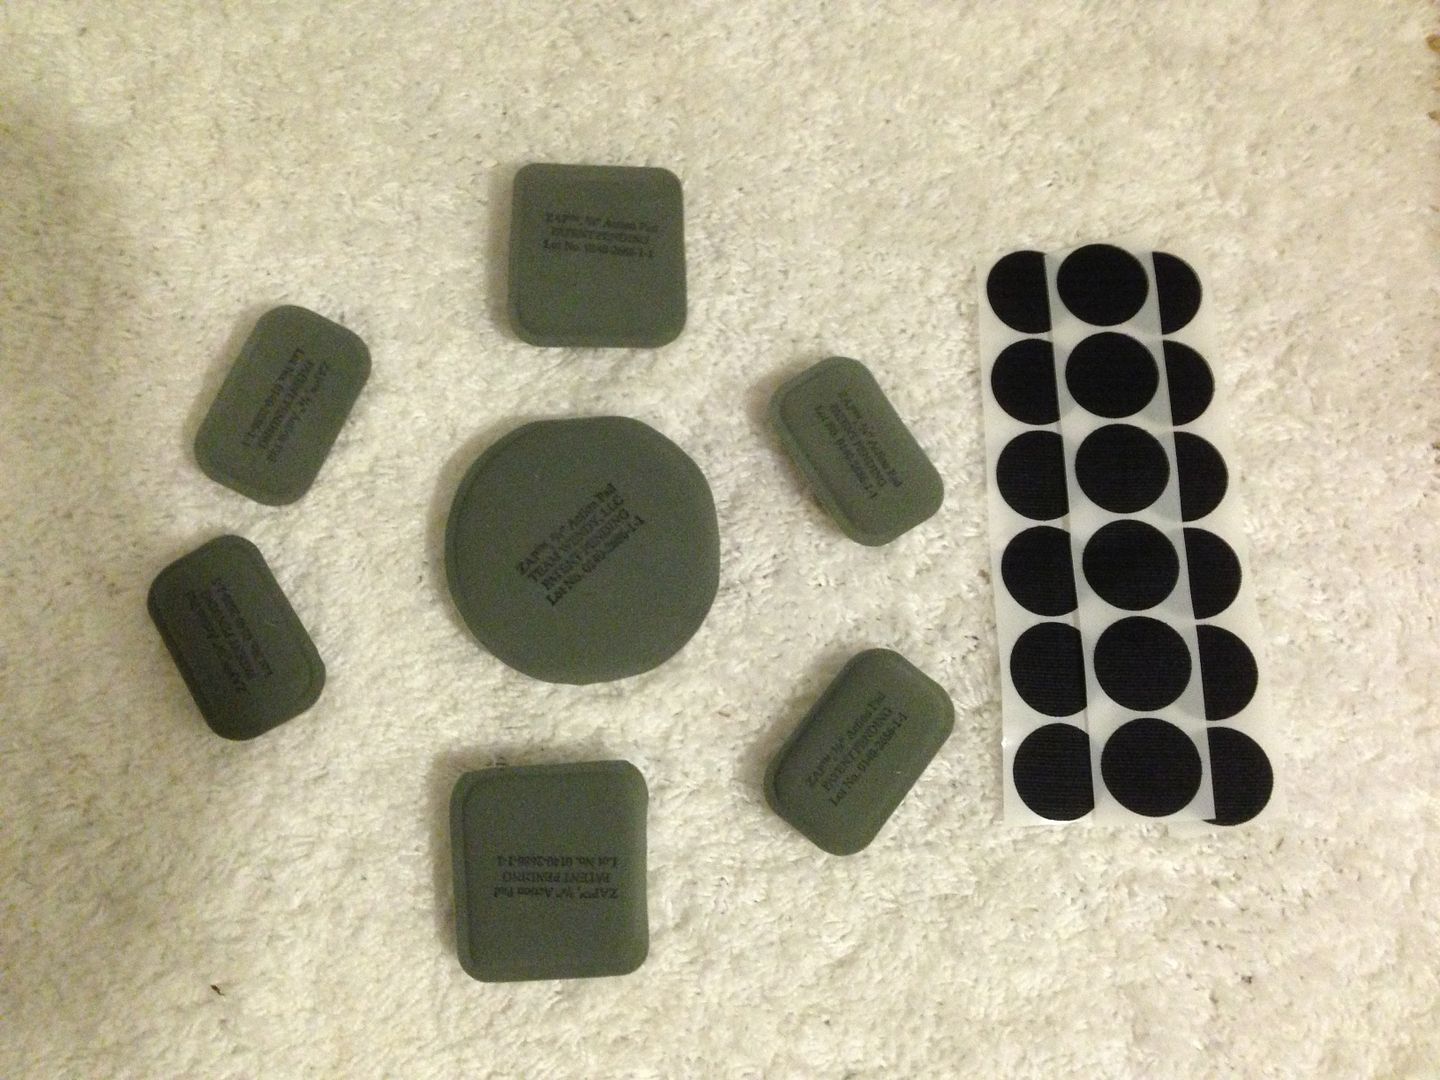
We used the standard military helmet pads. $17 on amazon.
Glued the breathers on, removed the masking tape, and put the vents back on the top of the helmet. We decided that since we could not use them we might as well just put them back where they go.
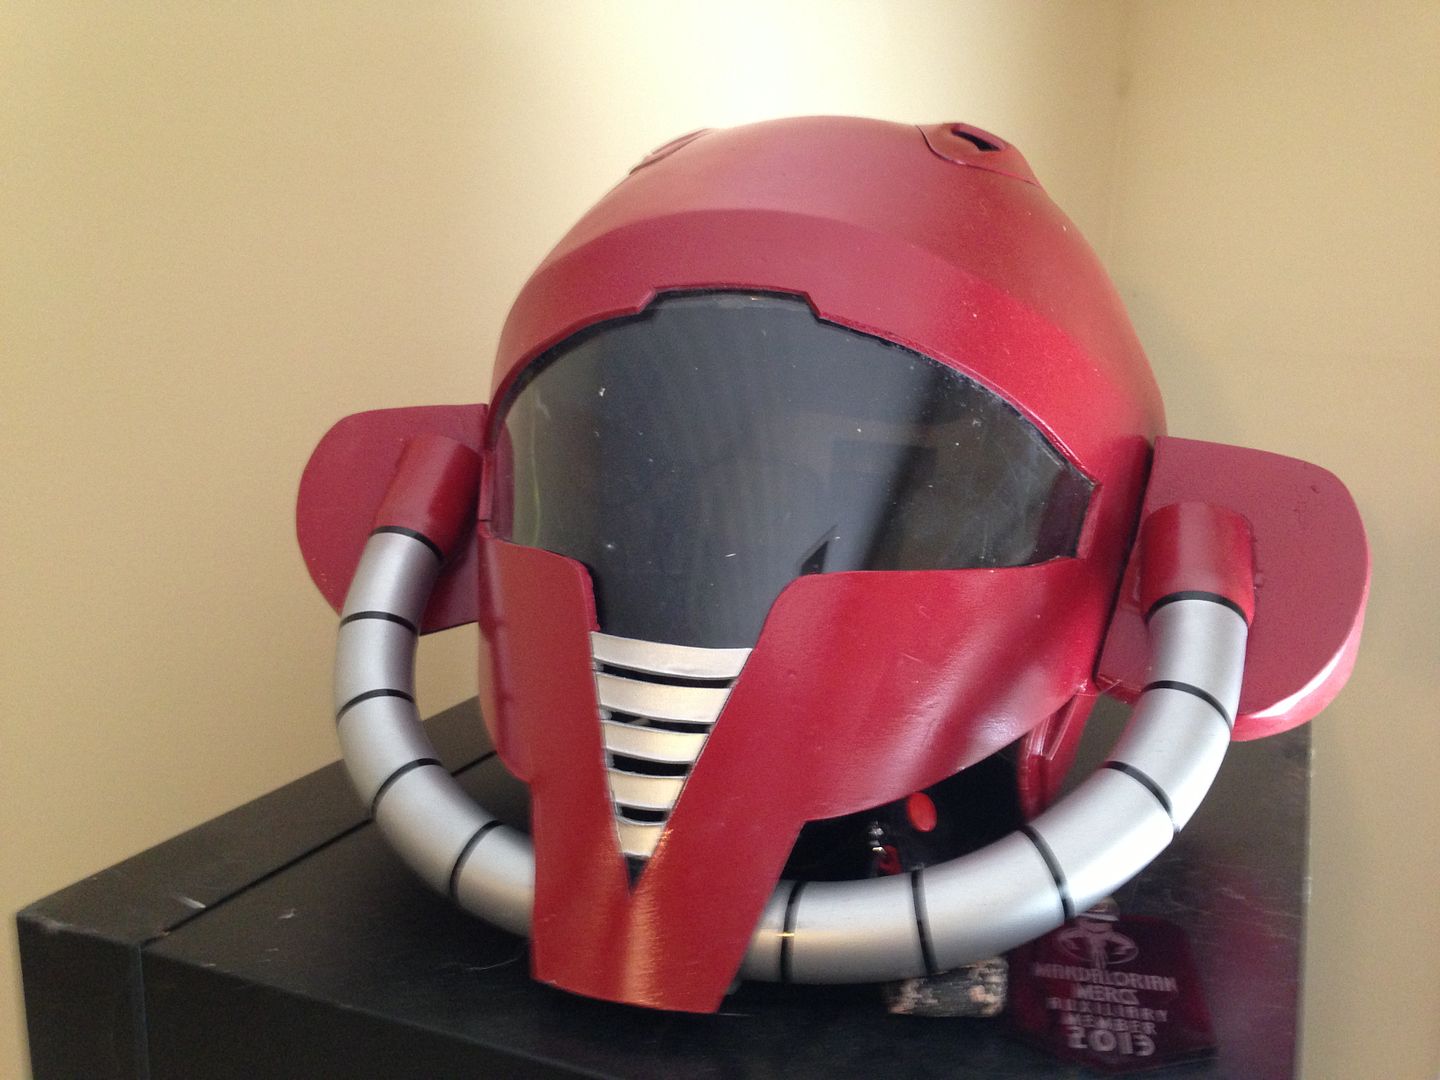
*Note the Mandalorian Mercs Auxiliary Member badge
**Yes we used windex on the visor after taking the photo.
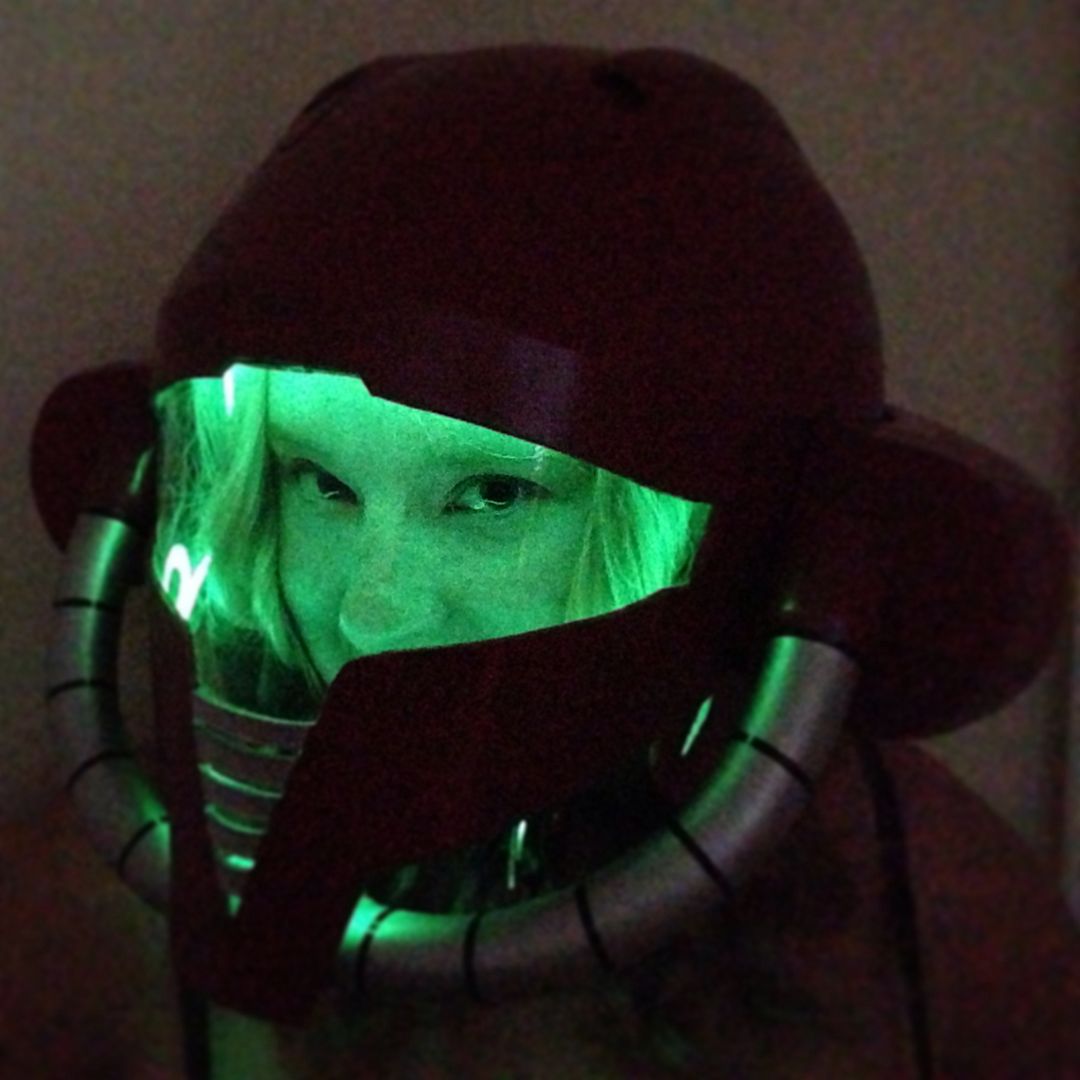
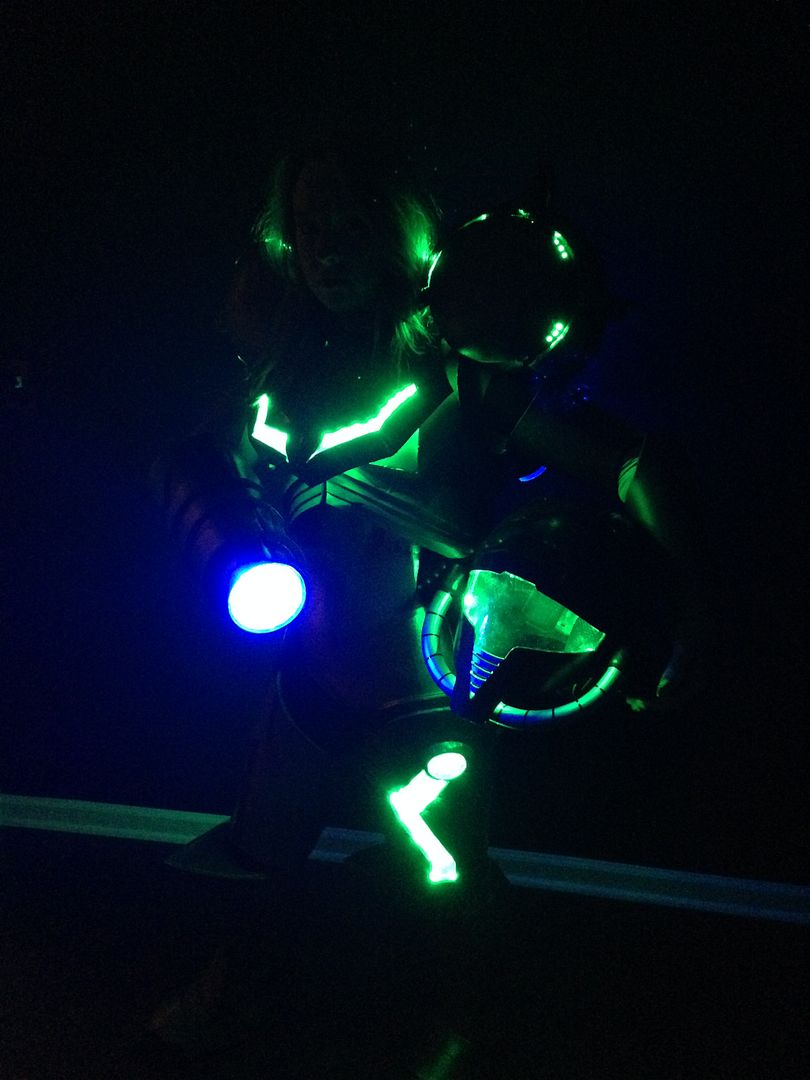
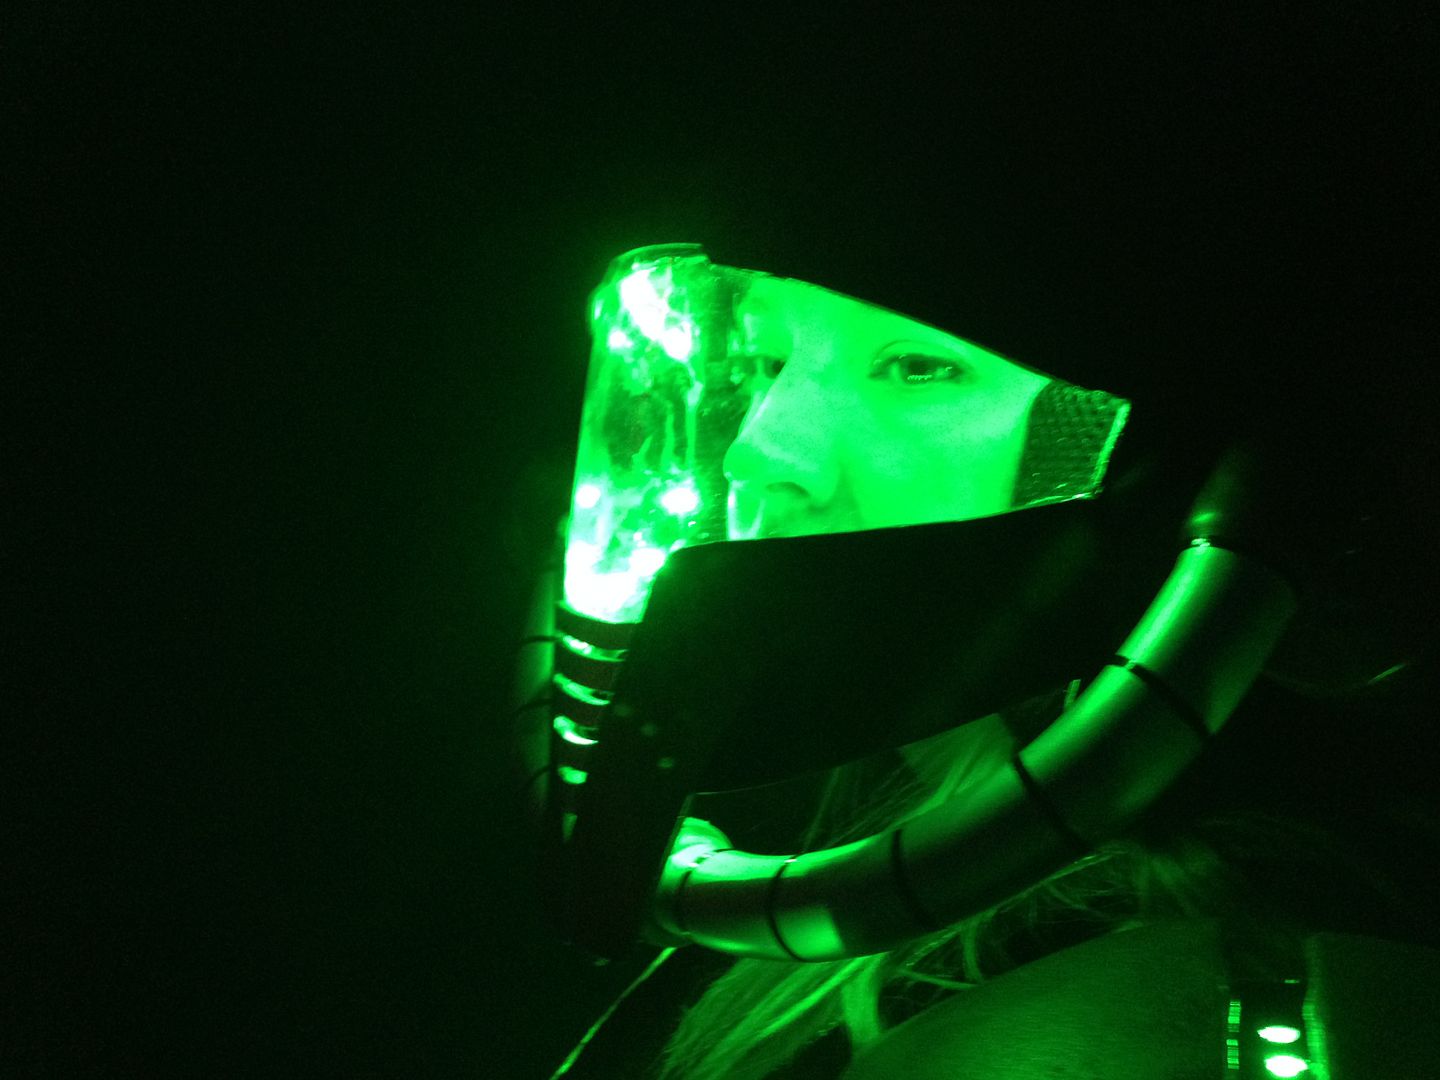
Oh and we put EL wire up in the helmet.")
- - - Updated - - -
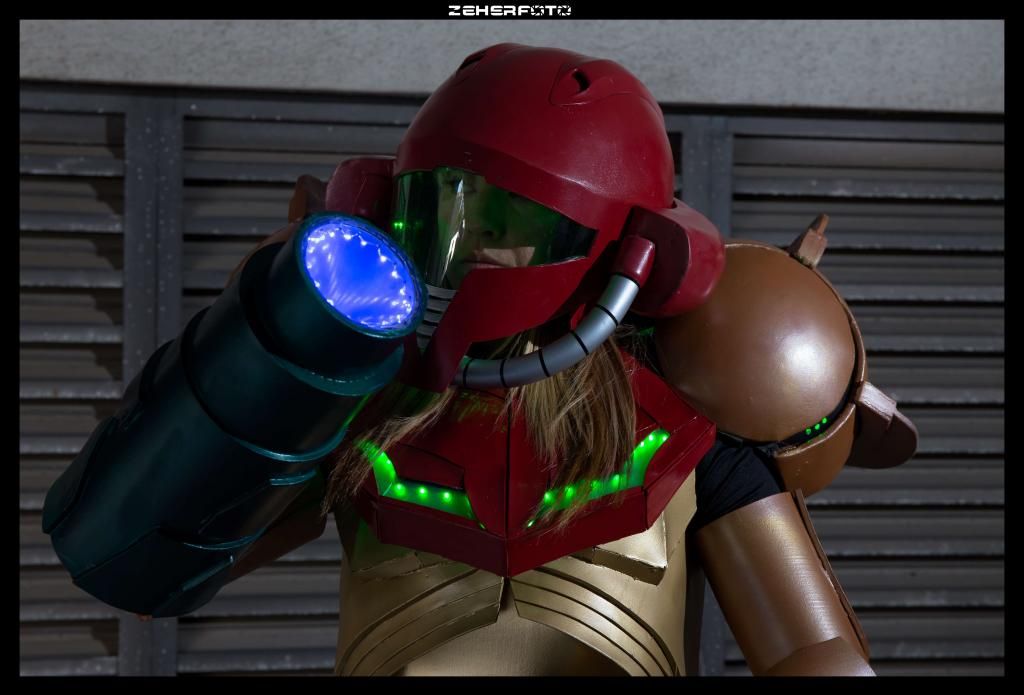
:::Arm Cannon:::
7/15/2014 Update
Wow. It's been a long time since we did any work. Anyhoo...
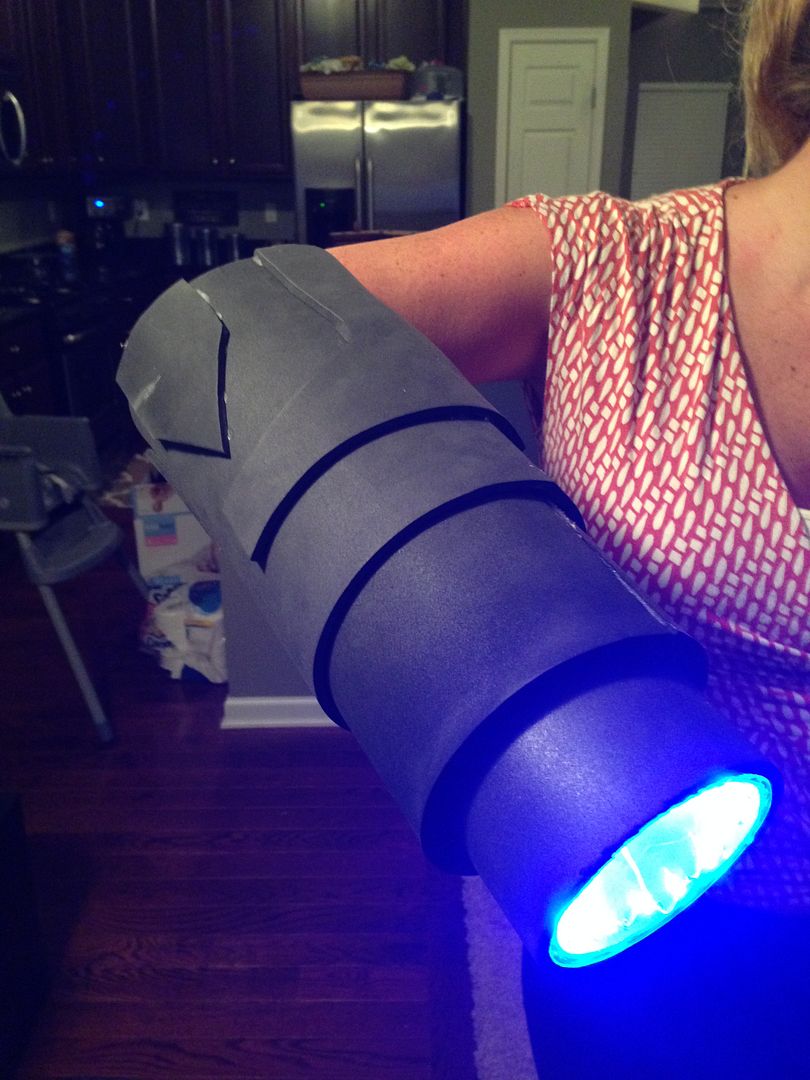
We found a thin clear plastic tube that seemed to scream "Oh me me! Use me for the arm cannon." We then took an oil funnel since it had the perfect cone shape and, with some cutting, did this.
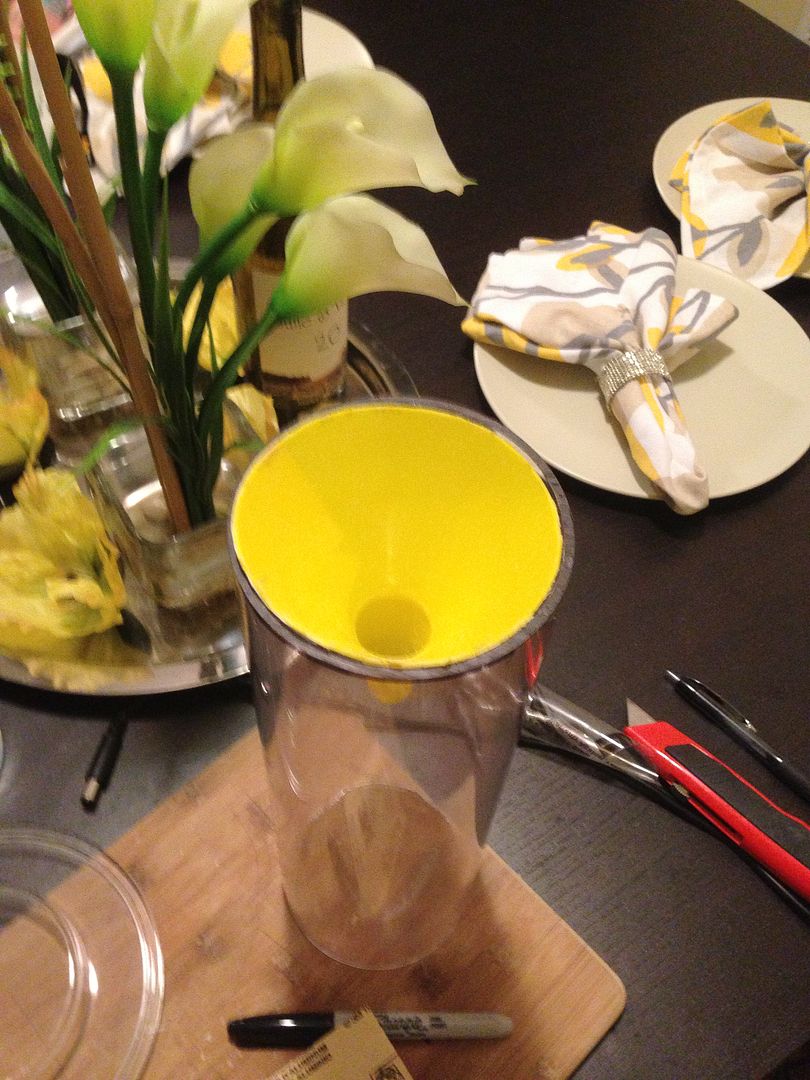
We then used some Krylon Chrome Paint on the yellow funnel to make it as reflective as possible. We cut out a clear plastic disc to act as a cover and sealed it using hot glue.
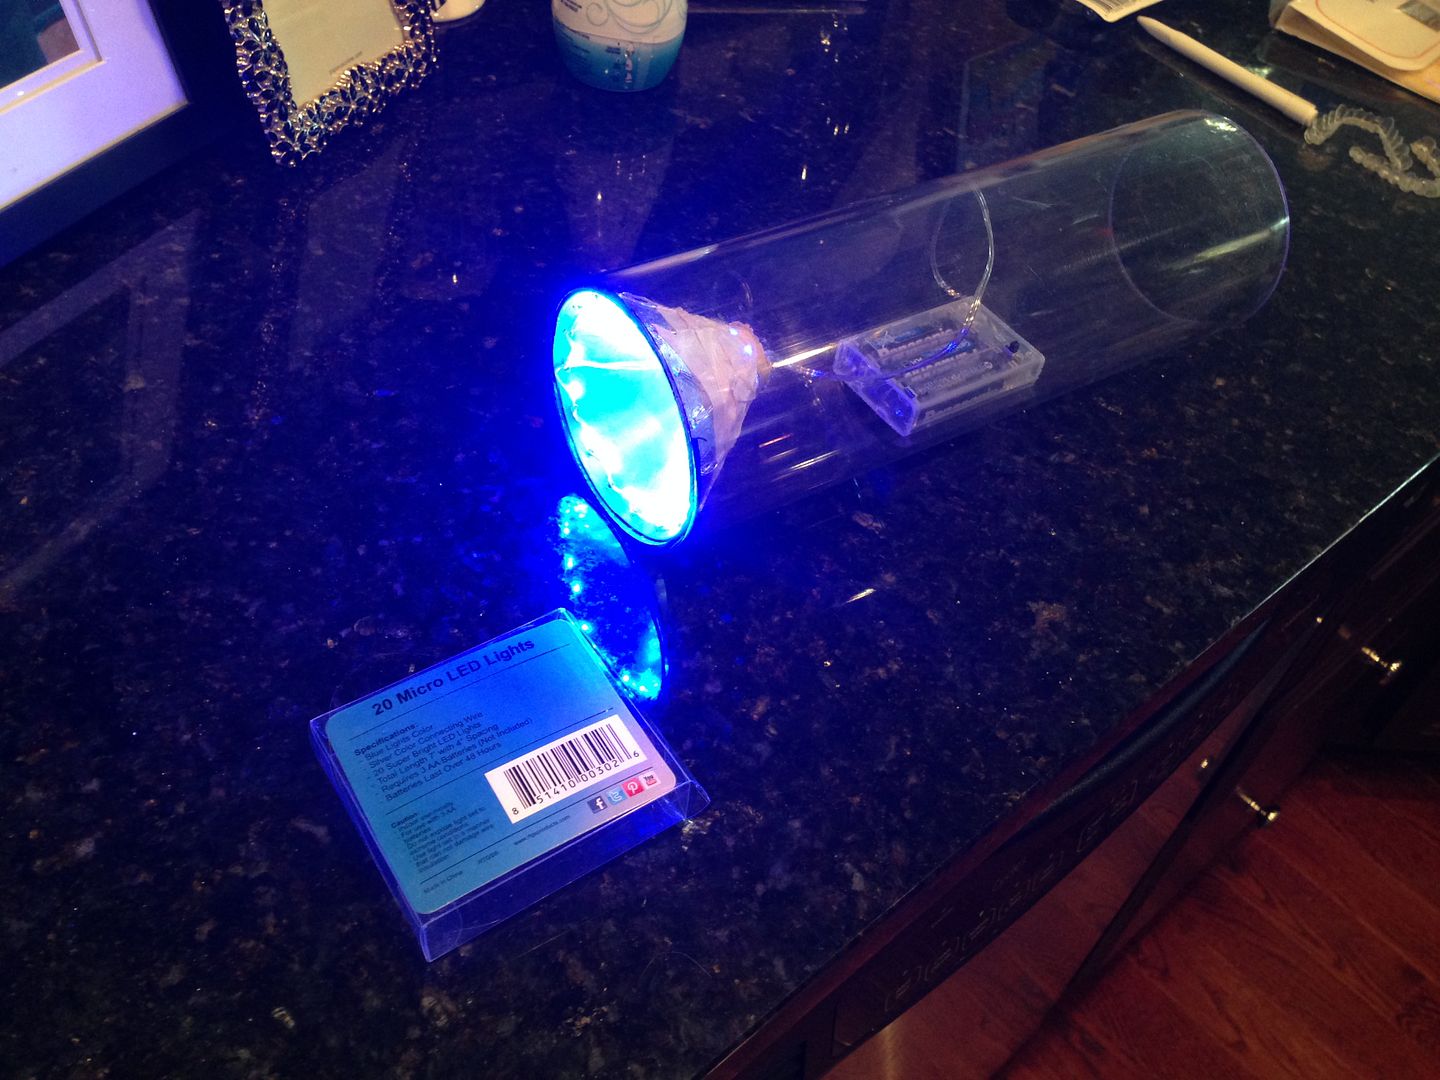
We bought these $6.25 Blue LED String Lights and strung them on the inside of the painted funnel.
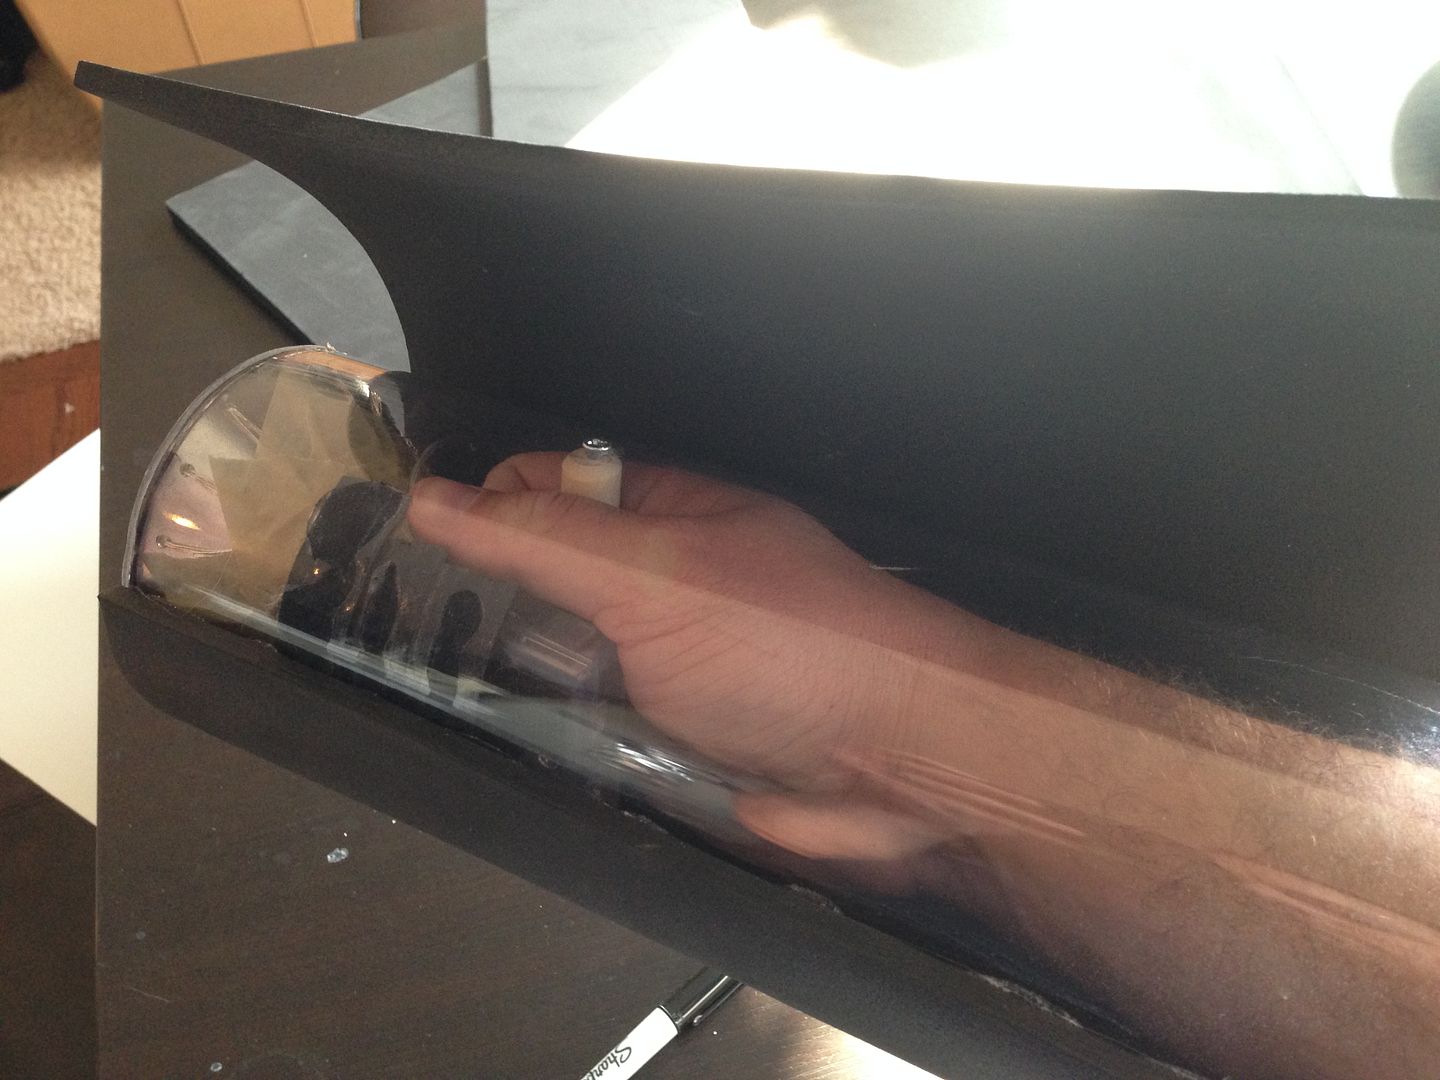
We then took some costuming foam (1/4" i think) and wrapped the plastic tube so that it would be the correct length. We used hot glue to make everything stick. At the same time we put in a piece of wood to act as a handle. We used velcro to make the battery pack stay put.
We then used some 1/2" thick foam, additional layers of 1/4" foam, and cut out some designs to give the cannon more "character"
- - - Updated - - -
:::The Chest & Shoulders:::
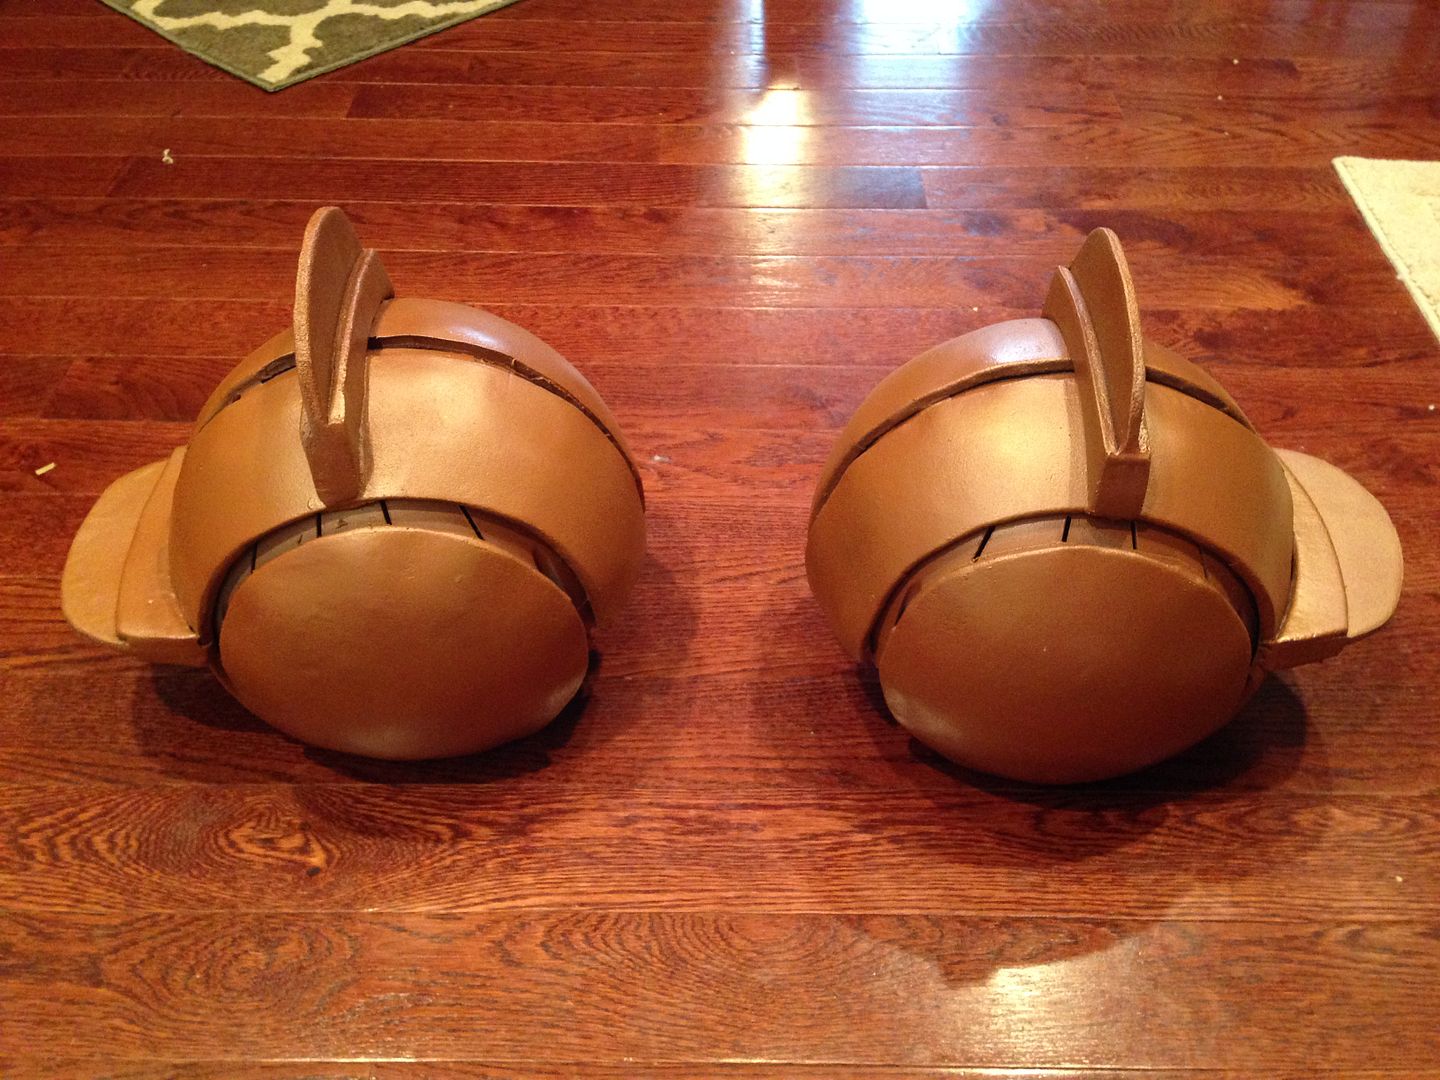
We never really thought about how hard it is to A) obtain/make 10" perfect spheres and B) do it cheaply. You can buy solid foam balls at JoAnns for $17 each but you would then have to coat in resin and fiberglass cloth, sand, bondo, sand, bondo, etc. to have the structural stability needed. One idea we cam across was to buy 10" hamster balls off amazon for $12. We figured we would hold off on this until after we got the helmet done as this would give us time to A) do more research, B) experiment with foam, C) get the quote from the Cosplayhouse.com about the jumpsuit.
Ok so we think it's a bad idea to try and learn a new technique on a costume you have never built before....but that's how we have had to learn everything else lol.
We recently heard of Worbla (available for sale here) which is a type of thermo plastic. You can heat it, it will becomve very soft and plyable and then hardens as it cools. It has an adhesive side too. Honestly, the more we use this stuff the more we will never go back to using sintra. It's light, sandable, can take any shape, covers foam very well, requires only a heat gun and scissors (no dremmel or saws like sintra) and can creat some amazing detail. Here is a sample picture of a complete costume made of worbla.

You can't get that detail with metal, foam, or sintra.
Do youself a favor, buy a small shet of this, and play around with it. You can make anything from knives to bras, wonder woman costumes to iron man suits. Way easier than shaping hard plastics or metals. Anyways, that's my sales pitch.
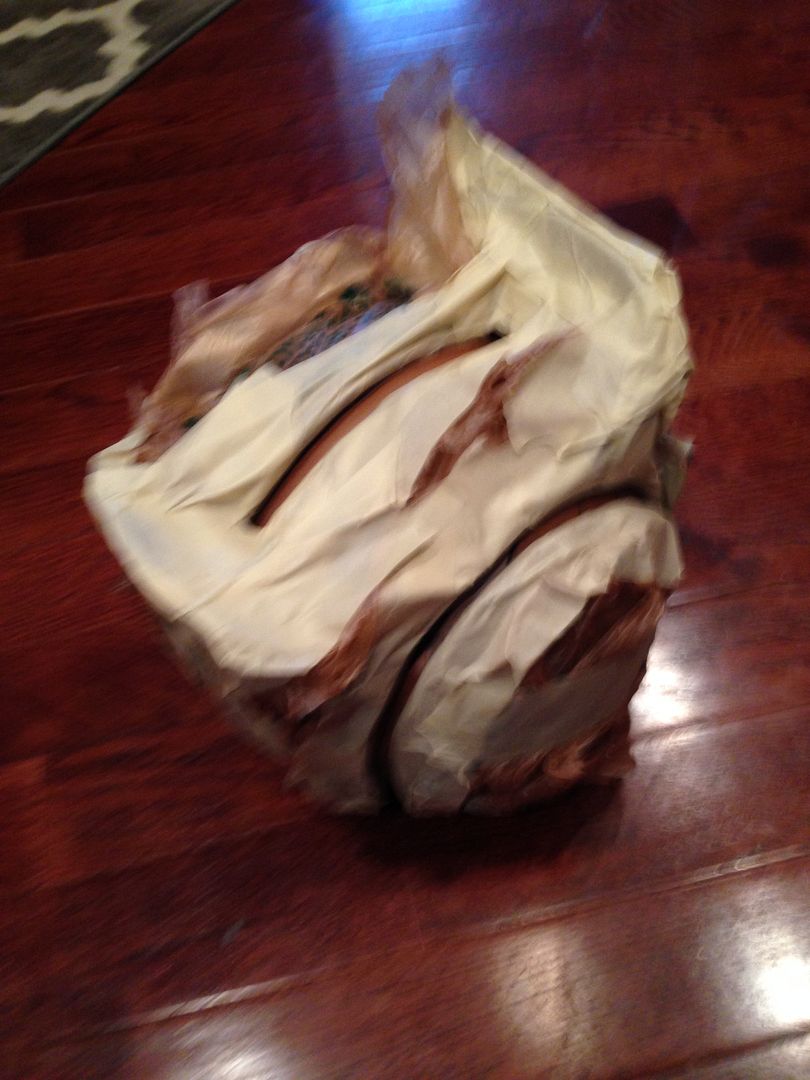
So we took the hampster balls we listed back in the original post and tried many ways to get the foam to lay flat. The problem is, flat foam does not want to lay evenly on a sphere. Worbla solved that problem easily. First we marked off on the hampster balls where we wanted to lay foam/worbla and where we wanted to leave the "trenches." We then cut out foam pieces that would go on the ball. This took forever because you naturally want to cut straight strips but you have to actually cut arches. Math. whatever. We then covered those foam pieces in worbla and stuck them to the ball. You have to keep heating the worbla and letting it cool to ensure it hols the shape right. Sometimes it will form bubbles or air pockets. Just price them with a needle or exacto knife and smoth them out. Easy.
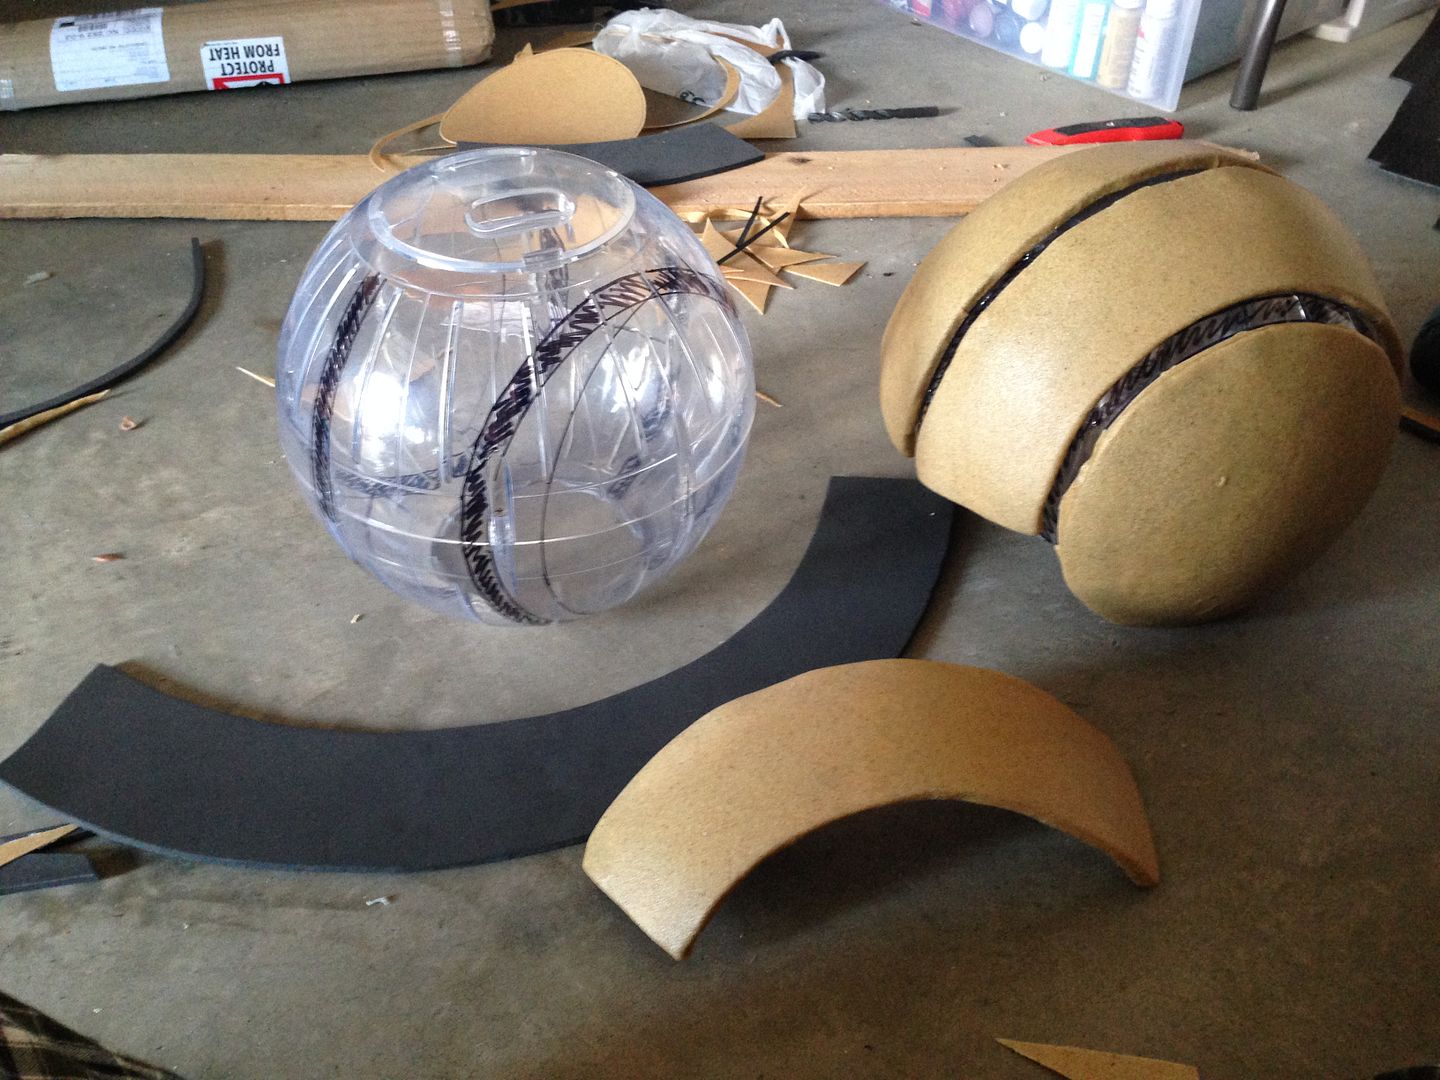

Those things are solid. Just as strong a 1/8" sintra.
We did a lot of work yesterday. We took posterboard (the kind with the lovely gridlines) and recreated Jenni Kallberg's chest plate as best we could. Once we got the sizing down we then traced and cut it out of 1/4" foam. We also did the same thing with the biceps and left gauntlet. For the chest plate this foam will act as a base.
We took some really thin translucent plastic to act as the "windows" and taped the LED light kit in place.
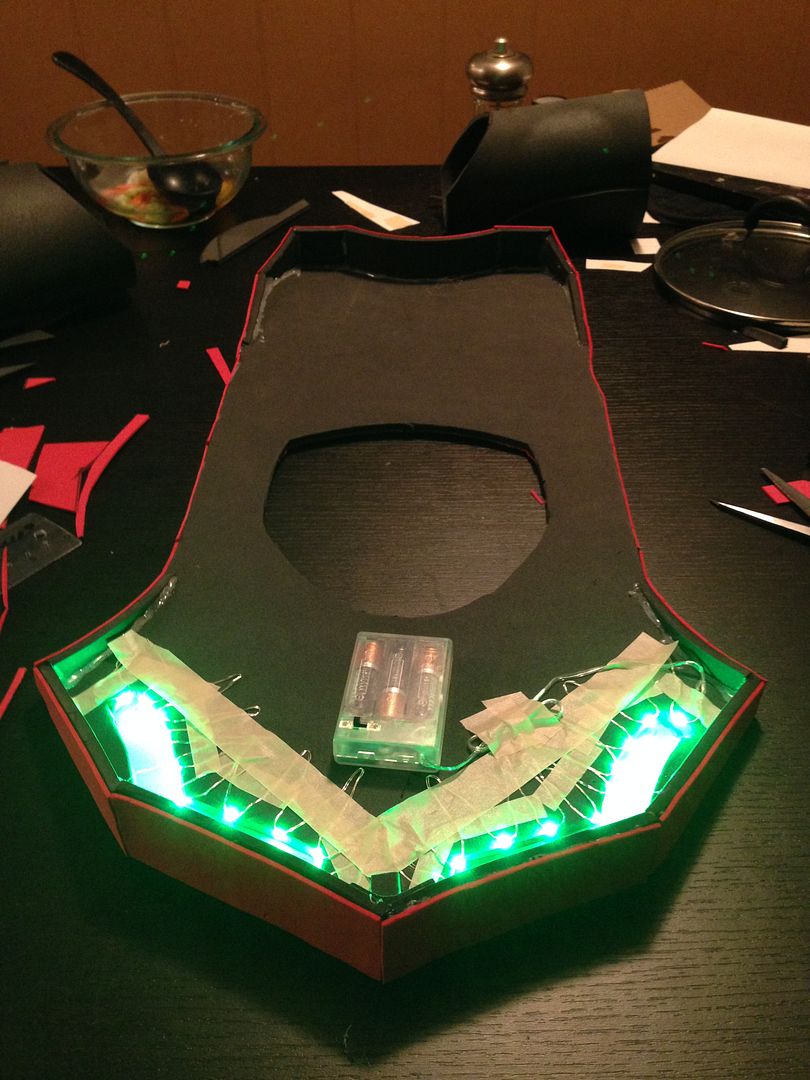
Then we took some read 1/16" foam sheets from Walmart, traced out the chest plate again, cut them into little pices, and then hotglued them to the foam base. We love the way it turned out.
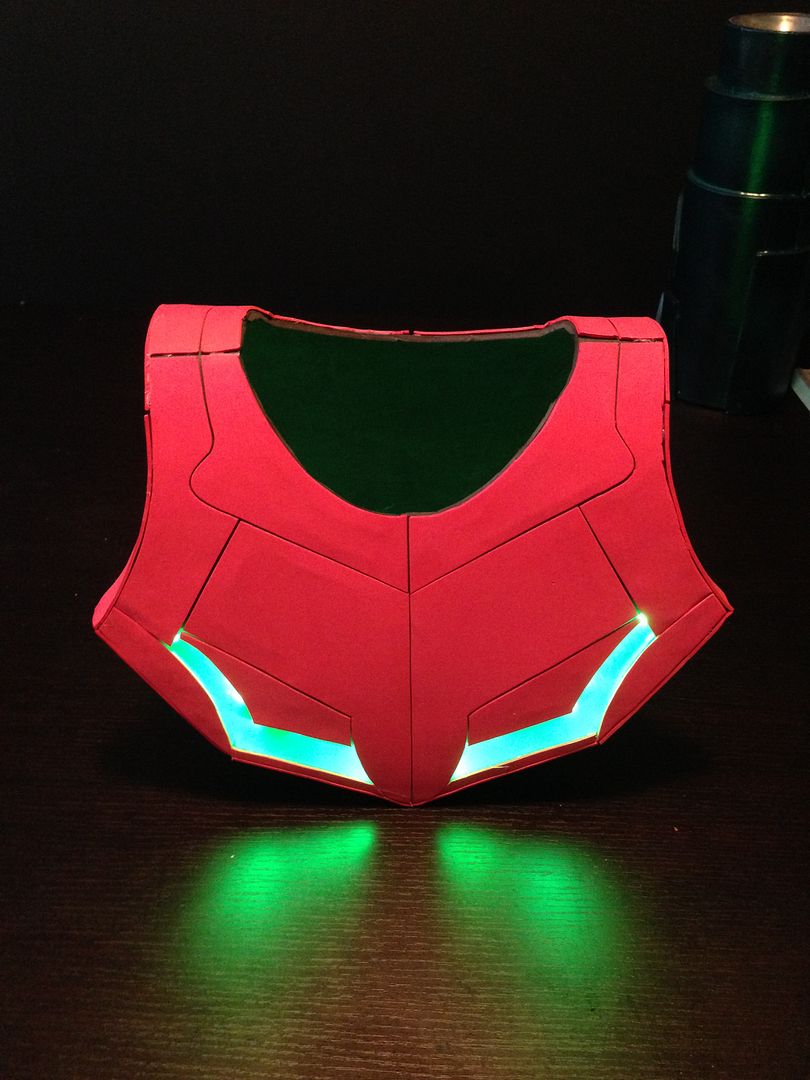
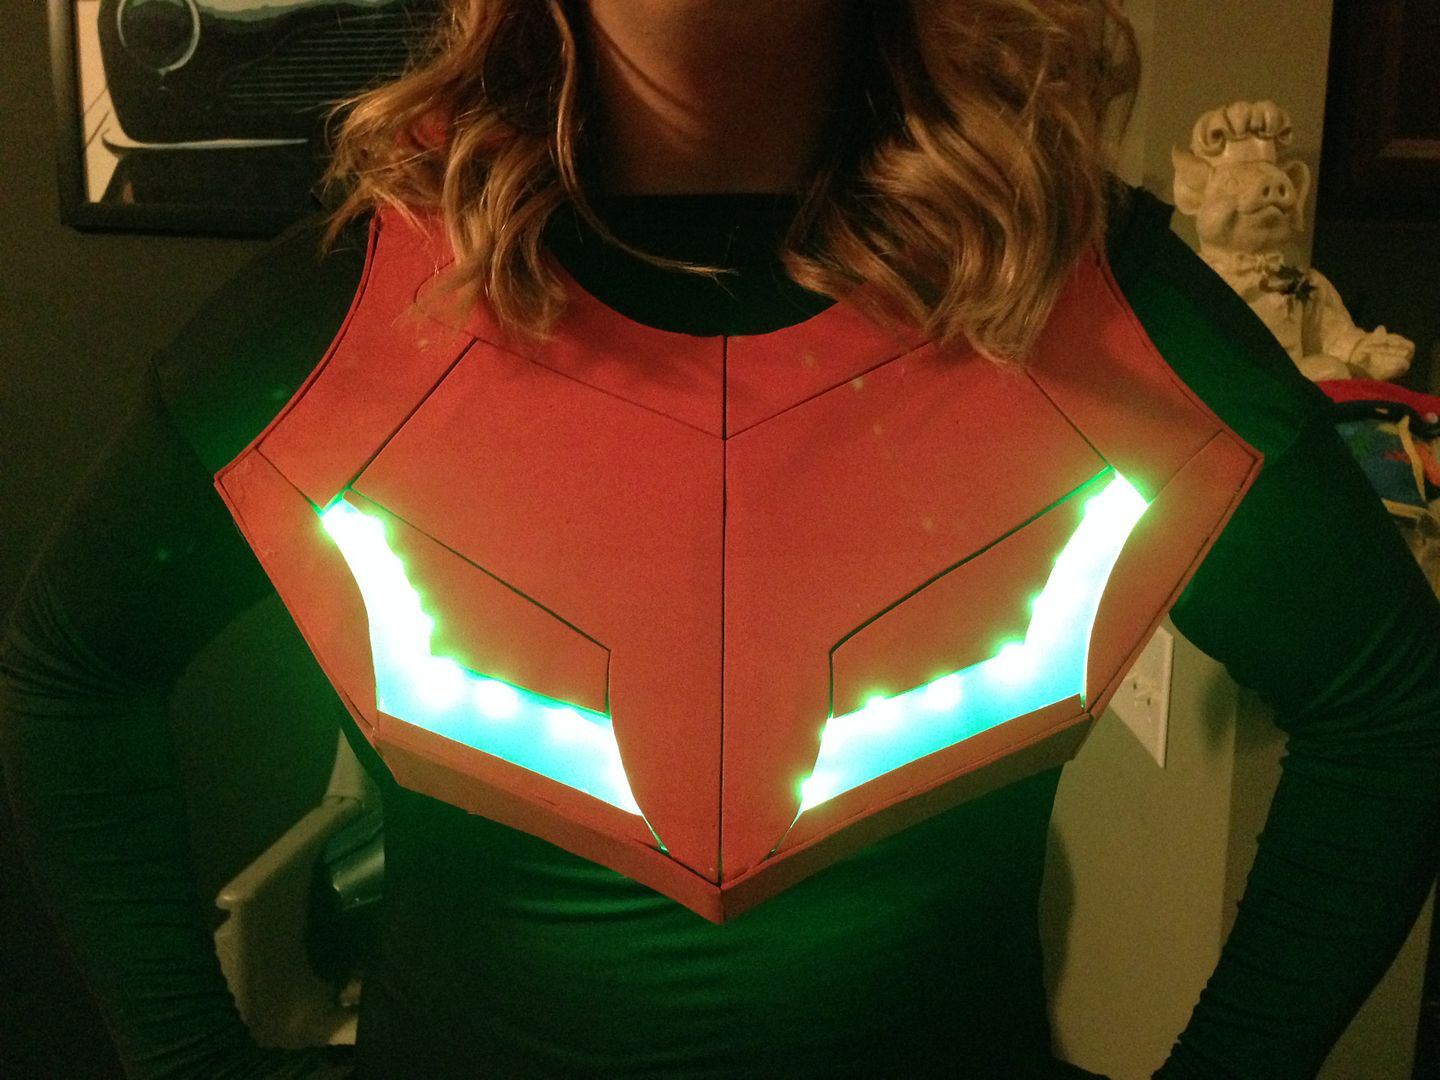
Time for a test fit
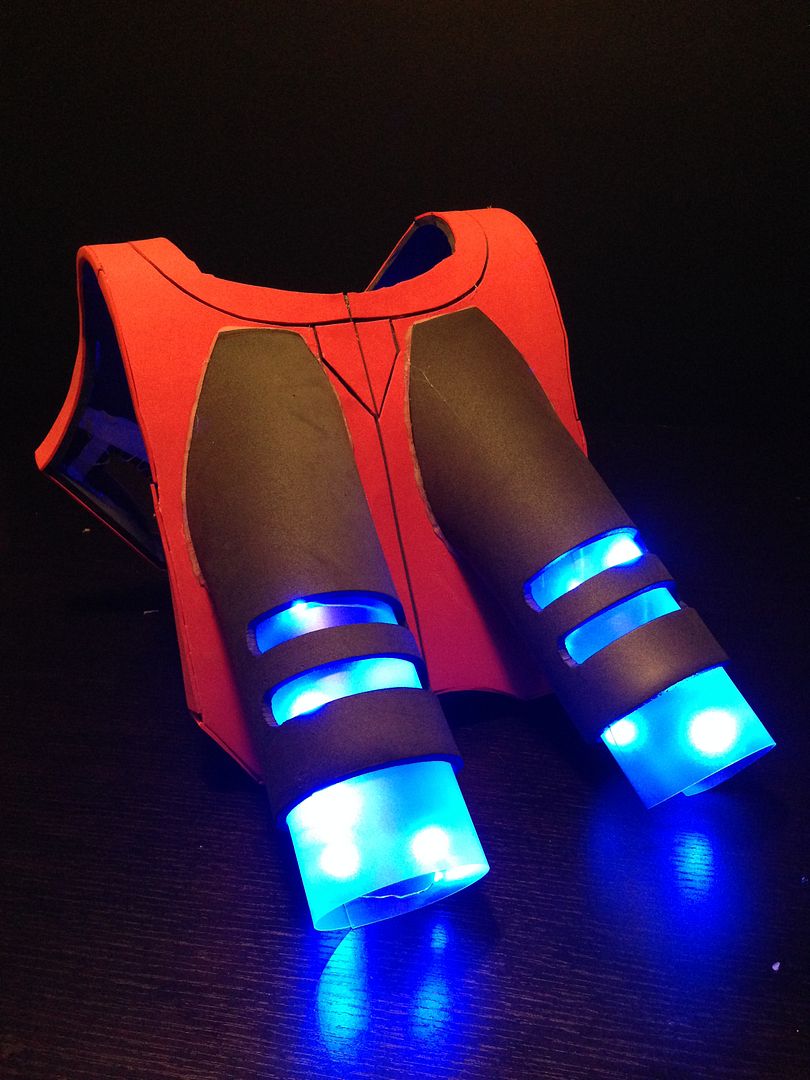
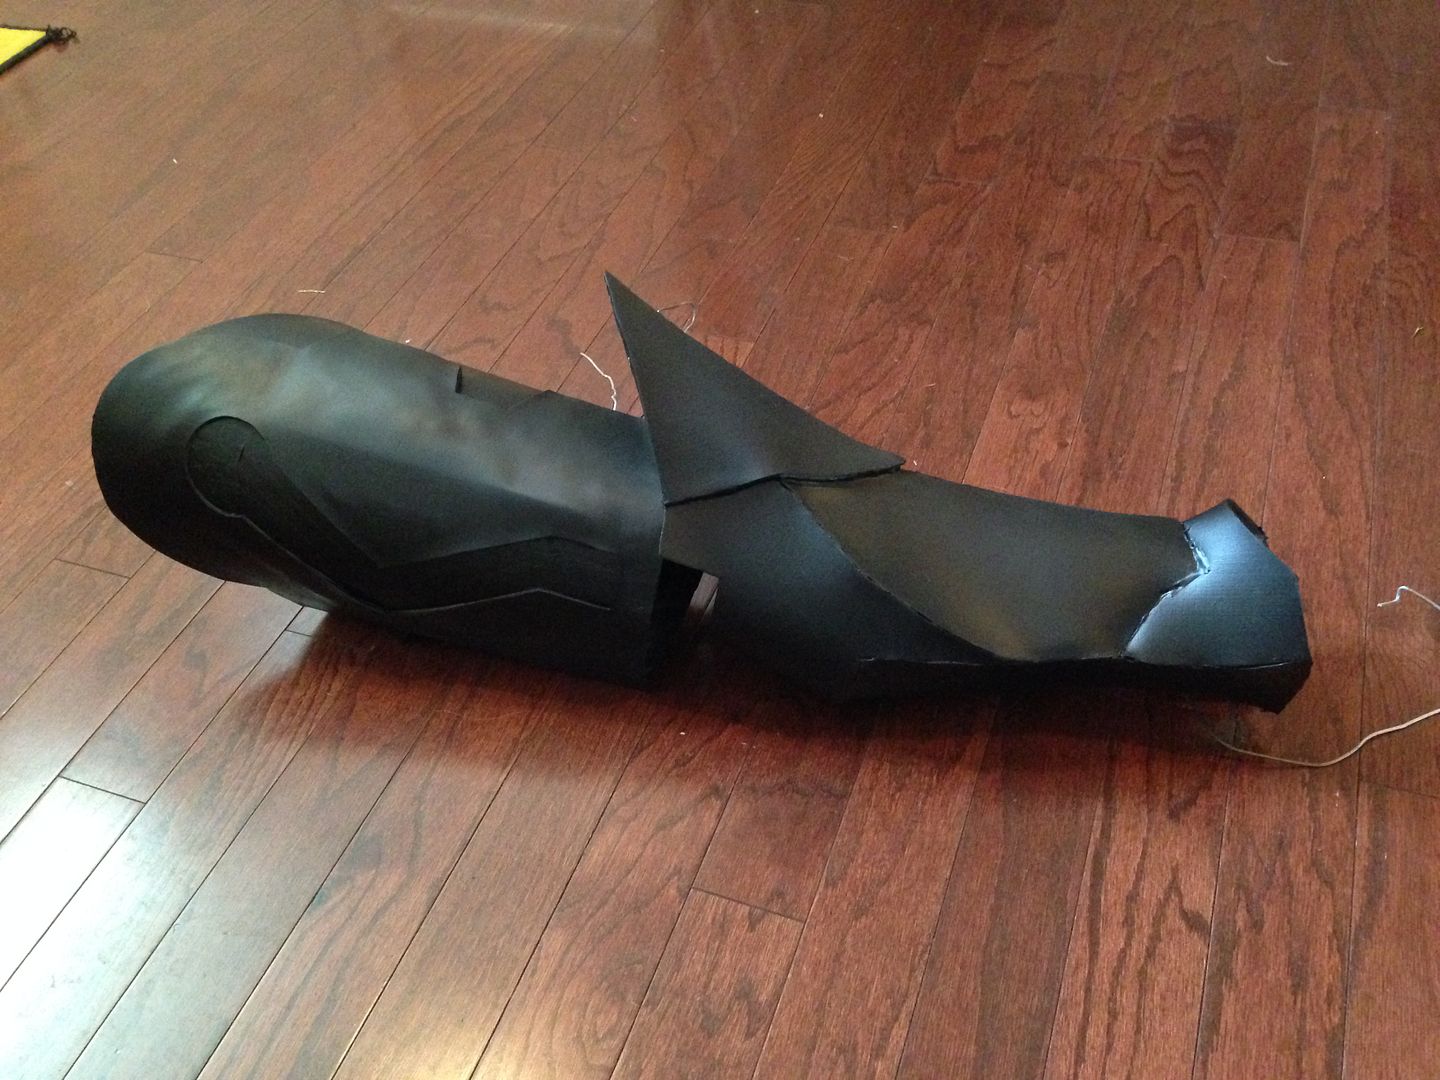
Hey, let's add a jet pack!
Hey, we have extra translucent film laying around.
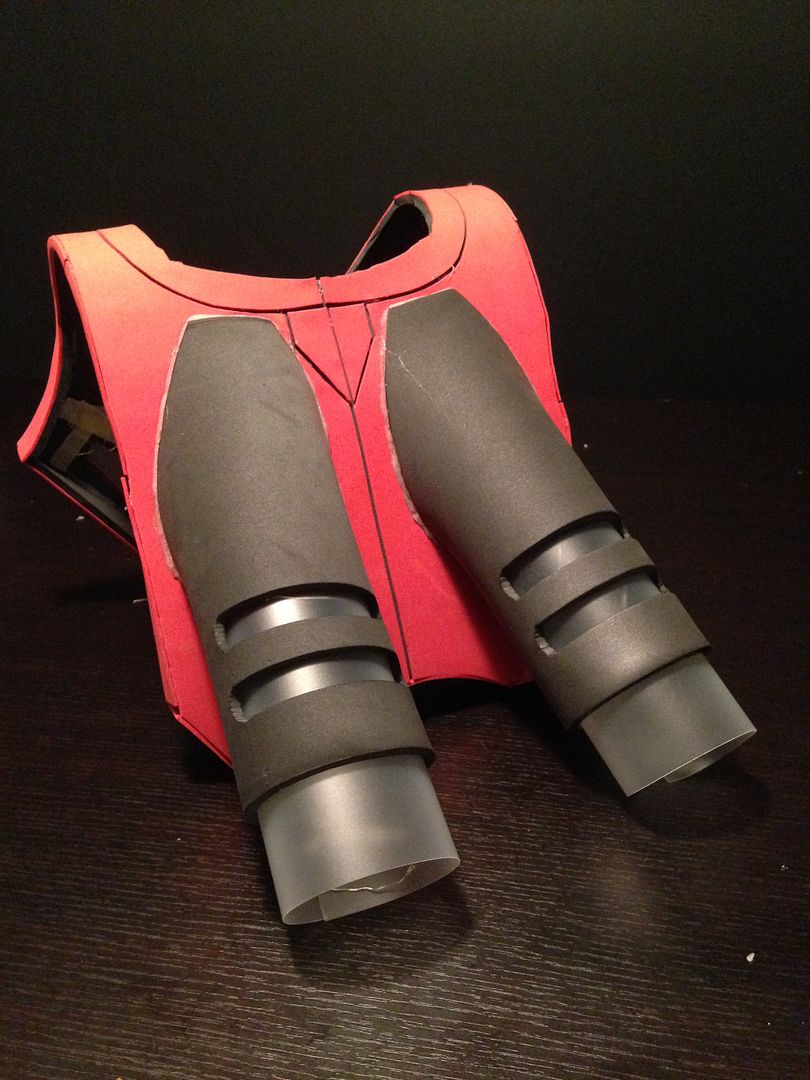
Hey, we have an extra blue LED kit ($6 on amazon) laying around. Beautiful.
8/11/2014 Update
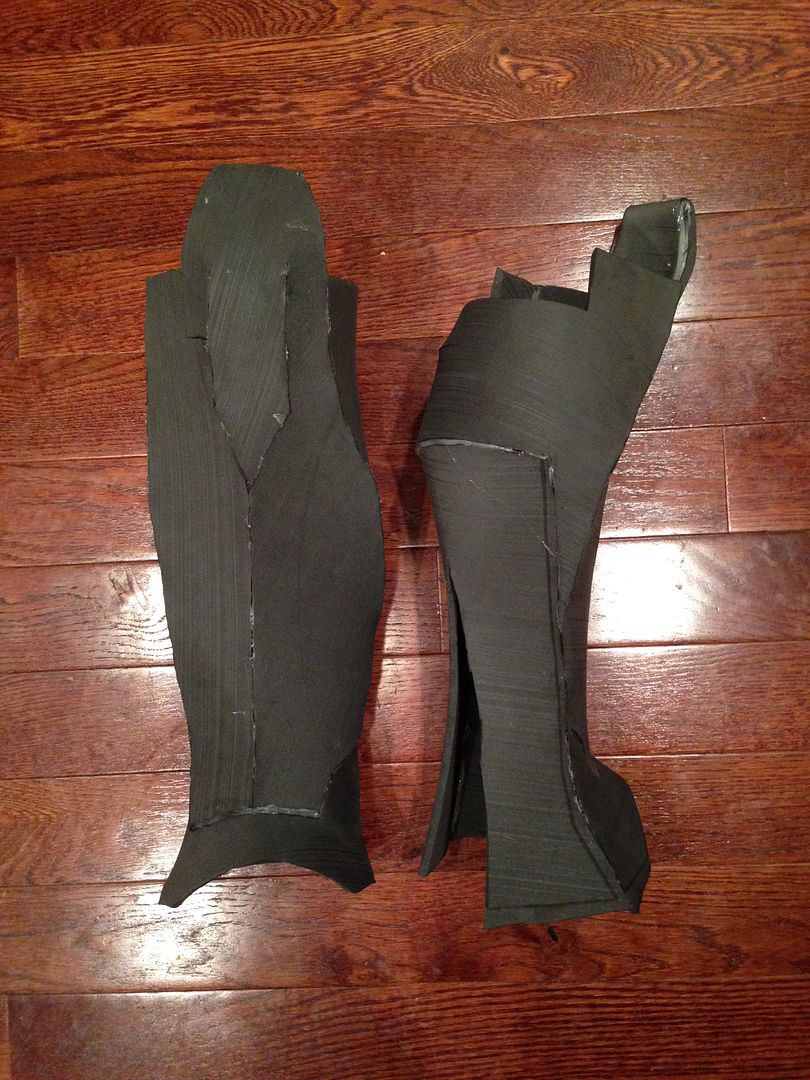
So we can make the thighs no problem and will be doing them this week. The problem will be the shins. The solution? I found a thread on the Replica Prop Forum by JFcustom that list's a ton of pepakura files that have been tailored for use with foam instead of paper. I scrolled down to find some shins that look Metroid-ish. I went with BSD's Rex Phasell.

We like how they turned out.
Finally started painting! For the copper/bronze we will be using Rustoleum High Heat Aged Copper. For the yellow we will be using Rustoleum Metallic Spray Gold Rush. For the red we will be using Rustoleum Colonial Red (Gloss). We put 4 thick coats of Black Plasti Dip over everything before painting (for the shoulder bells, before the Plasti Dip we did a thin layer of bondo on the worbla, sanded, 1 layer of primer, sanded, another layer of primer). We didn't like how "brown" the Aged Copper turned out so we barely misted (1 pass quick pass from 12" away) some Krylon Premium Metallic Gold. Now that's sexy.
Next we taped off the shoulder bells so that we could lay down 2 coats of Rustoleum 2X Flat Black.
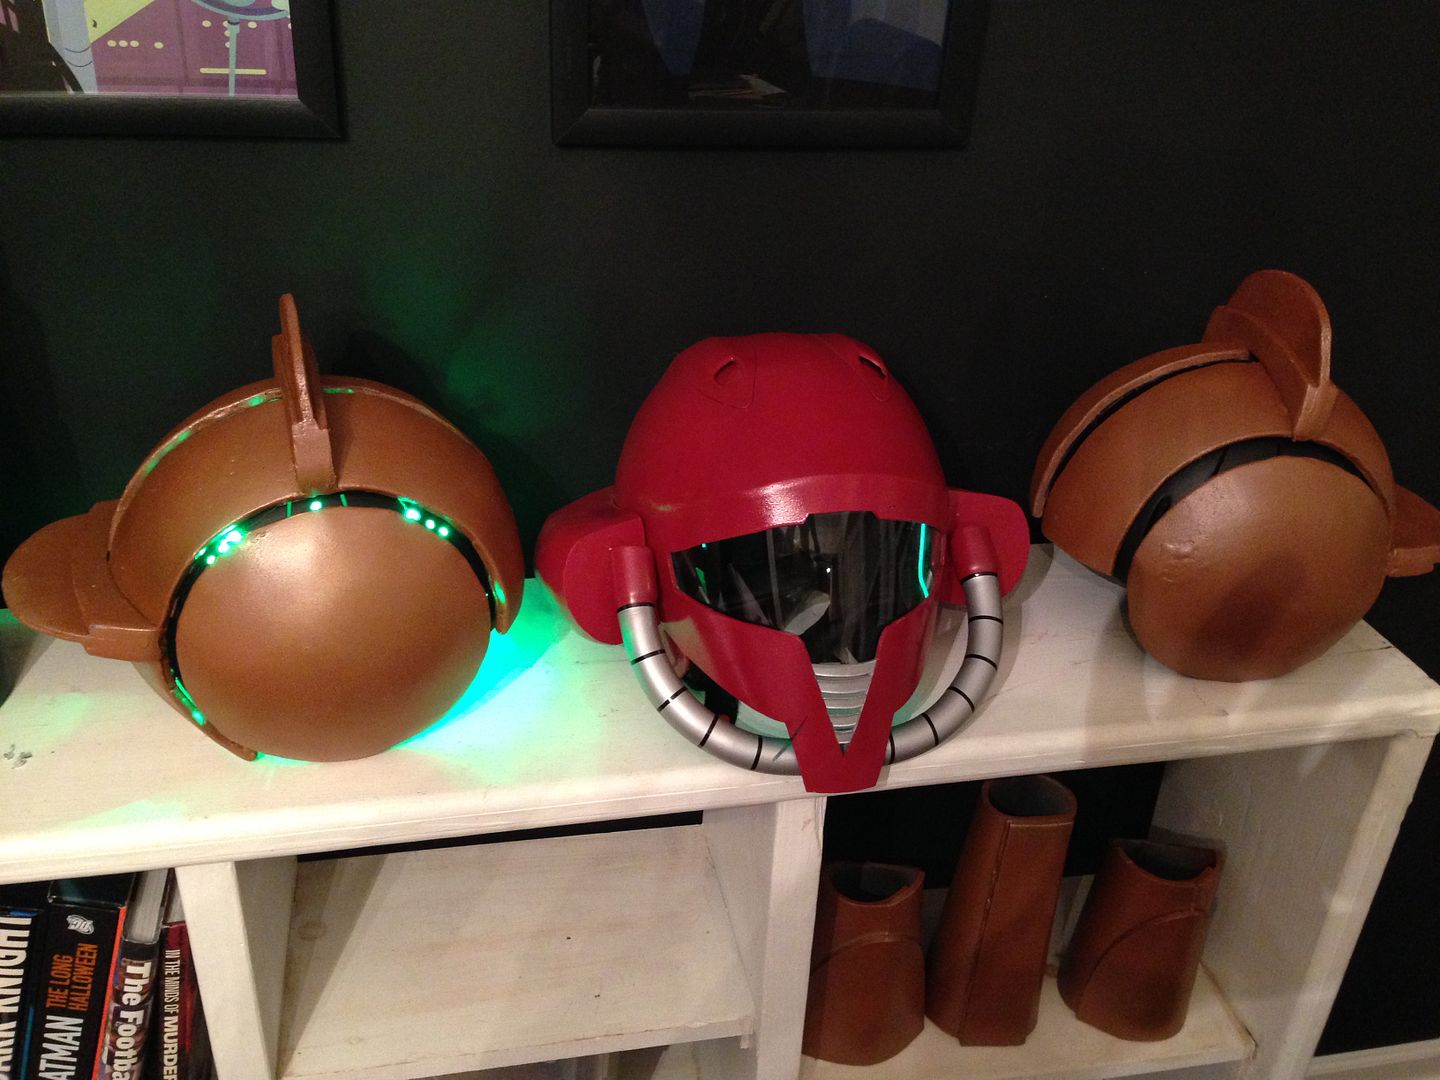
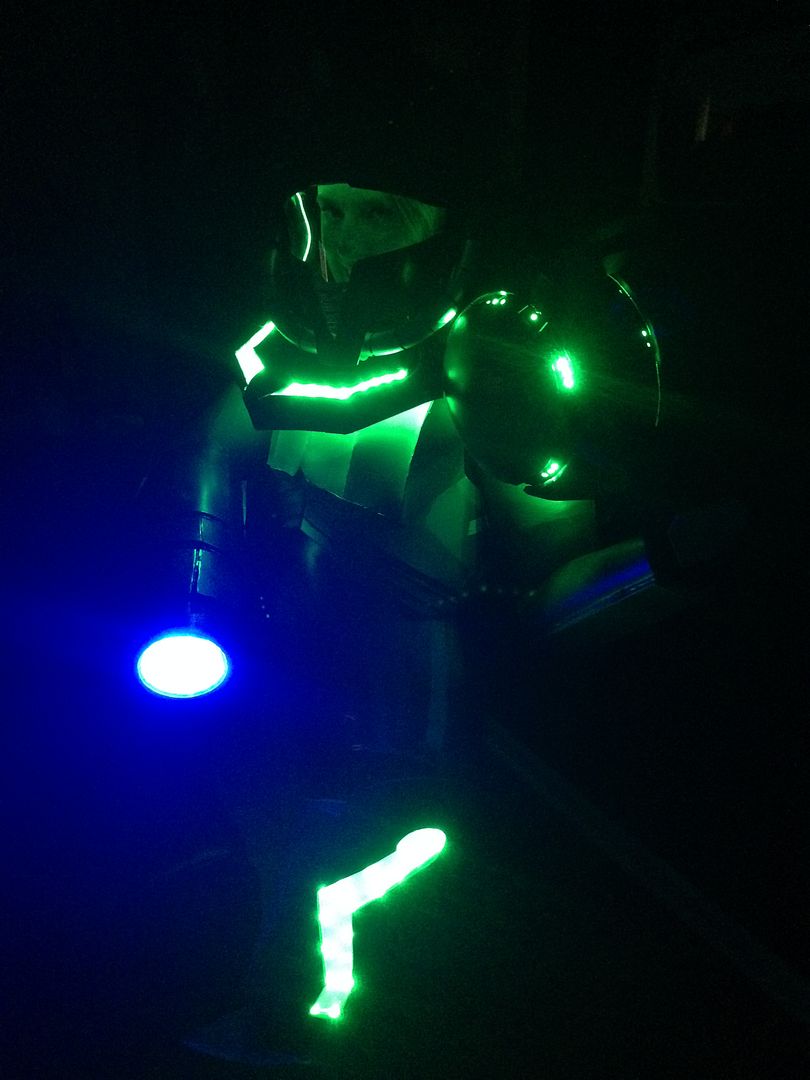
We then installed 2 Green LED Light Kits in one shoulder bell. We then ordered 4 more light kits on Amazon (2 for the other shoulder bell and 1 for each thigh).
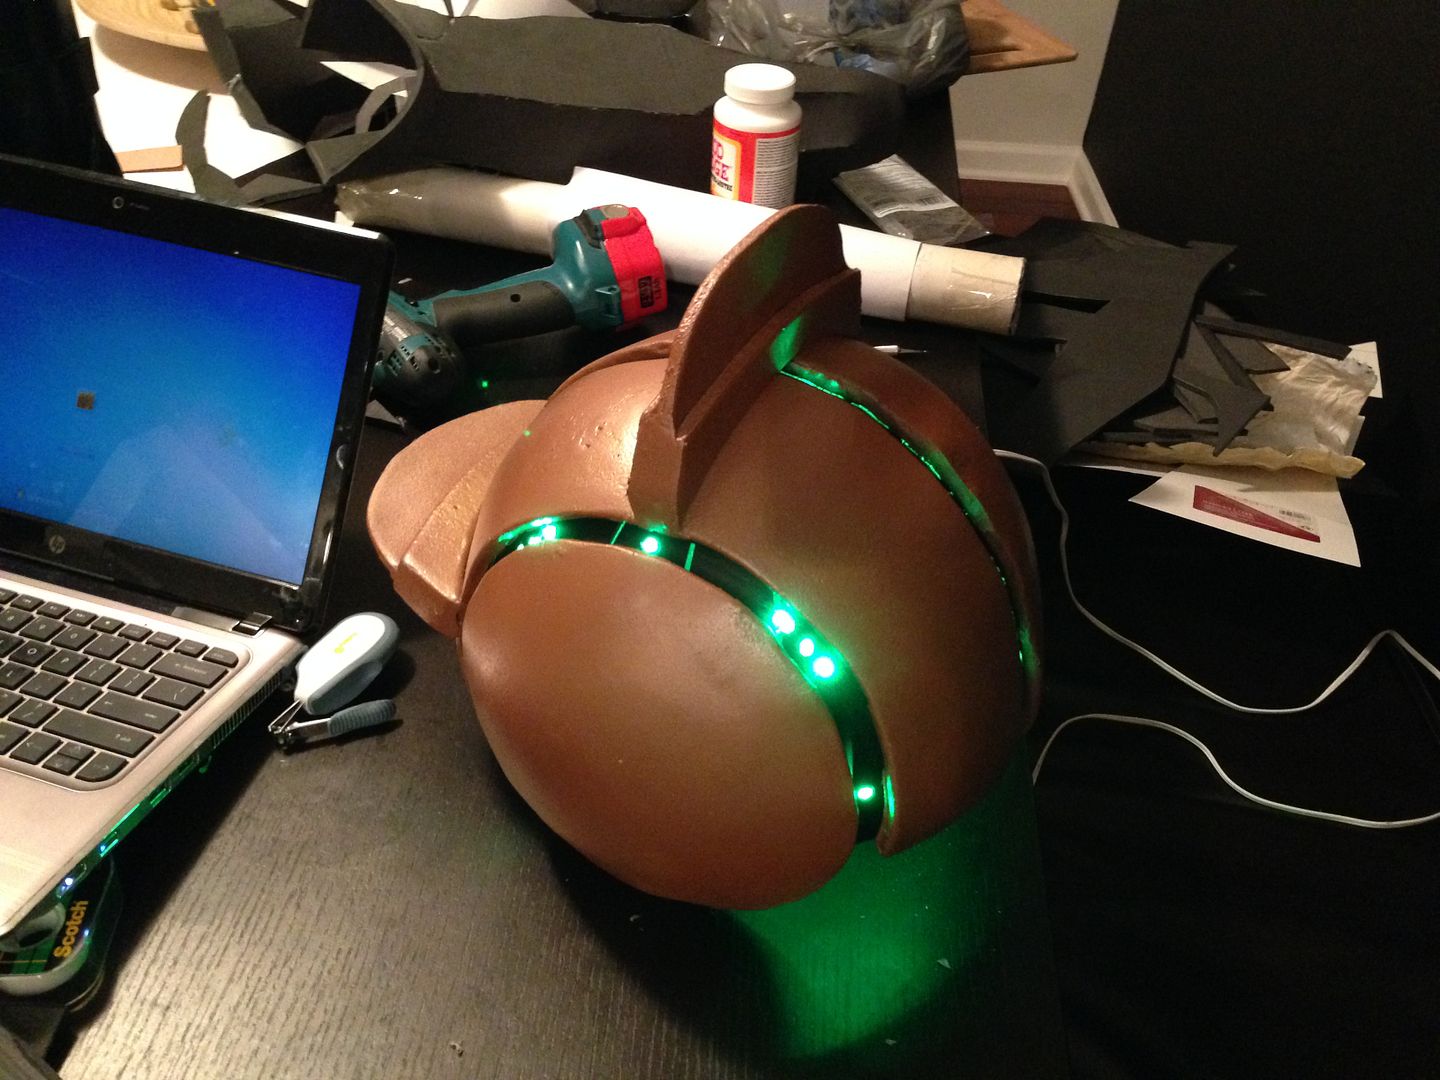
Here is a pic the shoulder bells next to the helmet. You can also see the biceps and the left forearm on the shelf.
8/18/2014 Update
We think you guys are going to like one of the pictures in this update ;D
So we like the shins that were on BSD Rex Phasell's foam files, but they needed something to make them less Star Wars-y and more Metroid-y. We cut off the knee guards and added this pointy things to mirror Pixel Ninja's design a little more. Also, we built out the thighs added the LED's and transparent window, taped everything off, and put 3 coats of plasti dip.
So we have been putting off doing the chest as it is like the 2nd hardest thing on the suit (the first being the abdomen). Since we are not tailors, have never build anything this complicated, etc. we searched the interwebs for a solution. What we settled on was good ole BSD Rex Phasell's foam files again. In this pic the foam looks gray/primered for some reason (it must be the lighting?).
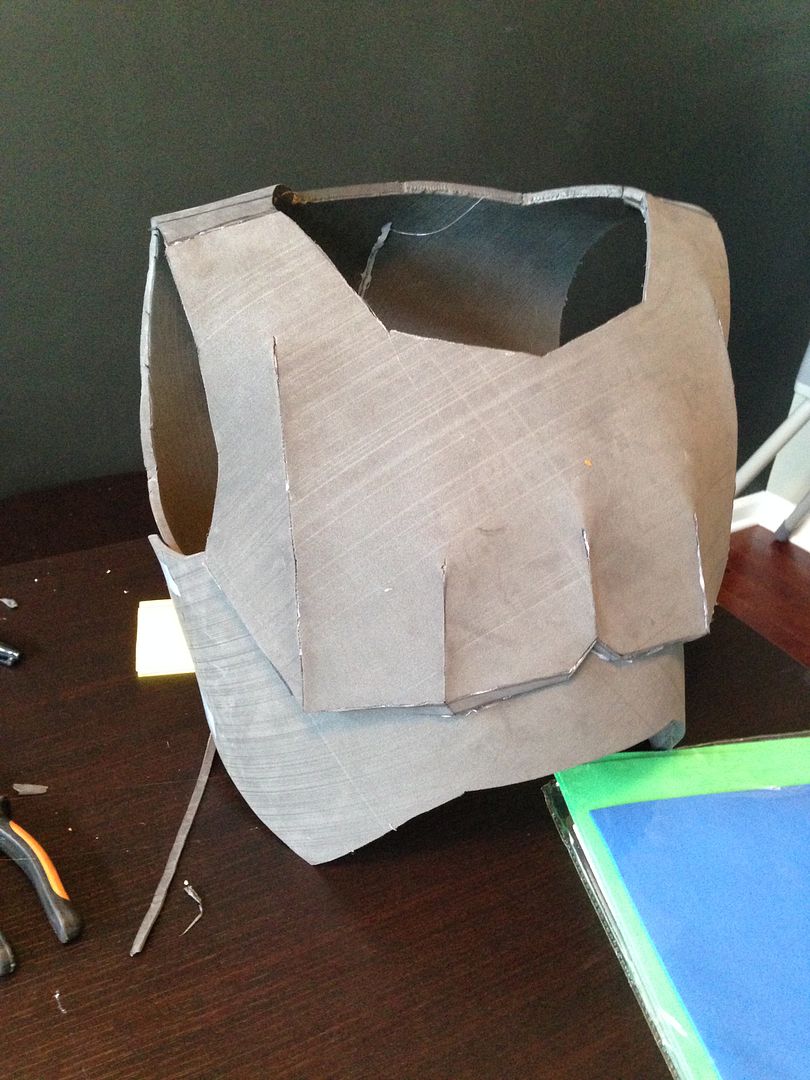
We then took very thin craft foam and cut strips to make the layers/rib-looking-things.
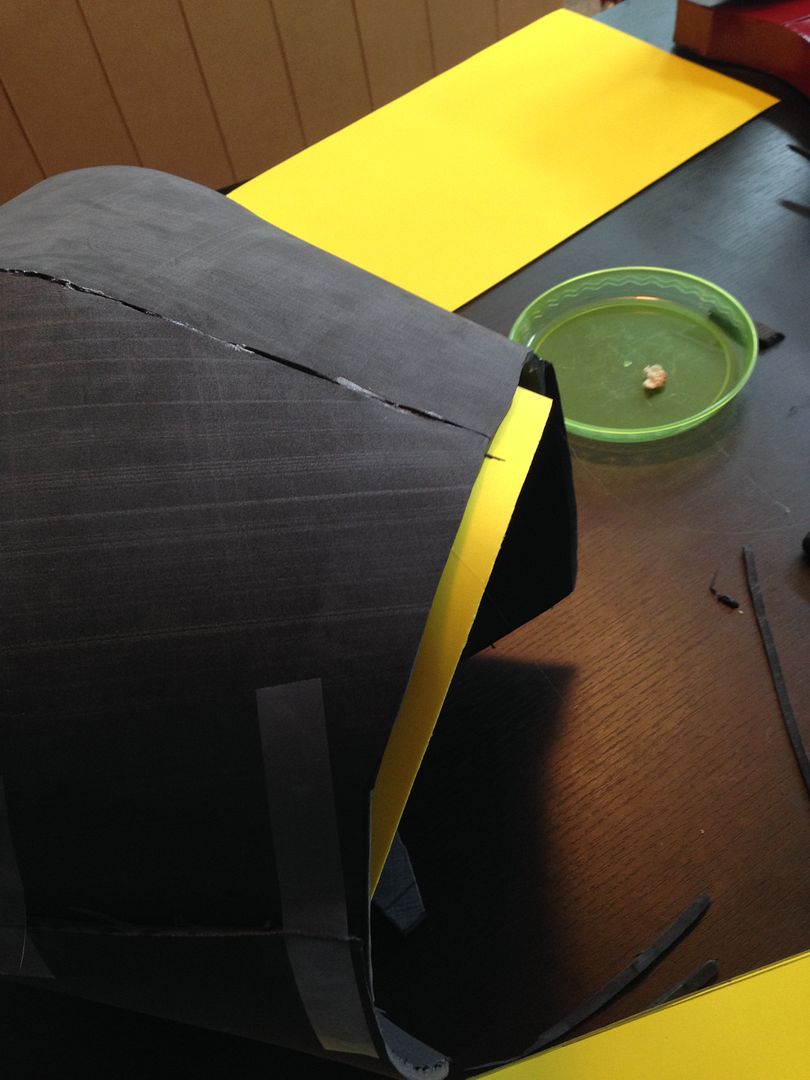
Something just wasn't looking right about the chest. Again we needed to do something to make it less Star Wars-y and more Metroid-y so we shortened the abdomen area to make it less angled. We then added the layers of craft foam for the front ribs.
Well that's it for today.
Oh wait. Almost forgot.
...
...
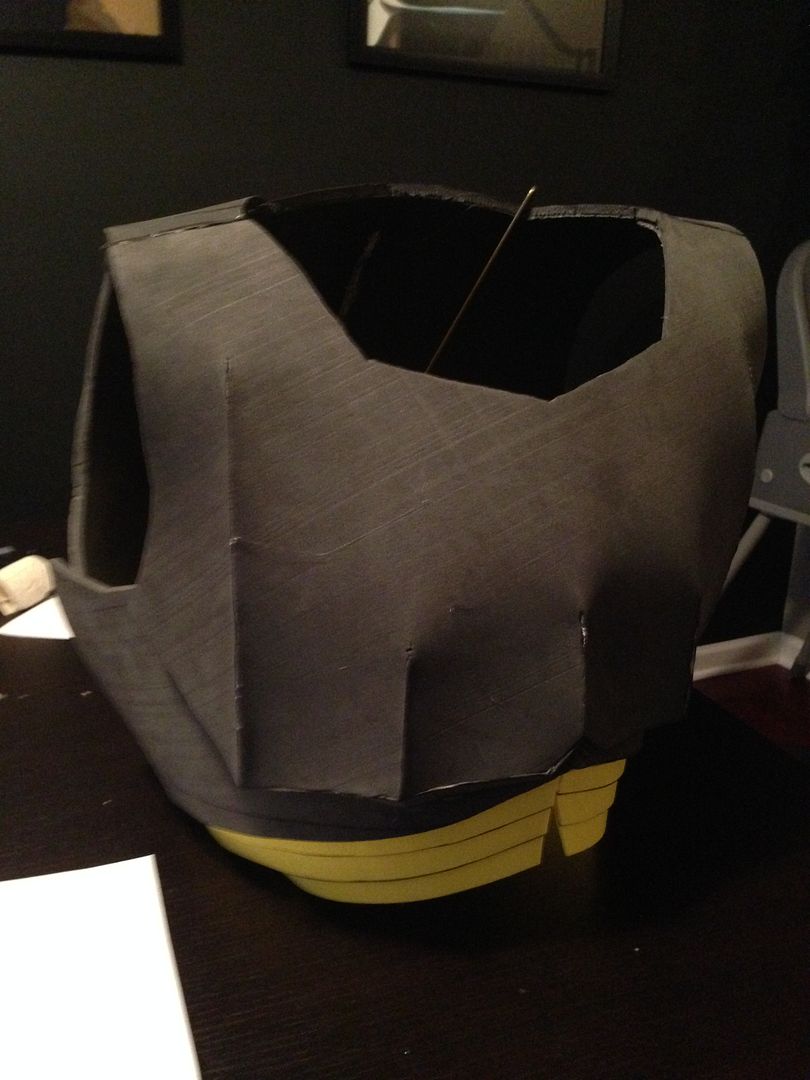
Test fit!
8/20/2014 Update
Another solid update. We got all of the suit painted (except the shoes). Again, for the copper/bronze we used Rustoleum High Heat Aged Copper and barely misted a tiny bit of Krylon Premium Metallic Gold. For the yellow we used Rustoleum Metallic Spray Gold Rush.
We just don't have the skill/time/resources right now to do the abs in foam AND make them look good. We have exactly 6 days left to get the costume ready for dragon con. We will do this on update 2.0 later down the road. Solution? We found a metallic gold dance/gynmastics leotard on Amazon.com or Discountdancesupply.com for $22.

We also just bought a pair of gold satin spandex gloves for $11 to cover her left arm. Hasn't arrived yet but hopefully it will look good. If It doesn't then we will just stick with the black gloves built into the morph suit.
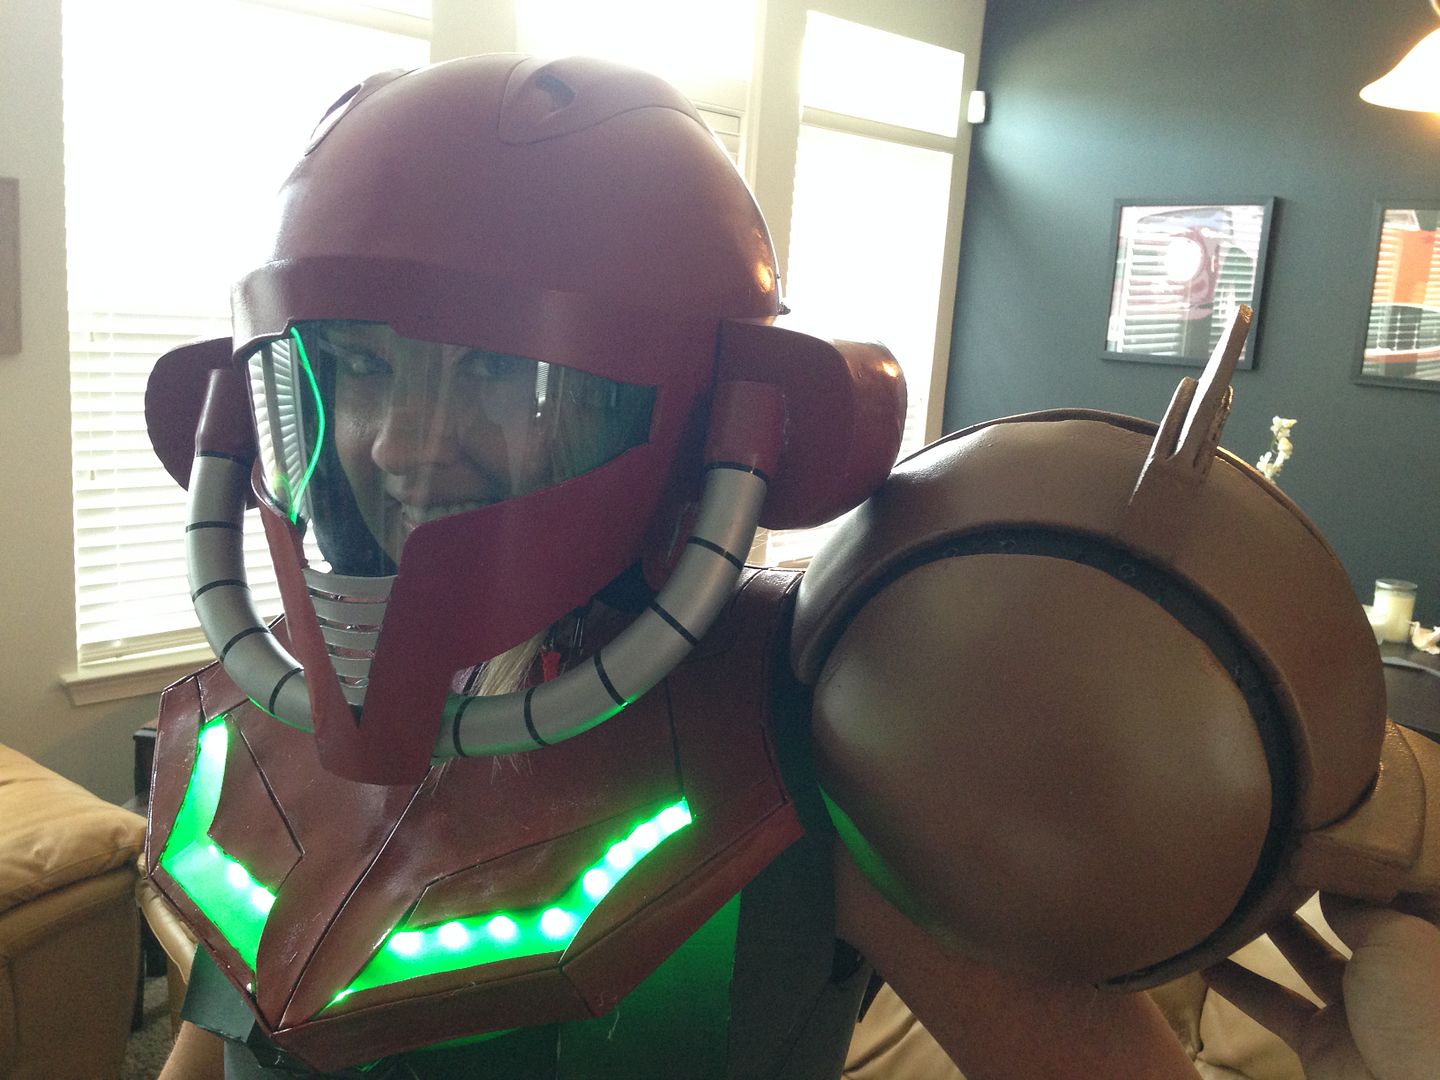
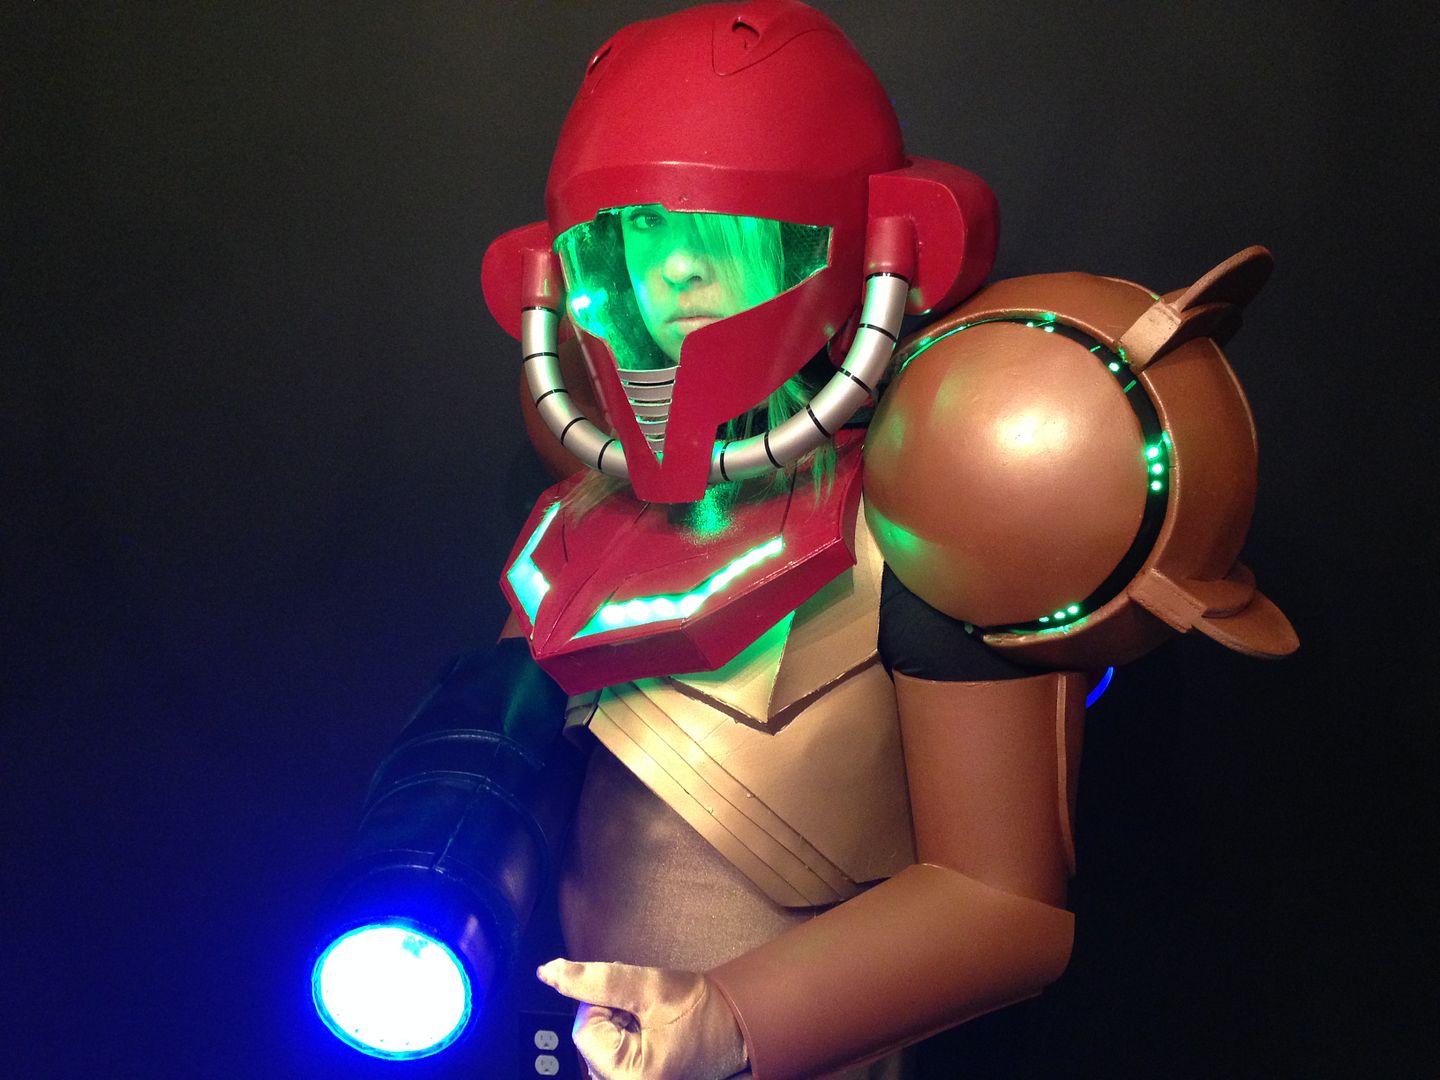
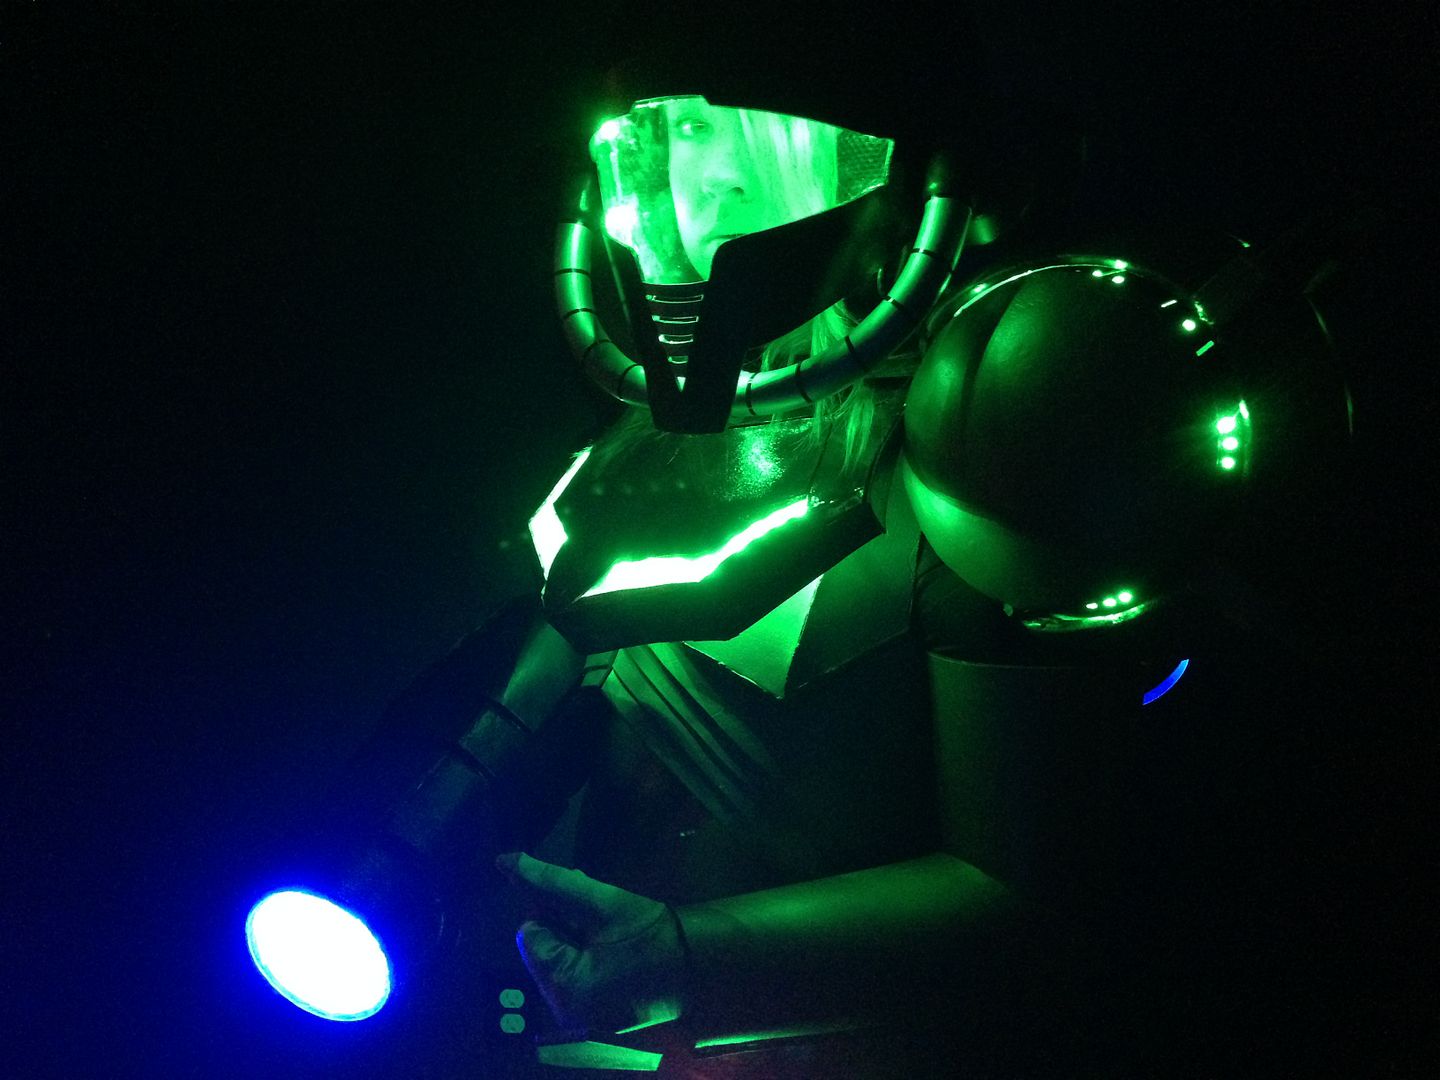
Since everything was painted, we figured it was time for a full costume test fit. This let us know where we need to mount the velcro, how to go about mounting the shoulder bells, areas that need to be reinforced to minimize wear and tear, etc. We also got to try out the lights. Did you know that this costume requires 30 AA batteries? I sure which I knew how to wire electronics so that I could get it down to a more reasonable amount lol.

Big Updates:
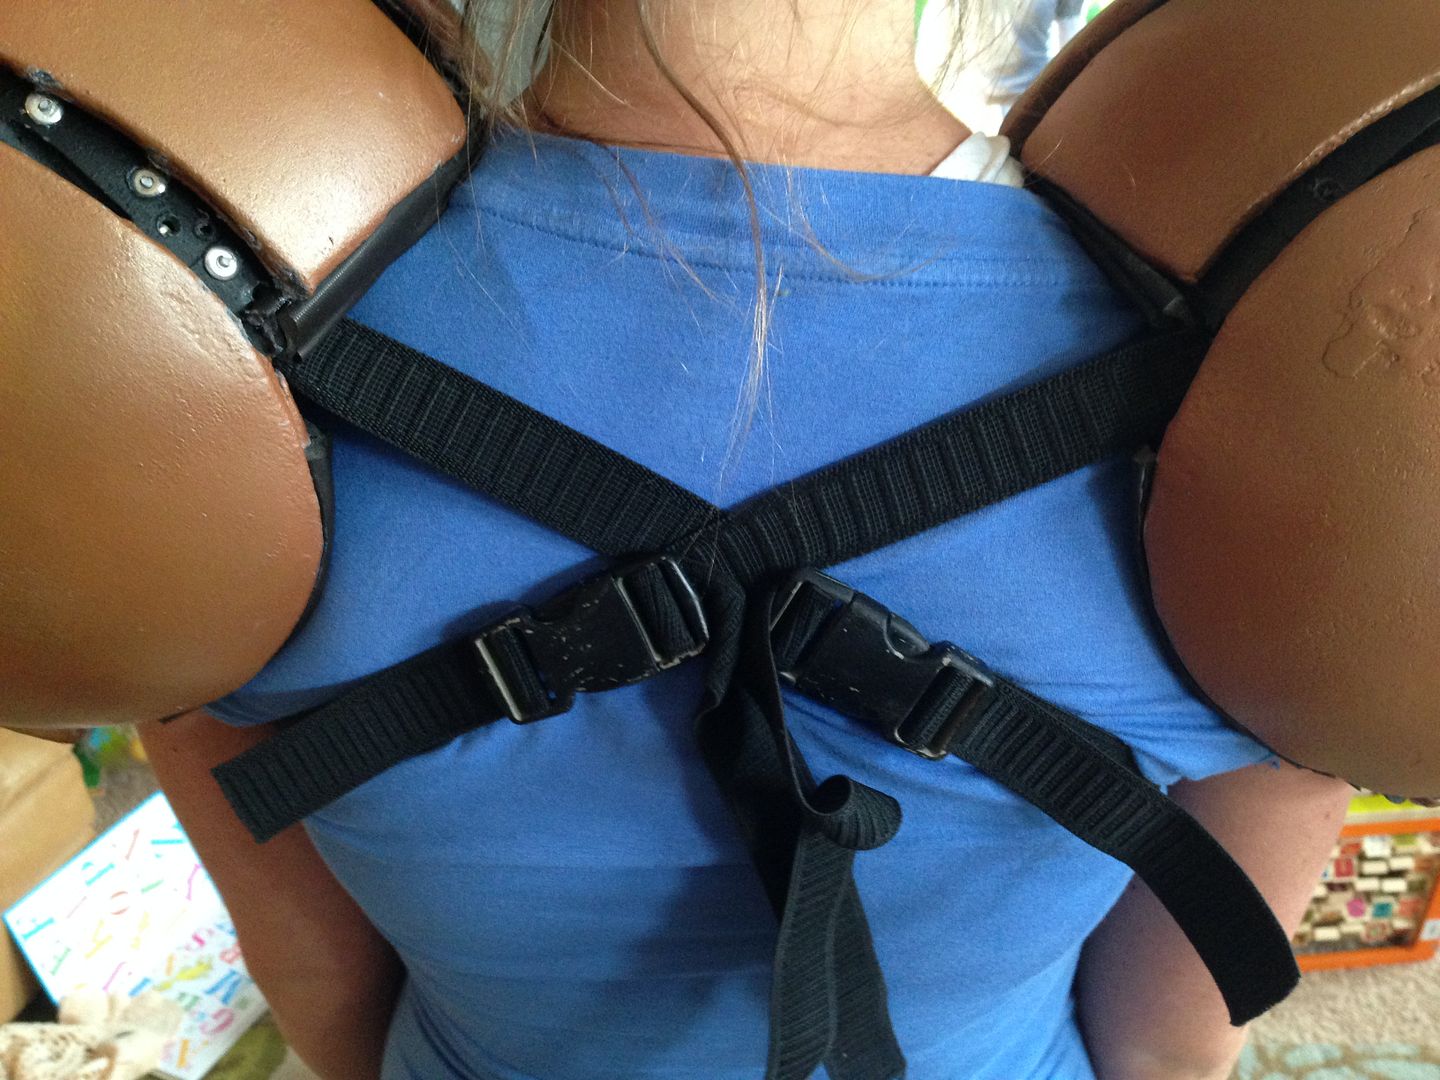
So we found a great way to make the shoulder bells. Get some 1" elastic bands, rivet them to the shoulder bells, and attach buckles so that you can adjust how tight they are.
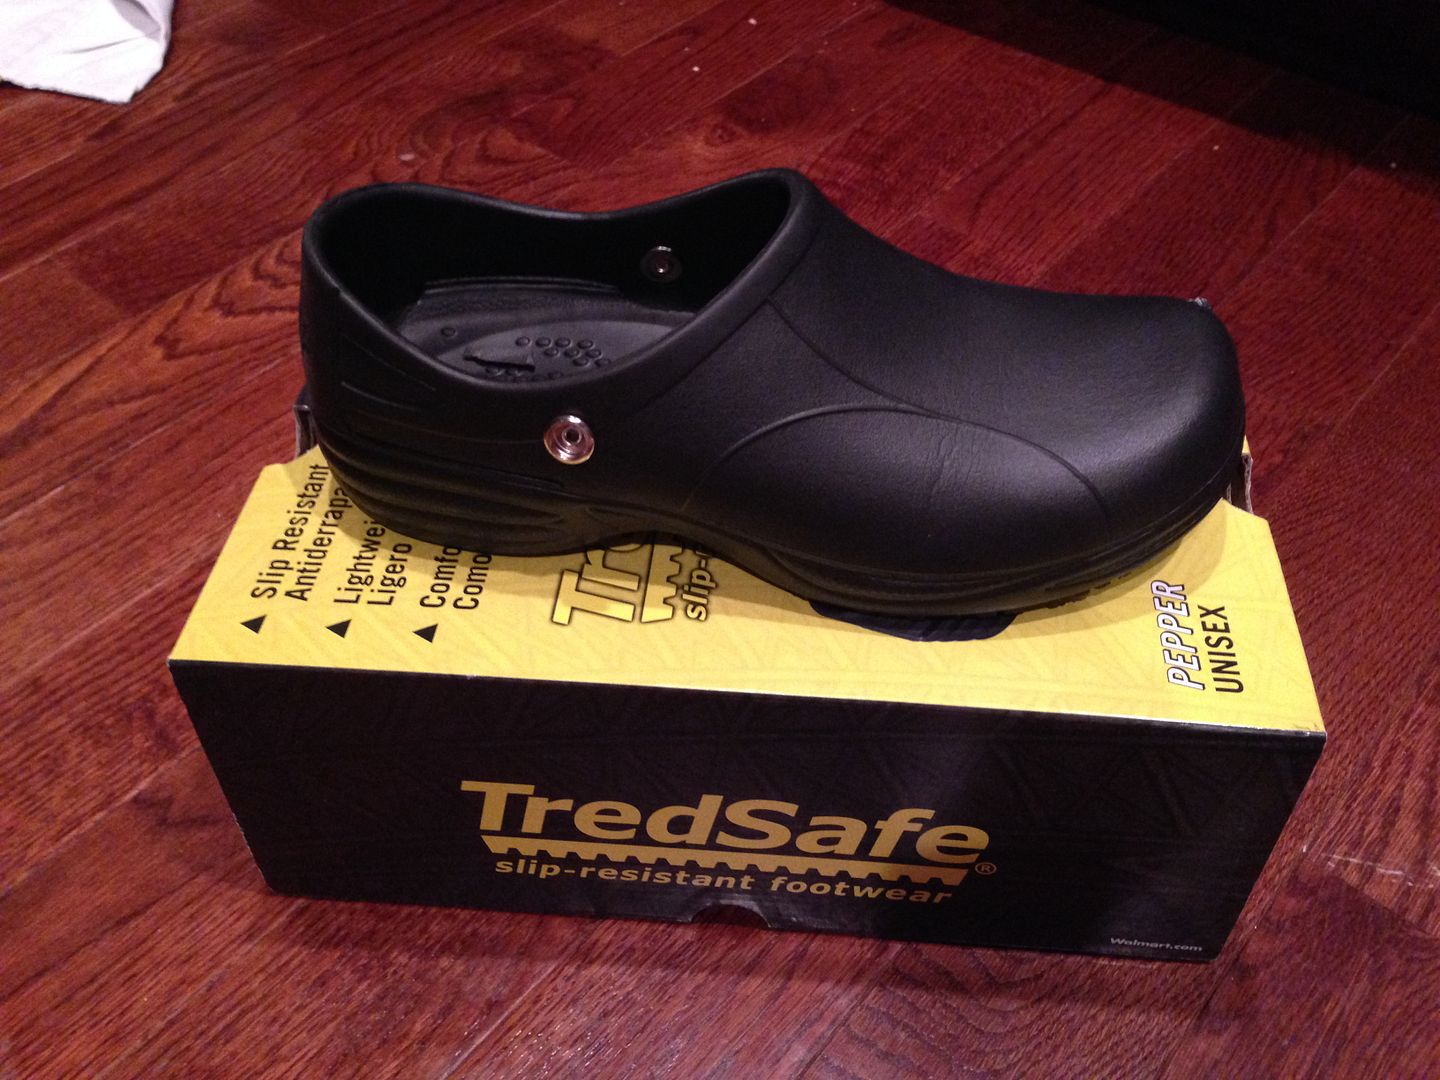
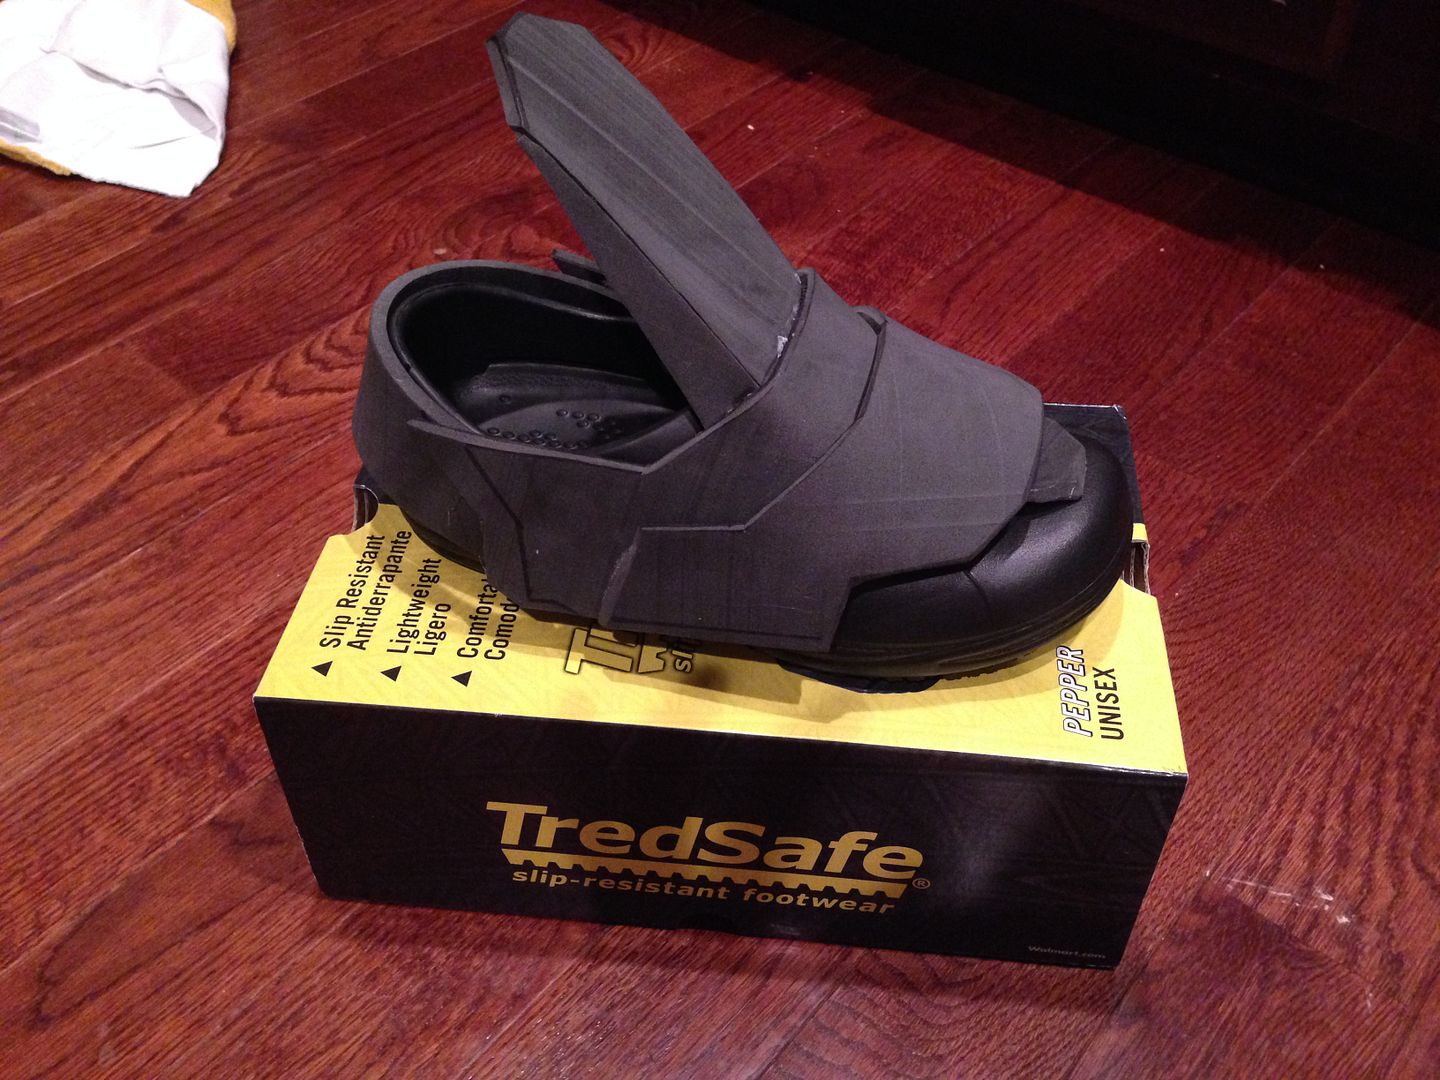
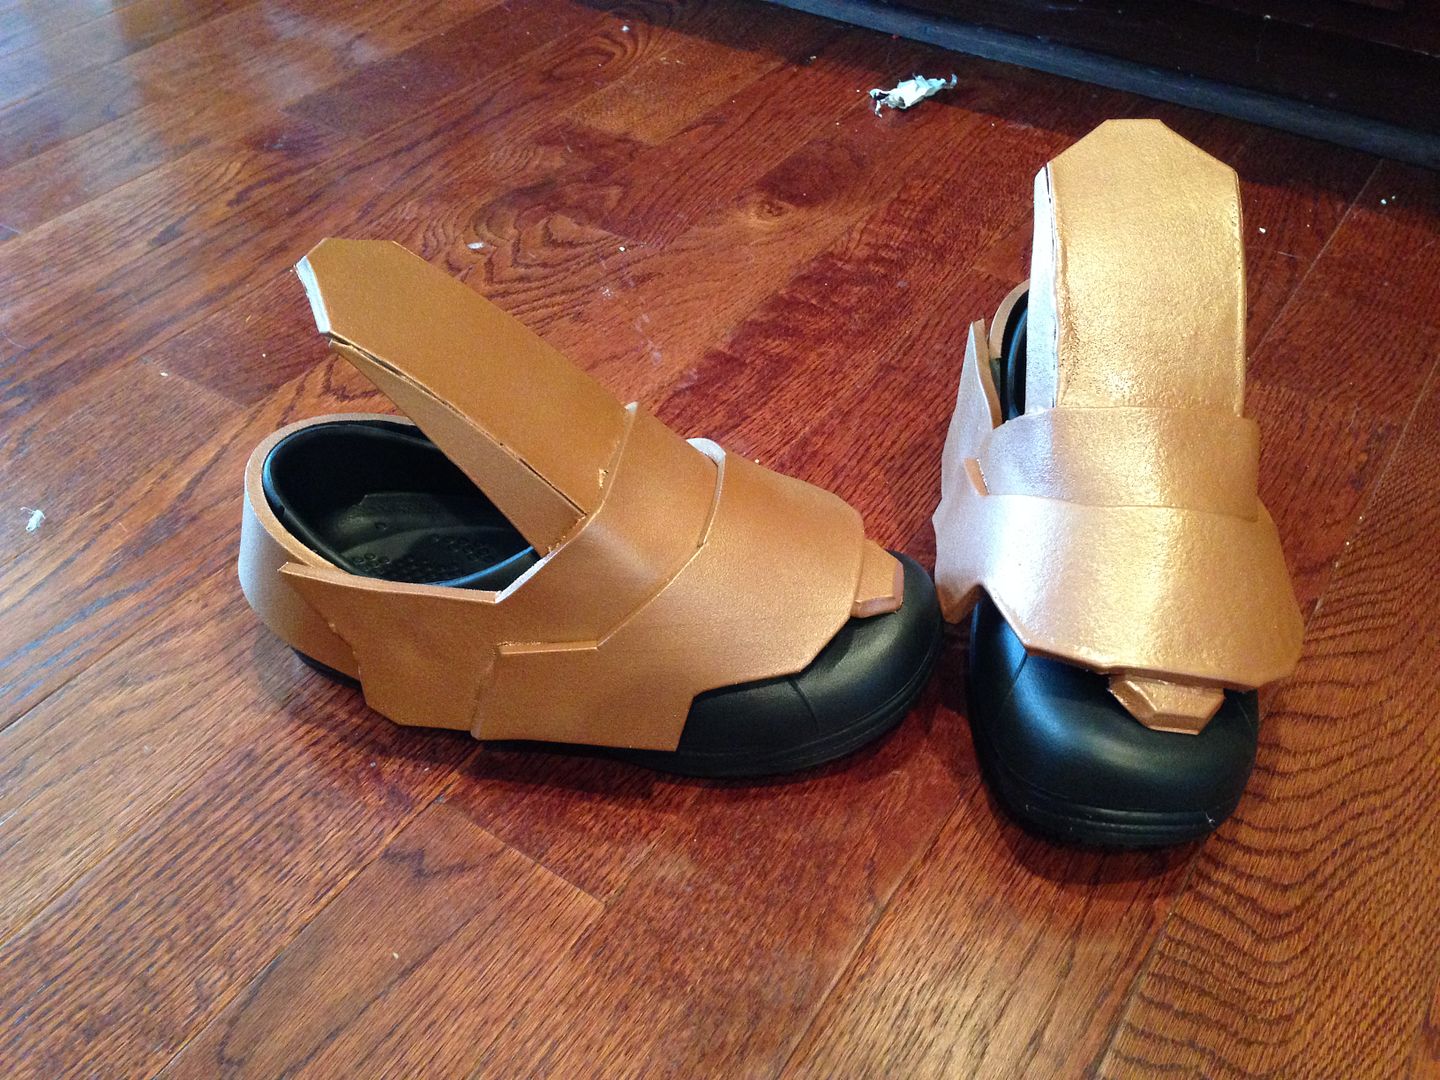
Next, buy some cheap Server shoes from Walmart for $20. Attach some 1 button snap on each side. This will allow the foam covering to swivel or "move" when you walk, kneel, pose, squat etc. Think of the foam as being on a seesaw. For the shoes, we used part of the shoe design from the Pepper Potts Rescue Armor.
And with that...
:::Version 1.0 Complete:::
*As we all know no costume is ever fully complete since we as cosplayers are always tinkering/tweaking/upgrading/etc.
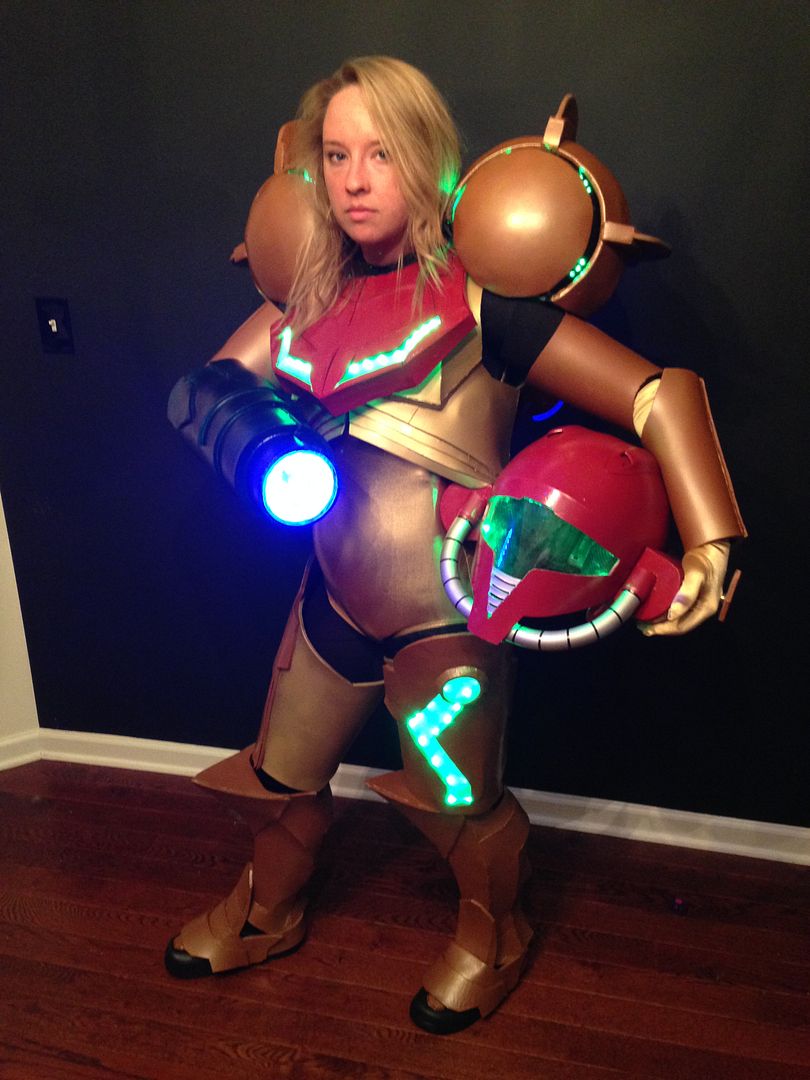
*As we all know, a costume is never truly done as we are always upgrading, tinkering, modding, etc.
Photos by Matt Zeher of ZEHERFOTO - Dragon Con 2014
BUILD JOURNAL
Since making my SWG Mando Armor took so much time, my wife made me promise her that the next project I did would be to make her a metroid suit. We decided to do this build together as a husband-wife team. We have been working on this for over a year and have been keeping a WIP on another site. We have decided to move it here as this community is not focused on one particular subset of cosplay.
That means, rather than making dozens of posts you will get one large wave of posts that shows our progress as of 8/4/2014. Thus this will be very pic heavy.
With that said, let's get this WIP started.
:::Concept & Planning:::
So we surfed the internet and, initially, did not like the costumes we saw out there. However, we came across a more simplistic costume that appeared easier to wear than the majority.
We LOVED both of Jenni Kallberg's Metroid Suits. You can view all of her cosplay costumes on her website including a nice WIP gallery).
We like that it appears to be a “simple” build. We love the grunge/industrial look of her first suit as well as the foam work done on the second suit. The helmet appears to be a motorcycle helmet covered with heat shrinking film (rather than Bondo or fiberglass). The shoulders, biceps, legs, shins, etc. appear to be plastic or some sort of hardened foam (demonstrated on her WIP for her other Metroid suits). We've never worked with that kind of foam before so we will go with what we know (Sintra, bondo, fiberglass, resin, etc.).
As for the body suit, we needed an undersuit and did not want to break the bank. Solution? A $25 morph suit from eBay. We will cut the head off (which wil help with the creepy factor).
:::The Helmet:::
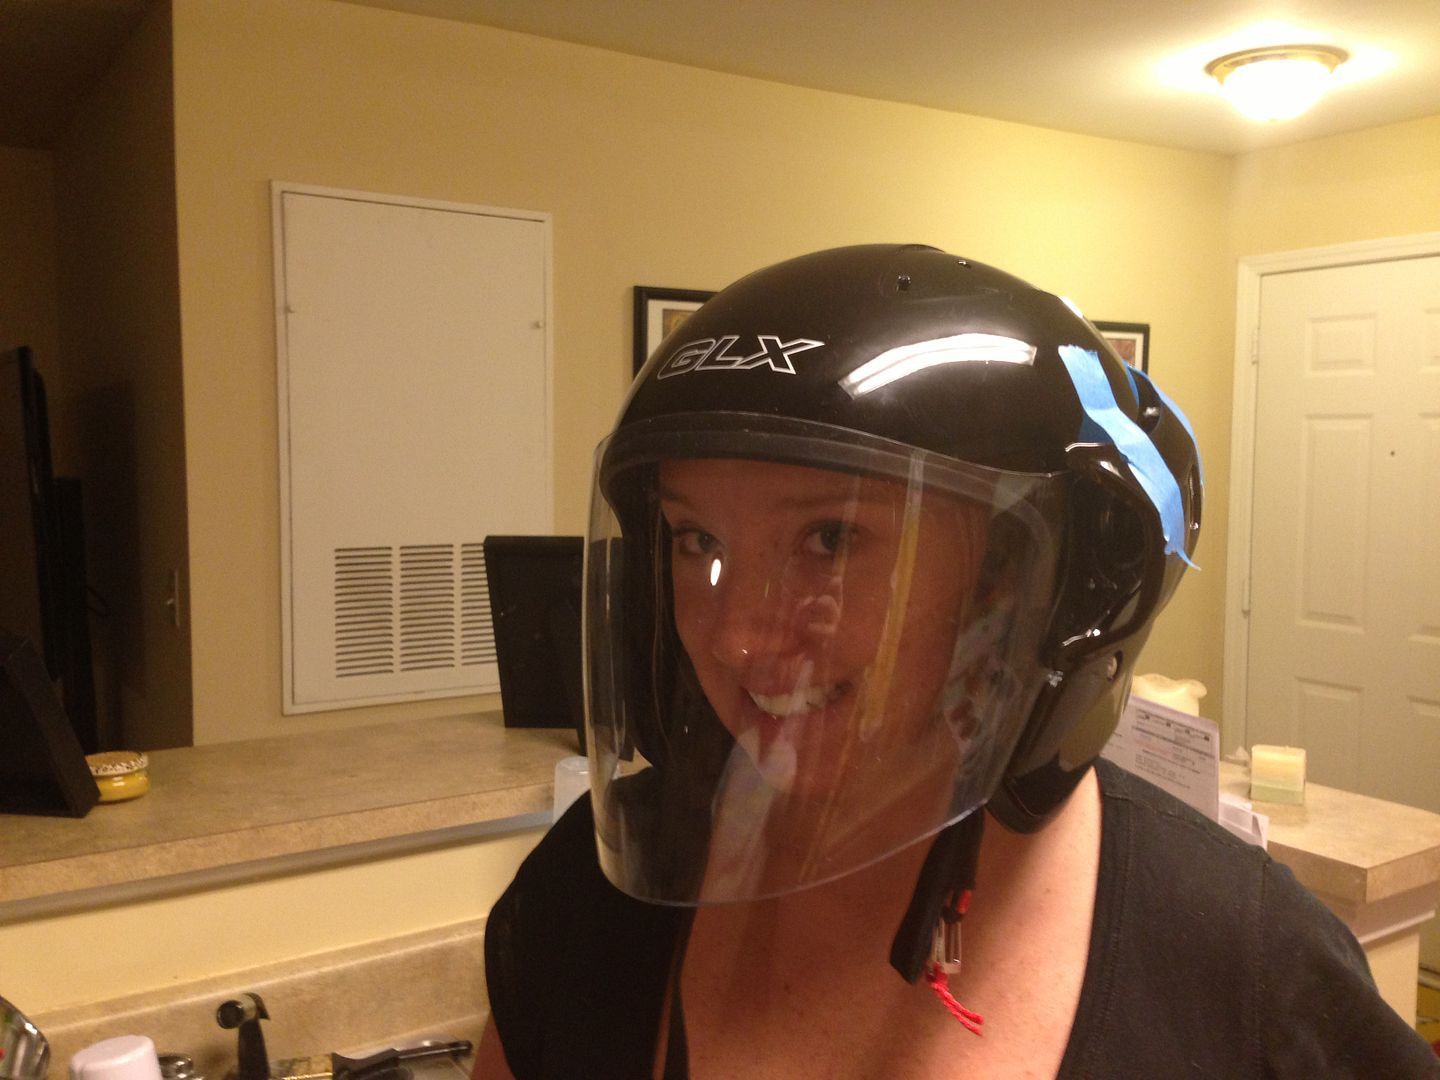
We bought a motorcycle helmet off amazon for $50. We LOVE the vents at the top and back (not pictured) of the helmet but we are not sure if we can/should use them. We want the helmet to look "metroid-y" and not "hey you modded a motorcycle helmet."
There is took much padding inside the helmet. While the padding inside the helmet is necessary for driving a motorcycle, it does not work for cosplay. We gutted it.
We really liked the length of the faceplate and the overall shape of the helmet. We took the top vents off and taped one high up and the helmet and one lower down. We believe that we can still use the vents...somehow.
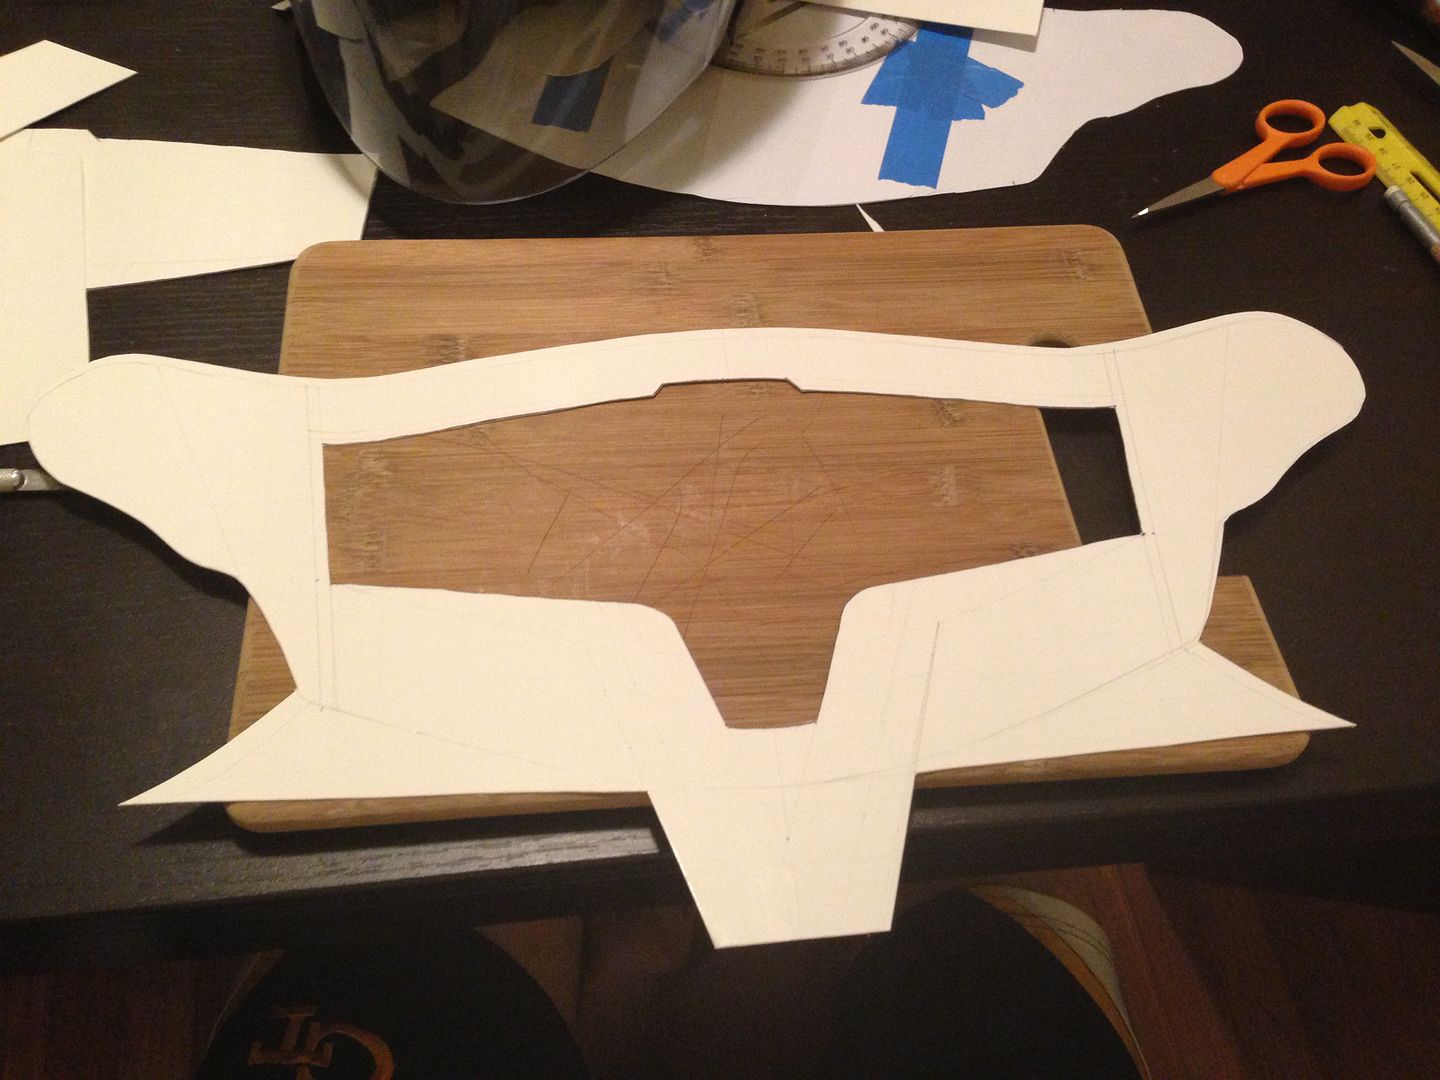
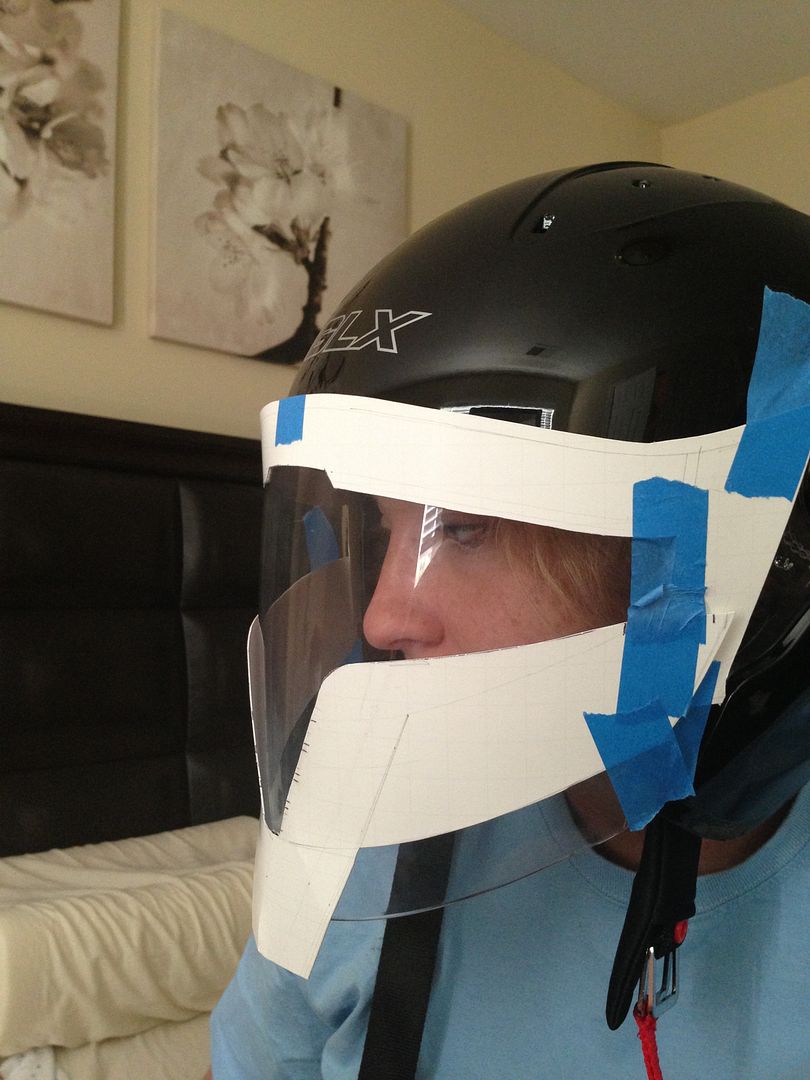
Next, we took the faceplate off the helmet and traced its outline onto posterboard and cutout a visor.
We taped the poster board visor to the helmet, tape the vents to the sides and held up a PVC elow. We like how this is turning out. Not sure if we will stick with the PVC or use something else (washing machine hose? electrical conduit cable?).
When Julie put them helmet on, we noticed that the visor was too tall. We shortened it by about 1.25 inches.
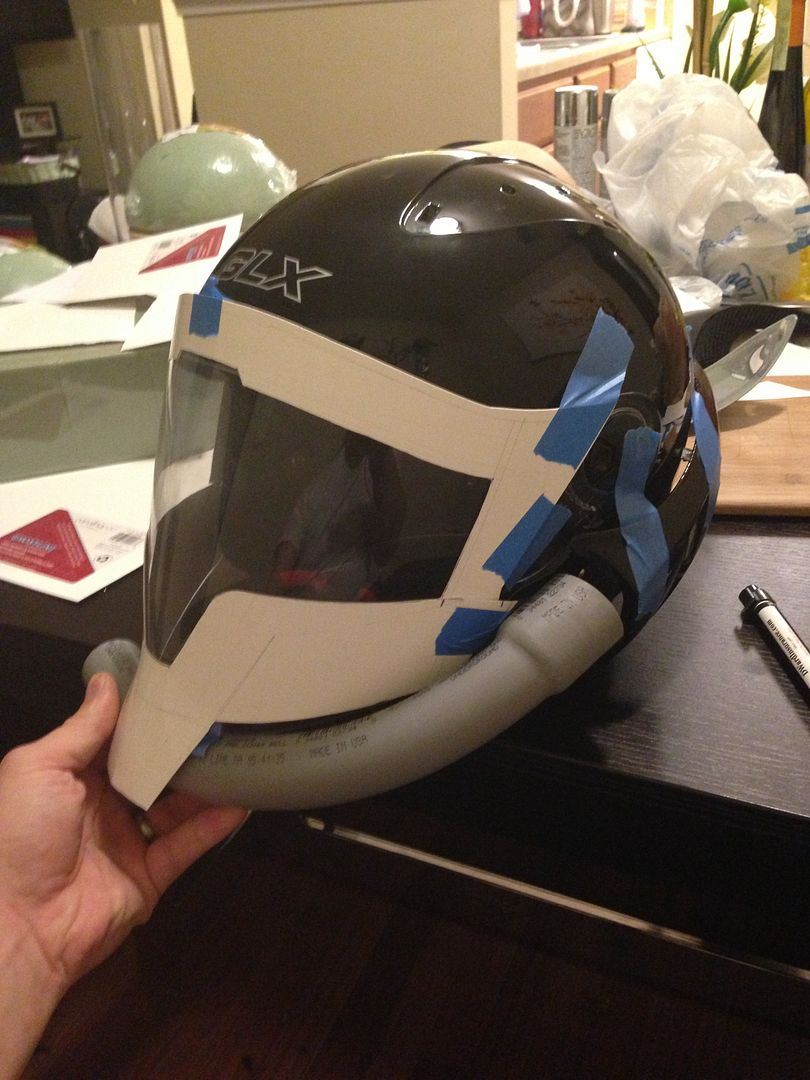
We sanded the helmet with 100 grit sandpaper. Next we cut out pieces of 1/8" thick PVC particle foam board (aka Sintra). PROTIP: For 1/8" thick sintra, only use an Exacto Knife and/or razor blade (box cutter) if you want precision cut lines. Using a hand jig or hacksaw....sucks.
When then taped those pieces to the helmet, traced them to reveal the excess, and then used a dremmel to cut the visor.
We used a heat gun to warm up the sintra and carefully shaped it. Since sintra is so soft, you can't get it too warm or you will dent it. We used Loctite professional grade super glue as it "sets in 5 seconds."
We then put the face shield back on. Looking good.
To make it look like one piece (and not like a motorcycle helmet) we put on a ton of Bondo.
While that was drying, we decided we might as well experiment with foam. We bought some of that foam you put in flower pots to stick fake flowers into. We used the Locite to glue two bricks together (gotta love 5 second dry times) and then cutout the "ears." I think the vents that came with the helmet are too "flat" so we may have to go with making out own ears out of foam.
We took the foam "ears," put a coat of resin down, wrapped them in a fiberglass cloth, and then put another coat of resin on top. Next We cut off the excess that remained and did some light sanding using a dremmel and random orbital sander. We repeated this step once more as we wanted to add a lot of structural stability to the foam ears. PRO TIP: When sanding fiberglass keep in mind that you will be showering yourself, your clothes, your uncovered skin, your hair, your workspace with "glass" that is "fiber" sized (hence the name fiberglass). If you do not want extremely itchy skin for the next 24 hours make sure to wear pants, gloves, long sleeve shirt, a hat, goggles, and a facemask. I had to learn the hard way not to sand fiberglass in shorts, flip flops, and a t-shirt.
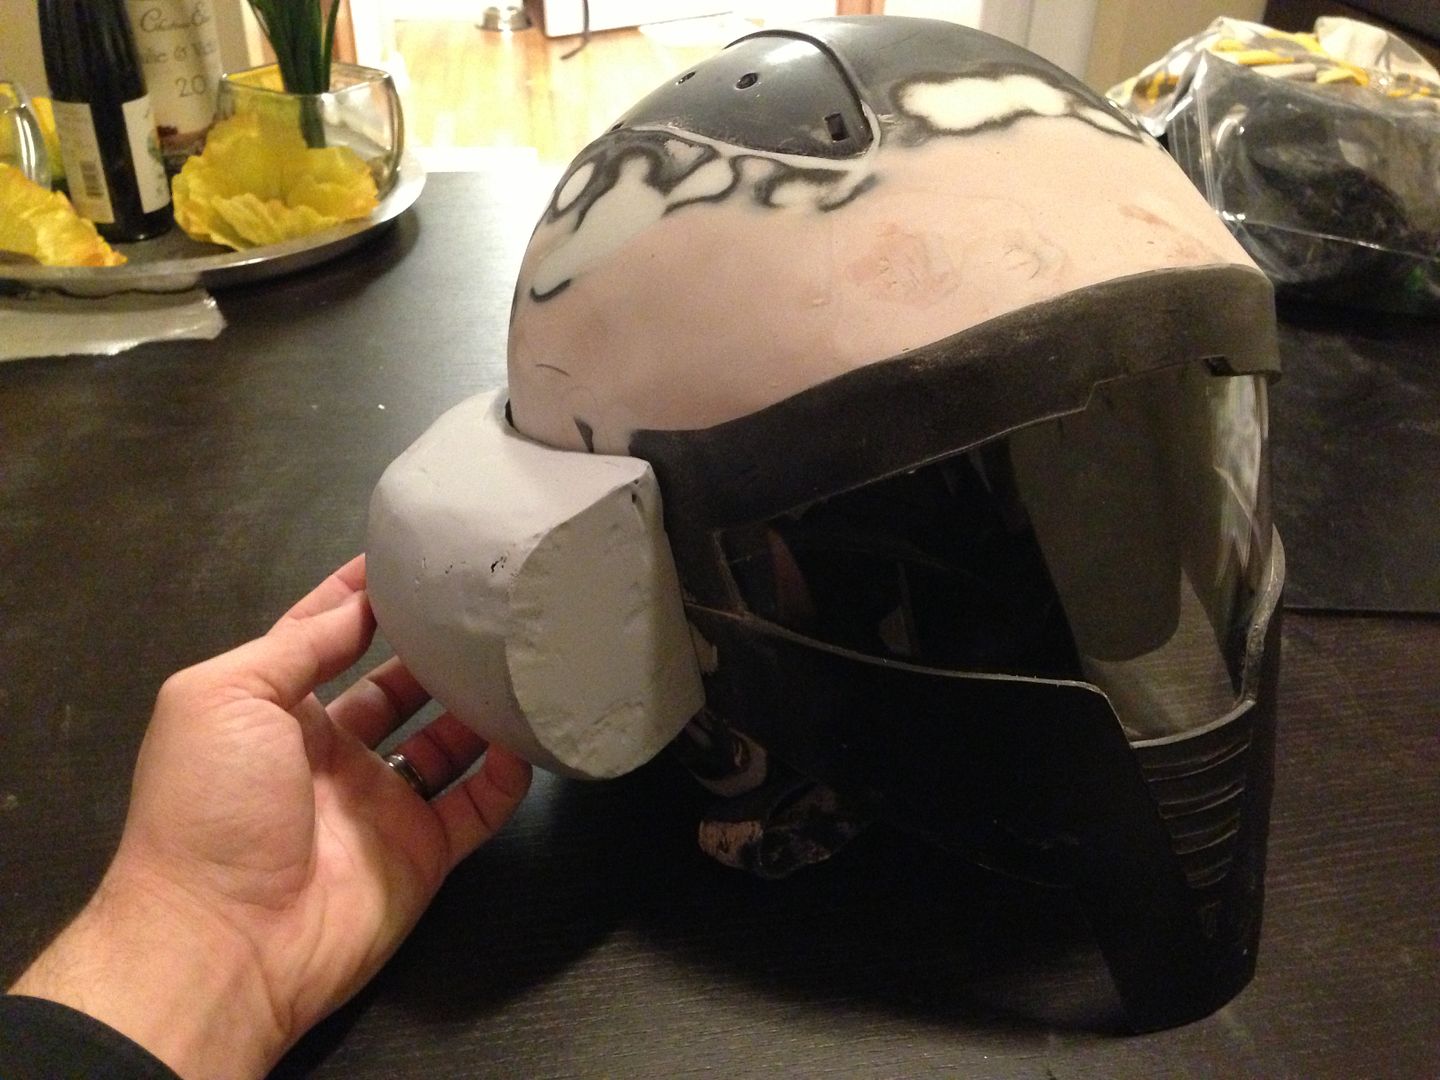
Here is a pic with the ears laid next to the helmet.
Thinking ahead, I was curious as to how I would actually mount the ears to the helmet. I essentially had 2 problems: 1) the fiberglass layer was thin and the inside was just foam...thus screwing into the ears would not create a solid hold. 2) While the ears are about the right shape they are not flush with the sides of the helmet...thus gluing them in place would also not give a solid hold.
My solution was to cut out pieces of sintra, use a heat gun to soften them up so that they laid flush to the side of the helmet. This ensures a snug fit, added structural stability, and a spot to both screw into and put glue down. I then put bondo down to fill in the gaps between the sintra and the ears. Finally I sanded them down and put down a coat of primer to show m where all I needed to go over again with the bondo.
Both Primered and put up to the helmet. See how flush they are? Yay.
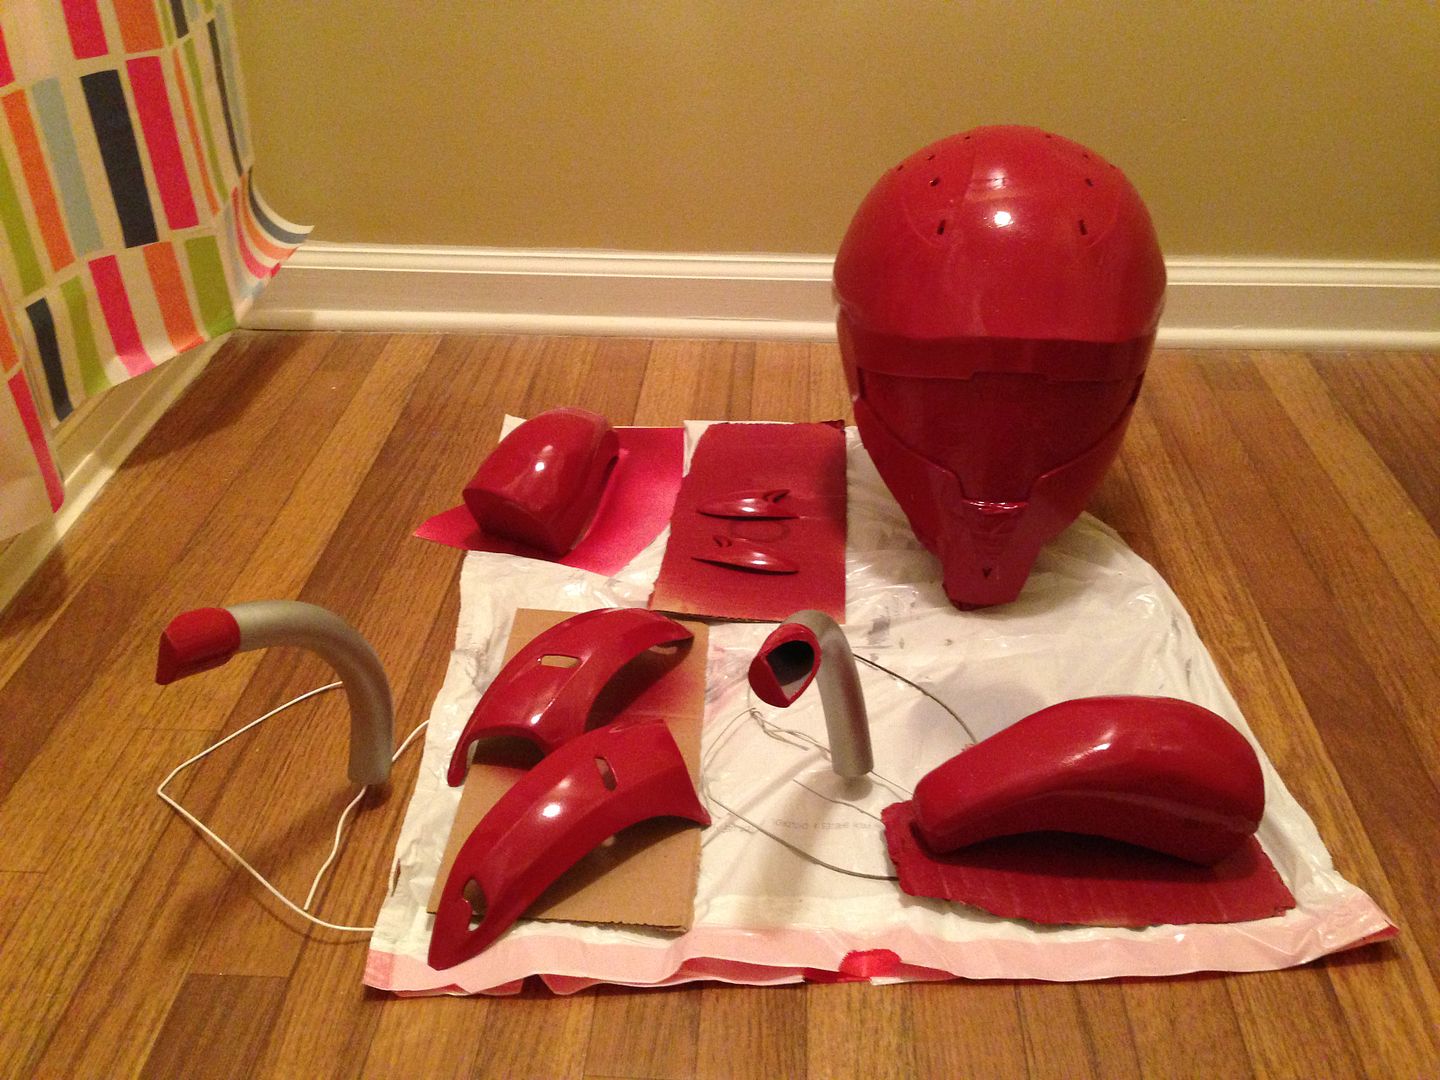
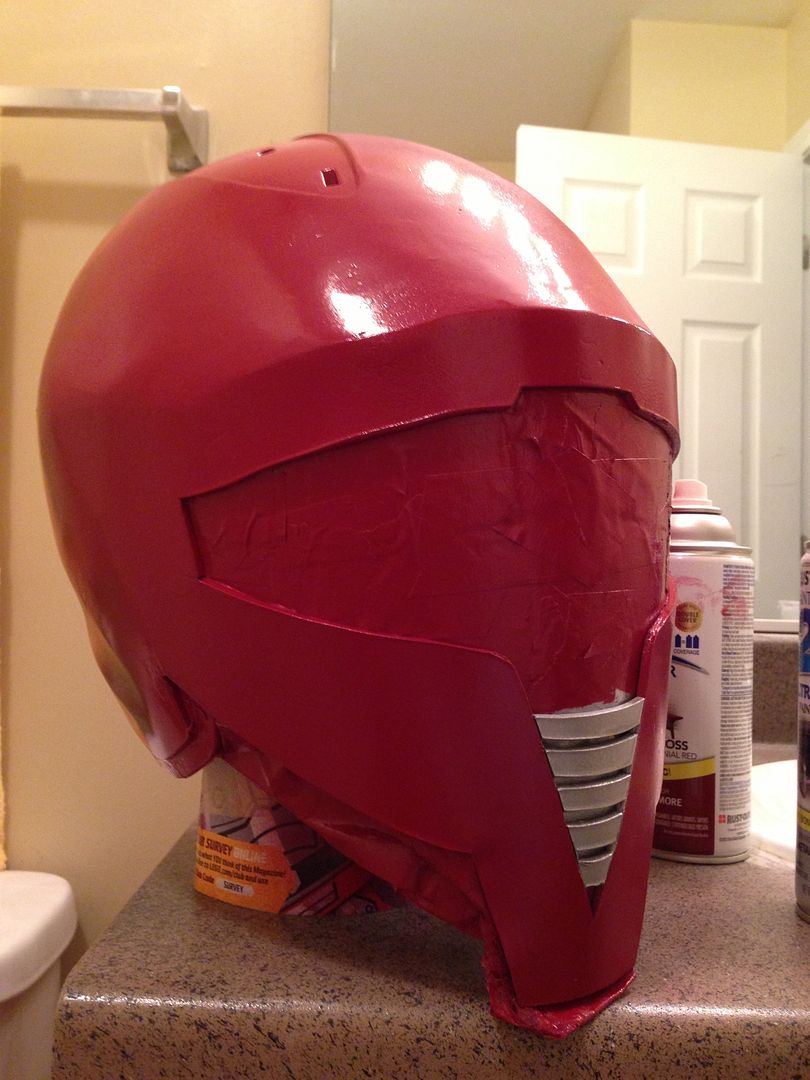
We glued the ears in place, lightly sanded (2000 grit) washed everything, primered everything, and then...finally...PAINTED! What a beautiful red.
We used automotive pinstripe (the same one on Vix's mando bucket) for the "breathers."
We used the standard military helmet pads. $17 on amazon.
Glued the breathers on, removed the masking tape, and put the vents back on the top of the helmet. We decided that since we could not use them we might as well just put them back where they go.
*Note the Mandalorian Mercs Auxiliary Member badge
**Yes we used windex on the visor after taking the photo.
Oh and we put EL wire up in the helmet.
- - - Updated - - -
:::Arm Cannon:::
7/15/2014 Update
Wow. It's been a long time since we did any work. Anyhoo...
We found a thin clear plastic tube that seemed to scream "Oh me me! Use me for the arm cannon." We then took an oil funnel since it had the perfect cone shape and, with some cutting, did this.
We then used some Krylon Chrome Paint on the yellow funnel to make it as reflective as possible. We cut out a clear plastic disc to act as a cover and sealed it using hot glue.
We bought these $6.25 Blue LED String Lights and strung them on the inside of the painted funnel.
We then took some costuming foam (1/4" i think) and wrapped the plastic tube so that it would be the correct length. We used hot glue to make everything stick. At the same time we put in a piece of wood to act as a handle. We used velcro to make the battery pack stay put.
We then used some 1/2" thick foam, additional layers of 1/4" foam, and cut out some designs to give the cannon more "character"
- - - Updated - - -
:::The Chest & Shoulders:::
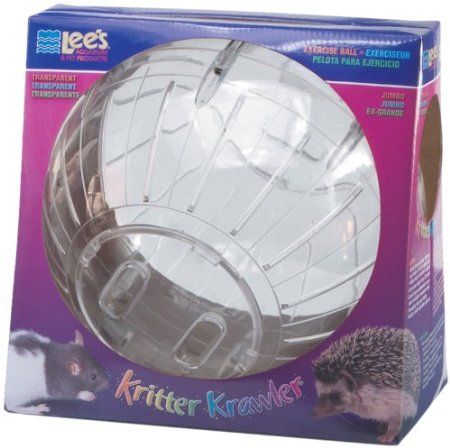
We never really thought about how hard it is to A) obtain/make 10" perfect spheres and B) do it cheaply. You can buy solid foam balls at JoAnns for $17 each but you would then have to coat in resin and fiberglass cloth, sand, bondo, sand, bondo, etc. to have the structural stability needed. One idea we cam across was to buy 10" hamster balls off amazon for $12. We figured we would hold off on this until after we got the helmet done as this would give us time to A) do more research, B) experiment with foam, C) get the quote from the Cosplayhouse.com about the jumpsuit.
Ok so we think it's a bad idea to try and learn a new technique on a costume you have never built before....but that's how we have had to learn everything else lol.
We recently heard of Worbla (available for sale here) which is a type of thermo plastic. You can heat it, it will becomve very soft and plyable and then hardens as it cools. It has an adhesive side too. Honestly, the more we use this stuff the more we will never go back to using sintra. It's light, sandable, can take any shape, covers foam very well, requires only a heat gun and scissors (no dremmel or saws like sintra) and can creat some amazing detail. Here is a sample picture of a complete costume made of worbla.
You can't get that detail with metal, foam, or sintra.
Do youself a favor, buy a small shet of this, and play around with it. You can make anything from knives to bras, wonder woman costumes to iron man suits. Way easier than shaping hard plastics or metals. Anyways, that's my sales pitch.
So we took the hampster balls we listed back in the original post and tried many ways to get the foam to lay flat. The problem is, flat foam does not want to lay evenly on a sphere. Worbla solved that problem easily. First we marked off on the hampster balls where we wanted to lay foam/worbla and where we wanted to leave the "trenches." We then cut out foam pieces that would go on the ball. This took forever because you naturally want to cut straight strips but you have to actually cut arches. Math. whatever. We then covered those foam pieces in worbla and stuck them to the ball. You have to keep heating the worbla and letting it cool to ensure it hols the shape right. Sometimes it will form bubbles or air pockets. Just price them with a needle or exacto knife and smoth them out. Easy.
Those things are solid. Just as strong a 1/8" sintra.
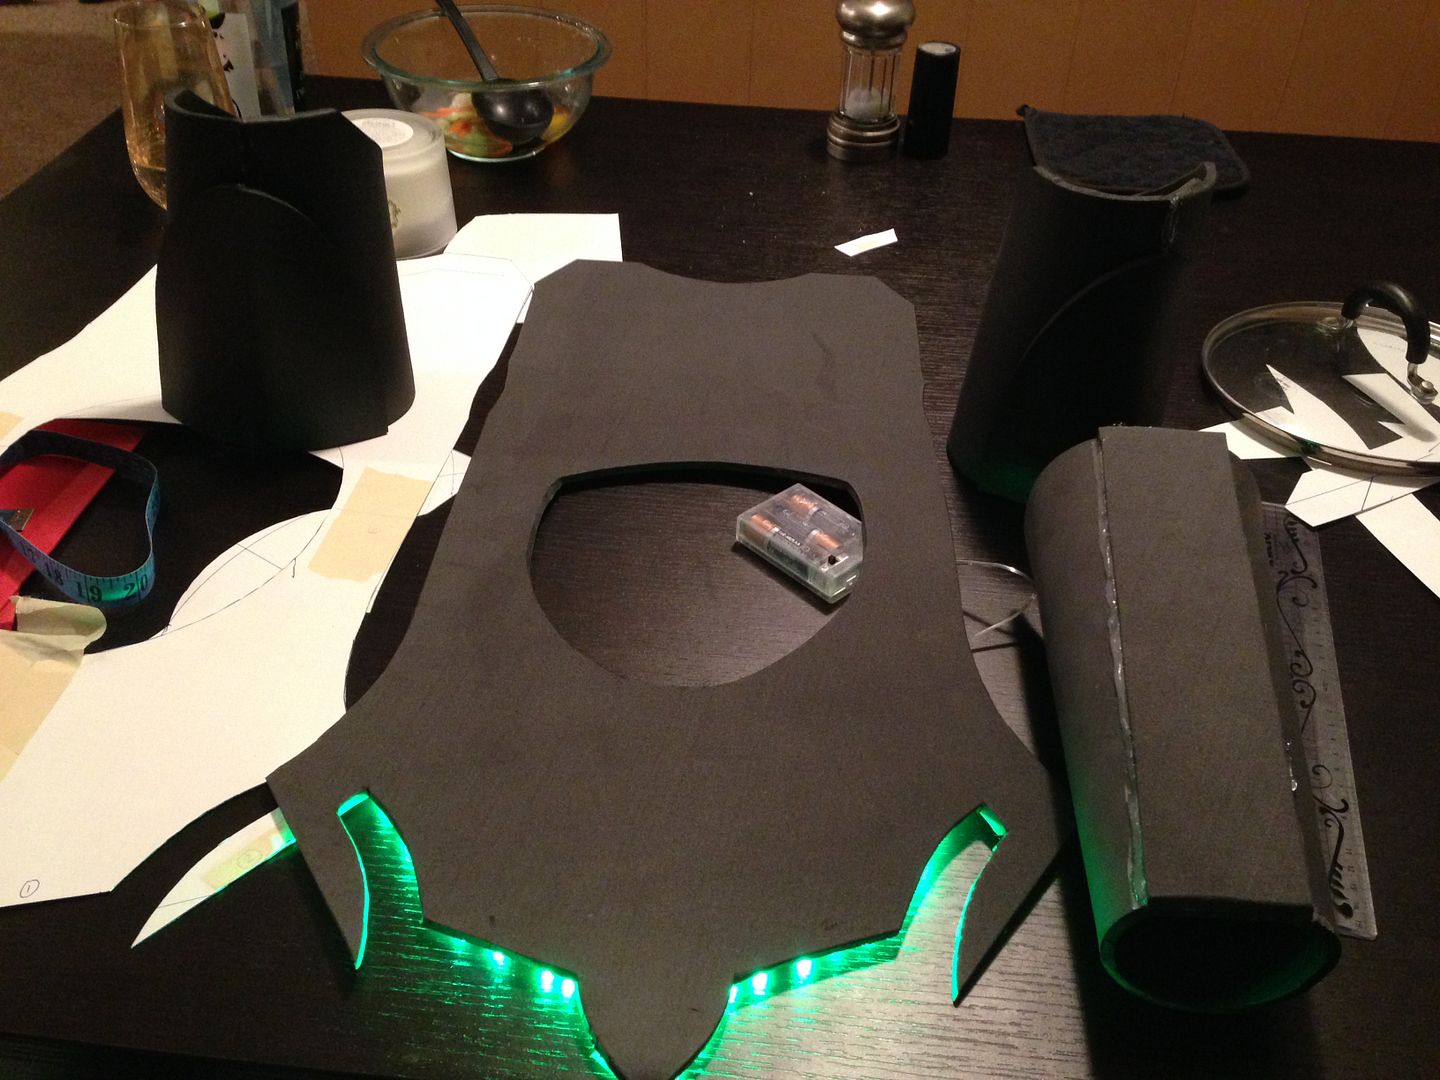
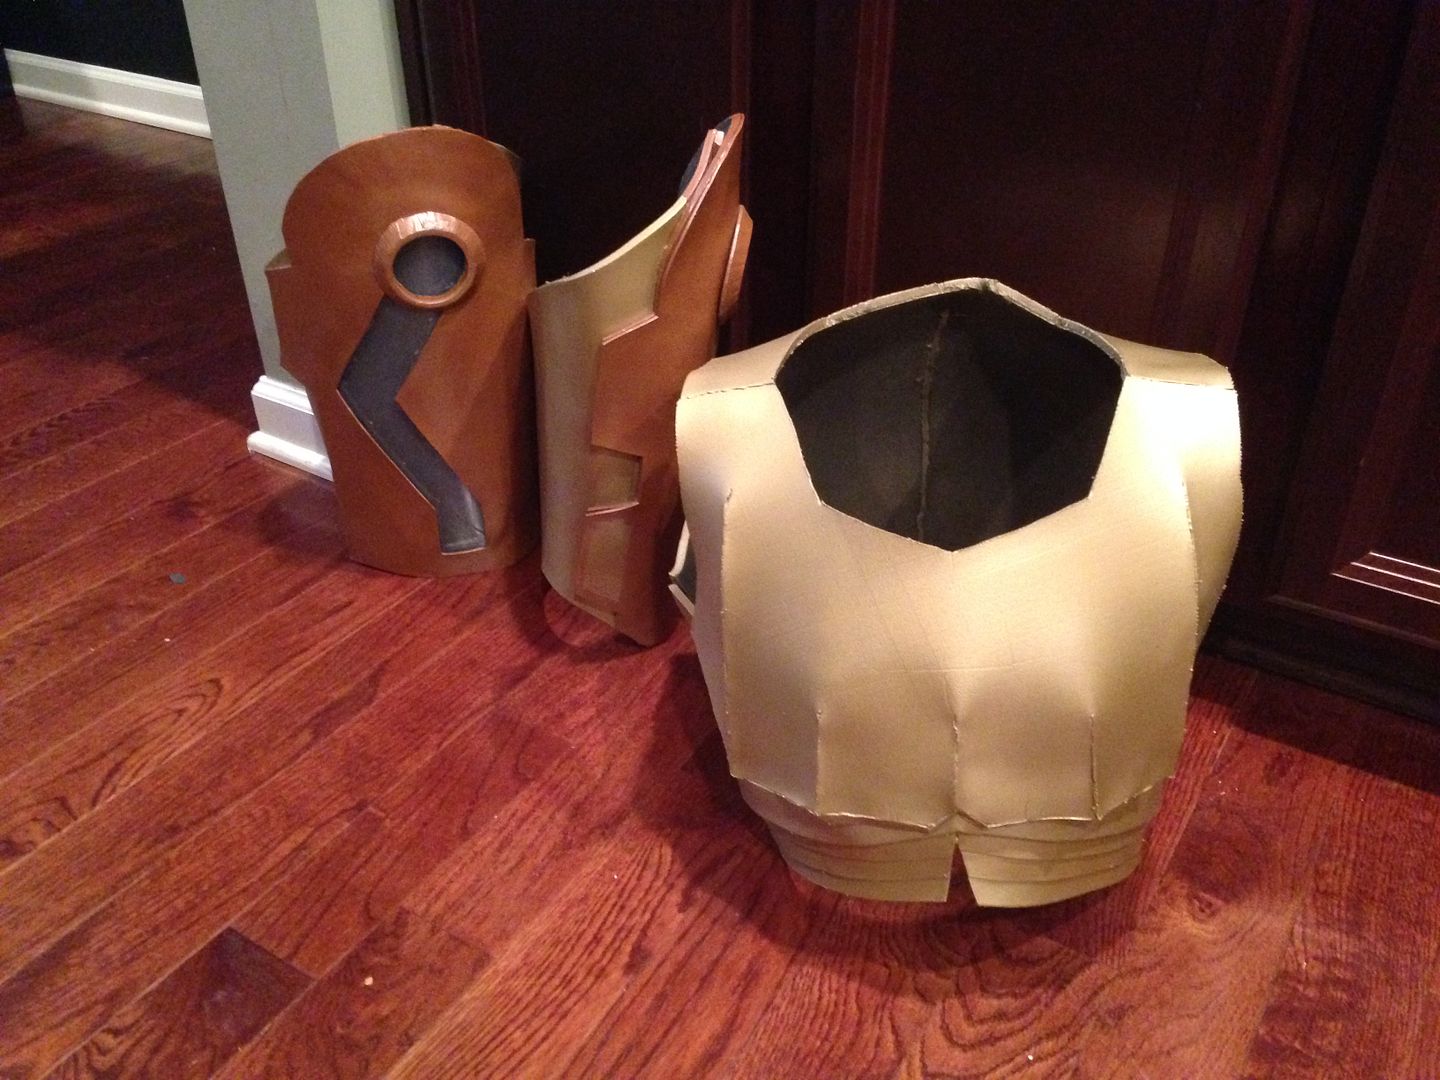
We did a lot of work yesterday. We took posterboard (the kind with the lovely gridlines) and recreated Jenni Kallberg's chest plate as best we could. Once we got the sizing down we then traced and cut it out of 1/4" foam. We also did the same thing with the biceps and left gauntlet. For the chest plate this foam will act as a base.
We took some really thin translucent plastic to act as the "windows" and taped the LED light kit in place.
Then we took some read 1/16" foam sheets from Walmart, traced out the chest plate again, cut them into little pices, and then hotglued them to the foam base. We love the way it turned out.
Time for a test fit
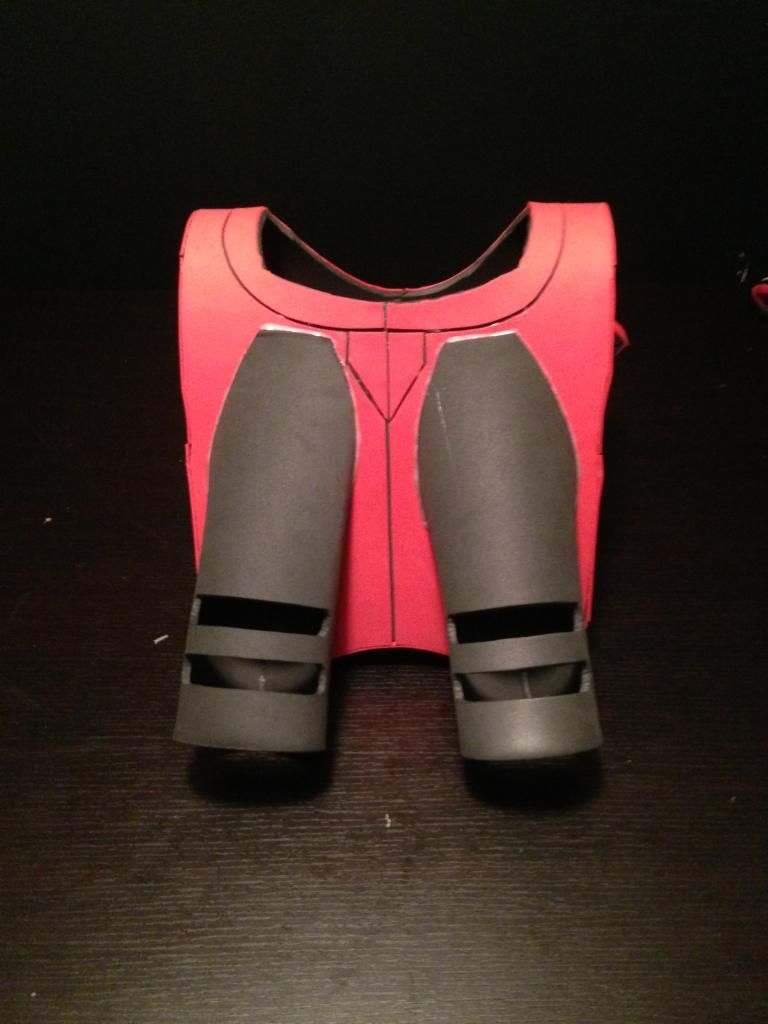
Hey, let's add a jet pack!
Hey, we have extra translucent film laying around.
Hey, we have an extra blue LED kit ($6 on amazon) laying around. Beautiful.
8/11/2014 Update
So we can make the thighs no problem and will be doing them this week. The problem will be the shins. The solution? I found a thread on the Replica Prop Forum by JFcustom that list's a ton of pepakura files that have been tailored for use with foam instead of paper. I scrolled down to find some shins that look Metroid-ish. I went with BSD's Rex Phasell.
We like how they turned out.
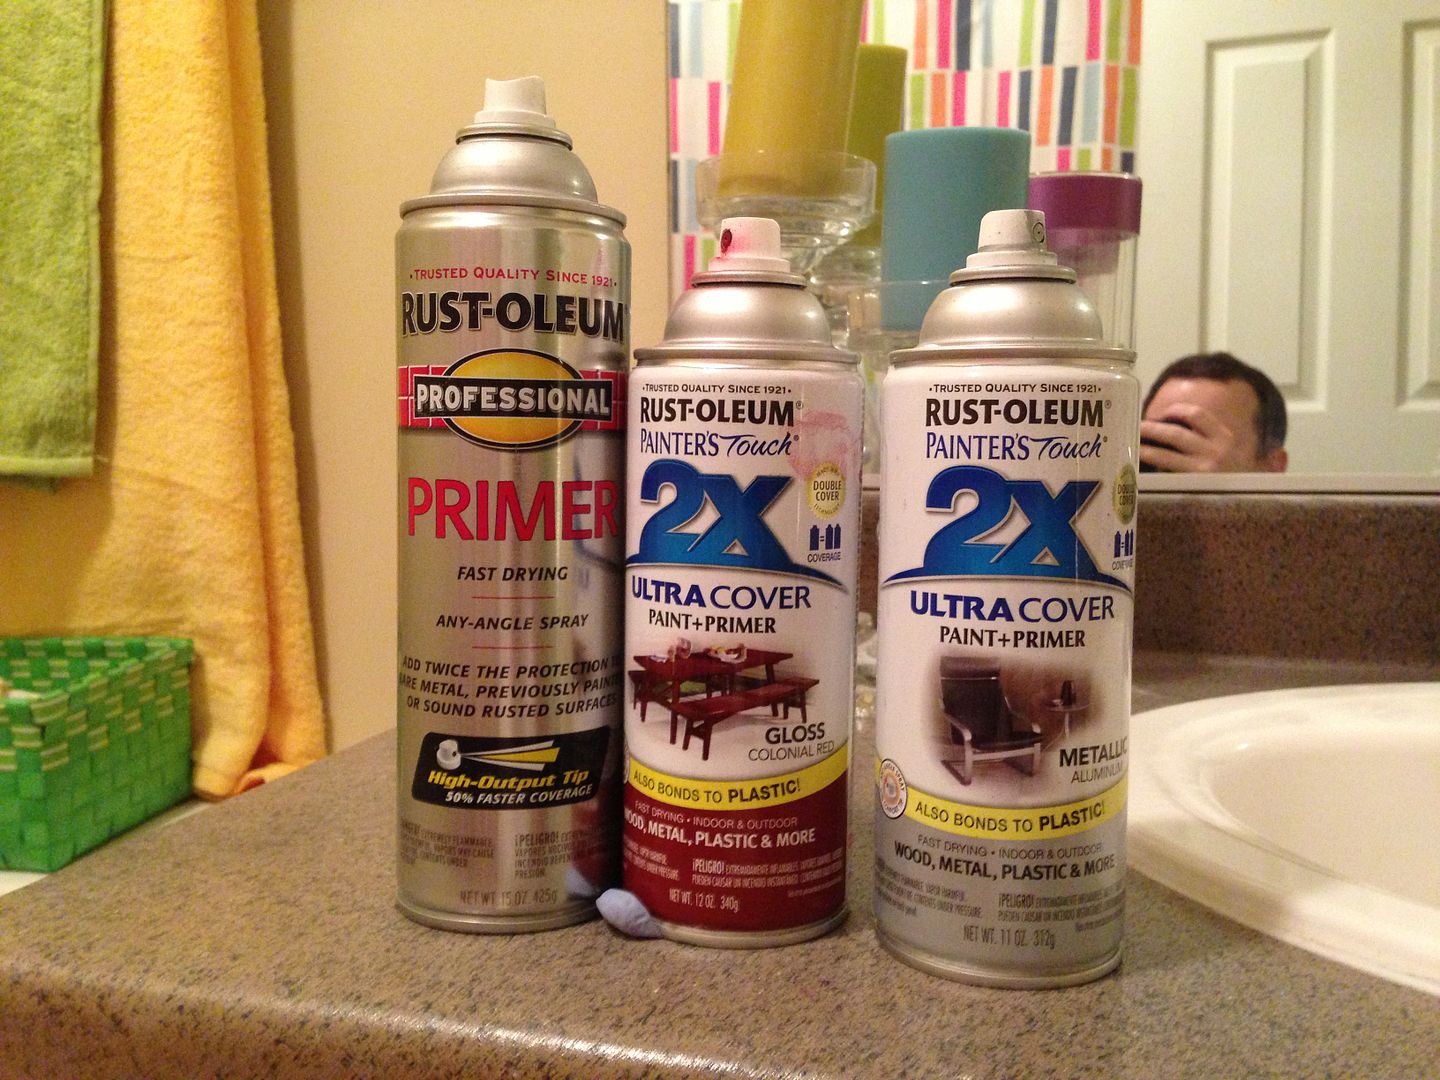
Finally started painting! For the copper/bronze we will be using Rustoleum High Heat Aged Copper. For the yellow we will be using Rustoleum Metallic Spray Gold Rush. For the red we will be using Rustoleum Colonial Red (Gloss). We put 4 thick coats of Black Plasti Dip over everything before painting (for the shoulder bells, before the Plasti Dip we did a thin layer of bondo on the worbla, sanded, 1 layer of primer, sanded, another layer of primer). We didn't like how "brown" the Aged Copper turned out so we barely misted (1 pass quick pass from 12" away) some Krylon Premium Metallic Gold. Now that's sexy.
Next we taped off the shoulder bells so that we could lay down 2 coats of Rustoleum 2X Flat Black.
We then installed 2 Green LED Light Kits in one shoulder bell. We then ordered 4 more light kits on Amazon (2 for the other shoulder bell and 1 for each thigh).
Here is a pic the shoulder bells next to the helmet. You can also see the biceps and the left forearm on the shelf.
8/18/2014 Update
We think you guys are going to like one of the pictures in this update ;D
So we like the shins that were on BSD Rex Phasell's foam files, but they needed something to make them less Star Wars-y and more Metroid-y. We cut off the knee guards and added this pointy things to mirror Pixel Ninja's design a little more. Also, we built out the thighs added the LED's and transparent window, taped everything off, and put 3 coats of plasti dip.
So we have been putting off doing the chest as it is like the 2nd hardest thing on the suit (the first being the abdomen). Since we are not tailors, have never build anything this complicated, etc. we searched the interwebs for a solution. What we settled on was good ole BSD Rex Phasell's foam files again. In this pic the foam looks gray/primered for some reason (it must be the lighting?).
We then took very thin craft foam and cut strips to make the layers/rib-looking-things.
Something just wasn't looking right about the chest. Again we needed to do something to make it less Star Wars-y and more Metroid-y so we shortened the abdomen area to make it less angled. We then added the layers of craft foam for the front ribs.
Well that's it for today.
Oh wait. Almost forgot.
...
...
Test fit!
8/20/2014 Update
Another solid update. We got all of the suit painted (except the shoes). Again, for the copper/bronze we used Rustoleum High Heat Aged Copper and barely misted a tiny bit of Krylon Premium Metallic Gold. For the yellow we used Rustoleum Metallic Spray Gold Rush.
We just don't have the skill/time/resources right now to do the abs in foam AND make them look good. We have exactly 6 days left to get the costume ready for dragon con. We will do this on update 2.0 later down the road. Solution? We found a metallic gold dance/gynmastics leotard on Amazon.com or Discountdancesupply.com for $22.
We also just bought a pair of gold satin spandex gloves for $11 to cover her left arm. Hasn't arrived yet but hopefully it will look good. If It doesn't then we will just stick with the black gloves built into the morph suit.
Since everything was painted, we figured it was time for a full costume test fit. This let us know where we need to mount the velcro, how to go about mounting the shoulder bells, areas that need to be reinforced to minimize wear and tear, etc. We also got to try out the lights. Did you know that this costume requires 30 AA batteries? I sure which I knew how to wire electronics so that I could get it down to a more reasonable amount lol.
Big Updates:
So we found a great way to make the shoulder bells. Get some 1" elastic bands, rivet them to the shoulder bells, and attach buckles so that you can adjust how tight they are.
Next, buy some cheap Server shoes from Walmart for $20. Attach some 1 button snap on each side. This will allow the foam covering to swivel or "move" when you walk, kneel, pose, squat etc. Think of the foam as being on a seesaw. For the shoes, we used part of the shoe design from the Pepper Potts Rescue Armor.
And with that...
:::Version 1.0 Complete:::
*As we all know no costume is ever fully complete since we as cosplayers are always tinkering/tweaking/upgrading/etc.
Last edited: