lilshrt4atroopr
New Member
Hey guys! I'm new here have been lurking for about six months now. I've had several failed projects but I'm hoping to see this one through as I would like it to be done in time for this year's cons.
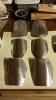
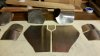
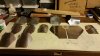
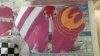
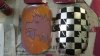
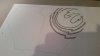
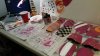
Below are some pictures of the armor pieces I made from aluminum. I picked aluminum because it's lightweight compared to normal sheet metal but it still has that nice authentic look of armor. I cut the aluminum with heavy duty shears which was a bit tedious. Then I went back and filed off the burrs using a flat file for the edges and convex curves and a round file for the concave curves. There were some scratches on the metal I polished out with my dremel and some polishing compound. This was my first time using my dremel; you basically treat it like sandpaper and start with a rougher grit compound and rubber tip, then move to buffing wheel and brass polish. I'm pretty pleased with the way it turned out. The whole process took a few days to complete.
I will post some more pictures once I get done painting. I haven't started on the adventure gear yet but don't worry it will come! I'm going to make this a bit like a tutorial so that anyone wanting to make this can learn from my experiences and save themselves some trouble by replicating parts of my process if they desire. Starting out with a big project can be overwhelming so I hope I can help someone else out!
Resources
http://rebelsreport.com/2014/10/27/cosplay-101-eva-foam-vs-sintra/
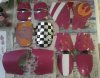
http://eitanya.deviantart.com/art/Downloadable-Sabine-armor-templates-483881333
Below are some pictures of the armor pieces I made from aluminum. I picked aluminum because it's lightweight compared to normal sheet metal but it still has that nice authentic look of armor. I cut the aluminum with heavy duty shears which was a bit tedious. Then I went back and filed off the burrs using a flat file for the edges and convex curves and a round file for the concave curves. There were some scratches on the metal I polished out with my dremel and some polishing compound. This was my first time using my dremel; you basically treat it like sandpaper and start with a rougher grit compound and rubber tip, then move to buffing wheel and brass polish. I'm pretty pleased with the way it turned out. The whole process took a few days to complete.
I will post some more pictures once I get done painting. I haven't started on the adventure gear yet but don't worry it will come! I'm going to make this a bit like a tutorial so that anyone wanting to make this can learn from my experiences and save themselves some trouble by replicating parts of my process if they desire. Starting out with a big project can be overwhelming so I hope I can help someone else out!
Resources
http://rebelsreport.com/2014/10/27/cosplay-101-eva-foam-vs-sintra/
http://eitanya.deviantart.com/art/Downloadable-Sabine-armor-templates-483881333
")


