Hey gang,
For this submission, I have two costumes for my kids. Ok, one of them was originally built to be mine, but as I'll be manning my "haunted house" for halloween and can't think of any other time I'd wear the suit, my son gets to wear it. (Finally an advantage to him being my size).
Costume 1: HALO 3 style Mjolnir Armor.
Costume 2: Dr Who Weeping Angel.
My background in cosplay or costuming = Zero. However I am a do-it-yourself type who tends to pick projects after I see something and think "I wonder if I could do that?". In this case, last halloween I came across a HALO Master Chief costume for sale for $800 and thought "That's nuts, I wonder if I could build one". Shortly there after I discovered this wonderful site (and the HALO specific one) and began reading. Work began on the armor in January and technically still isn't finished. I started with pepakura and fiberglas, which proved troublesome, especially after pep'ing two helmets that didn't fit. Then I discovered the joys of foam and haven't looked back. Lots of "firsts" with this adventure: First time playing with fiberglas and foam. First time using plaster on a person and modeling with clay. Vast majority of learning came from following a tip or build thread on this forum and then figuring out how to apply it here.
HALO Armor: Again I originally planned this to be my suit, although I really didn't think about when/why I would ever wear it. (have never been to a CON or contest or anything). The quest was about "can I do this?". At the time there were good plans and build threads for HALO 3 style armor, less so for the newly arrive HALO 4, so I decided to go with the 3 version, couched with the plan that any anomolies would be played off as being just some other Spartan (not necessarily Master Chief). In the end, I made my own number and unit symbol so that it is a stand alone Spartan. Earlier this summer I decided that my son would probably fit in the armor and had more of a chance to wear it than I would, so I modified slightly to fit him (and still need to change out the boots since he wears a freaking size 15 shoe!). Figure he'll wear it for Halloween, maybe a school party, and perhaps if we get ourselves to a local Comic-Con in November.
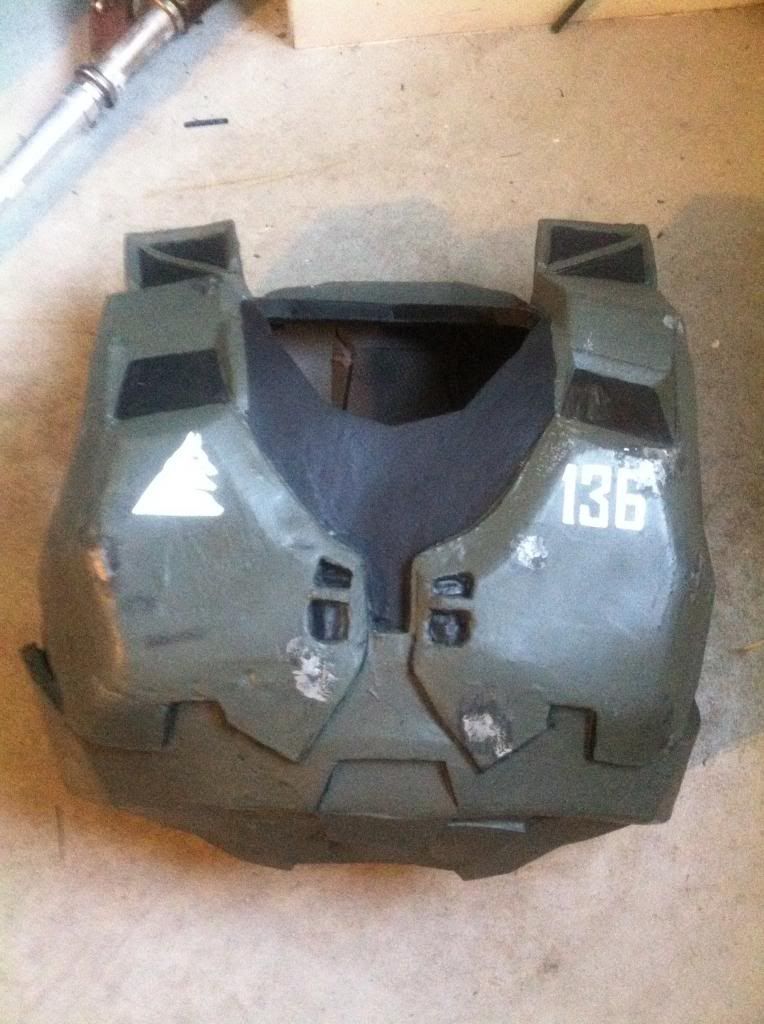
Details: The armor is all foam, covered with plasti-dip and mod podge, then painted with green camo spray paint. In some areas I painted it silver, then put some goop on certain spots, painted camo, then wiped goop off to try and get look of battle damage that exposed base metal. My lousy seams were filled by silicon caulk which worked out fairly well, as it kept its flexibility while moving. Still need to work out details of the undersuit. In this pic its just black t-shirt and running pants. May end up with the same but will add velcro to keep pieces in place.
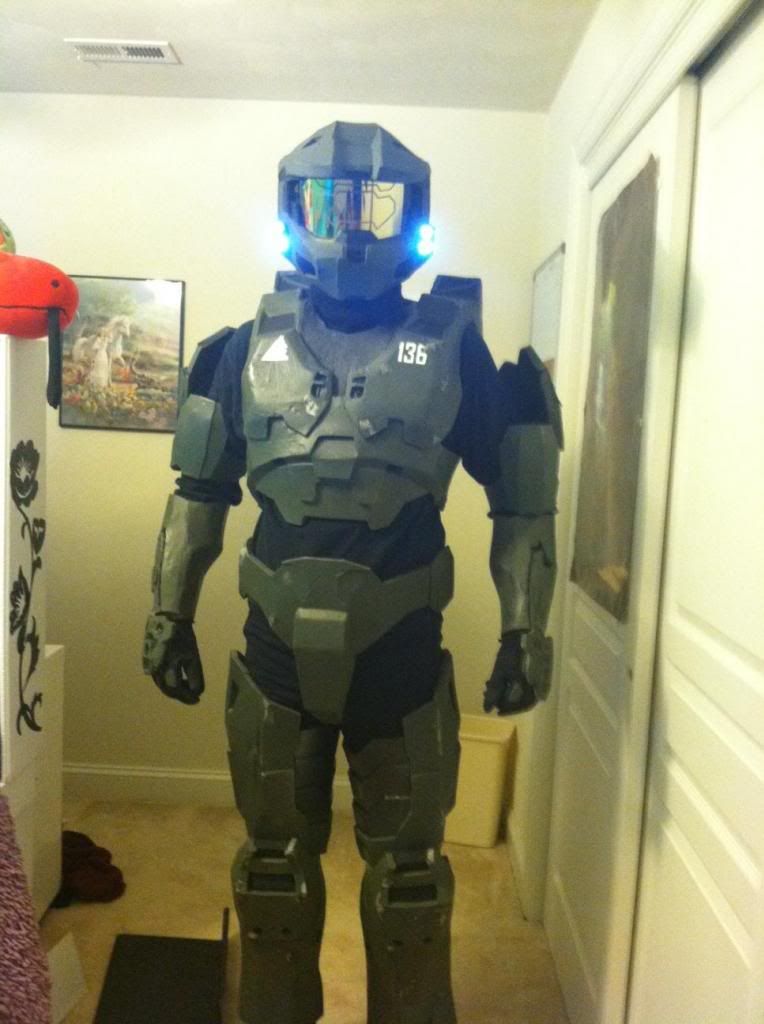
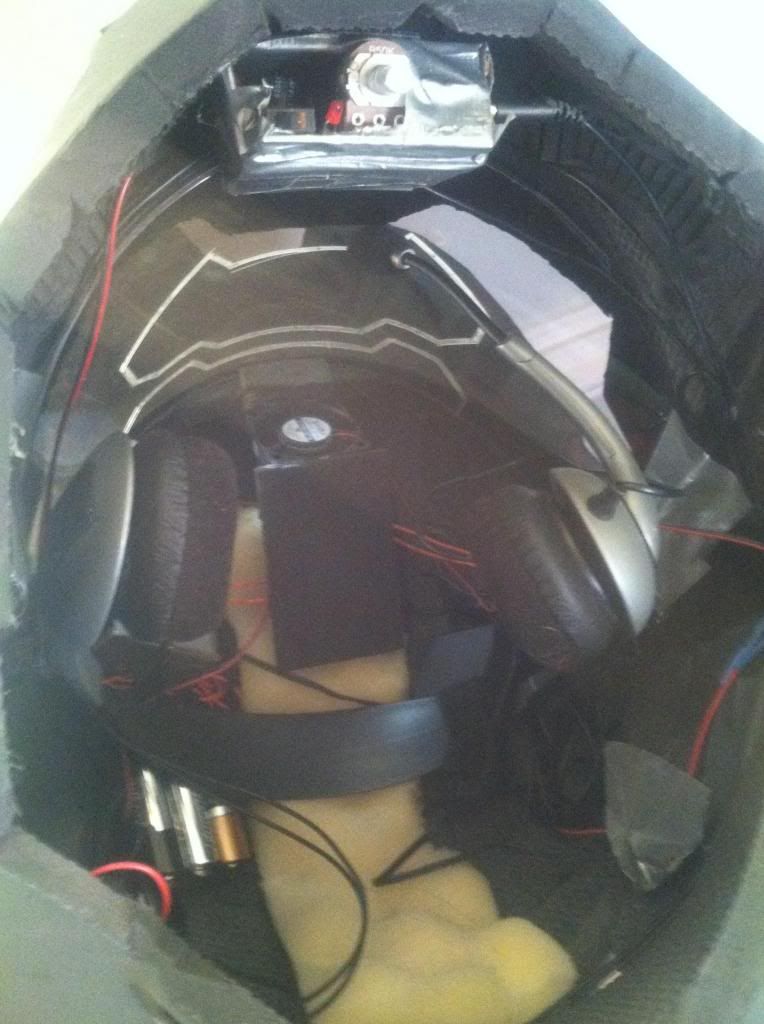
The helmet is stuffed with a number of electronics. The lights (4) do light up. I have a fan blowing on the faceshield to keep it from fogging up, I have a voice modulator going to two small speakers mounted in either cheek that lower the pitch of voice and broadcast it out (although still not loud enough) and I have audio enhancement via mics mounted in the ear area of the helmet that are wired to a board that boosts the signal and delivers it to the headset you see in the photo. its a jumbled mess, as I thought I'd rig a single power supply for all, but failed to design properly. So right now everything has its own battery pack. However the advantage is, I still have everything in the helmet, so there are no wires sticking out or anything that needs to connect to the rest of the suit.

The battlerifle was made via Pep files that I then transcribed onto carboard and made into a rough frame, to which I added thin craft foam overtop. I then painted various colors/textures of black. I have also added electronics such that a pull of the trigger gives about a 3sec burst sound. I've got the speaker inside the PVC pipe handgrip which gives a much louder, echo effect. Not super loud, but loud enough that I think the effect will still be there. Was going to also illuminate the ammo counter, but wasn't happy with my first attempt. May end up skipping that, depending on time and interest.

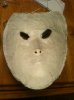
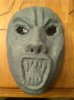
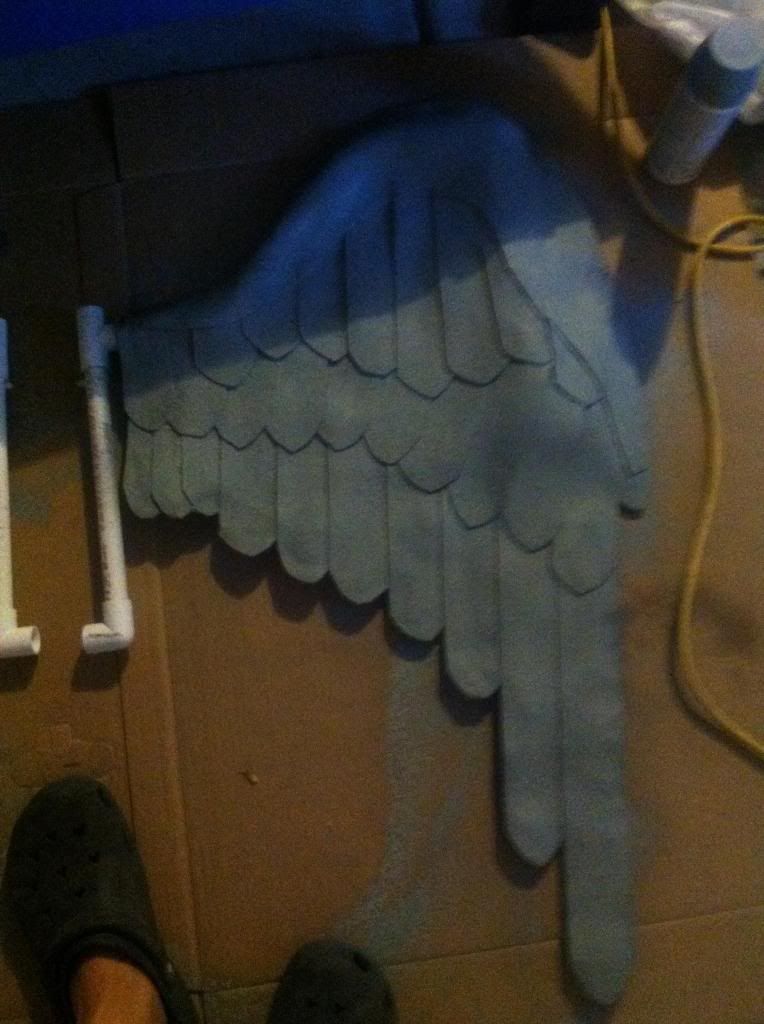
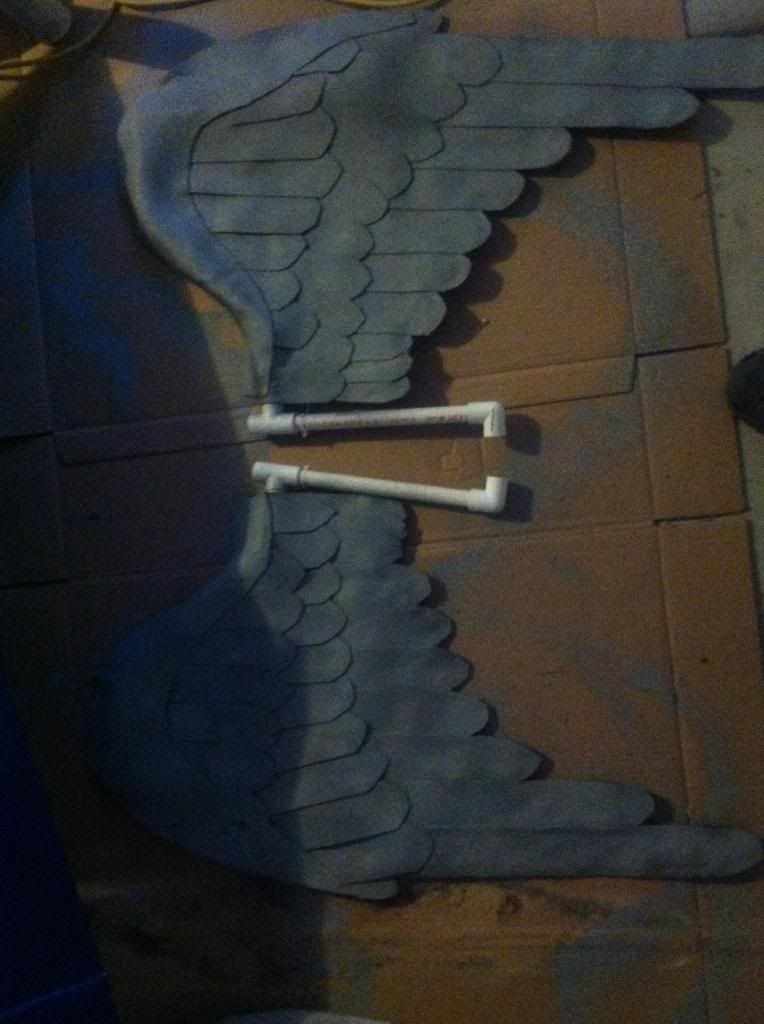
Weeping Angel: Earlier this summer, high on my hubris of being a costume creator like a "Face Off" star or something, I told my other kids to give me ideas and I'll make their costume too. One daughter took me up on it and wanted to be a Weeping Angel from Dr Who. Again, I checked out RPF and found two great threads that got me started.(penwiper and Kilayi) Combined the build ideas from the two and have an angel who is still a work in progress. The dress was scratch made (which is great for a costume but I've got no future in the clothing industry), the wings are craft foam overtop chicken wire (figured they'd get banged around in storage, so I could bend them back into shape whenever I need to use them). The face is a plaster-gauze direct mold of her face, with crayola clay on top to make the details. Arms are panty hose with press-on nails. I made a costly mistake with this one so far, in that I tried to be clever and use stone textured spray paint. My thinking was, well its a statue of stone, so use stone texture paint. Couple of problems here. 1. Those cans are expensive compared to regular paint, 2. The texture looks like rough concrete not smooth stone that a finished statue would be. But now I'm stuck since I already started using that junk I kinda have to keep on using it. Naturally only one local store carries it (for a ridiculous price) and they are currently out (I need 3 more cans at least). Lesson learned here, use the flat grays that the other (smarter) builders did on theirs. For the wig, so far I've tried to spray paint a play wig we already had. I'm not sure thats going to work out. Will make a call whether to abandon that idea later this week when I get some more paint in it. Tomorrow my daughter has the joy of putting on the pantyhose arms (that I had her sew the fingers), and get spray painted. That'll be fun. (well, for me at least). I'll have better WIP photos for this costume since its still being built.
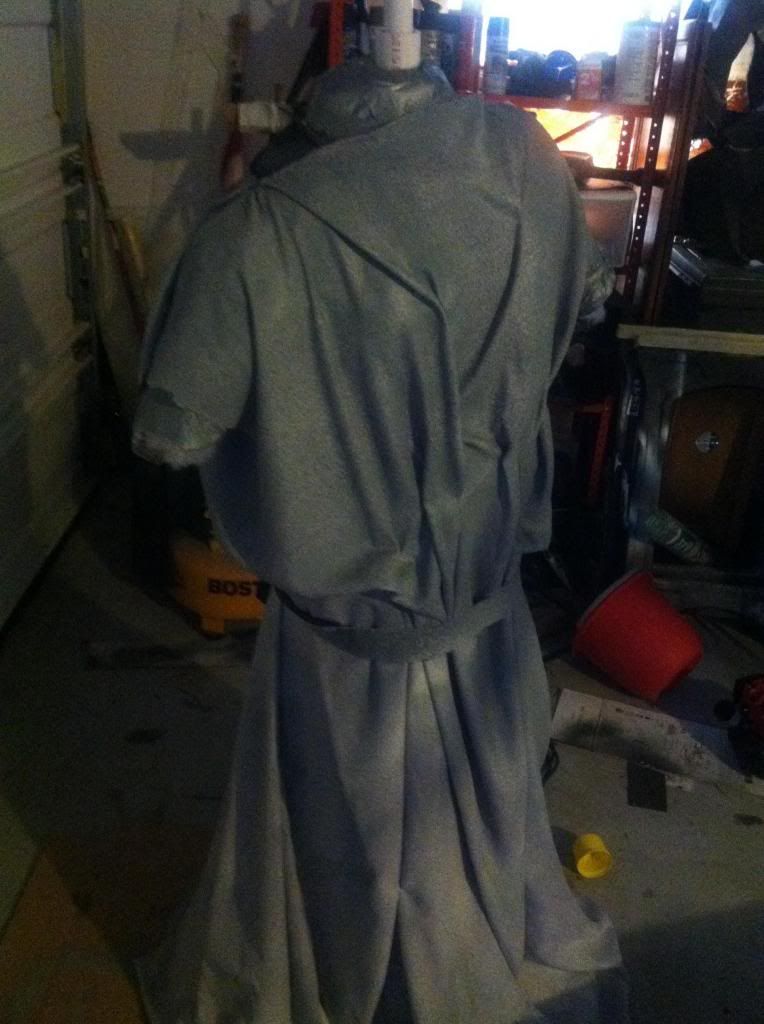
I did build a duct tape dress manequin off my daughter so I had something to build around. I have that just mounted on some PVC for a frame. Thinking that manequin will then form the base for the 2nd papermache version. The wings will be joined to each other via PVC and then inserted into a simple camelbak pouch. I haven't rigged that up yet (only just painted the wings) but in my mind it works perfectly
For the eyes, I'm currently planning on using thin acrylic. I've heated a small sheet and bent it around a baseball, so they have a curve to them. I also have some free samples of car window tint that I'm going to see if that'll provide a dark enough look. They won't be gray, but I'm not sure what else to use and still let her actually see out (that seems to be one of the complaints from the other build threads)

As an aside, if you have an angel, naturally you have to make it do its angel thing (moving in dark only), so my haunted house is going to be a TARDIS with the angel guarding the candy bowl. I've got the Dr Who video with the "instructions" that I'll play for groups as they come through then turn out the lights and hit a strobe when they are at the candy bowl. Thinking I may make a second, static, angel out of papermache just to add to the confusion. (that'll be time dependent). I'll post another build thread for the haunted house (not part of this contest, obviously).
For this submission, I have two costumes for my kids. Ok, one of them was originally built to be mine, but as I'll be manning my "haunted house" for halloween and can't think of any other time I'd wear the suit, my son gets to wear it. (Finally an advantage to him being my size).
Costume 1: HALO 3 style Mjolnir Armor.
Costume 2: Dr Who Weeping Angel.
My background in cosplay or costuming = Zero. However I am a do-it-yourself type who tends to pick projects after I see something and think "I wonder if I could do that?". In this case, last halloween I came across a HALO Master Chief costume for sale for $800 and thought "That's nuts, I wonder if I could build one". Shortly there after I discovered this wonderful site (and the HALO specific one) and began reading. Work began on the armor in January and technically still isn't finished. I started with pepakura and fiberglas, which proved troublesome, especially after pep'ing two helmets that didn't fit. Then I discovered the joys of foam and haven't looked back. Lots of "firsts" with this adventure: First time playing with fiberglas and foam. First time using plaster on a person and modeling with clay. Vast majority of learning came from following a tip or build thread on this forum and then figuring out how to apply it here.
HALO Armor: Again I originally planned this to be my suit, although I really didn't think about when/why I would ever wear it. (have never been to a CON or contest or anything). The quest was about "can I do this?". At the time there were good plans and build threads for HALO 3 style armor, less so for the newly arrive HALO 4, so I decided to go with the 3 version, couched with the plan that any anomolies would be played off as being just some other Spartan (not necessarily Master Chief). In the end, I made my own number and unit symbol so that it is a stand alone Spartan. Earlier this summer I decided that my son would probably fit in the armor and had more of a chance to wear it than I would, so I modified slightly to fit him (and still need to change out the boots since he wears a freaking size 15 shoe!). Figure he'll wear it for Halloween, maybe a school party, and perhaps if we get ourselves to a local Comic-Con in November.
Details: The armor is all foam, covered with plasti-dip and mod podge, then painted with green camo spray paint. In some areas I painted it silver, then put some goop on certain spots, painted camo, then wiped goop off to try and get look of battle damage that exposed base metal. My lousy seams were filled by silicon caulk which worked out fairly well, as it kept its flexibility while moving. Still need to work out details of the undersuit. In this pic its just black t-shirt and running pants. May end up with the same but will add velcro to keep pieces in place.


The helmet is stuffed with a number of electronics. The lights (4) do light up. I have a fan blowing on the faceshield to keep it from fogging up, I have a voice modulator going to two small speakers mounted in either cheek that lower the pitch of voice and broadcast it out (although still not loud enough) and I have audio enhancement via mics mounted in the ear area of the helmet that are wired to a board that boosts the signal and delivers it to the headset you see in the photo. its a jumbled mess, as I thought I'd rig a single power supply for all, but failed to design properly. So right now everything has its own battery pack. However the advantage is, I still have everything in the helmet, so there are no wires sticking out or anything that needs to connect to the rest of the suit.


The battlerifle was made via Pep files that I then transcribed onto carboard and made into a rough frame, to which I added thin craft foam overtop. I then painted various colors/textures of black. I have also added electronics such that a pull of the trigger gives about a 3sec burst sound. I've got the speaker inside the PVC pipe handgrip which gives a much louder, echo effect. Not super loud, but loud enough that I think the effect will still be there. Was going to also illuminate the ammo counter, but wasn't happy with my first attempt. May end up skipping that, depending on time and interest.

Weeping Angel: Earlier this summer, high on my hubris of being a costume creator like a "Face Off" star or something, I told my other kids to give me ideas and I'll make their costume too. One daughter took me up on it and wanted to be a Weeping Angel from Dr Who. Again, I checked out RPF and found two great threads that got me started.(penwiper and Kilayi) Combined the build ideas from the two and have an angel who is still a work in progress. The dress was scratch made (which is great for a costume but I've got no future in the clothing industry), the wings are craft foam overtop chicken wire (figured they'd get banged around in storage, so I could bend them back into shape whenever I need to use them). The face is a plaster-gauze direct mold of her face, with crayola clay on top to make the details. Arms are panty hose with press-on nails. I made a costly mistake with this one so far, in that I tried to be clever and use stone textured spray paint. My thinking was, well its a statue of stone, so use stone texture paint. Couple of problems here. 1. Those cans are expensive compared to regular paint, 2. The texture looks like rough concrete not smooth stone that a finished statue would be. But now I'm stuck since I already started using that junk I kinda have to keep on using it. Naturally only one local store carries it (for a ridiculous price) and they are currently out (I need 3 more cans at least). Lesson learned here, use the flat grays that the other (smarter) builders did on theirs. For the wig, so far I've tried to spray paint a play wig we already had. I'm not sure thats going to work out. Will make a call whether to abandon that idea later this week when I get some more paint in it. Tomorrow my daughter has the joy of putting on the pantyhose arms (that I had her sew the fingers), and get spray painted. That'll be fun. (well, for me at least). I'll have better WIP photos for this costume since its still being built.
I did build a duct tape dress manequin off my daughter so I had something to build around. I have that just mounted on some PVC for a frame. Thinking that manequin will then form the base for the 2nd papermache version. The wings will be joined to each other via PVC and then inserted into a simple camelbak pouch. I haven't rigged that up yet (only just painted the wings) but in my mind it works perfectly
For the eyes, I'm currently planning on using thin acrylic. I've heated a small sheet and bent it around a baseball, so they have a curve to them. I also have some free samples of car window tint that I'm going to see if that'll provide a dark enough look. They won't be gray, but I'm not sure what else to use and still let her actually see out (that seems to be one of the complaints from the other build threads)


As an aside, if you have an angel, naturally you have to make it do its angel thing (moving in dark only), so my haunted house is going to be a TARDIS with the angel guarding the candy bowl. I've got the Dr Who video with the "instructions" that I'll play for groups as they come through then turn out the lights and hit a strobe when they are at the candy bowl. Thinking I may make a second, static, angel out of papermache just to add to the confusion. (that'll be time dependent). I'll post another build thread for the haunted house (not part of this contest, obviously).
Last edited: