Nice video
A few tips.
I attach the p[pistons and squares before I apply aluminum black and paint for 2 reasons. It's easier and you can clean up the excess epoxy easier. Plus I always use a wire brush on my Dremel to expose some bare metal so the parts are glues to metal instead of paint.
I also noticed you didn't used the provided washer to create a flat surface for the square, That seems to be the most underused part of the kit but the tutorial explains it pretty well
From the other thread
ROTJ BLASTER TUTORIAL
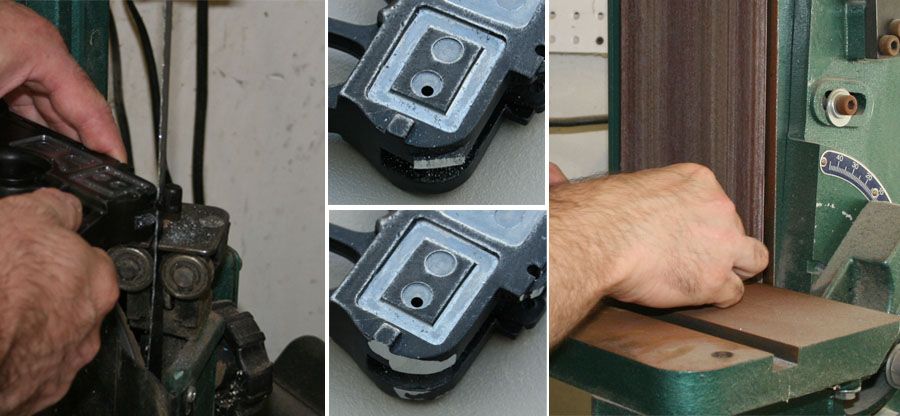
REMOVING THE SAFETY
For what ever reason most of the ROTJ Blasters did not have a rear safety lever. This part is very easy to remove and can be done with a variety of hand or power tools. The metal that a denix is made from is of poor quality and the hardness is not consistent so take it slow of you could damage what ever tool you are using to cut it.
Here is how I do it:
- I use a metal band saw to roughly cut it off (left and to center images)
- Then I use a large bench mounted sander to blend it in (right and bottom center images)
CUTTING THE BARREL
The barrel can be cut with any metal cutting tool such as a hack saw or Dremel
It should be cut to a length of 8 5/8” or 21.9cm fro the front edge to the back edge not including the bolt.
Here is how I do it:
- I use a metal band saw to roughly cut it off
- Then I use a large bench mounted sander to remove the saw marks and to put a slight bevel on the front circumference
- I also use this time to fix imperfection in the casting and to remove seem lines
MOUNTING THE RIGHT SIDE GREEBLIES
I use a combination of super glue and epoxy to attach the SQUARE and super glue and a rivet to attach the PISTON
- I attach a small washer with super glue to provide a level mounting surface for the SQUARE
- Then I apply a small dab of 5 minute epoxy to the area marked green and let it set up while I do the following
- I sand the back of the SQUARE to provide a better surface for the epoxy to bond to
- I apply super glue to the areas marked in red
- I mount the PISTON and the SQUARE at the same time and use each part as a reference to get them aligned properly (in this picture the photo distortion makes then look a little out of place)
- The super glue should set up quickly and hold the SQUARE in place until the epoxy is cured
- I let this sit for at least an hour to make sure the epoxy is fully cured
- Then I “POP” the rivet with a Stanley Rivet Gun
- I modified the nose of the rivet gun to fit into the PISTON slot to prevent it from damaging the PISTON but you can grind a small nut and use it as a spacer to do the same thing
MOUNTING THE LEFT SIDE GREEBLIES
I use a combination of super glue and a rivets to attach the PISTONs on the left side
Here is how I do it:
- I install the top piston and rivet with out any glue to use as a reference
- Then I apply a small dab of super glue behind the mounting hole of the lower piston
- I install the lower piston
- Because the 2 mounting holes are perpendicular to the mag base plate you can use a craft stick to automatically align the pistons
- Once the bottom piston is glued in place I remove the top piston
- I apply a small dab of super glue behind the mounting hole of the upper piston
- I install it and use the craft stick to align it to the bottom piston
FILLING THE HAMMER PIN HOLE
The ROTJ Blaster has 2 details on the back left raised square on the LOWER RECEIVER. These are cut into the mauser with a milling machine spot face.
Unfortunately the rear spot face is in the same area as the HAMMER PIN and once you install the HAMMER PIN it leaves a hole in the spot face.
I fix this with a time consuming process so if you’re not bothered by it, don’t worry about it.
Here is how I fill it:
- I reduce the length of the hammer pin by .030” of an inch
- I install the hammer and hammer pin in the same way I install it in a mauser
- I recess the right side of the pin with a punch, then I place a small amount of epoxy into the hole and then drive the pin flush to the right side of the mauser
- Then I fill the hole on the left side with a small amount of epoxy and let it cure for an hour, working the hammer every 10 minutes to make sure it doesn’t get epoxyied in place
- Once the epoxy is cured I drill it out of the hole a tiny bit to create a pocket for Rock Hard Wood Putty
- I fill the hole and create a tiny bump on the surface so that when it is cured it will not dimple into the hole
- I use a paper punch to make tiny sanding disks for my Dremel mandrel
- I epoxy a disk to the Dremel mandrel and let it cure
- Once the Rock Hard Putty is cured I use the sanding disk at a very slow speed and carefully sand down the bump until it is flush
- I normally have to replace the sanding disk at least once

The results are not perfect but I like it better the the none filled way
WEATHERING THE FLASH HIDER
There are several versions of the ROTJ FLASH HIDER, some are clean and others seem to be black Delrin that has been painted silver with black worn edges
I prefer a slight weathering that looks more natural
Here is how I do it:
- I completely blacken the FLASH HIDER WITH Aluminum Black
- I mount it on a mandrel that in my drill and then using a soft worn out sanding pad I remove a lot of the blackened surface by spinning it against the sanding pad.
- I complete the process by using using lightly hand sanding it parallel to the center bore.
- Once complete I apply a light coat of Testors Dullcoat.
The scratches in these images are not noticeable in person