Robocop Helmet Build (pep file)

chris01

Active Member
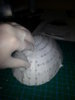
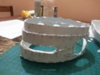
Hey, since ive been looking to buy a Robo suit and i dont seem to find it anywhere.:cry I have decided to make it myself. I've seen videos on other makers making it, so i decided to give it a try. Casually i found the file on the whole costume (except for the calves) on Ebay. The maker on the file is Laellee (this maker is a member here on the RPF). Annnnd its a great file. So, since im new on this pepakura stuff i started on the helmet. I'll keep posting the progress until i'm done with the whole parts. I hope to get the helmet completed by monday.


"Let the woman go you are under arrest"

Robocop
 

Attachments

  • 20130626_212204.jpg
    20130626_212204.jpg
    1.9 MB · Views: 291
  • 20130628_191719.jpg
    20130628_191719.jpg
    1.9 MB · Views: 497
  • 20130628_214327.jpg
    20130628_214327.jpg
    2.2 MB · Views: 245
This is the progres so far. I think it has gained more shape. Though i know that is not the exact shape of the movie version it looks acurate in cosplaycharacter terms, which is my goal here. Leave your comments!


Here's the progress on the chin.


An idea in how it looks with the chin all toghether.
 
Thanks for your comment and support Insane Luck!

Heres an update to the helmet build i think it looks sexy!. I expect to have it complete for today!


Not bad for a first build huh?


Leave comments!
 
Well im going to Texas this saturday, i wont be able to finish the project until august so i apreciate your support guys.
 
hi Chris01 looks like your of to a good start , keep up the hard work. I hope your're okay with me pointing something out to you. you need to flip the indentation on the ear. imagine that the ear is made up of three sections. the outer rim. the inner circle and the peg. you've got it so that the inner circle is raised above the rim. it needs to be lower with the center peg or stump flush with the height of the outer rim. here is a picture to show you what i mean.
robocopear.jpg

it is an easy thing for you to fix . all you should have to do is push the paper down on itself until it pops into the right place. I hope this helps buddy keep up the work its going to look great when you finish.
 
Thank you Strengthofmen for pointing me about this issue. I was'nt really sure on how to get it rigth. Ill work on it and get some pictures later on the progress. Cheers mate!:thumbsup
 
This thread is more than 10 years old.

Your message may be considered spam for the following reasons:

  1. This thread hasn't been active in some time. A new post in this thread might not contribute constructively to this discussion after so long.
If you wish to reply despite these issues, check the box below before replying.
Be aware that malicious compliance may result in more severe penalties.
Back
Top