Revisiting my 9 year old Assault Phaser

Chrisisall

Sr Member
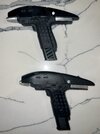
In 2013 (& 2014) I finished my assault phasers. I carved & sanded it from wood & epoxy putty, then dropped it in rubber & cast it in resin. Made about 7 & sold 4 to cover my material costs. The metal bits were just resin painted & glossed to look like metal.
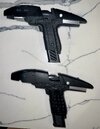
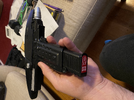
Today I received real metal parts (thanks Nicksdad) and began an upgrade. I thought it was gonna be pretty simple, but you all know that story. Always more to do than ya think...
First thing I did was sand down the metal emitter so that all the rings would be in line with the curve & not have independent edge heights.
Then I popped off the original resin emitter, drilled a hole, made room under the 'hood', cut off the side turn, and hacked into the rear heat sink fins, then sanded, and now I'm out of gas. No way to do this all in one sitting. Oh well.
9 years ago I made this, and just now finishing it the right way.....
More next week.
IMG_20220330_170846.jpg
IMG_20220329_181013.jpg
IMG_20220521_152046.jpg
IMG_20220521_170530.jpg
IMG_20220521_181051.jpg
IMG_20220521_183342.jpg
 
Last edited:
I did the same! The post is buried on here somewhere. Just waiting for a butt plate to finish it off properly now. It's been so long no one does them anymore.
 
Okay, I got all the parts fitted (sanding aluminum is no fun. The rear fins had to be shortened by almost 2mm) & now I have to re-paint. Problem is, I gave it clear, flat acrylic coats back then. I have no idea if the Rustoleum satin black (same can I used back then) will stick to it, or if it will react badly in some way. So I test sprayed my first mid grade cowl/hood to see... More Tuesday.
IMG_20220522_185654.jpg
IMG_20220522_185702.jpg
 
'Butt plate'? Like as in the bottom of the handle/ clip?
I did the same! The post is buried on here somewhere. Just waiting for a butt plate to finish it off properly now. It's been so long no one does them anymore.

I made a few for my Assault phaser. Have a few extras around if you're interested.

- Skyler101
 

Attachments

  • tempImageRZhKtx.png
    tempImageRZhKtx.png
    12.6 MB · Views: 101
  • tempImagerAl5RO.png
    tempImagerAl5RO.png
    13 MB · Views: 105
HHAhah I will! I swear! Yeah this is from WAAAAAAAY back. When we had a "Man on the inside". Props were FEDEX overnight, and returned next day post RTV. Its off an original.

Funny Story, Greg Jein was hired to make props for one of the movies. They needed the assault phaser again, but slightly modified. He happen to hit a convention, bought some castings of the assault phaser someone was selling.....took it home, changed a couple of things, painted them, Into the next movie they went.
Great story, thanks! (y)
 
I remember when you originally posted your in progress work on the phaser on Hobby Talk. I was watching for your posts at the time since I couldn't believe how well the sculpting was coming out. It's gorgeous. Hard to believe it was 9 years ago!
 
I remember when you originally posted your in progress work on the phaser on Hobby Talk. I was watching for your posts at the time since I couldn't believe how well the sculpting was coming out. It's gorgeous. Hard to believe it was 9 years ago!
Hey man, nice to see someone besides me who remember this project! Yeah, 9 years- took me long enough to upgrade to metal parts, eh? My thinking back then, if memory serves, was that if I didn't make it 100% myself, that I couldn't really say I made it. Today I realize that I could have made the metal parts myself if I'd had a $1000 lathe to spin aluminum blocks on. So I'm giving myself a break, retroactively.
Thanks so much for chiming in here!

IMG_20220330_170846.jpg
 
Holy cow! Your refreshed paint job looks fantastic!

The satin black finish is precisely what this design needs (as opposed to the milky weathering applied to Master Replicas pieces). In fact, I’ve heard from people I trust that the milky, weathered finish was a design mistake at Master Replicas.

Whoops!

Any way, I own a couple of those “milky mistakes” from Master Replicas, both purchased second hand on eBay.

One is pristine, having sat in it’s covered display case since new.

The second one has… well… issues. Its exterior finish is great - pretty much perfect. Its electronics are a different story. The lighting FX work, but there’s no sound. I removed the rear cover surrounding the soundboard and speaker it appears the connections were severed or corroded at some point.

After seeing how great your build looks in strait-forward satin black (i.e. no milky weathering), I think I’m going to rebuild my “problem child” MR assault phaser to a “fresh from the industrial replicator” spec. I think I’ll also take this opportunity to repaint the honeycomb relief behind the front cowl with a more correct hue (perhaps a misting of Alclad dark aluminum).

Thanks for inspiring me to make my “old boy” look young again!
 

Attachments

  • 0E290F6F-6253-44F3-A5D7-06DCEECDFA9F.jpeg
    0E290F6F-6253-44F3-A5D7-06DCEECDFA9F.jpeg
    2.9 MB · Views: 82
  • 29EECD7E-7423-4172-BE38-A2EDE4BC8AD9.jpeg
    29EECD7E-7423-4172-BE38-A2EDE4BC8AD9.jpeg
    2.9 MB · Views: 93
Last edited:

Your message may be considered spam for the following reasons:

If you wish to reply despite these issues, check the box below before replying.
Be aware that malicious compliance may result in more severe penalties.
Back
Top