You are using an out of date browser. It may not display this or other websites correctly.
You should upgrade or use an alternative browser.
You should upgrade or use an alternative browser.
Pyro X-Wing build with scratched canopy...
- Thread starter Colin Droidmilk
- Start date
jedimaster
Sr Member
Think I read somethin about the "New Nose".....??? Care to share Steve...?
Colin Droidmilk
Sr Member
Heh just saw your pm, Simon. Will update asap! Done sod-all on the cockpit - due to Y distraction - but yeah I've hacked the nose off and will be sticking Frank's other nose on and extending the fuse. The other nose will deffo give more of the Roman hooked effect. But I couldn't really tell if that other nose was any good until I'd cut the other one off and actually held it in place.
Lee, re the Y, I've done the engines, correcting the warp weirdness, and stuck your lovely Tees on. Will post pics in that Y thread - also asap!
Lee, re the Y, I've done the engines, correcting the warp weirdness, and stuck your lovely Tees on. Will post pics in that Y thread - also asap!
Colin Droidmilk
Sr Member
Okay here's some pics of what I have in mind for the nose.
Colin Droidmilk
Sr Member
Re: Pyro X-Wing build with scratched canopy...now with nose mod!
Simon, where are ya? Got something for ya, my san...
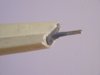
Using white blu-tac I've done a try-out for the nose positioning. This new nose here is placed a whole cm further forward, a tad further than it can take probably, so I'll move it back a mm or so, then definitely extend it backwards so the nose butt makes the right pattern again with the fuse and fuse chips etc. The nose piece is too short anyway, I reckon, and the slope starts too abruptly, so extending it back to the fuse should work out (if my sculpting skills are up to it). I arrived at this through much studying of the first photo below.
Simon, where are ya? Got something for ya, my san...
Using white blu-tac I've done a try-out for the nose positioning. This new nose here is placed a whole cm further forward, a tad further than it can take probably, so I'll move it back a mm or so, then definitely extend it backwards so the nose butt makes the right pattern again with the fuse and fuse chips etc. The nose piece is too short anyway, I reckon, and the slope starts too abruptly, so extending it back to the fuse should work out (if my sculpting skills are up to it). I arrived at this through much studying of the first photo below.
jedimaster
Sr Member
Sweet..... Looks much better Steve. I've got a solid fuse (different casting) which has no twist in the fuse and the same "original nose" as you've just attached. It has shrunk like the Cerney one you have but proportionally . I'll post some pix. It may help a little but that's a major improvement you got there mate. Yea... It's Pyro time!
Colin Droidmilk
Sr Member
Pyro time it is!
Glad you like. Looking forward to your pix...
Glad you like. Looking forward to your pix...
Colin Droidmilk
Sr Member
Done some more work on this nosejob. Epoxied a supporting brass pole into the front of the fuse. Currently pratting about with styrene shims and an xacto in the hole I drilled in the nose-cone. This is because the hole in the nose isn't quite in the right place. And this is because both holes were just guessed, done by eye. No other way to do it really. Anyway, I'm getting there, I think. Pics soon!
Any chance you could cast that canopy?
Colin Droidmilk
Sr Member
Flattered you'd like one! Trouble is, casting is beyond my ken, and also this is a pretty fragile object. But it wasn't that hard to make. Use the kit canopy as a stencil. Begin by making the front 3 window frames. Draw round the kit canopy for each of the frames, tracing the shapes out onto 1mm styrene. For the top window frame, once you've drawn round it, just narrow the front by 2mm - this is the key step in improving the look. These 3 shapes are of course the outer planes of the canopy. Then, shoving blu-tac on the inner surfaces to hold them together, fit the front 3 frames together, sit 'em in the fuse, and see where you are. If any of the panes are too big or too small or the wrong shape, refine them by making second versions, making careful note of how the shapes need adjusting. When satisfied, cut out the holes for the windows and fill in the bodies of the frames with putty, using ref pics to take careful note of frame thickness. Repeat all this for the rear section, though this is a lot harder, and there are problems here I've yet to solve... - mainly because there are a lot of devilish, curved surfaces on the fuse here. Oh, and before you do any of this, beware the fact that my scratched canopy is not always flush with the fuse walls - it sits inside them at a few points due to the fact that the styrene is straight and the fuse walls have a slight bow, though it doesn't show up too much unless you've really got your nose up to the thing, and for me, it's a price worth paying for the better overall look. Hope this helps!
Colin Droidmilk
Sr Member
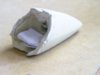
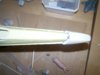
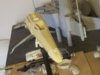
Some pics, then. Check out the mess inside the nosecone, ha ha! But that ungodliness is what gets the nose into line - just. It ain't perfect but is about the best possible given the fact that the nose and fuselage here are 2 genetically separate beasts. Guess it's a miracle the match is this good given the shrinkage, warp and weirdness of the fuse. Also, note the backwards extension of the nosecone, roughed out here in white blu-tac. The extension of the whole model here is about 7mm. That might change as I continue fooling about with it.
Attachments
jedimaster
Sr Member
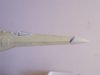
Looking good Steve... It's a bloody nightmare to get right. Here's that other fuse with the same nose cast in.
Colin Droidmilk
Sr Member
Nightmare is right - it's why I haven't been able to face doing it for the last 6 months. Thanks for the pic. Interesting.
Just epoxied the nose into place. The die is cast. There's no going back now. Hope the hell no nasty surprises await as I sculpt...
Just epoxied the nose into place. The die is cast. There's no going back now. Hope the hell no nasty surprises await as I sculpt...
Colin Droidmilk
Sr Member
Great - my face has puffed up into an itching inflamed mass after blocking in the nose sculpt with putty. My eyes and lips are now a completely different shape. And that was with wearing a mask. Why do we put put ourselves through this stuff, eh? Lol...
jedimaster
Sr Member
Pix or it didn't happen!
Colin Droidmilk
Sr Member

Miliput, its sooo not the same stuff these days mate, i find it awful to use in its current recipe, Magisculp is what i use for those jobs. Eye does look puffy mate, go easy on that stuff id say. X wing looks so nice, i have to see this one done.......a lot of thought and head scratching has gone into her thus far, it begs to be painted sometime!
lee
lee
Colin Droidmilk
Sr Member
Yeah, reckon you're right. They also changed the recipe of the epoxy brand I use. It now dries way too fast and has a wonderful new odour - a sort of delicate blend of vomit and rotting meat.
Thanks for the kind words there. It's been a bit dicey getting some of the aspects of this nose to work out, though. Like the underside lip where nose meets fuse. That's still too thick, and to get it thin enough (I want the thin lip of the old nose, ha ha ha!) will probably mean eating into the resin part of the nose. Not too happy about that. Knew there'd be some problem with this - it's inherent in moving the nose forward - but it's a bit worse than I was hoping. I also suspected the niche on the upper surface would bite me in the arse, but looking again at the ref, it seems it might've been a bit too short anyway, so extending it back - as I have to - won't look as weird as I thought, and might even be a bit more accurate. I'll try and post some more pics later...
Thanks for the kind words there. It's been a bit dicey getting some of the aspects of this nose to work out, though. Like the underside lip where nose meets fuse. That's still too thick, and to get it thin enough (I want the thin lip of the old nose, ha ha ha!) will probably mean eating into the resin part of the nose. Not too happy about that. Knew there'd be some problem with this - it's inherent in moving the nose forward - but it's a bit worse than I was hoping. I also suspected the niche on the upper surface would bite me in the arse, but looking again at the ref, it seems it might've been a bit too short anyway, so extending it back - as I have to - won't look as weird as I thought, and might even be a bit more accurate. I'll try and post some more pics later...
Colin Droidmilk
Sr Member
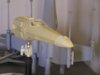
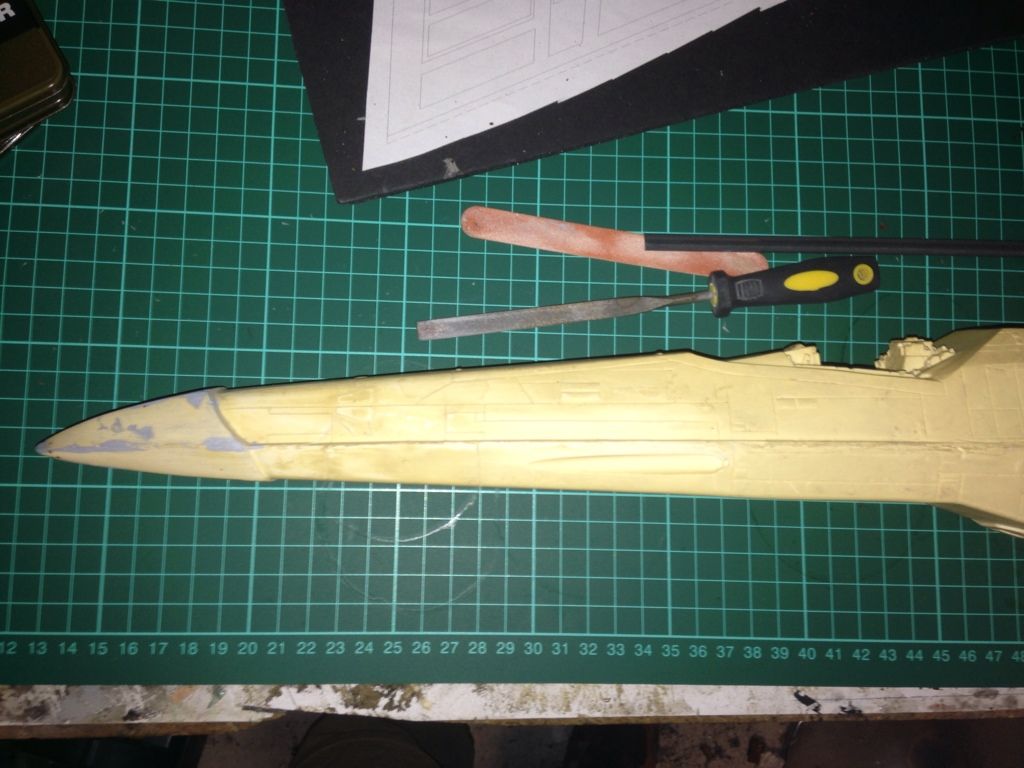
Ok, some more pics. Pinned a wing on provisionally, and tried a fit of the cockpit interior. This is sitting too high and will need something shaved off the bottom. If I use it, that is...(Simon, you know what I'm talkin' 'bout, man. Heh heh..) Sanded a ton off the nose. May sand more off the nose rear to shorten the nosecone a tad.Sorry about the blurry pics, but this is due to standing the other side of the room and using the zoom - only way to show the over-all shape without wide-angle distortion.


 .
.
.Similar threads
- Replies
- 117
- Views
- 12,338
- Replies
- 15
- Views
- 2,404