Utinni
Sr Member
Yup…I’m finally gonna do it!
I’ve been a member of this board from the start, building and collecting replica props and costumes for over 20 years now. Like everyone here, there’s dream projects you want to do, more than the typical prop, something that seems unobtainable. My first, back in ’99, I bought my first set of Galaxy Trading/Wookie Cantina Stormtrooper armor. Then, in the very early days of the A.S.A.P. board I was a part of the first Proton Pack research and building group and have built four packs and some traps over the years. It took me around 5 years to put together my Rocketeer costume, this is when there were only 2 maybe 3 accurate finished ones out there, well before pepakura and resin printing was easily available, the days of having to know a friend of a friend that has some secret information about a certain part.
My last 2 big dream projects are an accurate Boba Fett costume and my ultimate prop… the DeLorean Time Machine! I’m pretty much done with my con years of costuming, and my side business, making and selling jewelry at Ren Faires took over my free time and I haven’t had a prop project in almost 8 years! The ITCH to build has retuned!
So, my next adventure is going to build as close of a replica of the BTTF Time Machine as I can do! I'm shooting for a BTTF 1 car that can convert to a Mr. Fusion version. I would like to have as many original parts as I can find, and afford, I'm fully aware of the rarity and high values some parts have and due to the overall cost to do this, I will be happy using high quality replicas of parts I know I can probably never get my hands on. If I can use a metal replica over a resin casting, I will. I don't need to have every imperfect ding or dent or scratch as the real car, but I want to use 99% of the correct part, not a lot or any stand-in parts that "get by" for the general public because they look futuristic or misc. electronics slapped onto the car. This will be a LONG term project for me, I’m not in a rush. And similar to Munson’s Matmobile build blog, I’d like to share my journey here, with fellow fans and builders! Previous builders, like Gary Weaver and the “A car” restoration team, laid the ground work for such a project. He and others have identified MANY parts over the years to help other builders, and what’s exciting is that there’s still a couple parts yet to be found! That’s what pulls me to this project! Back to the days of climbing through racks of old parts in surplus stores, page after page on Ebay to try and find a part. The chase, that’s what’s fun about this hobby!
My plan is to gather or scratch build as many parts as I can, and then look for a suitable car for conversion. I want to collect everything first, except for the parts where I need the physical car to build– rear metal deck plate and vents, conduit for the flux bands and such. I don’t want a half built project car sitting in my garage for years before I can finish it. I want to do the conversion all at one time. Several builders have done it this way, and it seems the best way for me.
I’ve already started gathering and purchasing parts from other builders and I plan to share each part of the build process here. This will be a multi-year project for me, I’m fully aware that the price of DeLoreans has been creeping up and up lately, but at the moment, I don’t have the budget set aside for one right now. So collecting the parts for now, it will be.
Here I'm sitting in Sean Bishop's car, before he sold it years ago, THAT was the day I knew I needed to build one!

Here's most of my current collection of parts, I'll get more into detail with them as I start modifying and building them up. I also currently have on order:
CNC machined Turbine/inner core and lid
CNC machined Medical heatsink
CNC machined Radio heatsink
CNC machined oil separators
CNC machined Metal Cross-over tube elbows
CNC machined Delrin Torin blower
Metal Oil separator mesh tubes
Metal dash box casings
Part: Rear deck heating vent
Area: Rear Driver's side pontoon
Original ID’ed Part: Heating vent from an old Xerox machine
Materials: All Metal, some plastic connectors.
Type: Replica
Maker: Mat Bedogni
I’m really happy and honored to get this piece. It was one of the last parts made by Mat Bedogni, he was an extremely talented TM parts builder that recently passed away un-expectantly.

Part: Plutonium Chamber vents
Area: Rear deck center- Plutonium Camber
Original ID’ed part: 1959 Dodge Polara Hubcab
Materials: Metal
Type: Original Part
This is the upper part of the Plutonium chamber, that the turbine and lid sits on. In early pre-production and in 1 shot in the movie you can see the vents light up with an orange glow. I might add the opaque white plastic behind the vents and add lighting effects.

Part: Cross-over Tube
Area: Rear deck, behind/above Plutonium Chamber
Original ID’ed part: Weatherhead Co.
Materials: Resin/Tubing
Type: Replica
I'll be upgrading this part soon to CNC machined metal elbows

Part: T-195 Radio Cooling Vent
Area: Rear deck center in front of the plutonium chamber
Original ID’ed part: vent from a military GRC-19 T-195 Radio
Materials: Aluminum machined
Type: Replica
Maker: James Napier

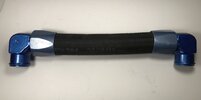
Part: Pacific Flex Vent Hoses
Area: Rear deck, attached the outside large vents connecting to the rear outside bulkhead
Original ID’ed part: Pacific flex hose
Materials: Stainless Steel
Type: Replica
Maker: James Napier

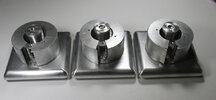
Part: Hockey Pucks
Area: Rear Driver's side pontoon
Original ID’ed part: Still Unknown, possible vintage film cassette housing, with roller bearings inside and tapered spindles. the silver bases were from airplane cigarette ash trays placed upside down
Materials: Aluminum machined
Type: Replica
Maker: James Napier

Part: Wormhole Emitter
Area: Outside Top between the doors
Original ID’ed part: Still Unknown, possible Military/Naval audio equipment
Materials: Aluminum machined
Type: Replica
Maker: James Napier

I have a resin casting from the "A car" when the restoration team was working on the car.

Part: Overhead light
Area: Inside upper Console rear area
Original ID’ed part: Grimes Aircraft Emergency Light
Materials: Metal and plastic
Type: Original Part
Maker: Grimes

Part: Time Switch
Area: Inside center armrest front
Original ID’ed part: Dayton Drum Switch
Materials: Metal, added Acrylic Cover
Type: Original and custom Acrylic Cover
Maker: Dayton
This is a newer version, so I need to locate a replica Dayton plate and form the clear casing.


Part: Flux Capacitor Enclosure
Area: Inside Rear Bulkhead center
Original ID’ed part: Stahlin Enclosure J1210HPL 12x10x5
Materials: Fiberglass Metal
Type: Original
Maker: Stahlin

Resin Cannon Elbows and parts for the Flux Capacitor and Bailout box

Part: Bail out Box
Area: inside behind driver's seat
Original ID’ed part: Project box, Bail out bottle, Clamps. I'm currently using a old Soda stream bottle from the UK, it has the same measurements of real bailout bottle, stand-in until I can pick up a real bottle
Materials: Metal
Type: Original and stand-in bottle

Part: Flux Band Holders
Area: around the outside of the car
Original ID’ed part: custom made for the films
Materials: Resin/hard rubber
Type: replica
Maker: Brad Gaffy

Part: Mr. Fusion Lid
Area: rear deck
Original ID’ed part: custom made for the films
Materials: Resin casting
Type: casting from the "A car" restoration build team
Maker: Restoration team

Part: Mr. Fusion
Area: rear deck
Original ID’ed part: Krups coffee grinder
Materials: Pastic
Type: Real part
Maker: Krups.

Part: Flux Box plugs
Area: front, top and read of the car attached to the flux boxes
Original ID’ed part: Mole Richardson plug
Materials: Resin and metal
Type: Replicas
Maker: Brad Gaffy

Part: Clare Electronic Box detail parts
Area: inside center arm rest
Original ID’ed parts: Circuit Breakers, Fuse holders, Toggle Switch, Kulka terminals
Materials: Metal, plastic
Type: real parts
Maker: various

Cable Glands, used in the flux boxes and inside of the car on the rear bulkhead, these sizes are mainly for the flux boxes.

Part: Gold Replay bank
Area: inside rear bulkhead behind passenger seat
Original ID’ed part: Potter & Brumfield KHU11D32 Relays, these are VERY rare and hard to find, even the most accurate replicas out there don't have these
Materials: Metal, Plastic
Type: Originals
Maker: Potter & Brumfield

I happened to find the motherload of them:

Part: Time Circuit Keypad
Area: inside front center dash next to time circuits
Original ID’ed part: security keypad
Materials: Resin cast
Type: cast from "A car" restoration team
Maker: "A car" restoration team

Part: Plutonium Canister
Area: rear deck
Original ID’ed part: custom made for the film
Materials: Acrylic
Type: Replica
Maker: Gonktoys

I have a couple other small detail parts, and mentioned I have several other parts currently on order. I'll go more in depth in detail on the parts as I work on them. I'll be updating as I go!
If you have any tips or suggestions, or extra parts I haven't already listed and looking to sell please let me know! I'm not currently looking for any replica paper props, or props not associated with the actual car build - hover boards, remotes, plutonium cases. etc.
This is going to be an awesomely fun project!!!
- Jeff
I’ve been a member of this board from the start, building and collecting replica props and costumes for over 20 years now. Like everyone here, there’s dream projects you want to do, more than the typical prop, something that seems unobtainable. My first, back in ’99, I bought my first set of Galaxy Trading/Wookie Cantina Stormtrooper armor. Then, in the very early days of the A.S.A.P. board I was a part of the first Proton Pack research and building group and have built four packs and some traps over the years. It took me around 5 years to put together my Rocketeer costume, this is when there were only 2 maybe 3 accurate finished ones out there, well before pepakura and resin printing was easily available, the days of having to know a friend of a friend that has some secret information about a certain part.
My last 2 big dream projects are an accurate Boba Fett costume and my ultimate prop… the DeLorean Time Machine! I’m pretty much done with my con years of costuming, and my side business, making and selling jewelry at Ren Faires took over my free time and I haven’t had a prop project in almost 8 years! The ITCH to build has retuned!
So, my next adventure is going to build as close of a replica of the BTTF Time Machine as I can do! I'm shooting for a BTTF 1 car that can convert to a Mr. Fusion version. I would like to have as many original parts as I can find, and afford, I'm fully aware of the rarity and high values some parts have and due to the overall cost to do this, I will be happy using high quality replicas of parts I know I can probably never get my hands on. If I can use a metal replica over a resin casting, I will. I don't need to have every imperfect ding or dent or scratch as the real car, but I want to use 99% of the correct part, not a lot or any stand-in parts that "get by" for the general public because they look futuristic or misc. electronics slapped onto the car. This will be a LONG term project for me, I’m not in a rush. And similar to Munson’s Matmobile build blog, I’d like to share my journey here, with fellow fans and builders! Previous builders, like Gary Weaver and the “A car” restoration team, laid the ground work for such a project. He and others have identified MANY parts over the years to help other builders, and what’s exciting is that there’s still a couple parts yet to be found! That’s what pulls me to this project! Back to the days of climbing through racks of old parts in surplus stores, page after page on Ebay to try and find a part. The chase, that’s what’s fun about this hobby!
My plan is to gather or scratch build as many parts as I can, and then look for a suitable car for conversion. I want to collect everything first, except for the parts where I need the physical car to build– rear metal deck plate and vents, conduit for the flux bands and such. I don’t want a half built project car sitting in my garage for years before I can finish it. I want to do the conversion all at one time. Several builders have done it this way, and it seems the best way for me.
I’ve already started gathering and purchasing parts from other builders and I plan to share each part of the build process here. This will be a multi-year project for me, I’m fully aware that the price of DeLoreans has been creeping up and up lately, but at the moment, I don’t have the budget set aside for one right now. So collecting the parts for now, it will be.
Here I'm sitting in Sean Bishop's car, before he sold it years ago, THAT was the day I knew I needed to build one!
Here's most of my current collection of parts, I'll get more into detail with them as I start modifying and building them up. I also currently have on order:
CNC machined Turbine/inner core and lid
CNC machined Medical heatsink
CNC machined Radio heatsink
CNC machined oil separators
CNC machined Metal Cross-over tube elbows
CNC machined Delrin Torin blower
Metal Oil separator mesh tubes
Metal dash box casings
Part: Rear deck heating vent
Area: Rear Driver's side pontoon
Original ID’ed Part: Heating vent from an old Xerox machine
Materials: All Metal, some plastic connectors.
Type: Replica
Maker: Mat Bedogni
I’m really happy and honored to get this piece. It was one of the last parts made by Mat Bedogni, he was an extremely talented TM parts builder that recently passed away un-expectantly.
Part: Plutonium Chamber vents
Area: Rear deck center- Plutonium Camber
Original ID’ed part: 1959 Dodge Polara Hubcab
Materials: Metal
Type: Original Part
This is the upper part of the Plutonium chamber, that the turbine and lid sits on. In early pre-production and in 1 shot in the movie you can see the vents light up with an orange glow. I might add the opaque white plastic behind the vents and add lighting effects.
Part: Cross-over Tube
Area: Rear deck, behind/above Plutonium Chamber
Original ID’ed part: Weatherhead Co.
Materials: Resin/Tubing
Type: Replica
I'll be upgrading this part soon to CNC machined metal elbows
Part: T-195 Radio Cooling Vent
Area: Rear deck center in front of the plutonium chamber
Original ID’ed part: vent from a military GRC-19 T-195 Radio
Materials: Aluminum machined
Type: Replica
Maker: James Napier
Part: Pacific Flex Vent Hoses
Area: Rear deck, attached the outside large vents connecting to the rear outside bulkhead
Original ID’ed part: Pacific flex hose
Materials: Stainless Steel
Type: Replica
Maker: James Napier
Part: Hockey Pucks
Area: Rear Driver's side pontoon
Original ID’ed part: Still Unknown, possible vintage film cassette housing, with roller bearings inside and tapered spindles. the silver bases were from airplane cigarette ash trays placed upside down
Materials: Aluminum machined
Type: Replica
Maker: James Napier
Part: Wormhole Emitter
Area: Outside Top between the doors
Original ID’ed part: Still Unknown, possible Military/Naval audio equipment
Materials: Aluminum machined
Type: Replica
Maker: James Napier
I have a resin casting from the "A car" when the restoration team was working on the car.
Part: Overhead light
Area: Inside upper Console rear area
Original ID’ed part: Grimes Aircraft Emergency Light
Materials: Metal and plastic
Type: Original Part
Maker: Grimes
Part: Time Switch
Area: Inside center armrest front
Original ID’ed part: Dayton Drum Switch
Materials: Metal, added Acrylic Cover
Type: Original and custom Acrylic Cover
Maker: Dayton
This is a newer version, so I need to locate a replica Dayton plate and form the clear casing.
Part: Flux Capacitor Enclosure
Area: Inside Rear Bulkhead center
Original ID’ed part: Stahlin Enclosure J1210HPL 12x10x5
Materials: Fiberglass Metal
Type: Original
Maker: Stahlin
Resin Cannon Elbows and parts for the Flux Capacitor and Bailout box
Part: Bail out Box
Area: inside behind driver's seat
Original ID’ed part: Project box, Bail out bottle, Clamps. I'm currently using a old Soda stream bottle from the UK, it has the same measurements of real bailout bottle, stand-in until I can pick up a real bottle
Materials: Metal
Type: Original and stand-in bottle
Part: Flux Band Holders
Area: around the outside of the car
Original ID’ed part: custom made for the films
Materials: Resin/hard rubber
Type: replica
Maker: Brad Gaffy
Part: Mr. Fusion Lid
Area: rear deck
Original ID’ed part: custom made for the films
Materials: Resin casting
Type: casting from the "A car" restoration build team
Maker: Restoration team
Part: Mr. Fusion
Area: rear deck
Original ID’ed part: Krups coffee grinder
Materials: Pastic
Type: Real part
Maker: Krups.
Part: Flux Box plugs
Area: front, top and read of the car attached to the flux boxes
Original ID’ed part: Mole Richardson plug
Materials: Resin and metal
Type: Replicas
Maker: Brad Gaffy
Part: Clare Electronic Box detail parts
Area: inside center arm rest
Original ID’ed parts: Circuit Breakers, Fuse holders, Toggle Switch, Kulka terminals
Materials: Metal, plastic
Type: real parts
Maker: various
Cable Glands, used in the flux boxes and inside of the car on the rear bulkhead, these sizes are mainly for the flux boxes.
Part: Gold Replay bank
Area: inside rear bulkhead behind passenger seat
Original ID’ed part: Potter & Brumfield KHU11D32 Relays, these are VERY rare and hard to find, even the most accurate replicas out there don't have these
Materials: Metal, Plastic
Type: Originals
Maker: Potter & Brumfield
I happened to find the motherload of them:
Part: Time Circuit Keypad
Area: inside front center dash next to time circuits
Original ID’ed part: security keypad
Materials: Resin cast
Type: cast from "A car" restoration team
Maker: "A car" restoration team
Part: Plutonium Canister
Area: rear deck
Original ID’ed part: custom made for the film
Materials: Acrylic
Type: Replica
Maker: Gonktoys
I have a couple other small detail parts, and mentioned I have several other parts currently on order. I'll go more in depth in detail on the parts as I work on them. I'll be updating as I go!
If you have any tips or suggestions, or extra parts I haven't already listed and looking to sell please let me know! I'm not currently looking for any replica paper props, or props not associated with the actual car build - hover boards, remotes, plutonium cases. etc.
This is going to be an awesomely fun project!!!
- Jeff
Attachments
Last edited:
") Updated Jan 2021
Updated Jan 2021