You are using an out of date browser. It may not display this or other websites correctly.
You should upgrade or use an alternative browser.
You should upgrade or use an alternative browser.
Phase II Enterprise Study Model
- Thread starter Shaw
- Start date
Interesting! Looking at the artwork without the windows added it makes complete sense that they were done after the fact to make the design "busier". Is this something you discovered from research or a conclusion you reached from studying the picture (either way it's quite the discovery)?
Also, to be a bit pedantic about it, I'm fairly certain that particular painting is attributed to John Berkey.
And if you don't do a kit I would completely love a set of nacelles.
Also, to be a bit pedantic about it, I'm fairly certain that particular painting is attributed to John Berkey.
And if you don't do a kit I would completely love a set of nacelles.
Shaw
Well-Known Member
Thanks guys!
You wouldn't happen to know what his role/connection to Phase II was? I don't have his name in any of my notes on the production artists.
Plus there seemed to be a lot of drawings/paintings that were later modified to reflect changes from Phase II to TMP.
I've been making some small amounts of progress, and I'm pretty sure I'm close to connecting the dorsal to the secondary hull.
Also I think I've hit on nearly all the aspects of the nacelle that I wanted in place before making molds, so I'm hoping to join most of the major nacelle elements together in the next week and get them ready. As with the bridge/B/C deck, some aspects of the nacelles will be easier to address on the final parts (in the final material) than the collection of materials that the master is made out of.
Anyways, here is another test assembly I threw together...
Yeah, I think that going with something larger might end up being an easier route (specially if you're going to light it). If I can't pull off getting some parts from the original molds to do a studio scale version, I'll most likely try a half studio scale version (which is about the size of the 1/350 Refit Enterprise kit). The more I learn about this design, the more I realize that this needs to be done as a lit model.Who knows, I might even just scrap my attempt to do one of these with the AMT kits and try doing one with the 1/350 Polar Lights kits instead (after I've got a few other simple to do kitbashes under my belt first).
I didn't know that... thanks!Also, to be a bit pedantic about it, I'm fairly certain that particular painting is attributed to John Berkey.
You wouldn't happen to know what his role/connection to Phase II was? I don't have his name in any of my notes on the production artists.
I was studying the painting, which follows along very nice, logical geometric aspects of the shape and proportions of the Enterprise (specially given the strong perspective nature of the piece), and the windows (both placement and proportion) didn't seem to work with the rest of the artwork. Upon closer inspection, it looked like there were dark windows that were being covered which supported the idea that those other windows were added to the piece later.Interesting! Looking at the artwork without the windows added it makes complete sense that they were done after the fact to make the design "busier". Is this something you discovered from research or a conclusion you reached from studying the picture (either way it's quite the discovery)?
Plus there seemed to be a lot of drawings/paintings that were later modified to reflect changes from Phase II to TMP.
I've been making some small amounts of progress, and I'm pretty sure I'm close to connecting the dorsal to the secondary hull.
Also I think I've hit on nearly all the aspects of the nacelle that I wanted in place before making molds, so I'm hoping to join most of the major nacelle elements together in the next week and get them ready. As with the bridge/B/C deck, some aspects of the nacelles will be easier to address on the final parts (in the final material) than the collection of materials that the master is made out of.
Anyways, here is another test assembly I threw together...
It looks amazing. In another dimension this ship flew around for a five season mission and the crew all had those crazy beltless belt buckles. Really great to see this version of the Enterprise come to life.
What is the final Jefferies interpretation of the torpedo launchers? I do enjoy the double barrel look of the illustration, but that doesn't mean it was ever intended to be that way.
What is the final Jefferies interpretation of the torpedo launchers? I do enjoy the double barrel look of the illustration, but that doesn't mean it was ever intended to be that way.
Last edited:
Shaw
Well-Known Member
I think JMChladek pointed this out earlier in the thread, but the weapons assembly at the base of the dorsal was the phaser banks in Phase II.What is the final Jefferies interpretation of the torpedo launchers? I do enjoy the double barrel look of the illustration, but that doesn't mean it was ever intended to be that way.
Lets face it... the original Enterprise had no weapons. It wasn't really on anyones minds at the time it was being designed, so that aspect was left out. Jefferies tried to amend this in his TOS writers guide drawings by showing where they might be and the effects people (not always the same people or company from episode to episode) generally attempted to match this.
To fix this Jefferies added a clearly visible phaser bank at the base of the dorsal. This is also included in the Phase II writers guide which states...
... and our Optical Effect here is "blips or "squirts" of blue phaser fire, which are emitted from the vessel's main strut.
The definition of what "phasers" are covers both the standard beam version and the "Balance of Terror" version (which seemed like what was later called photon torpedos). I think this was an attempt to simplify weapons for the writers (with "phasers" being an all inclusive generic term).At any rate, the Enterprise was finally given a place where all that was to be seen coming from for Phase II.
What Jefferies designed was a tube like assembly (wider than it was tall) with a single cone-like opening and a smaller lens/ring suspended over that.
Because the tube is made up of two intersecting cylinders, artists took this to be two distinct tubes rather than a single wide one. Plus when this was changed for TMP it became two torpedo openings, so people tend to apply that backwards to the Phase II design.
This was all supported by a thin wedge dropping down from the dorsal and a slightly thicker wedge from the secondary hull. Unfortunately, Price/Loos mistook this for a full bend in the leading edge of the dorsal (which would have needed an opening cut into it to make room for the cone feature). This is something of a problem because the assembly is only slightly wider than the dorsal's widest points, which on the studio model had been moved forward by the Price/Loos change.
I'm still looking into how they planned on dealing with this on the final studio model, but for my study model, I'm sticking with Jefferies' original design (which is why I could leave the dorsal essentially TOS-like throughout all this).
Sorry for the long reply to a short question.
Don't apologize. Not an easy answer.
So the never finished Phase II model was an incorrect interpretation of Jefferies plans where the phaser weapons array connects... with the dorsal coming to a point instead of having a wider radius at the leading edge?
I certainly understand the intricacies of the design so much better seeing your model being built. In the past I thought the fate of a junk smooth refit would make an easy Phase II conversion. Couldn't have been more wrong. I'm really enjoying the Phase II Enterprise, there is so much more that is different when compared to the refit I never could see before.
Shaw
Well-Known Member
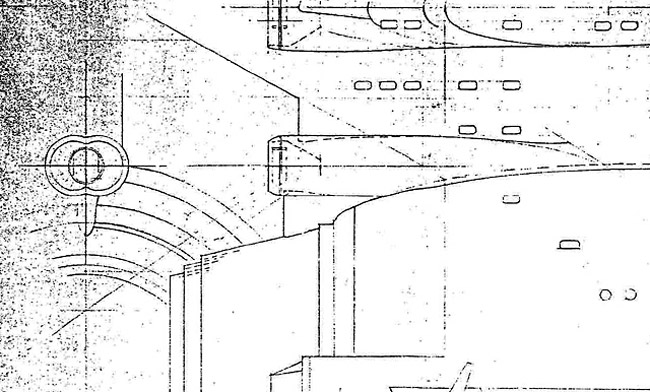
No... it should be a sharp edge.So the never finished Phase II model was an incorrect interpretation of Jefferies plans where the phaser weapons array connects... with the dorsal coming to a point instead of having a wider radius at the leading edge?
This is one of the reasons that building this model has been so enlightening for me, when I did the clean up of the plans back in 2007, I made assumptions based on having seen photos of the studio model. So what I thought was copy noise just above on the front view of the phaser assembly was actually the lightly drawn outline of the wedge.
It wasn't until I started having to plan out how to build the dorsal, and started looking at the actual cross sections Jefferies had provided that I realized that the leading edge of the dorsal didn't just change direction and dropped straight down (like how Price/Loos had built their model).
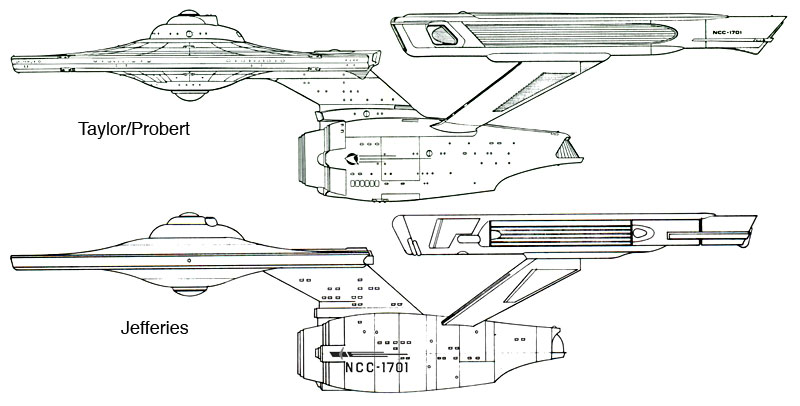
These are the plans that I used to build my dorsal (compared to the AMT/ERTL Refit dorsal that came with the kit)...
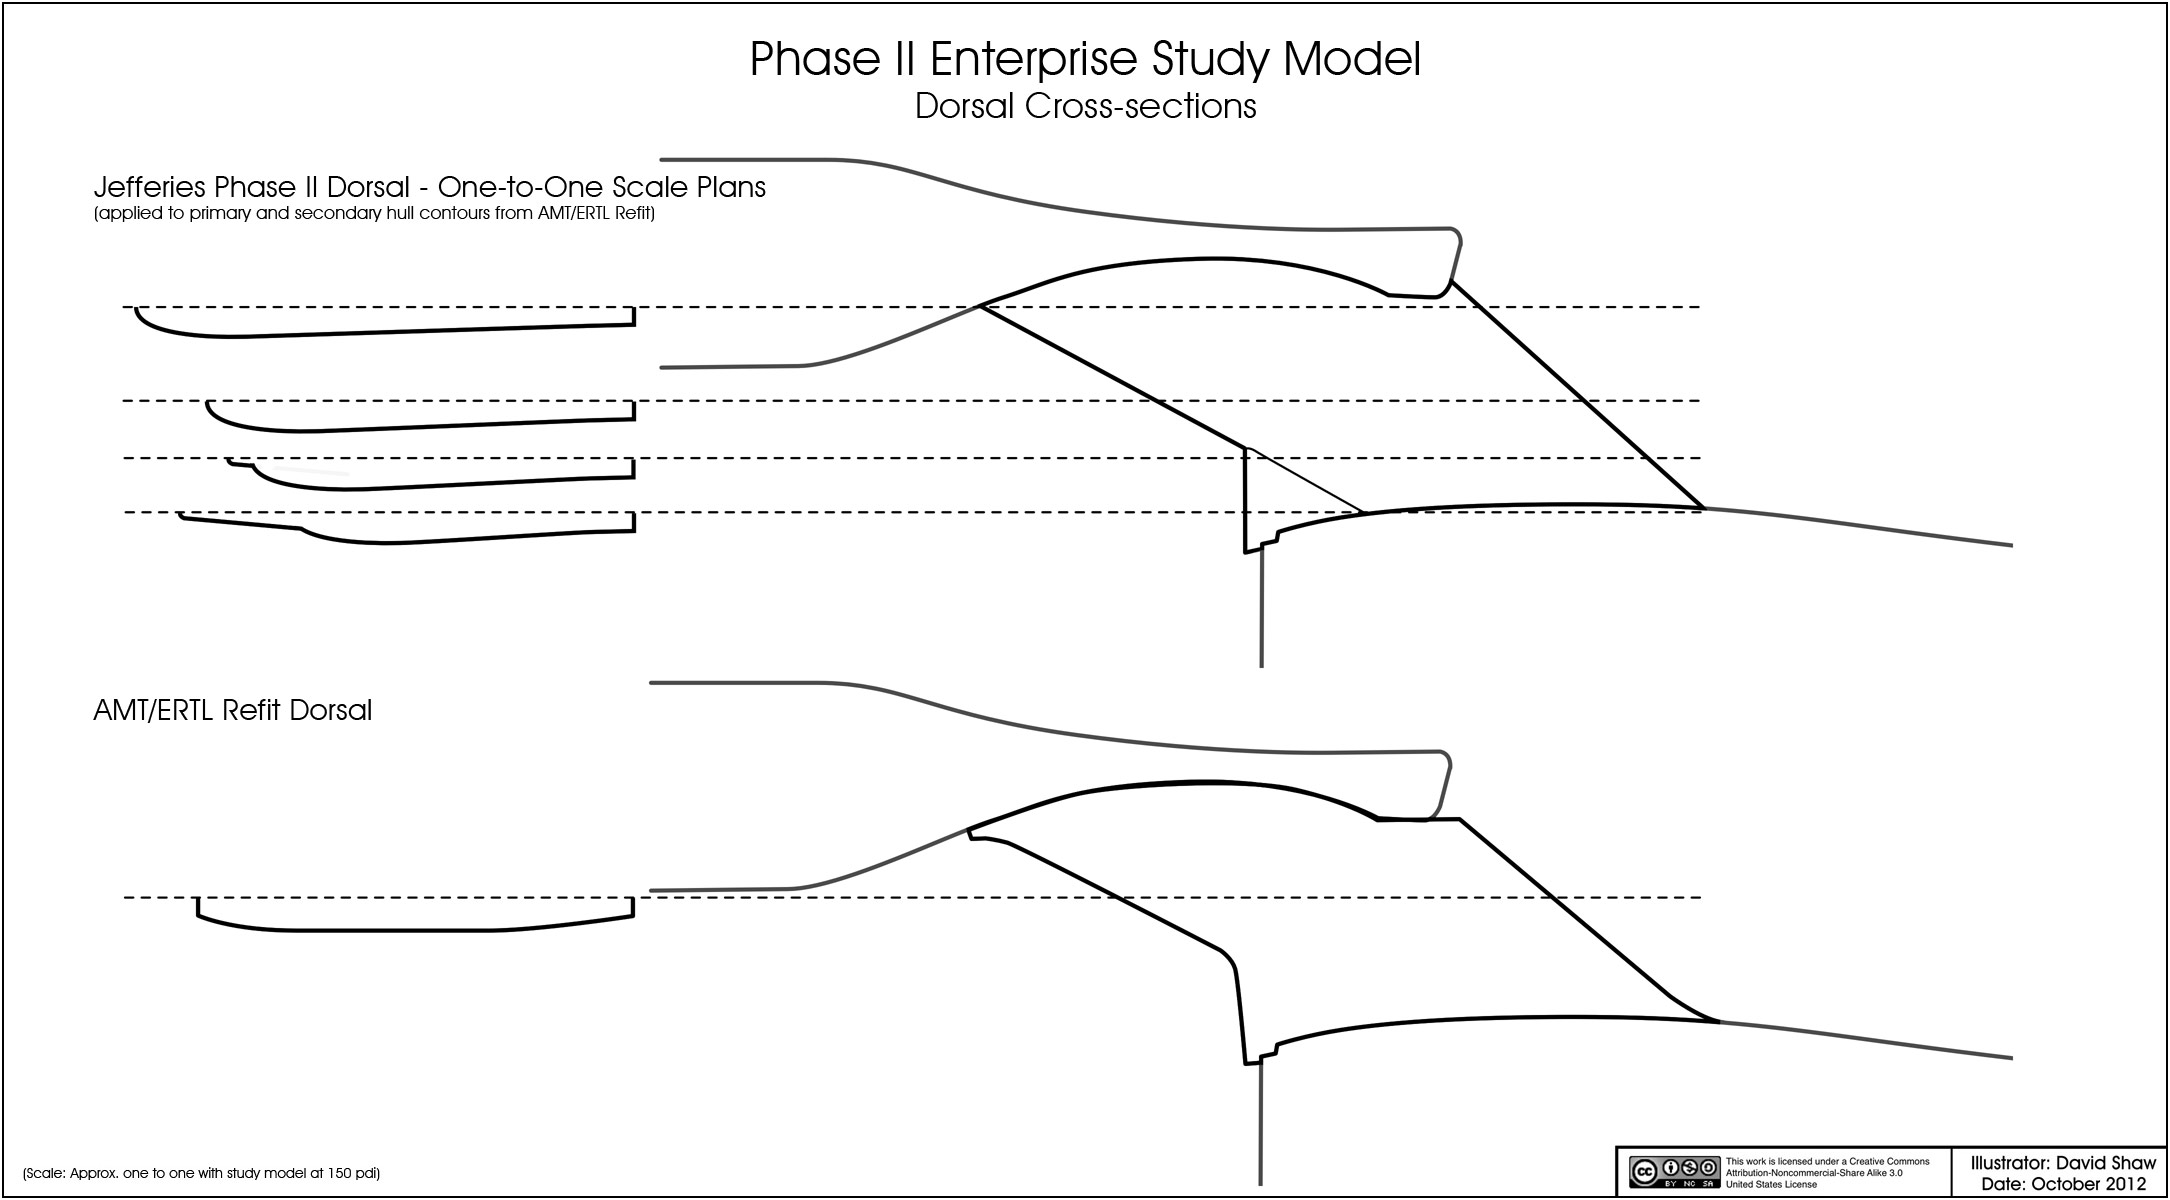
... so the dorsal itself had a wing-like cross section, and the part that extends down to support the phaser assembly is a sharp wedge. The rear of the assembly (being about as wide as the widest part of the dorsal) ends as it meets the dorsal's widest point. Here is a quick comparison of the Jefferies' design, the Price/Loos model and Jefferies' attempt to figure out how to work with what had been built (the alternate Jefferies drawing)...
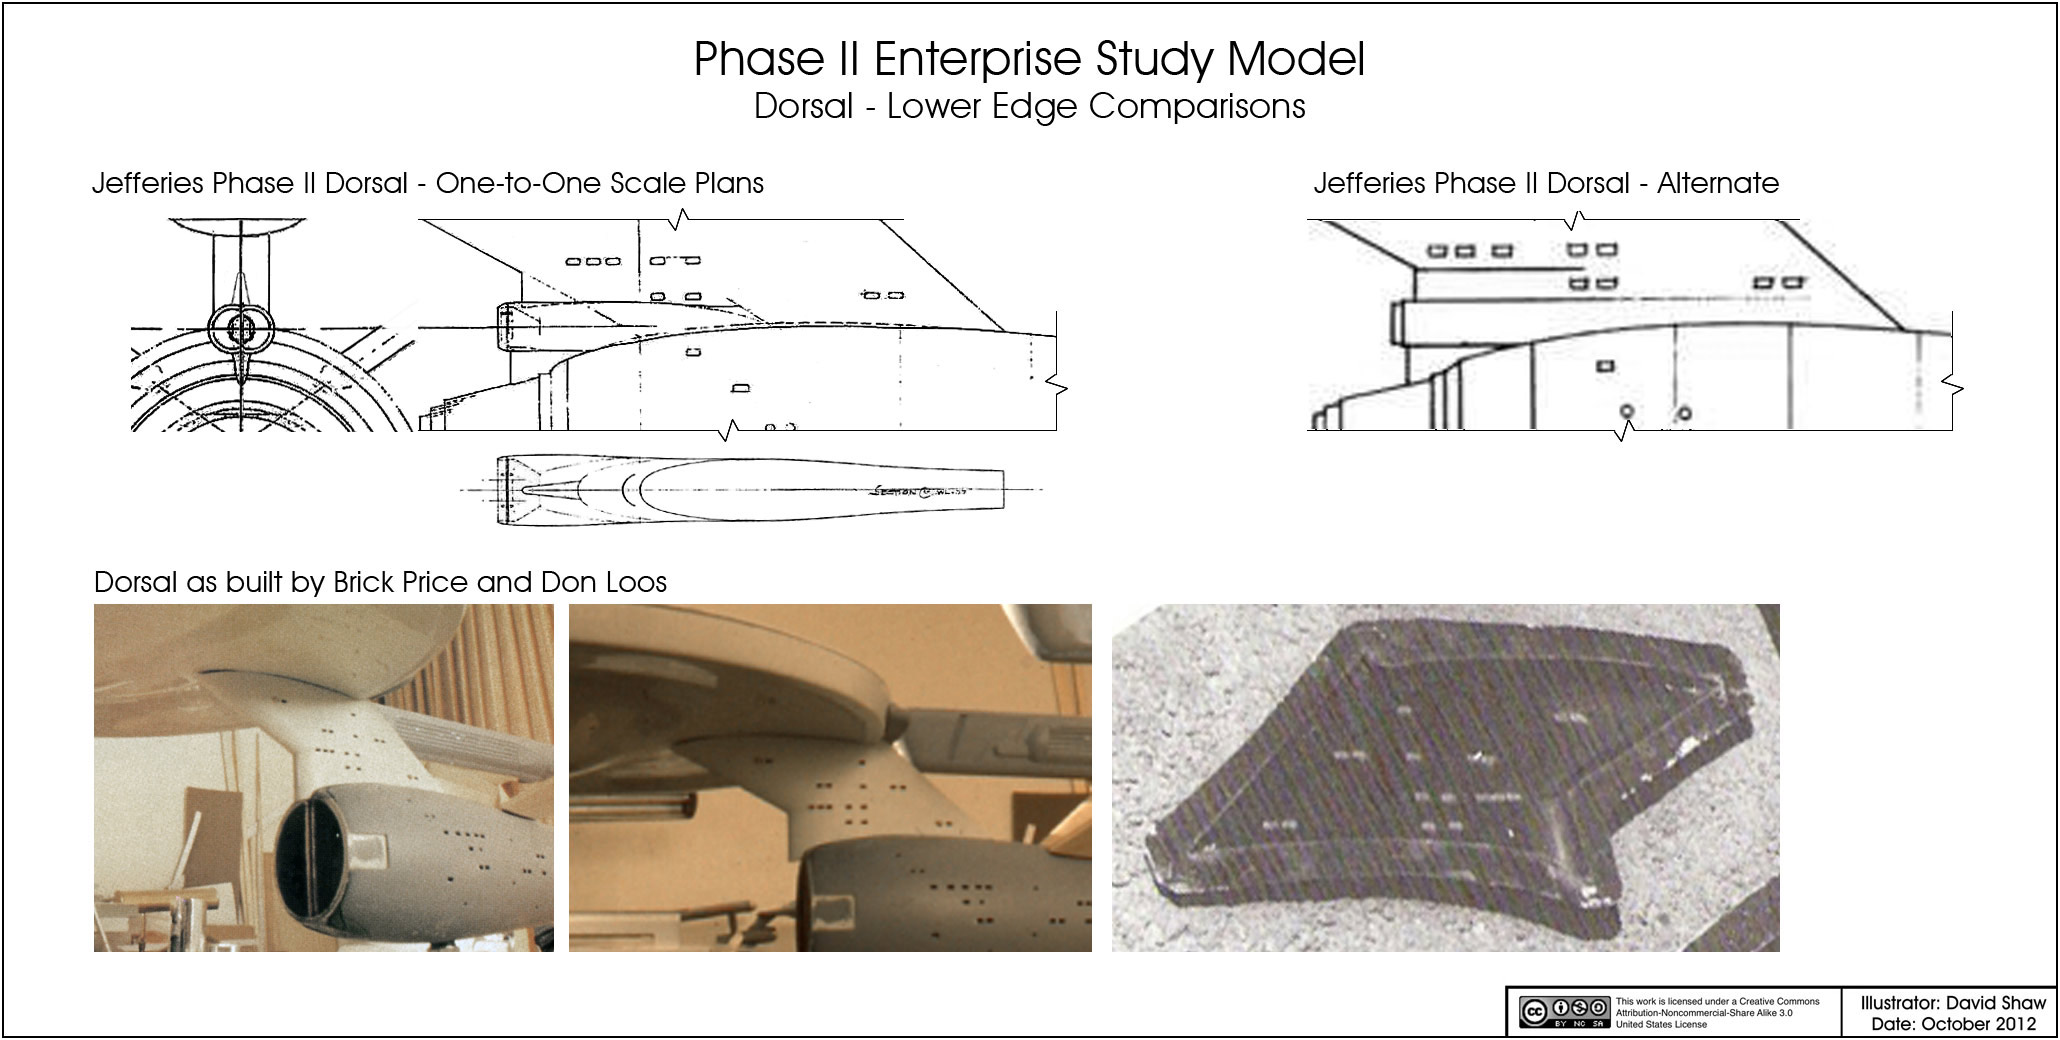
And this dorsal issue isn't the only deviation that Price/Loos made... the nacelle support pylons are also not how Jefferies designed them. In Jefferies design, the supports have a wing-like cross section (much like the dorsal). The Price/Loos model has essentially flat supports with some narrowing on the leading and trailing edges (much like the supports on the TMP model). Further, the grill aspect of the vents on the side of the Price/Loos model appear to completely fill the opening (again, much like the supports on the TMP model), but Jefferies had design those to have an open gap at the front (like the open gap on the vent features towards the front of the nacelles). This design element was a key feature of Jefferies design that is often left out but was there to add to the visual interest and depth of the Enterprise.
Throughout the Phase II Enterprise Jefferies incorporated these lips or over hangs hiding aspects of the ship in shadow or just out of view. The idea being to (subconsciously) draw the viewer's attention and ask what might be happening just out of view. This is why the impulse engine fin assembly doesn't rest flush on the surface of the primary hull (like it's predecessor on the TOS Enterprise).
Oh, and the fin part of the impulse engine (that is associated with the linear accelerator of the TOS impulse engine) is actually from the original design of the TOS Enterprise, which didn't make it to the final models (at least not with as high a profile as was originally designed).
What I find so interesting (and amazing) is that all this is being done by a guy working on another TV show at night in his hotel room. There is an incredible amount of thought and detail put into this design... way more than was called for based on what he was asked to do. And there is so much information that at first look I didn't see it, but now that I have to translate this to a physical model I'm discovering all sorts of gems hidden in plain sight. It is quite fun.
Okay I get what's going on where the dorsal meets the secondary hull. The explanation is much appreciated.
Amazing, this design is really more visually convincing as a "refit" Enterprise. Incredible attention to detail by Jefferies, and you are the first to bring it to life! One heck of a study model, make the nacelles available please.
Amazing, this design is really more visually convincing as a "refit" Enterprise. Incredible attention to detail by Jefferies, and you are the first to bring it to life! One heck of a study model, make the nacelles available please.
Shaw
Well-Known Member
Thanks!
Didn't get quite as far as I had hoped this last weekend, but made good progress. Below are test assembly shots with the new deflector assembly bowl (I desaturated the reds so the putty didn't stand out as much)...
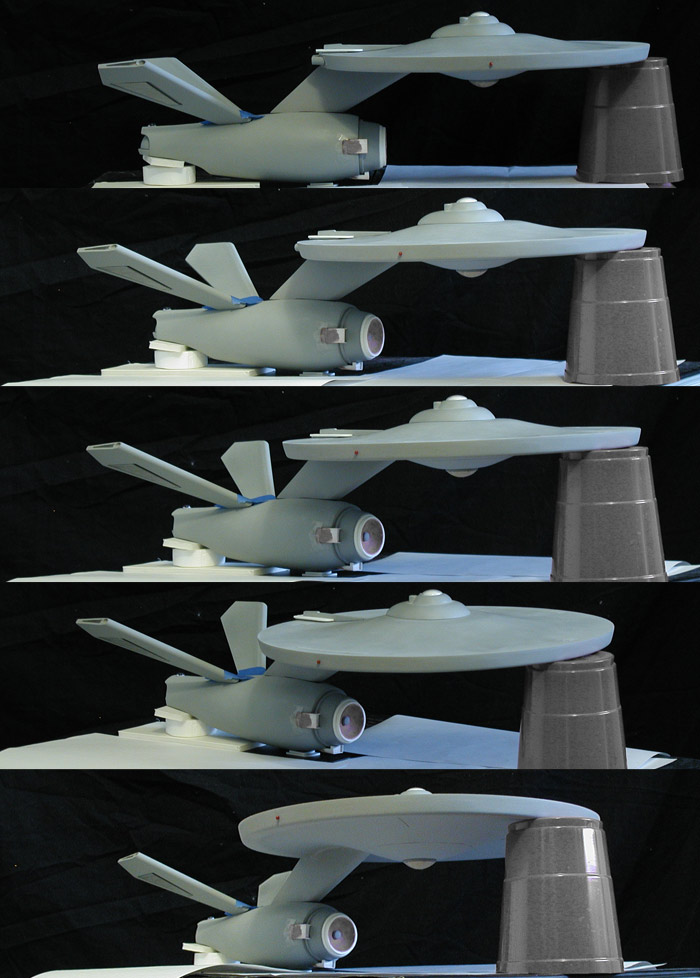
The increased depth of the new bowl closely matches the original design, which effects how the whole deflector assembly appears when shot from different angles. It wasn't that the shallow bowl of the original part didn't look good (which was why I was debating keeping it), it was that it would have compromised how the original design intended the deflector assembly to look from different angles.
Didn't get quite as far as I had hoped this last weekend, but made good progress. Below are test assembly shots with the new deflector assembly bowl (I desaturated the reds so the putty didn't stand out as much)...
The increased depth of the new bowl closely matches the original design, which effects how the whole deflector assembly appears when shot from different angles. It wasn't that the shallow bowl of the original part didn't look good (which was why I was debating keeping it), it was that it would have compromised how the original design intended the deflector assembly to look from different angles.
Shaw
Well-Known Member
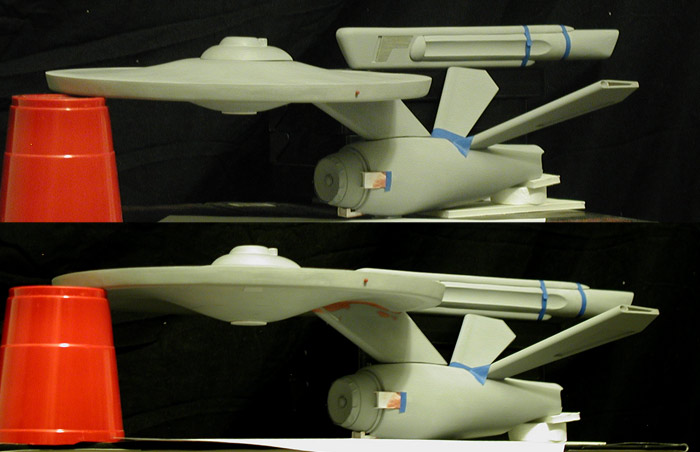
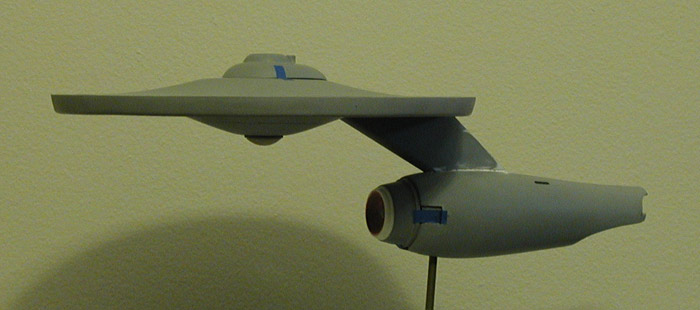
After attaching the dorsal to the secondary hull I started working on cleaning up the bottom edge of the nacelle support pylons. To get those edges correct I masked off the secondary hull where they attach, put the pylons in the exact position they would be in the end and applied putty to the gap. When that had cured enough I sanded to match the pylon's contours and now I have a pretty nice fit.
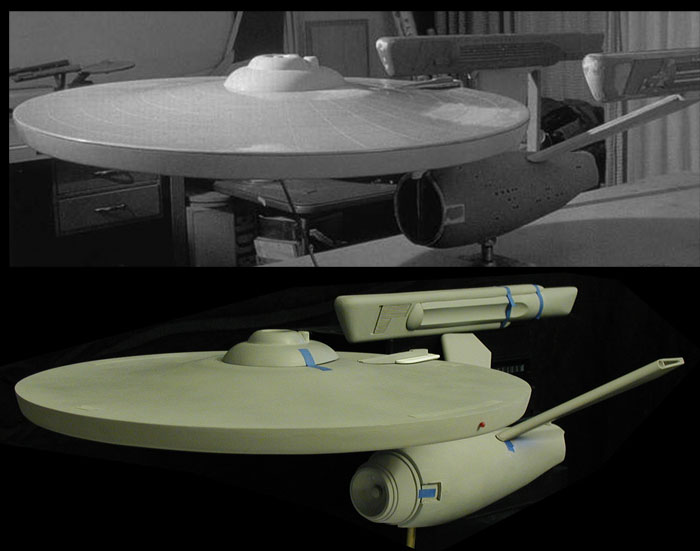
I happened to notice a while after taking those photos that one was pretty close to one of the original model...
I attached the bridge/B/C deck to the primary hull and I'm nearly finished enough with the deflector assembly to attach it to the secondary hull.
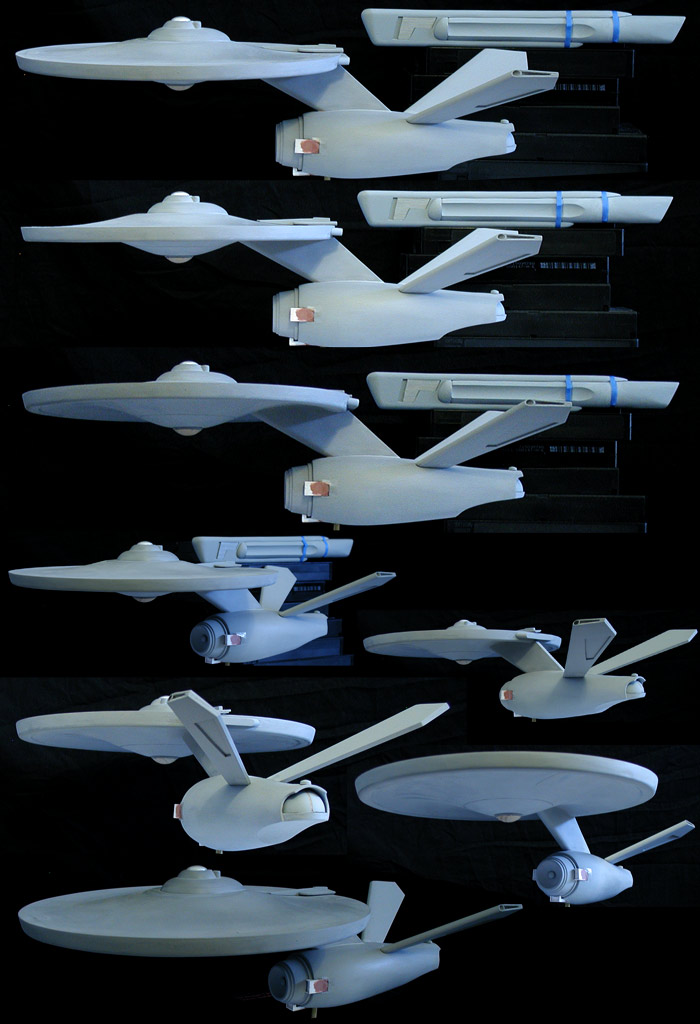
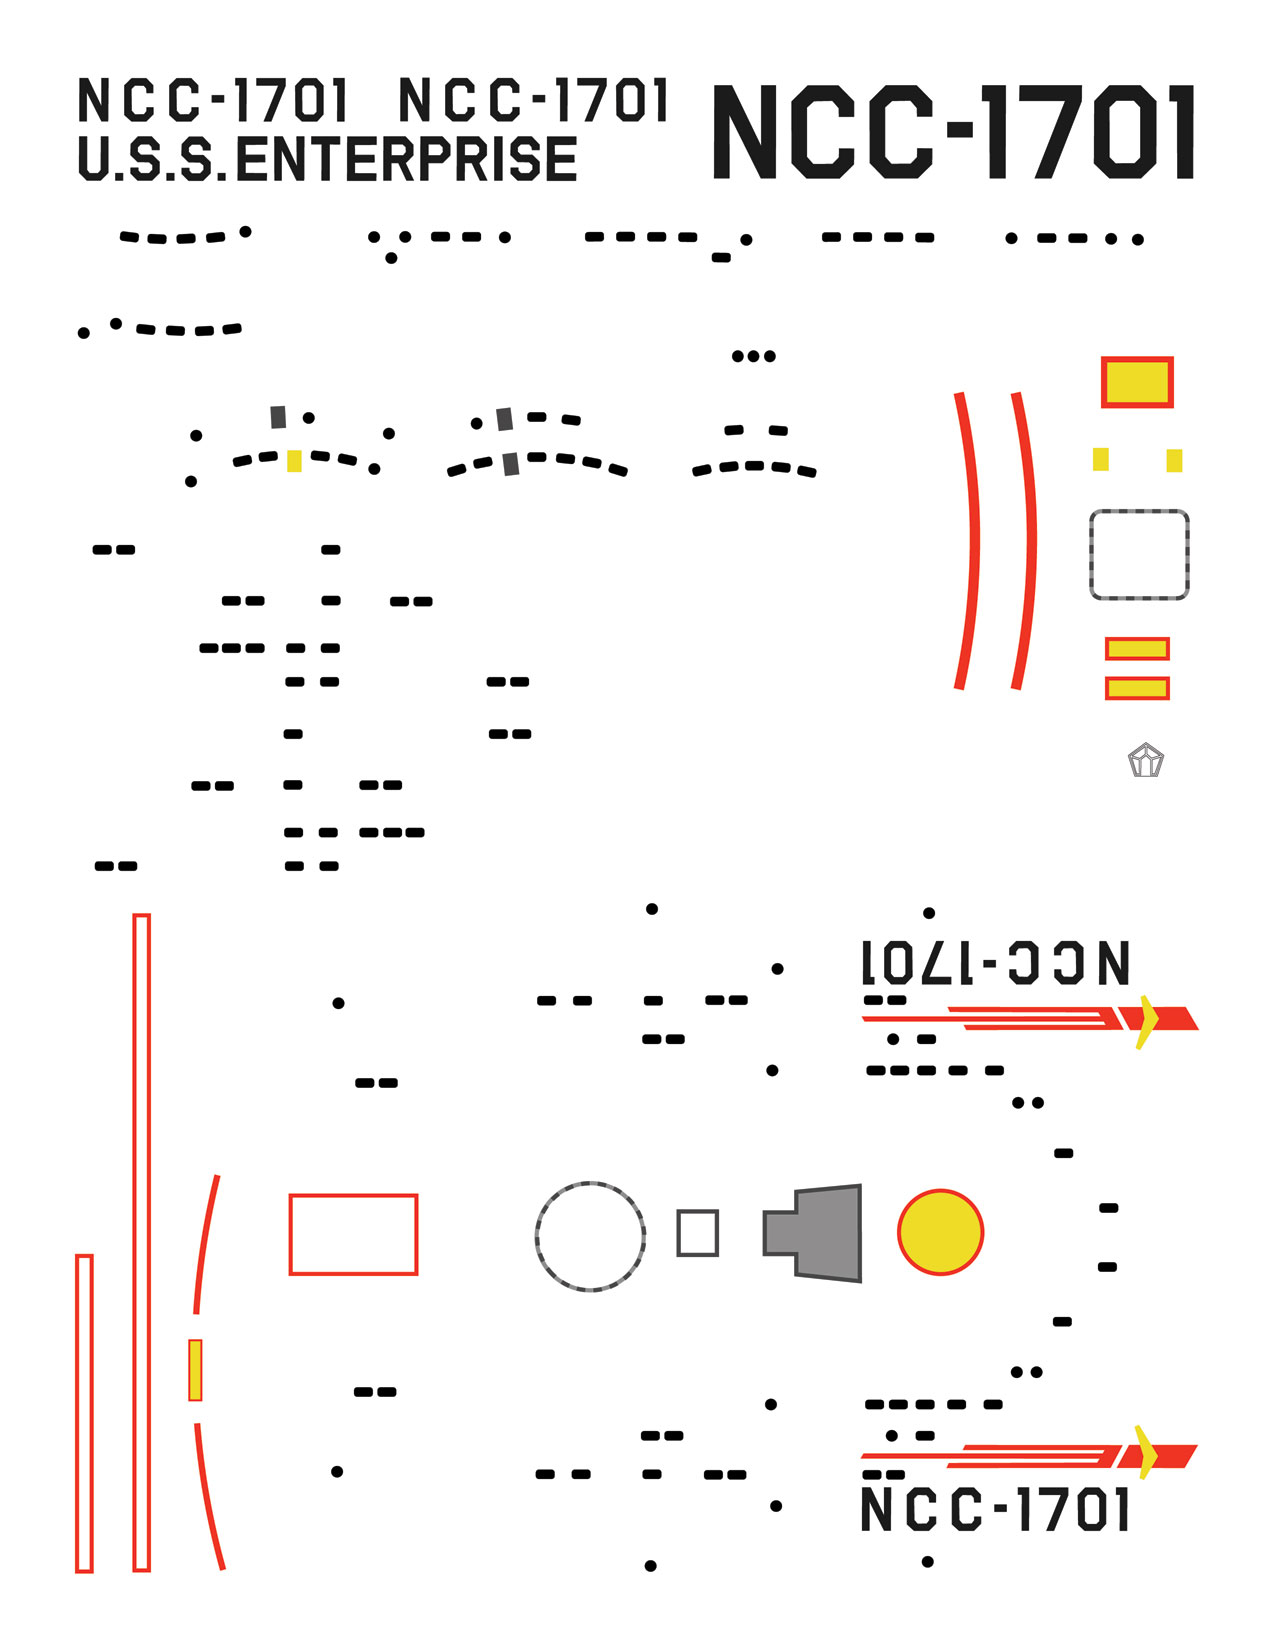
I've also started in on the decals this last weekend. I took rubbings of all the places I'd need decals for so i could match the contours and scanned them in. I've gotten pretty far on the windows (the ones for the primary hull are now done) and once I've gotten all the graphic elements I'm going to need put together I'll send them off to JTGraphics.
I happened to notice a while after taking those photos that one was pretty close to one of the original model...
I attached the bridge/B/C deck to the primary hull and I'm nearly finished enough with the deflector assembly to attach it to the secondary hull.
I've also started in on the decals this last weekend. I took rubbings of all the places I'd need decals for so i could match the contours and scanned them in. I've gotten pretty far on the windows (the ones for the primary hull are now done) and once I've gotten all the graphic elements I'm going to need put together I'll send them off to JTGraphics.
Shaw
Well-Known Member
I put a little more time into the model this week… mostly working on the decals. I'm about 95% done with them, just a few small details I need to cover. The lettering is based on the series version Enterprise letters (I traced each letter off the original decal sheet). The spacing of the smaller NCC-1701 is from Jefferies' plans (so they'll fit in nicely) and the U.S.S. ENTERPRISE spacing is unchanged from the original decal sheet (which matched how it appeared on the 33 inch Enterprise model).
I've been looking over my nacelle master and think I know how I want to proceed in finally putting it together. I'll take a series of images of it as it is right now (the parts together but not glued) before I take it apart and make the final adjustments.
I've been looking over my nacelle master and think I know how I want to proceed in finally putting it together. I'll take a series of images of it as it is right now (the parts together but not glued) before I take it apart and make the final adjustments.
LordSarvain
New Member
I've seen a few Phase II models, some physical and some CG, and a few really turned out nice but yours is really eye catching! Thanks for posting it!
Shaw
Well-Known Member
Thanks!
Update...
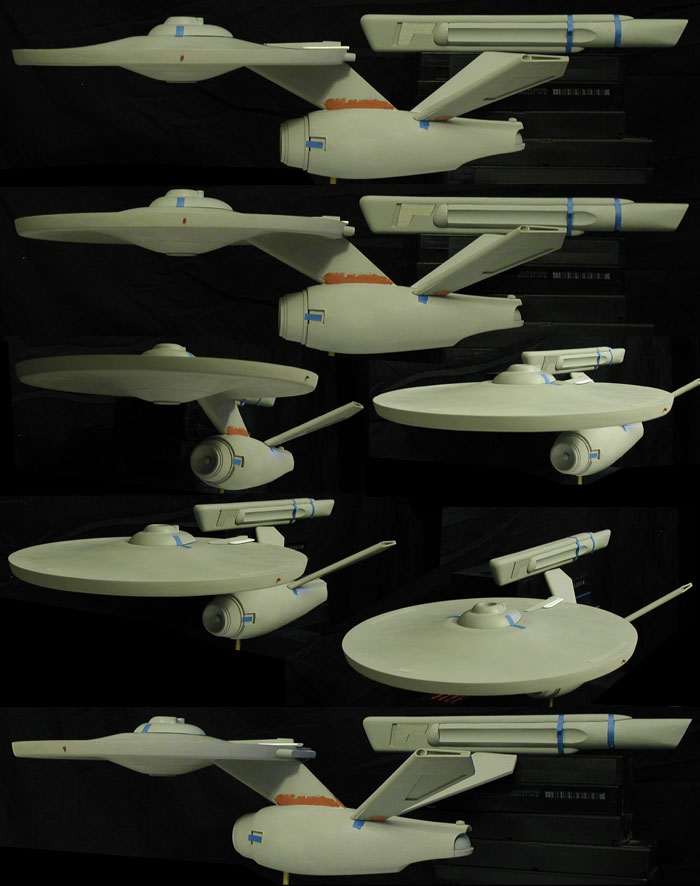
Most of what I've been doing the last month has been gluing on parts that I had either set in place or taped in place for previous test assemblies, so images wouldn't really convey much in the way of interesting progress. That and the fact that I figured the most interesting aspects of the build would come after I have both nacelles cast is why I slowed down on posting progress. Once I have the nacelles I'll be rounding the corner for the home stretch on this build.
I have a couple small details that still need attention, but for the most part, the nacelle master is ready and includes all the details I wanted built into the final parts. All the remaining details for the nacelles will be scratch built and added directly to the final nacelles.
So here is an image of about how the nacelle master looks now…

The carriage part it is sitting on isn't part of the nacelle (I had to make a port and starboard version of those parts). I just wanted to see how they looked together.
And here is another series of test assembly shots… mostly to see if the model is looking like what I've imagined rather than to see if things are fitting together.
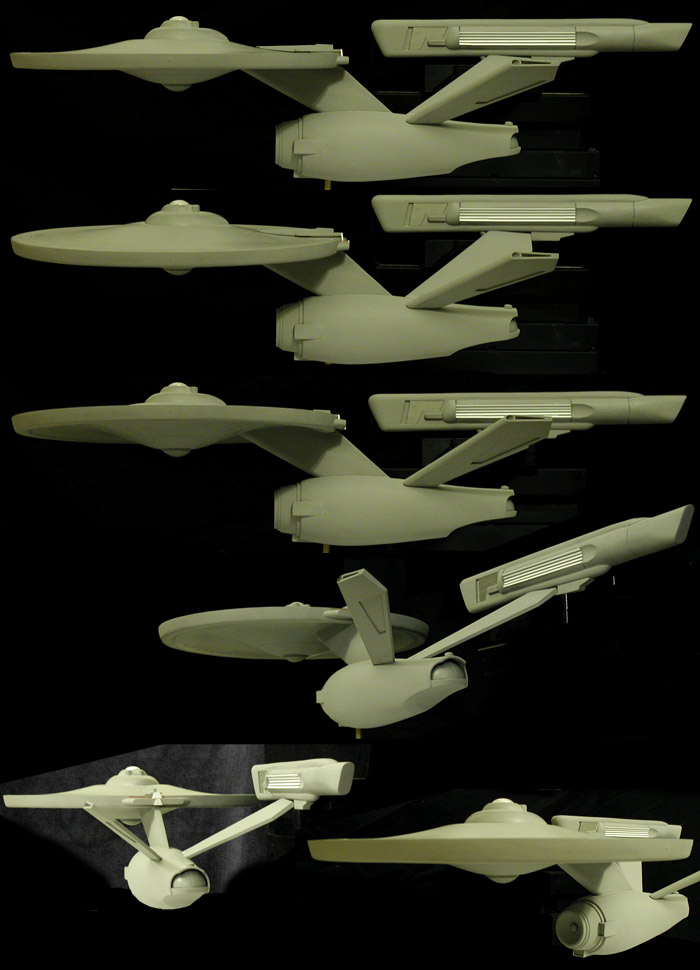
Even with the missing elements (mainly the weapons assembly and a second nacelle) it seems to be looking about how I envisioned it. I think the painting, weathering and decals will help keep it well grounded in TOS rather than pulling more towards TMP.
Update...
Most of what I've been doing the last month has been gluing on parts that I had either set in place or taped in place for previous test assemblies, so images wouldn't really convey much in the way of interesting progress. That and the fact that I figured the most interesting aspects of the build would come after I have both nacelles cast is why I slowed down on posting progress. Once I have the nacelles I'll be rounding the corner for the home stretch on this build.
I have a couple small details that still need attention, but for the most part, the nacelle master is ready and includes all the details I wanted built into the final parts. All the remaining details for the nacelles will be scratch built and added directly to the final nacelles.
So here is an image of about how the nacelle master looks now…
The carriage part it is sitting on isn't part of the nacelle (I had to make a port and starboard version of those parts). I just wanted to see how they looked together.
And here is another series of test assembly shots… mostly to see if the model is looking like what I've imagined rather than to see if things are fitting together.
Even with the missing elements (mainly the weapons assembly and a second nacelle) it seems to be looking about how I envisioned it. I think the painting, weathering and decals will help keep it well grounded in TOS rather than pulling more towards TMP.
It's really coming together nicely. Great comparison shot to the original model and wonderful work on the decal sheet.
Cant wait to see it with the registry.
Cant wait to see it with the registry.
Griffworks
Well-Known Member
I've really enjoyed watching this come together! Thanks for sharing this, David.
When she's complete, you really need to make the trip to WonderFest and enter her.
When she's complete, you really need to make the trip to WonderFest and enter her.
Hey, just wanted to link this in case you missed it. Some very interesting pics.
[EXCLUSIVE] pt.1 ? Interview with Visual Effects Supervisor Richard Taylor re: 1979?s Classic Star Trek: The Motion Picture plus RARE Behind the Scenes Production Images from his Collection! | BEYOND THE MARQUEE
[EXCLUSIVE] pt.1 ? Interview with Visual Effects Supervisor Richard Taylor re: 1979?s Classic Star Trek: The Motion Picture plus RARE Behind the Scenes Production Images from his Collection! | BEYOND THE MARQUEE
Shaw
Well-Known Member
Thanks!I've really enjoyed watching this come together! Thanks for sharing this, David.
I'm having a lot of fun doing the research on the original design and learning new techniques for building models. And hopefully in the end I'll have a cool model to look at too.
I could imagine bring her to display and share, but I don't think I'd enter anything I build into a contest. I build so few models that I never really get a chance to perfect or practice my skills, and it seems like I don't really do the types of subjects that judge well.When she's complete, you really need to make the trip to WonderFest and enter her.
But the idea of sharing my stuff at an event where I could be sure that there would be people actually interested in seeing it would be worth making that type of trip.
Thanks for the link!Hey, just wanted to link this in case you missed it. Some very interesting pics…
It is funny, but a number of things popped out at me while reading the interview and looking at the accompanying images.
First was that Brick Price and the Enterprise aren't in any of them. It seemed like the Abel and Associates guys were at Magicam at a different time than when Price had brought the Enterprise over to show a test assembly of it.
Second, and most striking, was this quote:
"The model that was being built really didn’t have that — I can’t remember any lights that were built into it but it was about two and a half, three feet long or something."
He isn't describing the Phase II Enterprise (a model almost five and a half feet long designed to be fully lit), he seems to be talking about the 33 inch TOS Enterprise model loaned to Abel and never returned. And as someone who wasn’t particularly a Star Trek fan, and was pushing to "scrap everything and start over", I wouldn't be surprised to find out that the original model of the Enterprise met it's demise at his hand.
Also, why is it that I keep seeing him and Probert getting credit for the new design when almost all of the major design changes were in place on Jefferies' Phase II design? I mean in this quote:
"I totally redesigned the nacelles so they weren’t, as in the original television series, like cigar containers, or circular. They were much more rectilinear and longer, a lot of parallel lines"
... it sure sounds like Taylor is taking credit for the design of the nacelles when in actuality he only made some modification to them from where Jefferies had them for the Phase II design.
To me (based on his account), Taylor sounded like a bull in a china shop. He had no previous experience (other than having seen Star Wars), and was sure everyone was wrong before even knowing what he was looking at. It is quite amazing, and sad at the same time.
The color images of the models done by Magicam confirm what I had seen in similar images and had suspected for quite some time… the color of the Phase II Enterprise was going to match the color of the original TOS models (based on the color of the 33 inch Enterprise model which they had on hand).
On to an update...
I finally got some time together to start in on the box I'll use for making the nacelle molds...
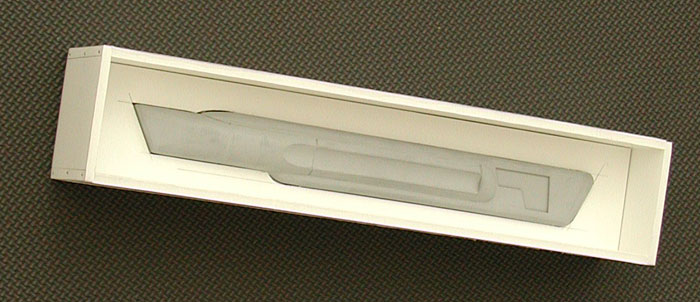
When I'm ready I'll fill the remaining gaps around the nacelle with clay and pour the rubber. When it sets I'll remove the center board (and clay) around the nacelle and pour the other side. Even though these are going to be used to make two different sides of each nacelle, I'd still like to get as straight a seam to rejoin the sides as possible.
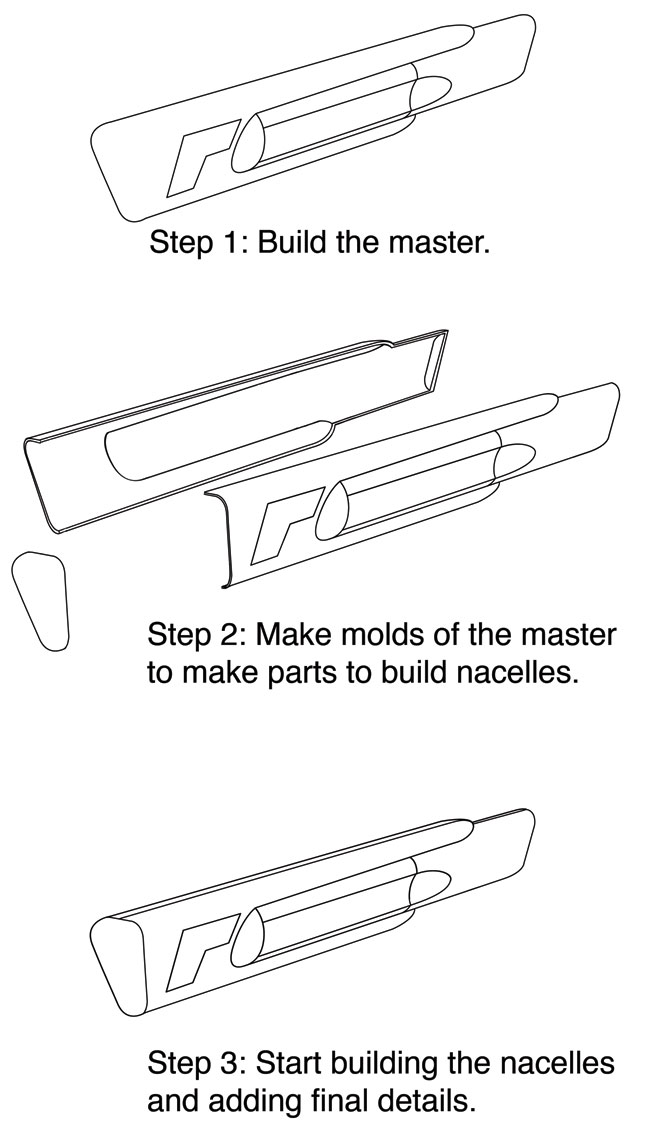
This diagram shows how I plan on building the nacelles.
Similar threads
- Replies
- 3
- Views
- 1,215
- Replies
- 13
- Views
- 1,346