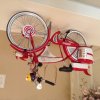
Pee-Wee's Big Adventure Bike

Been working on this 1:6 scale X1 model along side my full scale bicycle. Its not quite finished yet. I still have some details to add and some painting to finish. If only my full scale bicycle was this far along... For some reason its taking like 5 times as long to build this tiny bicycle... At least my wife lets me build this one in the house... :D

X1 A(13).jpgX1 A(8).jpgX1 A(10).jpg


Last edited:
Hey Ed, Absolutely amazing!!, that's the coolest model I've seen in a long time, you've really outdone yourself, I was wondering how you were coming along with it, I'm blown away by the detail, now all you need is a scale purple T-Rex!

Very impressive, it sure beats Gary's Custom models all to hell!
 
Last edited:
Edward, I was actually thinking about your model the other day & was wondering if you made any progress. Wow, progress is an understatement! That is a sight to behold. Absolutely stunning work.
 
I'm kinda getting caught up and got to work on my bike some more, since some of you are building Francis' x-2 and other custom variations, I thought I would leave mine in primer, how about a hot rod "Gasser" version?josh's bags and my bike 004.JPGjosh's bags and my bike 002.JPGjosh's bags and my bike 005.JPGjosh's bags and my bike 025.JPGjosh's bags and my bike 023.JPGjosh's bags and my bike 006.JPGjosh's bags and my bike 003.JPG
 
Red oxide primer would be even cooler.:cool

Anyway, here are some pictures of the saddlebag project.
Carved from foam (not by me) and coated with foam coat. These had been previously vacuuformed, which damaged them slightly. So I had to clean them up. Primer, bondo, sand, Repeat. Repeat. Repeat. This is the right side bag.
bag1.JPG

bag2.JPG


All clean.
bag4.JPG


Well, it was clean... And then...
bag3.JPG


Spray with clear coat and clayed to the table. A wall was built to trap the silicone for molding. Also in this picture you can see the paint wrinkled. This is because after I had clear coated I realized that I should mark off where the opening flap goes, to make it easier on anybody else who wants a set of these. So I taped it off and sprayed primer, that way when I remove the tape it would leave a nice clean groove. Unfortunately the primer reacted with the clear and wrinkled. I sanded it all of and did it again. More wrinkles. I couldn't keep sanding it down, in fear of going through the foam coat and ruining the sculpt, so I got it down as best I could and re-cleared it. This will mean I have a small bit of clean up to do on every piece that comes out of the mold. It will be negligible., but still a bummer because I had it so perfect!
bag5.JPG


Silicone!
bag6.JPG


And the left side. This is an Ultracal (gypsum cement) casting done from the inside of a vacuuform casting. The foam sculpt was too damaged to mold directly. Plus, this way I have no fear of sanding through too far. This does present it's own set of problems, but I still think I should have this one cleaned up and molded by the end of the week.
bag7.JPG

bag8.JPG


That's where I'm at right now.
 
Hey Ruddigger, lookin good, where did you get the vacuum formed pieces?,josh's bags and my bike 019.JPGjosh's bags and my bike 020.JPGjosh's bags and my bike 037.JPGjosh's bags and my bike 031.JPGjosh's bags and my bike 042.JPGjosh's bags and my bike 040.JPG here's a set I'm just finishing up for Skillcrane, looks familiar don't they?,
 
The sculpts the Ruddigger has are mine, I sculpted over 3 years ago, they are patterns I used to vac form my bags. They been sitting under my desk at work for a while and let Ryan use them to make some bags.
 
No Billy, they don't look very similar to me at all, the most telling difference is the way yours is so rounded on the bottom. Why? Did you sell vacuuforms or something? You did good work on those though, I hope my fiberglassing comes out that nice.
 
Hey Abe, That's a shock!, I thought someone tried to vacuum form a set of mine and was selling them, but if those are yours?!, that's crazy, our sculpts look like they could be from the same person, and I made mine from scratch!,
 
No, Ruddigger, I have made a few sets from fiberglass just like Pee-wee's were made and sold them online to a few members here, I guess I couldn't tell from the pics that Abe's were different on the bottom, I was looking at the grille grooves, They look just like mine.
 
Well, we're all copying the same thing, so there are bound to be similarities. But from the pictures you've posted I see the main differences between yours and mine as yours being taller, more rounded, smaller at the tail section and the grooves slightly deeper.

Also, I believe droidboy is correct. The original were vac, not fiberglass. But I ride my bike a lot, I want something that will stand up to time, and heat, and wear. That's why I'm going glass.

P.S., I didn't mention that Abe sculpted before because I know he likes to remain anonymous sometimes. But now that the cat's out of the bag, a huge thank you to Abe for helping me out with this.
 
The shape of the doors will hold better in glass, the plastic had some issues when I cut open the doors. I used 3/16" styrene on my bags.
I'm learning to make wood patterns now.
 
I agree 100%, I intend to ride mine a lot too, and that's why I chose to use fiberglass also, I noticed the museum bikes doors were all out of shape, even in the movie when they were new they didn't fit that well, the console lid especially, Thanks guys, I love all this tech stuff!
 
They used a really thick plastic but it's definitely vac formed. I'll be doing mine out of fiberglass as well for the same reasons.
 
I was just going back through the thread, looking at Abe's pictures of sculpting the bags. Can you believe I came into this thread on page 17, in August 2011? 3 years coming up quick, gotta be done by then!
 

Your message may be considered spam for the following reasons:

If you wish to reply despite these issues, check the box below before replying.
Be aware that malicious compliance may result in more severe penalties.
Back
Top