I have a bunch of blaster projects either in the works or on the drawing board, figured I'd post here rather than a new one for each. Pew pew!
You may have seen my DL-44 project with parts from Denix, Todd's Costumes, and scratch:
Pedro's DL-44 (ANH Hero)

DDC Defender (ANH)
The next primitive weapon I've been working on is Leia's DDC Defender (ANH version), which is a conversion of the very nice though cheapo Rubies prop. At first glance this is very accurate, though not perfect. Most of the inaccuracies carry over from the Master Replicas version, as has been discussed extensively. The plan is to re-model anything that doesn't match up well with the real prop, as well as replace what I can with metal/found parts. I really enjoy the weight and metal "feel" of my DL-44, so wanted to get close to that with this blaster as well.
I sawed off the barrel, to be replaced with a stainless steel tube. Stainless is a bitch to work with and probably not the best choice, but it's nice and heavy! I back filled the plastic pistol frame with epoxy putty and squished in the tube, then cut away the excess epoxy. Perfect fit!


Still haven't figured out how I'm going to deal with the front sight. I'll probably scratchbuild something, trying to salvage the plastic parts may be a lost cause because it would be so thin at the bottom where the barrel plugs in. More on that later when I get to it.
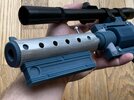
Rubies muzzle is reasonably accurate, but far from perfect. The "cooling fin" is close but no cigar, and the slot in the muzzle is modeled after the wrong Margolin version, with the slot too far back. For cooling fins I purchased a tomtit engine grill from Todd's (can't have too many of those laying around!). I'm fashioning the muzzle itself from a 1" diameter aluminum rod, less than $10 on Amazon for 12". I spent a couple weeks trying to think of a way to cut the diagonal slot using only hand tools and my wimpy drill press. I really need a metal shop, or at least a lathe and a mill. Anyhoo, I decided to drill a series of holes along the slot and cut away the rest with hand saw and files. Here I marked the angle with some math and a sharpie, and hammered starter points for the drilling.

1 million hours of filing later I had this! Next I'll cut to length, drill out the bore, chuck it in my drill, and ghetto lathe the beveled ends. The slot is a bit thicker than on the real muzzle, but that's how thick my big flat file is. It'll do!


Below the barrel, the Margolin has a thumb screw thingie to help field strip the weapon. I was going to just clean up the Rubies part, but the seam runs right through the knurl and is pretty much unfixable. I scrounged for suitable donor parts and came up with a cheap x-acto knife, the diameter is just slightly too big but close enough for me, and a nice small knurl. Here's the starter piece:

I sawed off a thin slice from the flat end, turned the inset side down a bit (ghetto lathe, hand drill and flat file), then the slice slid right over the inset. Nice! More filing to create the triangular cutout. I think this should come to more of a point, but I'm satisfied with this.


I filed the tip of an aluminum rod down to mate with this new part. After getting the angle right I realized that I need a larger diameter rod, it needs to be as wide as the knurled part in order to get the little cut-in at the base as on the real gun. I'll be filing down what remains of the x-acto handle for a better match, but here's the temp part to give you the idea.

That's where I'm at today. I'll be adding as many details from the real weapon as I can find, including adding the missing safety. I do have a couple questions for anyone who may have a real Margolin ( OdiWan72 , @scottjua), anyone want to help? I'd love a pic of the magazine/base of the grip, I'm sure there's some "stuff" down there but can't find any photos online. Also, can anyone provide dimensions for the front site parts? I'll probably scratch build something so need the basics, as well as the diameter of the knob up there. (maybe I can use a dime..hmm....). Also, there's a hole drilled each(?) side of the muzzle. Is there anything in the hole? A set screw of some kind?
You may have seen my DL-44 project with parts from Denix, Todd's Costumes, and scratch:
Pedro's DL-44 (ANH Hero)
DDC Defender (ANH)
The next primitive weapon I've been working on is Leia's DDC Defender (ANH version), which is a conversion of the very nice though cheapo Rubies prop. At first glance this is very accurate, though not perfect. Most of the inaccuracies carry over from the Master Replicas version, as has been discussed extensively. The plan is to re-model anything that doesn't match up well with the real prop, as well as replace what I can with metal/found parts. I really enjoy the weight and metal "feel" of my DL-44, so wanted to get close to that with this blaster as well.
I sawed off the barrel, to be replaced with a stainless steel tube. Stainless is a bitch to work with and probably not the best choice, but it's nice and heavy! I back filled the plastic pistol frame with epoxy putty and squished in the tube, then cut away the excess epoxy. Perfect fit!
Still haven't figured out how I'm going to deal with the front sight. I'll probably scratchbuild something, trying to salvage the plastic parts may be a lost cause because it would be so thin at the bottom where the barrel plugs in. More on that later when I get to it.
Rubies muzzle is reasonably accurate, but far from perfect. The "cooling fin" is close but no cigar, and the slot in the muzzle is modeled after the wrong Margolin version, with the slot too far back. For cooling fins I purchased a tomtit engine grill from Todd's (can't have too many of those laying around!). I'm fashioning the muzzle itself from a 1" diameter aluminum rod, less than $10 on Amazon for 12". I spent a couple weeks trying to think of a way to cut the diagonal slot using only hand tools and my wimpy drill press. I really need a metal shop, or at least a lathe and a mill. Anyhoo, I decided to drill a series of holes along the slot and cut away the rest with hand saw and files. Here I marked the angle with some math and a sharpie, and hammered starter points for the drilling.
1 million hours of filing later I had this! Next I'll cut to length, drill out the bore, chuck it in my drill, and ghetto lathe the beveled ends. The slot is a bit thicker than on the real muzzle, but that's how thick my big flat file is. It'll do!
Below the barrel, the Margolin has a thumb screw thingie to help field strip the weapon. I was going to just clean up the Rubies part, but the seam runs right through the knurl and is pretty much unfixable. I scrounged for suitable donor parts and came up with a cheap x-acto knife, the diameter is just slightly too big but close enough for me, and a nice small knurl. Here's the starter piece:
I sawed off a thin slice from the flat end, turned the inset side down a bit (ghetto lathe, hand drill and flat file), then the slice slid right over the inset. Nice! More filing to create the triangular cutout. I think this should come to more of a point, but I'm satisfied with this.
I filed the tip of an aluminum rod down to mate with this new part. After getting the angle right I realized that I need a larger diameter rod, it needs to be as wide as the knurled part in order to get the little cut-in at the base as on the real gun. I'll be filing down what remains of the x-acto handle for a better match, but here's the temp part to give you the idea.
That's where I'm at today. I'll be adding as many details from the real weapon as I can find, including adding the missing safety. I do have a couple questions for anyone who may have a real Margolin ( OdiWan72 , @scottjua), anyone want to help? I'd love a pic of the magazine/base of the grip, I'm sure there's some "stuff" down there but can't find any photos online. Also, can anyone provide dimensions for the front site parts? I'll probably scratch build something so need the basics, as well as the diameter of the knob up there. (maybe I can use a dime..hmm....). Also, there's a hole drilled each(?) side of the muzzle. Is there anything in the hole? A set screw of some kind?
Last edited:


") The mag release details are exactly what I needed! Should be pretty simple to scratch build.
The mag release details are exactly what I needed! Should be pretty simple to scratch build.