Painting guide for POL808 1/350 Enterprise

tabicat

New Member
I'm finally getting around to assembling and painting the 1/350th scale Star Trek Enterprise NCC-1701 model that I bought years ago. I've been trying to find pictures online of completed models that are painted according to the instructions, but with no success.

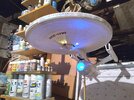
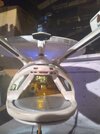
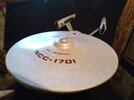
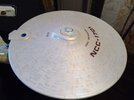
I can't even get past the first step because what I'm seeing online does not match the instructions. Specifically, the instructions say to paint a part of the top dome on the saucer section "rust".


If you download look at the PDF, it says to use color "H" on the dome, where "H" is rust (Model Master 1785). I've never seen a picture of the Enterprise with a dark red band on the dome.
 
Which movie you building it from?

TMP

st1esaucer2ml8.jpg
tmphd0722.jpg
tmphd0360.jpg


UDC

Bridge_Refit-A_10.jpg
KG_MD_JC_1701A_STUDIO_MODEL-007_resize.jpg
 
My advice on painting the refit as an overall rule (break rule when needed) is to paint everything lighter than you think, especially if you're going for an onscreen look (particularly the TMP paint job). Lighter contrasts help sell the scale and keep it from looking toy-like. The bride dome golden champagne color is barely noticeable on screen, so maybe just a very VERY light mist of the color. I also recommend buying the TrekModeler painting guide pdf. That's far more accurate than the kit instructions.
 
I've never seen "rust" used on the bridge of either the Refit or the "A" version. I would go with a mist of champagne gold and not regard the instructions too much. Photo references are going to be your best friend here.
 
My advice on painting the refit as an overall rule (break rule when needed) is to paint everything lighter than you think, especially if you're going for an onscreen look (particularly the TMP paint job). Lighter contrasts help sell the scale and keep it from looking toy-like. The bride dome golden champagne color is barely noticeable on screen, so maybe just a very VERY light mist of the color. I also recommend buying the TrekModeler painting guide pdf. That's far more accurate than the kit instructions.

For my 1/1000 builds, I detail-painted, then applied the Aztec decals, then misted the base white color over the model (with certain areas masked off) to tone it all down, then applied the livery decals. The stock Aztec decals pop too strongly at that scale, but I still used this method to tone down the Acreation decals that I actually used.


A256113F-D169-469F-BDB8-B32C742169DA.jpeg


Of course, if you're painting the Aztecs with iridescents, you'd have to do this beforehand with the detail-painted areas. That, or just mix lighter shades to paint with.

I've seen any number of builds with garishly-dark and intense detail-painting. Less is more.
 
For my 1/1000 builds, I detail-painted, then applied the Aztec decals, then misted the base white color over the model (with certain areas masked off) to tone it all down, then applied the livery decals. The stock Aztec decals pop too strongly at that scale, but I still used this method to tone down the Acreation decals that I actually used.


View attachment 1627119


Of course, if you're painting the Aztecs with iridescents, you'd have to do this beforehand with the detail-painted areas. That, or just mix lighter shades to paint with.

I've seen any number of builds with garishly-dark and intense detail-painting. Less is more.
Admittedly, mine is painted a bit dark on the details, but I do this specifically because the colors end up getting washed out when I do effects on the ship in Photoshop.

My 1:350 during photography:
TMPEnterprise project.jpg


And how it ends up with other effects applied afterwards:

SurakEnterpriseRendevous.jpg
 
Looks sharp!

Coincidentally, for my 1/1000 TOS build (to be posted soon in its own thread once it's totally done), I custom-mixed a light gray for the intercoolers and reactors loops, as per the 2016 Smithsonian restoration. After that was done, the contrast was a bit too striking against the base hull color. So, I misted the hull color over it. Not enough to significantly change the color, but just enough to get everything to visually tie together better, along with some pastel chalk weathering. I'm very pleased with the result.

Never underestimate the power of misting that base color over your detail painting. It can be tricky to get just right, but it can immeasurably help with the overall look of a model, as well as the scale effect.
 
Well from what I can see you are all master model builders,.....and I hate you all!!!!!!!!!! :unsure::(:mad::cautious::confused:


I am so scared of this thing it is not even funny. Still building up my skills before I start.


All of your suggestions will be very helpful. Thank you.
 
Well from what I can see you are all master model builders,.....and I hate you all!!!!!!!!!! :unsure::(:mad::cautious::confused:


I am so scared of this thing it is not even funny. Still building up my skills before I start.


All of your suggestions will be very helpful. Thank you.

I would suggest starting small. The 1/1000 kits are a great proving ground to experiment with techniques. The 1/350 kits are a considerable investment of money and effort, so it's good to build up a skillset before tackling the dream projects.
 
Or, like some of us, spend over a decade working on it and still not be done. :eek:

Yeah, no kidding. I started work on the 1/350 TOS model years ago, then set it aside while trying to solve certain problems. I ended up buying a whole new kit, because I know I could do it much better from scratch, now, after years of experience and technique-development.

The Refit, of course, is the Holy Grail, in terms of all the lighting and paint effects. I have yet to begin that one at all!
 

Your message may be considered spam for the following reasons:

If you wish to reply despite these issues, check the box below before replying.
Be aware that malicious compliance may result in more severe penalties.
Back
Top