You are using an out of date browser. It may not display this or other websites correctly.
You should upgrade or use an alternative browser.
You should upgrade or use an alternative browser.
Our Collective 5-Foot Millennium Falcon Build
- Thread starter Studio Kitbash
- Start date
New studio space for building the 5-Foot Falcon just got some inspirational decor in the form of a lifesize vinyl wall sticker (removable) from Fathead -- it's as big as the original prop.

Also, in case any of you didn't see it, Airfix re-released their 1/24 Hawker Harrier kit, a key source of important confirmed donor greeblies for lots of Star Wars props, including the 5-footer.
Before...

During...


After...

Whenever you have to hack apart somebody else's model, and you feel a slight twinge of guilt for destroying what was likely their pride and joy... just remember that it's a necessary sacrifice for a higher purpose.
Still, I kind of want to keep the barrel lock on there just as a tribute to the former owner...
During...
After...
Whenever you have to hack apart somebody else's model, and you feel a slight twinge of guilt for destroying what was likely their pride and joy... just remember that it's a necessary sacrifice for a higher purpose.
Still, I kind of want to keep the barrel lock on there just as a tribute to the former owner...
Thats 1/24 scale right? Good find.Before...
View attachment 1626938
During...
View attachment 1626939
View attachment 1626940
After...
View attachment 1626941
Whenever you have to hack apart somebody else's model, and you feel a slight twinge of guilt for destroying what was likely their pride and joy... just remember that it's a necessary sacrifice for a higher purpose.
Still, I kind of want to keep the barrel lock on there just as a tribute to the former owner...
Yes, 1/24 scale Bandai, it's the big one that goes on the Yardley McLaren monocoque on the bottom of the landing gear plateau.Thats 1/24 scale right? Good find.
The Dymo Tape Method:

I got a better result using the exact width of a piece of Dymo tape as my scribing-line cutting guide for trimming the Yardley McLaren monocoque than any other - including a previous method of deploying a high-speed circular Proxxon cutting saw adjusted vertically at the exact height for horizontal cutting and for which I thought this would guarantee equal heights on both sides, but which turned out to not be the case.
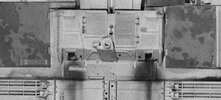
The other thing I figured out, the hard way, is that you'll get a better structural integrity and overall better result if you box out the center hole of the M60 body piece with Plastruct strip so that when your clamps apply sufficient pressure to connect the uneven bottom of the M60 piece with the dead-flat top piece of the Yardley McLaren monocoque, you'll have two benefits that really help: 1.) the resulting structure won't make the M60 piece look/seem "pushed in" or "concave at the center where it should be flat and 2.) you'll have the rim/edge of the box internal structure as extra surface area to glue the two pieces together, giving your center structural permanence and preventing further any "popping out" or "caving in" of this area. If you look into the center hole of the picture below, you can just barely make out the internal structure that's been added. Seen directly overhead, it's invisible, and of course once the Centurion tank hatch greeblie is added, it becomes entirely hidden.

The above picture taken BEFORE the Perfect Plastic Putty was added to seamlessly connect the two pieces.
The below picture is AFTER the same area has been filled with Perfect Plastic Putty:

I got a better result using the exact width of a piece of Dymo tape as my scribing-line cutting guide for trimming the Yardley McLaren monocoque than any other - including a previous method of deploying a high-speed circular Proxxon cutting saw adjusted vertically at the exact height for horizontal cutting and for which I thought this would guarantee equal heights on both sides, but which turned out to not be the case.
The other thing I figured out, the hard way, is that you'll get a better structural integrity and overall better result if you box out the center hole of the M60 body piece with Plastruct strip so that when your clamps apply sufficient pressure to connect the uneven bottom of the M60 piece with the dead-flat top piece of the Yardley McLaren monocoque, you'll have two benefits that really help: 1.) the resulting structure won't make the M60 piece look/seem "pushed in" or "concave at the center where it should be flat and 2.) you'll have the rim/edge of the box internal structure as extra surface area to glue the two pieces together, giving your center structural permanence and preventing further any "popping out" or "caving in" of this area. If you look into the center hole of the picture below, you can just barely make out the internal structure that's been added. Seen directly overhead, it's invisible, and of course once the Centurion tank hatch greeblie is added, it becomes entirely hidden.
The above picture taken BEFORE the Perfect Plastic Putty was added to seamlessly connect the two pieces.
The below picture is AFTER the same area has been filled with Perfect Plastic Putty:
These two identical engine pieces, from different sprues of different Tamiya 1/12 F1 models...

... are NOT identical.
They are subtly but significantly different, specifically on the profile:

smooth curvature profile above

block curvature profile on this one.
So check your references, and be sure to get the right greeblie for the job.
... are NOT identical.
They are subtly but significantly different, specifically on the profile:
smooth curvature profile above
block curvature profile on this one.
So check your references, and be sure to get the right greeblie for the job.
When you hack apart a model for rare greeblies, not everything comes off like you want it to...

There! I fixed it!

Still some sanding/filing/cleaning up to do, but close, and all in styrene.
Still some sanding/filing/cleaning up to do, but close, and all in styrene.
I just committed the second attempt at the armature to glue...


t2sides
Master Member
SK - I would strongly recommend you still look at making your Yardley height shorter. You need to be right to where the 5th rivet is showing, you are a little past 6. This will become apparent as too high once you connect it to the Sheridan part. It's easier to fix now IMHO...The Dymo Tape Method:
I got a better result using the exact width of a piece of Dymo tape as my scribing-line cutting guide for trimming the Yardley McLaren monocoque than any other - including a previous method of deploying a high-speed circular Proxxon cutting saw adjusted vertically at the exact height for horizontal cutting and for which I thought this would guarantee equal heights on both sides, but which turned out to not be the case.
The other thing I figured out, the hard way, is that you'll get a better structural integrity and overall better result if you box out the center hole of the M60 body piece with Plastruct strip so that when your clamps apply sufficient pressure to connect the uneven bottom of the M60 piece with the dead-flat top piece of the Yardley McLaren monocoque, you'll have two benefits that really help: 1.) the resulting structure won't make the M60 piece look/seem "pushed in" or "concave at the center where it should be flat and 2.) you'll have the rim/edge of the box internal structure as extra surface area to glue the two pieces together, giving your center structural permanence and preventing further any "popping out" or "caving in" of this area. If you look into the center hole of the picture below, you can just barely make out the internal structure that's been added. Seen directly overhead, it's invisible, and of course once the Centurion tank hatch greeblie is added, it becomes entirely hidden.
View attachment 1627386
The above picture taken BEFORE the Perfect Plastic Putty was added to seamlessly connect the two pieces.
The below picture is AFTER the same area has been filled with Perfect Plastic Putty:
-Sean
Thanks for the pro tip, Sean! Appreciated!SK - I would strongly recommend you still look at making your Yardley height shorter. You need to be right to where the 5th rivet is showing, you are a little past 6. This will become apparent as too high once you connect it to the Sheridan part. It's easier to fix now IMHO...
-Sean
Man, the 5th rivet! I thought I was already getting "dangerously low" and creating a sort of "Lowrider style" Falcon if I went any further.
The 5th rivet it is, then. Does the Sheridan part go "above and over" the lip of the Yardley? I was under the impression that the two Tank IVF2 pieces on top were the "stops" for the Sheridan deck piece, so that while the Yardley body is "lower" than the Sheridan, the Tank IVF2 pieces stop it from "sliding under" the Sheridan, like so:
lol, your full shelves! love em.
Armature looks good, nice work.
Armature looks good, nice work.
Last edited:
bwayne64
Master Member
This looks like the ILM shop, only cleaner, ; )I just committed the second attempt at the armature to glue...
View attachment 1628392
View attachment 1628393
View attachment 1628394
Bjorn
Sr Member
Ha, a fellow Rivet Counter! Love it !SK - I would strongly recommend you still look at making your Yardley height shorter. You need to be right to where the 5th rivet is showing, you are a little past 6. This will become apparent as too high once you connect it to the Sheridan part. It's easier to fix now IMHO...
-Sean

t2sides
Master Member
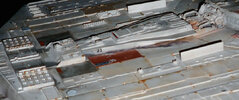
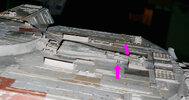
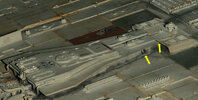
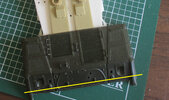
SK - Yes, you are pretty spot on - the problem I see you are having is your Sheridan is also cut too high.
The arrows give you a good indication in relation to those 2 hole 'openings', and the relationship of height of the Yardley to Sheridan.
You should cut your Sheridan at the yellow line.
These should explain it all....
The Black and white you can see where the Tiger 1 part bumps up to the Sheridan, that part is not too thick, but you get a good idea of where the Sheridan gets cut.
Attachments
This is VERY helpful -- thanks Sean. I'm changing to "the 5-rivet method" asap.
Similar threads
- Replies
- 11
- Views
- 1,109