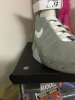
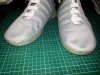
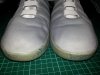
Finally finished installing a pair of Cavx's soles on this pair.
View attachment 561702View attachment 561701View attachment 561700View attachment 561699View attachment 561698
WOW the clear soles LOOK GREAT
 :thumbsup with your mag mod !!!
Finally finished installing a pair of Cavx's soles on this pair.
View attachment 561702View attachment 561701View attachment 561700View attachment 561699View attachment 561698
:thumbsup with your mag mod !!!Finally finished installing a pair of Cavx's soles on this pair.
Looks awesome dude! Have you already repainted the midsole on those? It looks like the original to me. I found it easier repainting the midsole while the clears were off.
Gotta get a set of cavx's second release of clear soles to put on my next V2s.
I used heat shrink to help hold things together as heat shrink gets sticky as it melts and shrinks. You still have to solder the joins though.
Finally finished installing a pair of Cavx's soles on this pair.
Finally finished installing a pair of Cavx's soles on this pair.
View attachment 561702View attachment 561701View attachment 561700View attachment 561699View attachment 561698
Heat shrink and heat sinking are actually two different things, with heat sinking you using an alligator clip on the component that is heat sensitive, in this case the EL panel's terminal pins. Then when you solder onto the pin, the alligator clip actually absorbs some of the heat, protecting the sensitive panel. I tried tonight and can confirm it works!
They look perfect Brad, as usual!
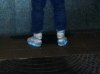
Your EL panel looks really aqua on pictures where did you get it from please?
Mine looks more cyan than aqua...
These look real good Brad. Taking your advice, I am currently installing my cavx soles. Pictures soon. Not sure my install looks as clean as yours though.
Sneek peek
They look perfect Brad, as usual!
Your EL panel looks really aqua on pictures where did you get it from please?
Mine looks more cyan than aqua...
Has anyone tried to use God Of Soles Reviver on the yellowed soles?

Do you guys have any tips in regards to gluing it back?
Is there any tutorial out there on how to install the button on the white collar part of the shoe? That's the last bit I'm confused by.
I think Jedifyfe did one, just some of his videos were pulled from YouTube for what ever reason.
You would need to unpick the stitching and using a chop stick to push the button and wire up inside.
So I ran more "battery life" tests on my all EL system and I got over 24 hours from the pair of cheap Aldi 9V batteries.
http://www.therpf.com/attachment.php?attachmentid=562826&d=1449361647
Pretty crappy snap. They went from this level of brightness to almost non-visible over the run, yet the batteries still measured 6.3V this morning.
@Vdirty is the guy that made that awesome looking cloth over foam MAG. I wonder if there has been any updates?