You are using an out of date browser. It may not display this or other websites correctly.
You should upgrade or use an alternative browser.
You should upgrade or use an alternative browser.
Nike Mag V2 Mod Discussion (Page 58 Shopping List)
- Thread starter Taff83
- Start date
-
- Tags
- back to the future
- Status
- Not open for further replies.
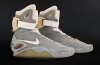
Does any one know how to get the mid sole this color ??Attached Thumbnails

Try this ^^.
https://www.youtube.com/watch?v=HZxkCac3e9k
Have you tried it does it crack after a while ? I wanna use spray paint but I heard it cracks after a while.
RVLF
Sr Member
I'm curious about that too... Is this painting method will last or is it just for display ?Have you tried it does it crack after a while ? I wanna use spray paint but I heard it cracks after a while.
cavx
Master Member
Have you tried it does it crack after a while ? I wanna use spray paint but I heard it cracks after a while.
I'm curious about that too... Is this painting method will last or is it just for display ?
I think you will find all paints will crack over time if you wear them. Display pairs should be fine.
cavx
Master Member
@John Lawlor if that is your first toe mod, well done. It looks good. They do get easier the more you do.
When I recently did mine, I used a plastic ruler, not a butter knife. Plastic and wood won't heat up like metal does and if you slip, less likely to cause damage to the shoe or an injury to yourself.
When I recently did mine, I used a plastic ruler, not a butter knife. Plastic and wood won't heat up like metal does and if you slip, less likely to cause damage to the shoe or an injury to yourself.
John Lawlor
New Member
@cavx Yeah it's definitely not for the faint hearted. The left one didn't want to come away cleanly when I was separating it but the right one was a dream. It seemed like there was way less glue on the latter, hence it was easier. Definitely a few "what the **** am I doing?!!" moments during it!
i know what you mean about the knife. There were a couple of slips that almost caught me out. What size ruler did you use? Must be quite a firm one if you're hacking the toe out of a Mag?
cheers
i know what you mean about the knife. There were a couple of slips that almost caught me out. What size ruler did you use? Must be quite a firm one if you're hacking the toe out of a Mag?
cheers
cavx
Master Member
@cavx Yeah it's definitely not for the faint hearted. The left one didn't want to come away cleanly when I was separating it but the right one was a dream. It seemed like there was way less glue on the latter, hence it was easier. Definitely a few "what the **** am I doing?!!" moments during it!
i know what you mean about the knife. There were a couple of slips that almost caught me out. What size ruler did you use? Must be quite a firm one if you're hacking the toe out of a Mag?
cheers
One shoe always seems to have better glue than the other.
Just a 30cm plastic ruler, one of my kids uses for school. Once I heated the rubber on the toe up, I was able to pull the cloth over with my thumb and then run the tip of the corner of the rule in between the cloth and the rubber to make a slot. I was basically just scraping the heated glue away. Once I got to the base, the rest just peeled open almost like taking skin off fruit. A bit scary how easy that came apart. I made sure to use way more glue when putting them back together.
DSplayer
Active Member
I am not 100% sure. Best to send him a PM and ask.
Markpoon just PM me back and said that these are his.
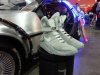
I have already repaint jordan soles and if you make thin layer it will work but cause it allays have a but, the repaint midsole are always more fragile as the factory paint.
Another point on the mag the midsole is verry flexible and paint need be also flexible for rest on sole.
On the video the guy use water for dilue the paint good idea but he was a little bourin and for a good result this work demand to be patient and delicat ^^.
Another point on the mag the midsole is verry flexible and paint need be also flexible for rest on sole.
On the video the guy use water for dilue the paint good idea but he was a little bourin and for a good result this work demand to be patient and delicat ^^.
cavx
Master Member
so you recomand this method only by adding some water to the paint ?
If your paint is water based, then you could thin it with water. If oil based, then use turps or acetone. The point is that the paint is layered on thinner, so a few coats may be required. This will either work or still crack depending on how flexible the paint actually is.
DragonGalvy
Sr Member
I haven't had my midsole paint crack yet - I did thin it down with water (as it was water-based) but the intention was more to ensure I didn't lose the texture of the midsole rather than preventing it from cracking. Can't remember how many coats I did though. Takes a long time with a tiny brush.
(I have no idea where the paint bottle is as I've recently moved, so I can't tell you many details about it, only that I got it from Ebay)
(I have no idea where the paint bottle is as I've recently moved, so I can't tell you many details about it, only that I got it from Ebay)
soundswipe
New Member
Alright I know this is probably a really dumb question but for EL panels with the metal pin looking things that stick out, do you have to connect to those pins in order for the EL to light? You can't just wire directly to the EL itself?
cavx
Master Member
Alright I know this is probably a really dumb question but for EL panels with the metal pin looking things that stick out, do you have to connect to those pins in order for the EL to light? You can't just wire directly to the EL itself?
Yes they are your terminals. There is no + or -, just pick a pin for each wire. best to "tin" the tabs first, tin your wires and "sweat" the two together rather than trying to solder them.
So what I did for mine was to 'sweat" solder the wires, lay a piece of electrical tape so that it just covered the exposed bus bar (that won't glow anyway) and stick soldered terminals onto that, then placed a 2nd piece behind and made sure both adhesive surfaces made good contact. Press down in between the wires to keep the sheet from shorting and then the bend them up behind the sheet. The use another piece of tape to hold them in place.
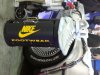
Just finished adding the colour filters to my all EL system.
Point to note. The sheet I used here have 6 sets of terminals, so I have made both parts of the sole lights as separate elements. I made them from a single part the first pair I did and if they move a bit during gluing of the soles, the whole thing moves.
Attachments

BTTFSpencer
Sr Member
edited
Last edited:
cavx
Master Member
@cavx If you paint the back of the panel around the individual dots silver, it would light-block and you could get the individual green, red and yellow points of light to be more visible.
I made an "aperture" and you lose too much light so why I am not using it on my pair.
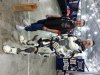
So over the weekend at SupaNova, I saw just one pair of HCs and no other MAGs anywhere.
My MAGs were on display for most of the time and I did wear them last night to dinner and this morning. They are now probably the most photographed pair in Australia.
I didn't run them continuously until about 5PM last night, then they ran all day today. So in total about 14 hours and they were still pretty bright tonight when I shut it off and put them away. All off cheap Aldi 9V batteries. I am impressed.
Attachments


- Status
- Not open for further replies.
Similar threads
- Replies
- 12
- Views
- 824
- Replies
- 0
- Views
- 1,074
- Replies
- 60
- Views
- 7,943