Nike Mag V2 Mod Discussion (Page 58 Shopping List)

Status
Not open for further replies.
The branding is the least of their problems. The Nike knockoffs are flying off shelves with swooshes every day. They can replicate a shoe to 99.99999% accuracy. They haven't got this shoe just right yet because they don't have the correct molds/files/info or correct product in hand to reverse engineer.

They don't care about branding, patents or IP. They will reverse engineer anything they think will sell.

The issue up and till recently was they didn't have a real shoe to study. They have a pair now though. So I think even December 25 is probably a bit close, but by the real MAG's "power lace" launch next near, we should have a better K-MAG. I Just don't see that price as being the final one. I think it will go up.
 
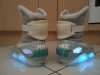
Why am I doing this again? Oh that's right. Because these are Uber cool with lights. Yeah...

attachment.php


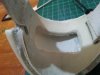
New clears have been attached leaving the side wing open for wiring the EL. Sock Toe is also complete.

attachment.php


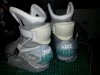
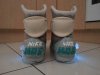
I decided to reshape the heel a bit. My heel cups have been built up using grey rubber. A few days back, I removed the old hand cut letters and added these new ones. I still don't have the proper mold, so this version will have to do until I get that. Anyway, machined letters look way better than hand cut letters. I broke the NIKE during the re-wire. Lucky I can make new ones. The letters are cast in their colours too, so no paint to peel here :) And of course I will be re-doing the spatter in the new colour. I changed the colour of the green/blue to be more blue as you can see from the new MAG. The old grey and spatters were shiny because that is how the rubber cures. During these mods, I have used a ceramic tool to just take the shine off, and it looks heaps better, so will continue with that.

attachment.php


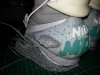
I also have been working on new clear bubbles with the three slots on the inside so that those that want LEDs can still use these when I finalize the masters and make a new mold. The top is very rounded like the RD part, but it is not long enough, so looks a bit too round. I will also have to take the shine off these as well. This size fits the standard cutout of the V2/HC and why I have made them at the same size. The new Heel Cups I am working on will have a larger bubble. Therefore bubbles will come with them when I actually start production. They too will have the larger NIKE and MAG, but the proper graphic that matches the RD.

attachment.php


The cloneprops 3D printed ankle buckle (medium) that I often refer to as CP-3D (not to be confused with C-3PO). I hope now that he back on the forums, that he up-loads the small version to shape ways as I find this meduim part just a touch too big. The good thing about the medium part is that it clips over the white rubber V2 part, so makes adding these one of the easiest mods around.

attachment.php


What I have done to mine is to cut right through the V2 rubber part and use the CP3D part as a new skin.

attachment.php


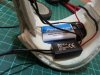
The cutout will hold a 9V battery. I was originally using 3V but the EL is not very bright on just 3V. 9V is much better. I picked up these 12V inverters for cheap locally. I may recess the inverter in a bit at some stage. Although this adds some weight to the buckle, the strap's velcro does hold it in place. I just didn't want the battery in the soles on this pair. in fact, I filled the cavity with a block of Pinkysil.
 

Attachments

  • 20151124_170540.jpg
    20151124_170540.jpg
    164.8 KB · Views: 406
  • 20151124_191439.jpg
    20151124_191439.jpg
    174.8 KB · Views: 422
  • 20151124_191307.jpg
    20151124_191307.jpg
    158.5 KB · Views: 411
  • 20151124_191230.jpg
    20151124_191230.jpg
    173 KB · Views: 420
  • 20151124_170604.jpg
    20151124_170604.jpg
    195.8 KB · Views: 410
  • 20151124_170549.jpg
    20151124_170549.jpg
    158.8 KB · Views: 414
Last edited by a moderator:
This shot is awesome ! Really looks like the RD to my eyes !


will you make a tutorial on the strap that you're making/wireing ?

What rubber do you use ? Any pictures of the process ?

Thank you. They have gone through a massive transformation since I got them in 2013.

The photos of the inside of the ankle buckle are the latest I have done. I spent far too long on them yesterday and hope to finish them today. I want these wearable for this week ends SUPERNOVA! I have not done anything "special" for the strap apart from my "power lace" system which uses the factory switch from the shoes for activation of the lights.


All the rubber on the mid-sole, letters etc are the same polyurethane I use for the clear soles. The difference is, I add a tint to it before I degas it. I mixed full containers of both the grey and the blue/green pigment to make sure I would not run out any time soon. You only dip the end of a chopstick in for 100g. Too much and the rubber won't cure properly or takes over 24 hours to cure.

The grey is generally added within the pot-life so that is smooths out as it cures. If I want texture (like I did with this pair), I will let the rubber go into gel state so it builds up and even sticks to the vertical surfaces. The cool parts about doing it this way as opposed to painting is that rubber itself is the colour, so it flexes with the base rubber of the shoe.

The rubber on the mid-soles did not crack like paint did during wear. The splatters are done by using a sharp stick and a glob of the now gel state rubber. You just touch it to the surface and lift it. It sticks where it touches and as you lift, you create a fine string. If you make it too thick, you can go over it with a bit of grey. When it cures, you will have a textured rubber sole that is colour fast and flexes with the shoe. Of course being the same rubber as the clears, this is UV stable so won't go yellow either.

These uppers are getting tired, so when I am ready to replace them, I might just buy US11 (to gain that missing 1/2" of height) and trim the 1/4" off the toe and fit those new uppers to these soles. If you look at the proportions of the US8, they are tall to their length. The US9s are only slightly taller, but are longer. The US11's are just 1/4" longer but a good half inch taller, so I'll be able to gain some height that way. I'll probably do this because the RD patterns are doing my head in again, so like electricity, sometimes it is best to choose the path of least resistance.
 
Last edited by a moderator:
Let there be lights!

attachment.php

attachment.php


WOW that was a stretch. I am sure the last pair was much easier than that. The last pair had never been modded before, so much easier to pull apart too.

Things to still do:

1. I have not added the filter to the bubble yet.

2. I have to fill in some parts with grey rubber and then re-splatter. I was originally using those older size 13 soles and now am using a medium (US9.5/US10) soles. I had to grind the old soles off and seems I have made the recess slightly over sized when grinding all the glue off.

3. I also need to replace my NIKE on one shoe as it broke off whilst getting the wires through the shoe.

I hope the light difference is just a case of needing a new 9V. I won't be happy if the EL is messed up.

Again, assemble the clear sole into a 3D part FIRST using your shoe as a template! I used Tarzan's Grip to do the main attachment, then went around all the edges with a 5min liquid super glue.

All wires and joins are double insulated and I have a heap of extra wire in there, so hopefully I don't go breaking another when I wear these. According to Facebook, it was a year ago when I had LEDs and the wire broke on the 2nd or 3rd wear. Then I went to GITD.

I had I also installed a clip so the buckle can be removed. Again, I installed my pressure switch under the strap again. I have a glass in each to give a solid surface to press against.
 

Attachments

  • 20151125_162726.jpg
    20151125_162726.jpg
    170.7 KB · Views: 438
  • 20151125_162842.jpg
    20151125_162842.jpg
    166.9 KB · Views: 444
  • 20151125_163020.jpg
    20151125_163020.jpg
    161.9 KB · Views: 66
First day of mag modding and literally everything possible has gone wrong :lol. Nothing that I haven't been able to fix for the most part which is good but I'm concerned I may have defective inverters. I don't know much about electronics but my brother does and he tested them out for me with a 9 volt battery test kit and they didn't light up. We tried with just the 9 volt battery and it worked fine. So now I'm not sure where to go. I also cannot figure out how to get my el strips to light.
 
First day of mag modding and literally everything possible has gone wrong :lol. Nothing that I haven't been able to fix for the most part which is good but I'm concerned I may have defective inverters. I don't know much about electronics but my brother does and he tested them out for me with a 9 volt battery test kit and they didn't light up. We tried with just the 9 volt battery and it worked fine. So now I'm not sure where to go. I also cannot figure out how to get my el strips to light.

Having just done mine, I have to agree that EL can be trying at times. My inverters were also playing up and that turned out to be battery issue. The inverters MUST have proper polartity to work. Althought the sheet does not care which wire is positive, I make sure that all wires with a black strip go into same side of the joiners.
 
Those are HC's. Look at the item description. I would stay away. False advertisement.

I clicked the link and this shoe is a real NIKE 2011 MAG, not a Halloween Costumes shoe.

attachment.php
 

Attachments

  • -Air-Mag-shoes-Back-To-The-Future-Men-s-shoes-adult-shoes-.jpg_640x640.jpg
    -Air-Mag-shoes-Back-To-The-Future-Men-s-shoes-adult-shoes-.jpg_640x640.jpg
    50.9 KB · Views: 453
Status
Not open for further replies.
Back
Top