Nike Mag V2 Mod Discussion (Page 58 Shopping List)

Status
Not open for further replies.
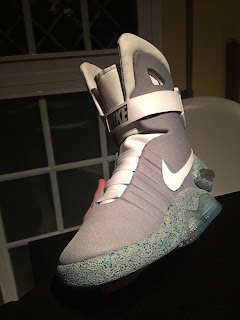
I cant seem to get access to the bottom of the shoe where the wires etc are :/

but i was thinking to have the strap running off its own battery what would the smallest battery be that could supply enough power to that tiny el strip?
 
Screwdriver?

Lol i was afraid too, but screw it ( no pun intended).

If i were to just snip the Sole LED's and replace them with EL would that be safe or would power still go to the wires?
I am thinking of just having the 3 Colour LED's in the bubble run off the stock battery and then having my strap and sole EL run off a 9v setup hopefully it all fits in the sole.

The stuff thats linked on page 58 costs way too much to ship to Australia ( the inverters are like $60 shipped haha) so i found a few UK sellers and this is what im going to buy.


9v Inverter with Battery Rig

http://www.ebay.com.au/itm/151029195875?_trksid=p5197.c0.m619#ht_2438wt_1111

2 way spliiter to connect to the Mid Sole and Strap

http://www.ebay.com.au/itm/151020226443?_trksid=p5197.c0.m619#ht_1564wt_1111

Switch to connect before the 2 way splitter ( i think that will work?)

http://www.ebay.com.au/itm/151027714618?_trksid=p5197.c0.m619#ht_2058wt_1111

Wires to connect my EL panels to the Splitter

http://www.ebay.com.au/itm/151024280850?_trksid=p5197.c0.m619#ht_2222wt_1111

Would this work?
 
Last edited:
I have a6 aqua sheets up in the junkyard now if anyone needs them for their mags.

its time for me to cut up some EL sheets and do some mags!
 
I have a6 aqua sheets up in the junkyard now if anyone needs them for their mags.

its time for me to cut up some EL sheets and do some mags!

how much are they?

--EDIT--

DERP!! diddnt realize you said you posted in the junkyard my bad
 
Last edited:
you have to go to junkyard threads.

On the subject of the heel cup leds.

I tried 1.5mm sheets but they are way too thick and hard.

And i ran out of biscuit tin plastic! which i used on one pair! lol!

so now ive got white matt 0.75mm (30,000) A4 styrene sheets (plasticard).

And like Taff83 has done, stick some copper tape on the back, and you can easily now solder the LEDs on, and it should easily fit in the heel cup bubble.
 
Lol i was afraid too, but screw it ( no pun intended).

If i were to just snip the Sole LED's and replace them with EL would that be safe or would power still go to the wires?
I am thinking of just having the 3 Colour LED's in the bubble run off the stock battery and then having my strap and sole EL run off a 9v setup hopefully it all fits in the sole.

The stuff thats linked on page 58 costs way too much to ship to Australia ( the inverters are like $60 shipped haha) so i found a few UK sellers and this is what im going to buy.


9v Inverter with Battery Rig

9V Portable Driver - Tiny Waterproof Inverter for 5m EL Wire / 175squ cm EL Tape | eBay

2 way spliiter to connect to the Mid Sole and Strap

2 way Splitter for EL Tron Wire (standard connectors) | eBay

Switch to connect before the 2 way splitter ( i think that will work?)

On/ Off Switch For EL Wire or EL Tape - Clips Into EL Wire, Inverter or Splitter | eBay

Wires to connect my EL panels to the Splitter

5 X EL Wire Connectors - attaches to EL Wire - cut your wire and plug it in! | eBay

Would this work?

Hi, the best and only inverters you should get are these ones as they are the thinnest and will fit in the hole thats in the sole.

3v thin inverter (I have one last pair of these available)
CL-IPTC-3v-3-7FT

and

9v thin inverter
CL-IPTC-9v-3-7FT

I had to get my 3v thin inverters from elsewhere due to the extortionate shipping costs from the USA (I don't know why they can't do regular airmail like normal people!)

Any other inverters will be too big for the soles so don't bother with them.
These above are the only ones to get.
 
Lol i was afraid too, but screw it ( no pun intended).

If i were to just snip the Sole LED's and replace them with EL would that be safe or would power still go to the wires?
I am thinking of just having the 3 Colour LED's in the bubble run off the stock battery and then having my strap and sole EL run off a 9v setup hopefully it all fits in the sole.

The stuff thats linked on page 58 costs way too much to ship to Australia ( the inverters are like $60 shipped haha) so i found a few UK sellers and this is what im going to buy.


9v Inverter with Battery Rig

9V Portable Driver - Tiny Waterproof Inverter for 5m EL Wire / 175squ cm EL Tape | eBay

2 way spliiter to connect to the Mid Sole and Strap

2 way Splitter for EL Tron Wire (standard connectors) | eBay

Switch to connect before the 2 way splitter ( i think that will work?)

On/ Off Switch For EL Wire or EL Tape - Clips Into EL Wire, Inverter or Splitter | eBay

Wires to connect my EL panels to the Splitter

5 X EL Wire Connectors - attaches to EL Wire - cut your wire and plug it in! | eBay

Would this work?

You don't need any splitters or anything. Just solder.

You just solder the wires, ie 2 wires going to one, and cover with electrical tape.

For the wire connections, just follow Jedifyfes wiring diagram (its the best!)
 
Hi, the best and only inverters you should get are these ones as they are the thinnest and will fit in the hole thats in the sole.

3v thin inverter (I have one last pair of these available)
CL-IPTC-3v-3-7FT

and

9v thin inverter
CL-IPTC-9v-3-7FT

I had to get my 3v thin inverters from elsewhere due to the extortionate shipping costs from the USA (I don't know why they can't do regular airmail like normal people!)

Any other inverters will be too big for the soles so don't bother with them.
These above are the only ones to get.

Yes i planned on getting those inverters but it would cost me about $60 to have them shipped to Australia :/
 
When I was testing my EL, I connected everything and there were some sparks like inside of the sheet itself right where the terminals are. It started to burn a slight line into it and now the right lead doesn't work. The left one and all of the other ones work perfectly though.

And I need some help. When I try to connect the EL sheet using some wire tape, it doesn't work. I've tried both the sticky and non sticky sides, with different combinations of where the wires went, and got nothing.

hi
i dont think there is a way to actually stick the Wire Tape directly to the EL Sheet or solder directly to the EL Sheet which doesn't have metal pins.

Its why you have to use Wireglue as an alternative to solder.

I think you just need some wireglue to stick the ends of the wiretape to the EL Sheet positive/negative tabs.

I'm assuming you are using the bits of the EL sheets without the metal pins?
If so, then you need wire glue to stick the Wire tape ends directly onto the EL sheet like jedifyfe explains in the tutorials.

At the moment, i've managed to get A6 Aqua EL Sheets with 6 connector pins, so im not having to use any wire glue at all. I can just solder directly to the metal pins.


My sheet does have the metal pins. I called them terminals in my last post. I've used electrical tape to connect all the wires and the tape to the sheet, but nothing happens.
 
My sheet does have the metal pins. I called them terminals in my last post. I've used electrical tape to connect all the wires and the tape to the sheet, but nothing happens.

ok, so if you have the terminals for positive/negative there, then have to solder onto them.

what you can do is simply solder some small length of standard black and red wire to each of the terminals. They only have to be very small lengths.

then solder those wires directly to the wiretape ends.

Remember to remove the thin film cover from the top end of the wiretape (the coloured ends). its tricky to remove, but its doable. you can then solder the wires directly to the wiretape.
 
these are by far the closest ive seen to the actual movie shoes, even over the RD's, and they blow the v2's totally out of the water.

id love a detailed tutorial on how to make those sir. even if its just the physical bits without electronics.

Yes, finally I ended my Mags Project.Im using 1020Mah lithium battery and 3V inverter with my Shapeways ankle buckle with Tamiya primer.
I dont use 9V because inverters spend a lot of battery, because ovbiously have a big coil(tested and confirmed).
The reason for have a delays in my project and absence of the forum was for the BIG amount of work in Oblivion and Star Trek films(I work in Visual Effects)Finally both is finished.
Anyway, I spend about a year for making a Mags from scratch.I learned A LOT about materials, compounds, and electronics.Thanks for all forum community for the always good opinions about my project.

100%wearable!!!
100%finest materials!!!
100% from scratch!!!

ankledetail.jpg

backlighton.jpg

closeup1.jpg

closeup2.jpg

closeup3.jpg

front.jpg

hero.jpg

inside1.jpg

jack.jpg

nikeEL.jpg
 
these are by far the closest ive seen to the actual movie shoes, even over the RD's, and they blow the v2's totally out of the water.

id love a detailed tutorial on how to make those sir. even if its just the physical bits without electronics.

Check out his other posts, he's got a fairly detailed blog with pictures of the entire process over the last year+.

It's not easy or cheap...fair warning.

-Nick
 
Oooooh. I didn't know you had to take film off of the top part while leaving the bottom part so it's not sticky. Works like a charm now. Thanks! :)
 
Last edited:
Oooooh. I didn't know you had to take film off of the top part while leaving the bottom part so it's not sticky. Works like a charm now. Thanks! :)

yeah, i was confused too when i did it for the first time.

the coloured layer of tape wire is the conductive part, you have to very carefully peel off its top layer somehow, and then you can make some small pin holes in the copper tape, and solder your wires or terminal pins to it.

i found poking a small pin hole in each coloured copper tape allows you to neatly poke the red and black cables and you can just dab some solder on, and jobs done.

Also, yeah, ignore what i said about soldering wire to the pins and then wire to the dollhouse tape.

since you have the terminal pins, just solder the terminal pins directly to the exposed coloured tape wire ends.

on one of my old el sheets which i used, it already had some red/black cable presoldered to the el sheets connector pins and was heatshrinked already, so thats why i soldered its wires to the wiretape, otherwise normally you can just solder metal terminal pins direct to wiretape.
 
Check out his other posts, he's got a fairly detailed blog with pictures of the entire process over the last year+.

It's not easy or cheap...fair warning.

-Nick

ya ive seen those nick. not easy I could handle, if I went slow. ive restored and sole swapped several nikes already so I think I could handle the build, IFF there were detailed blueprints with patterns, measurements and everything to go off of. pics and vids are fine but imo they are not enough for me to replicate what ive seen him build here.

not cheap might be an issue. but I would want my pair sans the electronics for daily wear, so should be somewhat cheaper. (they weren't lit up in the movie half the time anyhow so im fine with that)

if he had a kit with some precut and precast parts along with the shapeways parts then id jump on that. ill wait and see what he comes up with tho. =)
 
What order should I do the electronic mods in? It's a bit overwhelming when I look at all the stuff. I already know I'm doing the toe mod first and that's not electronics. And just to let you know, I'm doing Taff's rechargeable setup.
 
What order should I do the electronic mods in? It's a bit overwhelming when I look at all the stuff. I already know I'm doing the toe mod first and that's not electronics. And just to let you know, I'm doing Taff's rechargeable setup.

given that i will undertake this myself in the coming days ( Just gotta find a thin inverter here in Australia ) i would also like to know what would be the best way to start? im assuming starting from the sole and working your way up?
 
Status
Not open for further replies.
Back
Top