Mr Mold Maker
Master Member
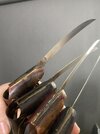
Hey folks! Been a while since I’ve had anything to share. I had some free time, and I’ve always really wanted to make myself a Freddy Glove. I had made attempts years ago that never quite reached my standards. Happy to say that I’ve just made my first Part One Glove, and I am thrilled with the results.
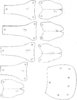
While it is certainly not down to the dent screen accurate, it is very screen “authentic”. What I mean by that is to the best of my ability, I used the exact same templates, the exact same materials, and exact same techniques, used to construct the original glove.
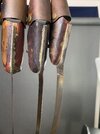
The stalls and tips are made out of 3/4” Type M Copper Pipe. The backplate and rings are made of .02 brass. The blades are .02 spring steel brazed on to the tips with a high silver content brazing wire. I tried to replicate everything down to individual brazing and solder spills. Other small details I replicated include the small hole next to the rivet on the ring stall, the slanted ring on the ring tip, and the slightly curved pinky blade.


Hope you like it. I also shot a short video where I show close ups and also movement of the glove.
I do paint commissions very frequently and plan on uploading short videos showing techniques and finished commissions, as well as builds like this. If that sounds like something that interests you, feel free to subscribe as well!
Many thanks,
J
While it is certainly not down to the dent screen accurate, it is very screen “authentic”. What I mean by that is to the best of my ability, I used the exact same templates, the exact same materials, and exact same techniques, used to construct the original glove.
The stalls and tips are made out of 3/4” Type M Copper Pipe. The backplate and rings are made of .02 brass. The blades are .02 spring steel brazed on to the tips with a high silver content brazing wire. I tried to replicate everything down to individual brazing and solder spills. Other small details I replicated include the small hole next to the rivet on the ring stall, the slanted ring on the ring tip, and the slightly curved pinky blade.
Hope you like it. I also shot a short video where I show close ups and also movement of the glove.
I do paint commissions very frequently and plan on uploading short videos showing techniques and finished commissions, as well as builds like this. If that sounds like something that interests you, feel free to subscribe as well!
Many thanks,
J
")