You are using an out of date browser. It may not display this or other websites correctly.
You should upgrade or use an alternative browser.
You should upgrade or use an alternative browser.
NEW PICTURES!! (last page) - Razor Crest - 1:34 - Modified/lights - Build log. - FINISHED!
- Thread starter Hoplitespear
- Start date
Hoplitespear
Sr Member
Thank you for the nice comment!WOW, Amazing, Fantastic and all those other words that describe coolness! Love the landing platform great details and lighting. As for real life that will always come first gotta pay the bills right? Without a doubt, "This is the Way"
You have pulled off an amazing piece of work here. I'd say you have found the way!
 I sincerely hope so. When printing I knew the measurements, but knowing and seeing, this thing is so much bigger than imagined.
Thx!Looking fantastic!
Hey Everyone
For me, its done... I put allot of time in this, it has been a project to do during this last covid year.
So without further delay... the last steps:
Going to sum up again in short
- Added masking tape for three big ring markers where the gear should go
- painted said markers
- The energy cells are way to bright, painted them black and immediately scraped of three lines creating this mechanical look.
- Added dust, washes, grime, rust to finish up the pad. I want a used, old pad, because its going to receive a used and 'in need of refurbish' Crest.
With the cargo boxes I made, i decided it would be nice if I could pose the model with the back door open. So I came up with this great illusion of painting a mat black panel to fit the back, and adding two piston's for the door.
It shows on photo's but even more In real life, it really sells the look without thinking, damn there is no inside.
I like my ships dirty, especially my star wars ships. Even though in the series it was mostly clean, in some occasions it was falling apart. So I'm picturing this landing platform on a dusty planet, after a dusty mission in atmosphere, in dire need of some fresh paint and touch ups.
I also tried my hand at some 'heat coloration' for the cannons (I like the result, although u might disagree)
Ok so here it is! NOTE: THESE PICS ARE QUICK WITH CELLPHONE - I have a friend coming over that knows allot more about taking pictures etc to take some with a nice reflex camera and backdrop/lights. (I know i promised this with my Venator aswell, so those will be coming too. Corona just didn't give me the opportunity yet) - SO BETTER PICTURES ARE DEFFINATLY COMING!!!!!!!!!!
Thank you for following this thread, commenting and supporting! Remember one more post is coming with professional pictures!
Cya!
-Hopli
Attachments

mcusanelli
Well-Known Member
Magnificent!! I’m completely blown away... and jealous!
Very well done. I love when people add lights to their models. And the display is great with the cargo crates and energy cells. Love it. I got to work on the full scale One that went into the volume. Its a very cool ship. All the hours you put into it really paid off. Looking forward to see what you do next.
Wow! Absolutely beautiful work! I love it!
This is seriously awesome! Subbed your thread! Following closely!Hey everyone!
Back with a new project!!
Small intro, since last year I have been doing a course/school to re-educate myself and switch careers. The education center has a 3D printer that 'students'(in this case adults) can use. Its a Raise3D pro2 plus, a very expensive printer, industrial grade but a beast!
I didn't have any experience 3D printing and always wanted to do a 3D printed 'kit'. My main goal was to see how it can be used for model making, either for details or full kits. My plan in the future is a resin printer to print small details for my custom builds.
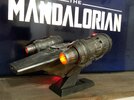
Now back to this project, being a huge fan of The Mandalorian and especially his ship the Razor Crest, I went looking online for files to print. I came along the gamebody website, bit the bullet and bought the STL files for the razor crest. (gamebody link).
After tinkering with the settings, learning about supports, rafts and so on I started the first print.
On a side note, I noticed that you´re from Brugge, and the ed center you mention probably is the Howest Campus? I´ve been there in 2008 and 2009 while working on German TV movies, very fond memories of Bruges and its citizens, we arrived as strangers and left as friends
.Hoplitespear
Sr Member
Man I've been staring at the "Buy Now' button on that model for a while now! Did you scale the file at all when you printed it? Did you use their recommended settings or did you change any of them like the infill, or print speed, etc.?
Love the piece!
I tried to copy the settings as much as possible. Rais3d has its own slicer, and they only have settings for the most common ones.
Nevertheless I just copied what i could, kept the speed the same and went for it. I also didn't touch the scale, pls beware ITS BIG!!!!
Thank you everyone else for the nice comments!
-Hopli
Hoplitespear
Sr Member
This is seriously awesome! Subbed your thread! Following closely!
On a side note, I noticed that you´re from Brugge, and the ed center you mention probably is the Howest Campus? I´ve been there in 2008 and 2009 while working on German TV movies, very fond memories of Bruges and its citizens, we arrived as strangers and left as friends
Nah its an adult program, not at the Howest campus. I am from Bruges that is correct! Thx for following, but the project is at an end. There will be just one more update post with 'photoshoot quality' pictures comming.
.-Hopli

Hey man, just going back a couple of pages I saw you used some small orange/clear connecting blocks for your electronics - could you let me know what brand these are? I’m hoping it will save my razorcrest from my horrible soldering.PART II
Hoplitespear
Sr Member
Really nice job here’s one I did and up for sale
hey can you tell me what material you used to make the base please
Thank you for the nice comment!
The one you made looks freaking amazing tho, I love the paint job.
Hey man, just going back a couple of pages I saw you used some small orange/clear connecting blocks for your electronics - could you let me know what brand these are? I’m hoping it will save my razorcrest from my horrible soldering.
Hey, those are 'wago connectors'. I think wago is the brand. Its used here in Belgium and europe to connect electricity in houses.
the clear/orange ones are specially made for soft multi stranded wires. we also have yellow ones to connect solid copper wires.
-Hopli-
Hoplitespear
Sr Member
Really nice job here’s one I did and up for sale
hey can you tell me what material you used to make the base please
Sorry! Forgot to give you a reply.
Its Multiplex board. covered with styrene.
-Hopli
can you give me the dimensions of it please and thank you