New BMF coming

Legacy Falcon is bigger. Closer to 32 inches. There was a guy somewhere on this thread that used the legacy walls and cut them down to fit. If your ok with the oversized detail then they work.

Thanks for confirming the size kokkari. I was just curious as I have seen a few selling legacy stuff in ebay.
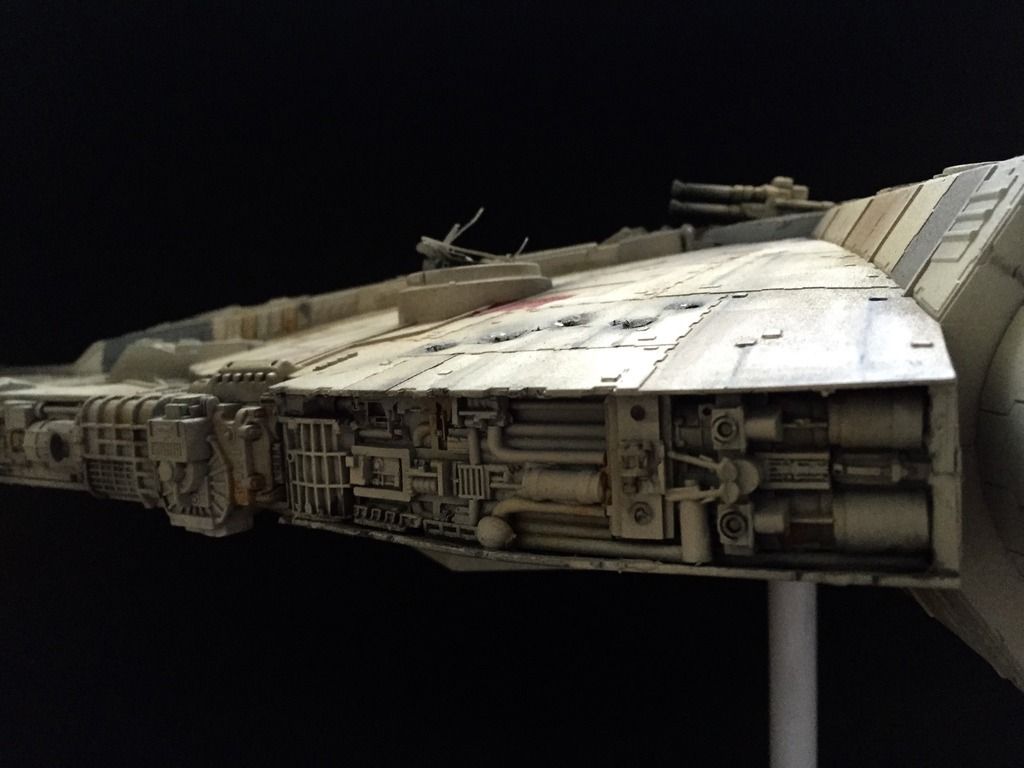
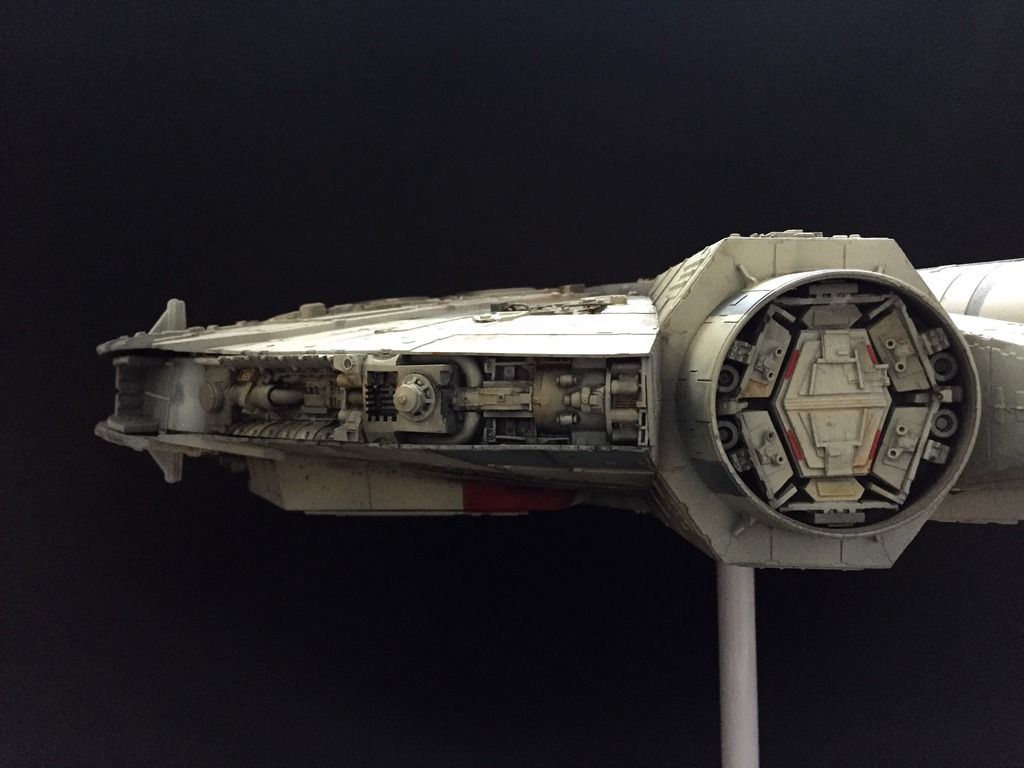
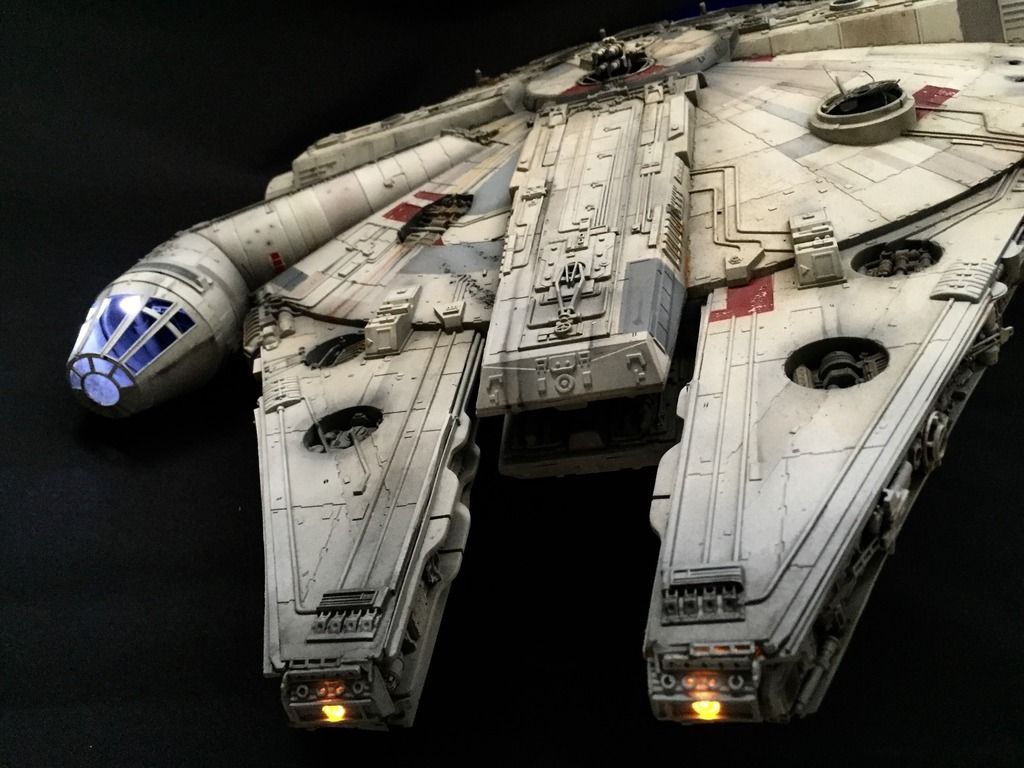
Anyway, I have just finished reading your build thread of this BMF - awesome workmanship!
If you dont mind, would you be kind enough to pm me a usps shipping quote of your kit to Manila, Philippines? Thanks!

Mardon (MLC)
 
Finally started to begin gluing on all my missing hullplates (found a GREAT superglue, BTW! It's a two-part Lepage product called "All Plastic", specifically made for bonding PE to essentially ANY other material, and seems to be working great at the moment, though it does bond INSTANTLY), and noticed something I'm hoping someone with knowledge of the history of the 32" Falcon might be able to answer. I'm at sticker 79 (the outboard plate, right behind the starboard docking arm), and while trying to find some clear reference pics of the notching for this plate, I noticed that the hull plate aft of this one (on the HS Falcon, it's got three chips on it, and two notches that needed to be cut out from the overhang) is seriously truncated in the pics I've got. It looks like the end of this plate lines up with the sidewall below in fact. The next plate aft returns to normal length, then there's a triangle bit, then the engine deck. Does anyone know if this one short plate was built that way, or was the model damaged sometime after Empire, snapping off the overhang?
 
Finally started to begin gluing on all my missing hullplates (found a GREAT superglue, BTW! It's a two-part Lepage product called "All Plastic", specifically made for bonding PE to essentially ANY other material, and seems to be working great at the moment, though it does bond INSTANTLY), and noticed something I'm hoping someone with knowledge of the history of the 32" Falcon might be able to answer. I'm at sticker 79 (the outboard plate, right behind the starboard docking arm), and while trying to find some clear reference pics of the notching for this plate, I noticed that the hull plate aft of this one (on the HS Falcon, it's got three chips on it, and two notches that needed to be cut out from the overhang) is seriously truncated in the pics I've got. It looks like the end of this plate lines up with the sidewall below in fact. The next plate aft returns to normal length, then there's a triangle bit, then the engine deck. Does anyone know if this one short plate was built that way, or was the model damaged sometime after Empire, snapping off the overhang?
See if this helps. It's sad you can see photos over the years where the plating overhang has bent, then cracked, then fallen off all around the model. I can't figure out why they don't take better care of this work of art! You can clearly see where more and more greeblies have fallen off too over the years. Especially as photos of it are available from its current tour.
View attachment VEH_IA_886.jpg
 
Okay I am skipping this one and concentrating on the DeAgo so mine is for sale. I kinda damaged the one I was working on so I took off all the add on parts and am gonna sell everything I have for upgrades with my second sealed Falcon. It has actually been listed for a little while but I am gonna go ahead and push hard to sell it so if anyone is interested it's in the Junkyard.

FYI Black Onyx resin that sticks to anything I ever have used it on like cement does not stick to the inside of the Falcon well. I thought I would try using thin layers of it to firm up the hull. Just peeled right off mostly.
 
See if this helps. It's sad you can see photos over the years where the plating overhang has bent, then cracked, then fallen off all around the model. I can't figure out why they don't take better care of this work of art! You can clearly see where more and more greeblies have fallen off too over the years. Especially as photos of it are available from its current tour.
View attachment 495780

Awesome! I somehow don't have this one - great angle which show me a couple of other things which I was going to have to confront eventually. Yeah, I had actually noticed that through the library I've assembled of tour photos, I actually can trace the history of the damage to the panel near the radar dish as it clearly got banged on something, then eventually cracked under its own weight, and finally fell away. I noticed a couple more BIG pieces on the underside near the rear landing gear (big, long rectangular piece) which is gone, along with some more tank wheels, and was wondering if this was the same thing I was seeing here. Problem of course is that the model as it exists on tour is far better documented than as it was shot, so I'm finding it tricky to figure out what was ILM and what was the ravages of time and too much handling. Thanks again for the photo, kokkari, that's EXACTLY what I was looking for!

.
.
.
Oh, and 12 hours on, and the LePage All Plastic is still hanging in there strong on the hull plates - can't pry them up with a fingernail, so I think this is a winner.
 
Timmy, what region are you from? I don't think I've seen the LePage brand anywhere here in south-eastern Virginia, USA.

Regards, Robert
 
I'm in Canada, so I'm sure it's an international branding for some other large corporation. 3MI maybe? Actually, some of the bottle designs remind me of the Loctite stuff, and in fact, both companies are owned by Henkel (!?), so maybe there's a Loctite version?
 
Last edited:
Timmy, looking at some web Google results, it appears to be some form of a CA & 'zipkicker' packaged together. How exactly do you use it (as in how is it applied...)
Thanks for the info, btw.
Regards, Robert
 
Timmy, looking at some web Google results, it appears to be some form of a CA & 'zipkicker' packaged together. How exactly do you use it (as in how is it applied...)
Thanks for the info, btw.
Regards, Robert


There's an activator pen, which when you take the cap off, looks kind of like a wide, chisel-tip marker. I'm guessing this is some kind of acid to score the parts? Anyways, you coat both parts with that, let it stand for 60s, then apply glue to one part, and slap the pieces together. Had a bubble of the actual glue blurp up accidentally and end up on my leg - it burned briefly, which regular CA doesn't do, so it's something else I suppose.
 
Timmy, looking at some web Google results, it appears to be some form of a CA & 'zipkicker' packaged together. How exactly do you use it (as in how is it applied...)
Thanks for the info, btw.
Regards, Robert

I use Zap-A-Gap glue with ZipKicker... you apply the glue like normal and the ZipKicker comes in a pump spray bottle. You give a blast of the kicker and it will instantly harden.
 
Yes, that effect is what I'm referring to but TimmytheKid's product is apparently a different process...

TtK, when you said 'burned' do you mean from heat or chemical action? CA when it kicks off will generate quite a bit of heat (ask me how I know!)

R/ Robert
 
Last edited:
It really doesn't matter what type of glue you use... just use it and get used to using it. There are so many different types of superglue out there, you could buy every different kind on the market and only like using one of them! Personally for me it's Zap-A-Gap, simply because it has a longer working time (I think it's like 2-3 minutes), has a long shelf life (I've been using the same bottle for about 10 years now and it's still good), and when dried can be sanded (not to mention the kicker).
 
Yes, that effect is what I'm referring to but TimmytheKid's product is apparently a different process...

TtK, when you said 'burned' do you mean from heat or chemical action? CA when it kicks off will generate quite a bit of heat (ask me how I know!)

R/ Robert

Well, I didn't get out the instant read thermometer or anything while I was jumping around going "******* IT!!!!!! OW!! MUTHER TRUCKER!!!!! DAMMIT, MY FAVORITE SUMMER PANTS!!!!" :D, but my impression was that it was a mild chemical burn rather than heat. Left the area red for a while too. Anyways, continuing to slap panels on, and it's still holding well. And Lrd Satyr8, yeah, normally I'd agree, but the almost unanimous reports of just how badly most CA fares against this PE crap is what's got me exicted about this particular stuff working so well. I mean, I shouldn't have been surprised, since it says right on the package it's formulated specifically for PE, but it still makes me happy :)
 
PE? Are you referring to the plastic? For the Hasbro Rebels MF, it is "PP", aka "#5 plastic" or 'polypropylene' - very slippery & non-reactive to chemical agents, hence its frequent use in food packaging...and other applications where toughness & inertness are important (like car bumpers.) Being cheap helps, too!

Regards, Robert
 
Huh - thought it was PE - but yes, low surface energy polypropylene shampoo bottle plastic is what I'm talking about. Anyways, PP is a naughty abbreviation - we don't use that here in Polite Junction Station.
.
.
.
(see, its funny because 'PP'. Ahhhhhhh...yeah. I'm an 8 year old this morning.)
 
Huh - thought it was PE - but yes, low surface energy polypropylene shampoo bottle plastic is what I'm talking about. Anyways, PP is a naughty abbreviation - we don't use that here in Polite Junction Station.
.
.
.
(see, its funny because 'PP'. Ahhhhhhh...yeah. I'm an 8 year old this morning.)

I think it is you're duty to make sure that the PP properly scuffed and sanded before attempting to glue anything to it! :)

(I said doody and pp! LOLOLOL)
 
You guys! Hey, did everyone download the latest decal tracker & images from the Hampton Roads Scale Modelers website?
R/ Robert
 
Heres some nice pics of my good friend John Simmons' Falcon,.....he's used Randy's parts...& gone for a Post DS2 Lando Falcon

John is a member here MerseaJohn

4399FF7B-B4FE-46D3-A1C8-0AC2DDCE9580_zpsnddachap.jpg

E6786E1A-F682-443C-ABC3-6539F45044BA_zpsnrhcnqki.jpg

8A7E0702-24AA-4209-B85B-EF15E557B3E7_zpss78kaomf.jpg

32BBD29F-081E-4572-A9E4-42BBADC185FE_zpsvqqpvyc8.jpg

85C03A17-3B56-465B-847F-A9EBC46C05BF_zpsx7hlhpwy.jpg

383AA396-D893-4A11-B773-EEFD8AF5BA17_zpsw7vin5jn.jpg

5C69C76E-45AD-4CA8-9B1D-1EE15E797B54_zps35citcli.jpg

8ADDCF10-7897-4E41-8365-A39BC08DDA53_zps4bpaiii6.jpg

E33ACDB8-58B1-4EDD-B62D-18A55F3B57B0_zps7aj1c0zn.jpg


More to be seen @ Scale Model Addict,......the contest finishes soon
Hasbro 29" Millennium Falcon Conversion

John
 
Last edited:
Back
Top