You are using an out of date browser. It may not display this or other websites correctly.
You should upgrade or use an alternative browser.
You should upgrade or use an alternative browser.
My the Amazing Spider-Man costume
- Thread starter wrroca
- Start date
Scottryan15
Well-Known Member
edit..
Last edited:
:eek
Sonjou, that was my actual reaction to your image. THat looks fantastic. Keep up the awesome work. With talent like that, no matter what computer problems you run into, I have no doubt you'll make a killer TASM Costume for yourself.
WOW!
-Nick
Sonjou, that was my actual reaction to your image. THat looks fantastic. Keep up the awesome work. With talent like that, no matter what computer problems you run into, I have no doubt you'll make a killer TASM Costume for yourself.
WOW!
-Nick
So Nick inspired me to work on the pattern for this a bit . i got a program to help retrieve corrupted files. used it was able to get my psd back partially. it wouldn't let me open it so i got another program that would batch a psd to a jpeg did that and i had my base again just have to go through and recut some lines and re color.

Very very nice.... Sonjou
I like the texture you used, I would like to know how I can make a texture for me, thanks ...
trial and error in photshop. i made 8 different patterns till i got the right right look.
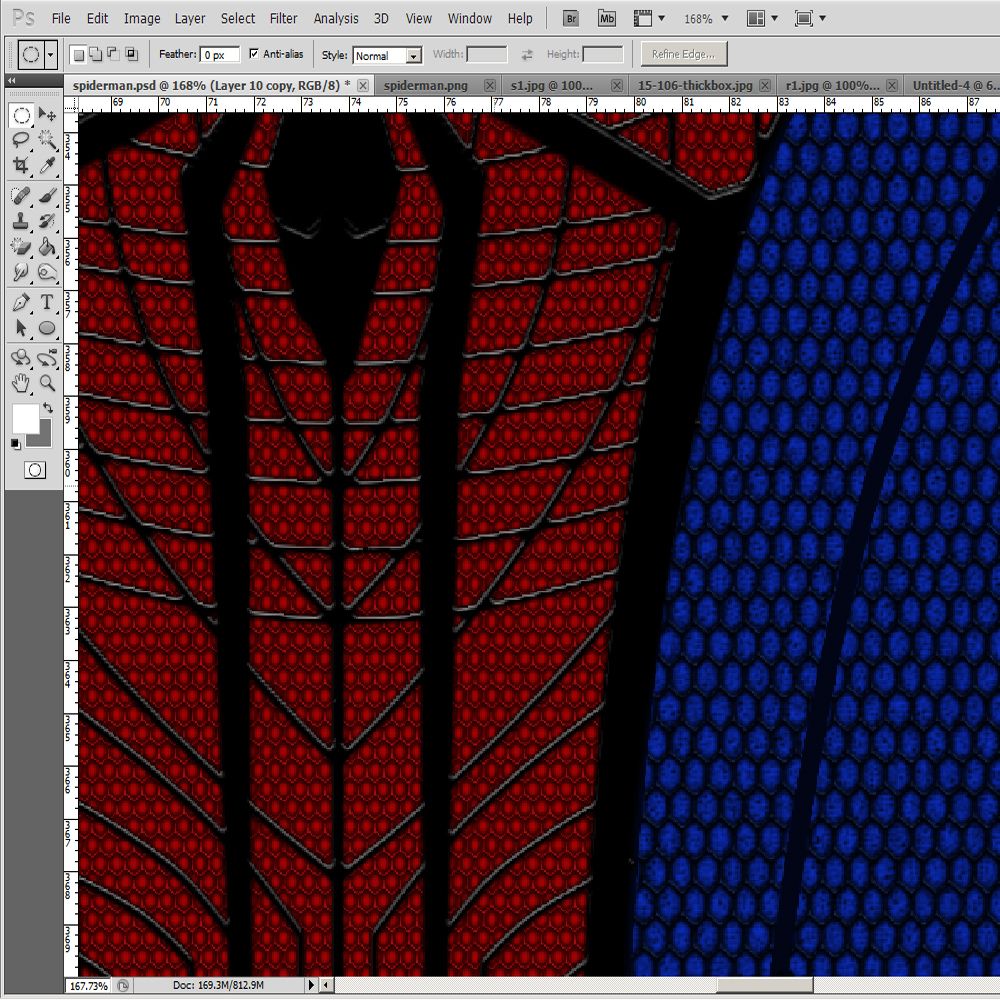
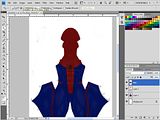
on the suit itself there are two different patterns the one in the red section there are 6 equal sides, and in the blue the top and bottom side are the same size. the left and right of each are longer and thinner.
I can make a tutorial on how I'm making my suit Pattern. but it would only make sense if you are using photoshop.
OK below is the way i made my pattern. im not saying this is the best way to make them. its just the way i did it. I'm not at home so i couldn't show how i apply them the the image of the suit but i can try to add that tomorrow night. first I will show you how I created the pattern. then I have the patterns below that so you can use the ones I made or create your own.
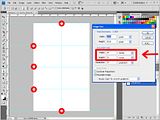
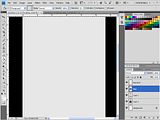
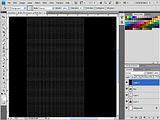
First start by thinking of a square number lets say 1000 x 1000 now take what ever square number you thought of and add 1/4 of that to the height. so create a new image 1000 x 1250 then go to the top of photoshop. image/image size a box will pop up.
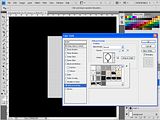
go to the second section that says document size and change usually from cm to Inches. the reason for that is to be able to line everything up with the ruler easier.
as you can see in my example i changed mine to 14 x 21. left click and hold on the ruler top or bottom and drag your guide line in the vertical center. and divide horizontal into quarters. if you drop your guide somewhere by mistake just press ctrl then left click and drag again.
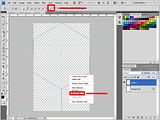
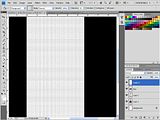
After that select your pen tool. and on your guide lines put the points in the shap i have in my example. once your lines are laid out select your brush tool set the size of the brush what ever size you want your lines to be. make sure black is selected. go back to your pen tool right click and stroke path. after that right click and delete path.
next we need to define our pattern. Press ctrl A then go to the top
click edit/Define pattern. then a box will pop up. type the name of the pattern you want. and click ok.
This is where i would show you how to apply the pattern to the reds and blues but i dont have my spiderman file with me at work. but i can type that part up in another post tomorrow.
this is the pattern i would use for the red

this is the pattern i would use for the Blue.

First start by thinking of a square number lets say 1000 x 1000 now take what ever square number you thought of and add 1/4 of that to the height. so create a new image 1000 x 1250 then go to the top of photoshop. image/image size a box will pop up.
go to the second section that says document size and change usually from cm to Inches. the reason for that is to be able to line everything up with the ruler easier.
as you can see in my example i changed mine to 14 x 21. left click and hold on the ruler top or bottom and drag your guide line in the vertical center. and divide horizontal into quarters. if you drop your guide somewhere by mistake just press ctrl then left click and drag again.

After that select your pen tool. and on your guide lines put the points in the shap i have in my example. once your lines are laid out select your brush tool set the size of the brush what ever size you want your lines to be. make sure black is selected. go back to your pen tool right click and stroke path. after that right click and delete path.
next we need to define our pattern. Press ctrl A then go to the top
click edit/Define pattern. then a box will pop up. type the name of the pattern you want. and click ok.

This is where i would show you how to apply the pattern to the reds and blues but i dont have my spiderman file with me at work. but i can type that part up in another post tomorrow.
this is the pattern i would use for the red

this is the pattern i would use for the Blue.

Last edited:
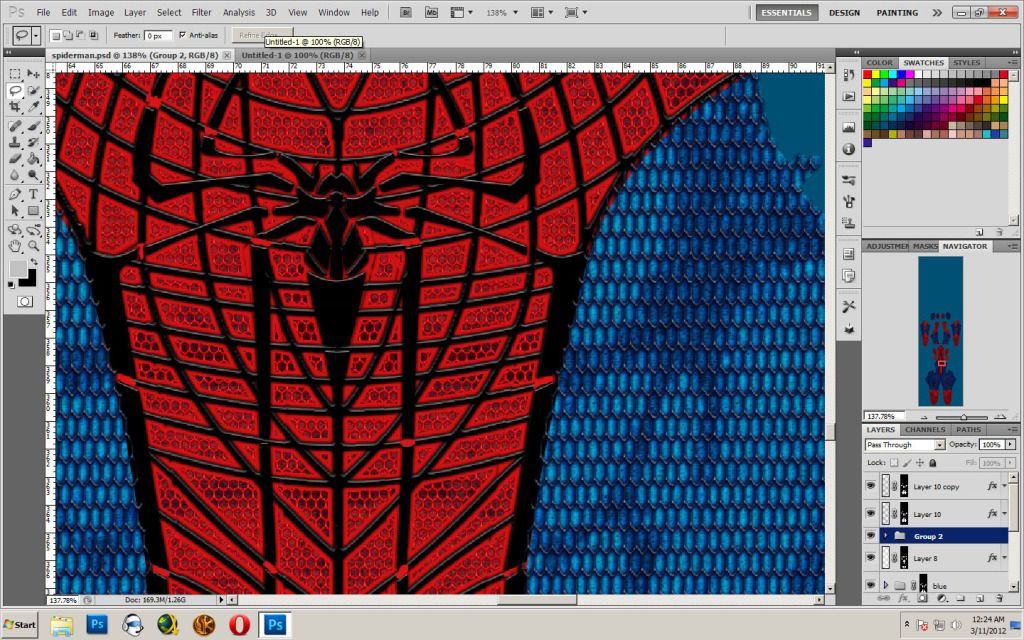
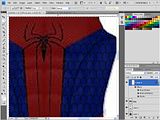
Worked on the patern some more today. change the spider pattern on the chest,
added muscle shading, textures on the colors, played around with the raised webs and brick patterns.
I still have a lot to go but its shaping up. i need to add the curves to the bricks that go over the muscles.
Before
after
added muscle shading, textures on the colors, played around with the raised webs and brick patterns.
I still have a lot to go but its shaping up. i need to add the curves to the bricks that go over the muscles.
Before
after
TaylorMcManus
Well-Known Member
Sonjou, that's looking awesome!
Johnnymuffintop
Well-Known Member
Slight suggestion, you may want the muscle detail to be more blurred to look more natural, also if you have it be the top layer, I think it'd look a little more authentic.


Johnnymuffintop
Well-Known Member
Well I'll be damned, didn't even notice it was like that. Good catch.
widescreen
Well-Known Member
The actual suit looks very difficult to replicate, but great work so far.
") I'll be following the progress on this one
I'll be following the progress on this one I kinda derailed wrroca's thread. sorry wrroca forgot what the first post was about.
So back on topic how to add the web over the specific area.
I'm not an expert at tutorials. and again there may be a better way to do this method.
but this is how I do it.
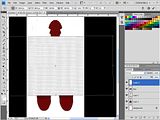
Im at my work so I didn't have my files or patterns so I used wrroca Image from the first post for this example.
1. Select the magic wand tool and click on the red. press ctrl c, then ctrl v
2. with the magic wand still selected click the blue on suit layer. press ctrl c, then ctrl v
Now you should see two new layers label one blue the other red.
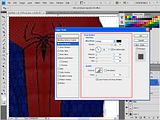
3. Create a new layer, select the fill tool, I picked a gray color. fill the whole layer. name that layer brick (or what ever you want to call the pattern)
4. Right click that layer go to pattern overlay. select the pattern you want to use. click ok.
5. Create a new layer under the blue brick layer that we just made.
6. select the blue brick layer and press ctrl E once to merger the two layers.
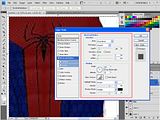
7. Depending on your pattern determines the next step. I needed the patern to be rotated to get the points facing verticle.
Press M , right click the image , select free transform. rotate till it is correct.
8. make sure your pattern is above the blue layer , press and hold alt and left click in between the two layers. ( that makes it so you can adjust the brick image anyway you want but it will stay inside the color layer.
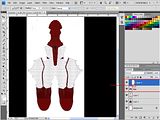
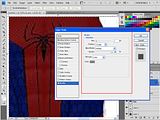
9. Select the eraser tool with the star on it. go the the image and left click on the white inside of the pattern. ( this removes all the white from the image
leaving only the pattern. )

10. change the layer to multiply

11. right click on the layer, press blending options, a window will pop up, play around with the settings you like. but below are the ones i used for this tutorial.
Drop shadow, Bevel and emboss, stroke
Thanks hope this helps
So back on topic how to add the web over the specific area.
I'm not an expert at tutorials. and again there may be a better way to do this method.
but this is how I do it.
Im at my work so I didn't have my files or patterns so I used wrroca Image from the first post for this example.
1. Select the magic wand tool and click on the red. press ctrl c, then ctrl v
2. with the magic wand still selected click the blue on suit layer. press ctrl c, then ctrl v
Now you should see two new layers label one blue the other red.

3. Create a new layer, select the fill tool, I picked a gray color. fill the whole layer. name that layer brick (or what ever you want to call the pattern)

4. Right click that layer go to pattern overlay. select the pattern you want to use. click ok.

5. Create a new layer under the blue brick layer that we just made.

6. select the blue brick layer and press ctrl E once to merger the two layers.

7. Depending on your pattern determines the next step. I needed the patern to be rotated to get the points facing verticle.
Press M , right click the image , select free transform. rotate till it is correct.


8. make sure your pattern is above the blue layer , press and hold alt and left click in between the two layers. ( that makes it so you can adjust the brick image anyway you want but it will stay inside the color layer.

9. Select the eraser tool with the star on it. go the the image and left click on the white inside of the pattern. ( this removes all the white from the image
leaving only the pattern. )

10. change the layer to multiply

11. right click on the layer, press blending options, a window will pop up, play around with the settings you like. but below are the ones i used for this tutorial.
Drop shadow, Bevel and emboss, stroke


Thanks hope this helps
Sonjou thanks, I love this topic because I see that together we are creating a good pattern.
I'm in work the arms, and back of costume, a bit complicated but hey there we go .. I hope as always continue to give advice to fix it .. soon I'll upload pictures of it .. and thanks.
I'm in work the arms, and back of costume, a bit complicated but hey there we go .. I hope as always continue to give advice to fix it .. soon I'll upload pictures of it .. and thanks.
spidey4fun
Well-Known Member
Looks good.
Angel Song
New Member
wow Sonjou that's insane mon ami!
Love the design work.
Best of luck to you guys! I can't wait to see these spidey suits!
Love the design work.
Best of luck to you guys! I can't wait to see these spidey suits!
Similar threads
- Replies
- 2
- Views
- 496
- Replies
- 1
- Views
- 739