oleshobbyblog
New Member
Hi,
<TL;DR>
Basically this is my introduction post here on the forum. I also explain at some length the early stages of my first/current diorama build (Hoth from Empire Strikes Back) where I will use sounds and lights to create a sort of dynamic scene from the movie. Future updates will be my build log. I plan on posting about once a week, or at least make some weekly progress, but I have no deadline, and will sometimes have to put this project on the back burner for a few days for various reasons.
</TL;DR>
So this is my first post here, and I guess I should introduce myself first of all; Simply put I am a Star Wars fan that only recently took up the hobby of building plastic kits (by recently I mean the past 12-ish months). Thus far I have only finished one kit (Bandai's 1/144 Millennium Falcon), and started my second (Bandai's 1/144 AT-AT). I like to combine this with my second interest; building small arduino projects. I got started with that when my girlfriend asked if I could make her a light-up dress for Halloween. Let me clarify that I only put together the electronics and code as my skills as a dressmaker are quite lacking ;-) However we were able to find a dress she liked, to which we attached the LEDs and such. She was happy, and that was the most important success criteria")
Anyway, I thoroughly enjoy the problem solving involved in such projects, and so I have brought the micro controller aspect with me into my model building, which is how the Bandai Millennium Falcon came to have both lights and sound (see my blog posts about it here if you're curious).
This brings me to the present, where I am trying to do the same with a Hoth themed diorama..well, to be fair I started out small with a plan to _just_ build the Bandai AT-AT when it came out, then that thought spiraled completely out of control.
PSA: I should clarify that this is not only my second model (so expect skill level to be accordingly), it will also be my very first diorama. Period. So any advice, tips and constructive feedback is greatly appreciated!
I think I will divide this post into three parts; the idea, the electronics and the actual build.
At this point I am mostly done with the idea (yeah right..still subject to change of course)and the electronics (mostly, there might be some tuning of variables as LEDs are installed etc), and I am now mostly in the process of assembling, priming, painting and weathering. So expect my progress reports to be mostly about these steps. For those curious about the details regarding the early steps, please check out my blog: (https://oleandre.net).
Also, for those interested I am trying to put out videos of the build on YouTube as well https://www.youtube.com/user/vaipernor/
For various reasons I like to finish the electronics prototype first, to see that I am able to electronically _manifest_ my idea, before committing to the physical build.
My vision/plan/idea:
Some of these elements are of course extremely unneccesary and entirely on the "because, why not" level
Electronics:
I won't bore you with the (rather long) process I went through to arrive at these elements and this design. I have had some electronics at college, but that's some time ago, and most of it is sadly forgotten by now.
Parts:
So basically this is the wiring diagram, subject to future updates:

And here is the code to make it do all the stuff:
https://github.com/vaiper79/hoth_diorama
Here is a short video of it in action, while still being prototyped:
[H5VIDEO]https://cdn-grzladg5urnsyntwu.netdna-ssl.com/wp-content/uploads/2017/08/Demo.m4v[/H5VIDEO]
I will admit that the audio files are of questionable origin with regards to copyright, so I will not be sharing those any time soon, but YouTube has been invaluable...
Building:
So to catch you up on the build process, because I have to admit I have done a bit before I came here to post this.
The AT-AT head:
So my biggest fear, or hurdle, was how I would go about putting lights in the HLCs. So one evening I felt particularly brave I took my Tamiya Pinvise and went to town:


After I was able to drill a hole lengthwise through both the HLCs I felt confident the rest of the model would pose few issues with regards to hiding the wiring. I know many people put batteries in the AT-AT body and solve the wiring issue that way, but that would not be a viable route for me since I need to control the LEDs from the microcontroller located in "Echo base". Next I set about making a path for wires through the neck section:


I decided to ditch the fiber optics solution after I came across these tiny pico LEDs.

I used FO on the Falcon build, and while it worked well, it was a pain to fit in the tight confines..and the AT-AT head is NOT particularly roomy. I also opted for bigger LED inside the actual cockpit. I will not be gluing the head together, allowing for some access to the electronics, though if anything were to go wrong with the head LEDs I'll probably have to replace the entire assembly with a new head and neck anyway.
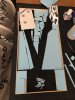
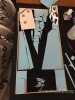
The AT-AT legs:
The second biggest hurdle of this part of the build is of course the legs. I need to pass three hidden pairs of wires up through the legs, and I won't lie; this caused some headache. Not the actual "hiding of the wires" part, but in what order to do things.
The process can be seen here:
I ended up with this order:
1) Posing the legs with a minimum of parts assembled.
I attached magnets in the bottom of the feet, and underneath a sheet of plastic with raised platforms so that the AT-AT would have something to be mounted securely to. The raised platforms are so that I can get some snow paste in under the legs so it looks like the AT-AT has actually sunk into the snow a little.
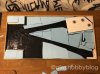
2) Marking the wire path with a sharpie
3) Gouging out excess plastic
I then gouged out plastic using a Dremel, a drill and an exacto knife.
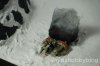
4) Wiring
Trying to roughly keep the desired pose, I basically just followed the previously sketched out paths to add the wires. I also started glueing some parts at this point to keep the wires in place, but I was careful to avoid getting glue into the moving parts. I still need to fine tune the pose. I used 30AWG magnet wire (it's not magnetic, but that's what it is called). This is very thin which makes hiding it very easy.
5) Fine tuning the pose
After the wires were installed, and I had regained the desired pose I used Tamiya's Extra Thin Cement to glue the legs in place. The extra thin cement seeps into the cracks between the various parts. Very useful in this instance.
6) Priming and painting
I mage some mistakes in the video called part 2, so I had to make a "redux" video to address that:
The AT-AT body:
Very simple. Assemble and paint. The secret is in removing the inner connecting points on the "under carriage" part. This way the main body housing can be lifted up and off with ease allowing easier access to where the wires from the head/neck join the wires coming up the legs. Lots of room for soldering these together.
Lastly I soldered the wires from the head to the wires from the legs, and also I soldered some longer, and thicker, wires to the wires coming out the bottom of the legs. This is so it is easier to incorporate in the rest of the circuit.
A demo of the AT-AT (pre-weathering), skip to about the 12 min mark to get to the demo:
General issues:
So I had some issue with my airbrush where the paint would dry/semi-dry before hitting the surface. This made me redo the whole main body section, but with the legs I think I will have to make do the way they came out. The surface on those isn't too bad, not like the main body which was very sandy and rough. I am hoping this will not pose too much of an issue when I start weathering. If it does, well..then I am scheduled for yet another attempt at the legs..
That's it for this post. If you read this far and you have suggestions to what I could cover in greater detail, or less, please let me know. Also, any suggestions related to the build are greatly appreciated.
Next up I was hoping to do the snowspeeders, but I have to wait for stuff to arrive in the mail. In the meantime I might do some work on the variou ground elements like the soldiers and Shapeways gun turrets/crates.
Update:
Added a video of the priming and painting process as I had to redo that bit.
<TL;DR>
Basically this is my introduction post here on the forum. I also explain at some length the early stages of my first/current diorama build (Hoth from Empire Strikes Back) where I will use sounds and lights to create a sort of dynamic scene from the movie. Future updates will be my build log. I plan on posting about once a week, or at least make some weekly progress, but I have no deadline, and will sometimes have to put this project on the back burner for a few days for various reasons.
</TL;DR>
So this is my first post here, and I guess I should introduce myself first of all; Simply put I am a Star Wars fan that only recently took up the hobby of building plastic kits (by recently I mean the past 12-ish months). Thus far I have only finished one kit (Bandai's 1/144 Millennium Falcon), and started my second (Bandai's 1/144 AT-AT). I like to combine this with my second interest; building small arduino projects. I got started with that when my girlfriend asked if I could make her a light-up dress for Halloween. Let me clarify that I only put together the electronics and code as my skills as a dressmaker are quite lacking ;-) However we were able to find a dress she liked, to which we attached the LEDs and such. She was happy, and that was the most important success criteria
Anyway, I thoroughly enjoy the problem solving involved in such projects, and so I have brought the micro controller aspect with me into my model building, which is how the Bandai Millennium Falcon came to have both lights and sound (see my blog posts about it here if you're curious).
This brings me to the present, where I am trying to do the same with a Hoth themed diorama..well, to be fair I started out small with a plan to _just_ build the Bandai AT-AT when it came out, then that thought spiraled completely out of control.
PSA: I should clarify that this is not only my second model (so expect skill level to be accordingly), it will also be my very first diorama. Period. So any advice, tips and constructive feedback is greatly appreciated!
I think I will divide this post into three parts; the idea, the electronics and the actual build.
At this point I am mostly done with the idea (yeah right..still subject to change of course)and the electronics (mostly, there might be some tuning of variables as LEDs are installed etc), and I am now mostly in the process of assembling, priming, painting and weathering. So expect my progress reports to be mostly about these steps. For those curious about the details regarding the early steps, please check out my blog: (https://oleandre.net).
Also, for those interested I am trying to put out videos of the build on YouTube as well https://www.youtube.com/user/vaipernor/
For various reasons I like to finish the electronics prototype first, to see that I am able to electronically _manifest_ my idea, before committing to the physical build.
My vision/plan/idea:
- One AT-AT with LEDs or fiber optics on the tips of the chin mounted HLCs, and also with a lit up cockpit. That red window slit looks so ominous.
- Two snowspeeders: One crashed with the cockpit opened and the pilot (Luke..) missing (he will be dangling under the AT-AT, of course). The second snowspeeder will be in flight, attacking. There will be LEDs in the guns, and possibly the engines (for effect, but I am not decided as there are no lights in the engines in the movie as far as I can tell). I am also going to attempt at having some level of lighting in the tiny cockpit..but we will see when I get there. This also means an open cockpit. Shapeways to the rescue.
- Some ground elements such as gun turrets, one of which I plan to make it look like has just blown up (with an LED inside), a trench with soldiers, crates and hosing like in the movie etc.
- On top of all this I will layer sound. There will be the score from the Hoth scene under it all, then the AT-AT walking sounds, snowspeeders flying past, explosions and lastly the sounds of snowspeeders and the AT-AT firing.
- The electronics need a place to go, so I plan to have Echo base as a mountain with an entrance at one end of the diorama to store them. This is also where I will have to make some delicate holes in the clear acrylic display case for the sound to come through.
- A last, but not least, a remote control and tiny display, to make it somewhat interactive.
Some of these elements are of course extremely unneccesary and entirely on the "because, why not" level
Electronics:
I won't bore you with the (rather long) process I went through to arrive at these elements and this design. I have had some electronics at college, but that's some time ago, and most of it is sadly forgotten by now.
Parts:
- Adafruit Pro Trinket 5V (https://www.adafruit.com/product/2000)
- WAV Trigger: (https://robertsonics.com/wav-trigger/)
- LEDs: (https://www.modeltrainsoftware.com/ledlights1.html) I use red pico sized 5V LEDs for all the laser cannons/engines, and a red 5mm 5V for the AT-AT cockpit.
- IR receiver/remote: (https://www.adafruit.com/product/157)/(https://www.adafruit.com/product/389)
- Amplifier: (https://www.adafruit.com/product/1712)
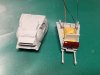
- Speakers: Bought in a store in Japan, but they are 8ohm 0.5W 5cm (extremely similar to these: https://www.sparkfun.com/products/9151)
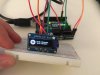
So basically this is the wiring diagram, subject to future updates:
And here is the code to make it do all the stuff:
https://github.com/vaiper79/hoth_diorama
Here is a short video of it in action, while still being prototyped:
[H5VIDEO]https://cdn-grzladg5urnsyntwu.netdna-ssl.com/wp-content/uploads/2017/08/Demo.m4v[/H5VIDEO]
I will admit that the audio files are of questionable origin with regards to copyright, so I will not be sharing those any time soon, but YouTube has been invaluable...
Building:
So to catch you up on the build process, because I have to admit I have done a bit before I came here to post this.
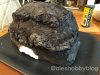
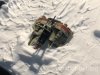
The AT-AT head:
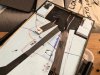
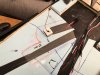
So my biggest fear, or hurdle, was how I would go about putting lights in the HLCs. So one evening I felt particularly brave I took my Tamiya Pinvise and went to town:
After I was able to drill a hole lengthwise through both the HLCs I felt confident the rest of the model would pose few issues with regards to hiding the wiring. I know many people put batteries in the AT-AT body and solve the wiring issue that way, but that would not be a viable route for me since I need to control the LEDs from the microcontroller located in "Echo base". Next I set about making a path for wires through the neck section:
I decided to ditch the fiber optics solution after I came across these tiny pico LEDs.
I used FO on the Falcon build, and while it worked well, it was a pain to fit in the tight confines..and the AT-AT head is NOT particularly roomy. I also opted for bigger LED inside the actual cockpit. I will not be gluing the head together, allowing for some access to the electronics, though if anything were to go wrong with the head LEDs I'll probably have to replace the entire assembly with a new head and neck anyway.
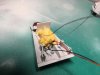
The AT-AT legs:
The second biggest hurdle of this part of the build is of course the legs. I need to pass three hidden pairs of wires up through the legs, and I won't lie; this caused some headache. Not the actual "hiding of the wires" part, but in what order to do things.
The process can be seen here:
I ended up with this order:
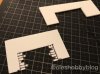
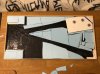
1) Posing the legs with a minimum of parts assembled.
I attached magnets in the bottom of the feet, and underneath a sheet of plastic with raised platforms so that the AT-AT would have something to be mounted securely to. The raised platforms are so that I can get some snow paste in under the legs so it looks like the AT-AT has actually sunk into the snow a little.
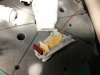
2) Marking the wire path with a sharpie
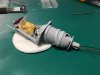
3) Gouging out excess plastic
I then gouged out plastic using a Dremel, a drill and an exacto knife.
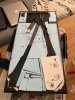
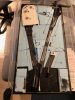
4) Wiring
Trying to roughly keep the desired pose, I basically just followed the previously sketched out paths to add the wires. I also started glueing some parts at this point to keep the wires in place, but I was careful to avoid getting glue into the moving parts. I still need to fine tune the pose. I used 30AWG magnet wire (it's not magnetic, but that's what it is called). This is very thin which makes hiding it very easy.
5) Fine tuning the pose
After the wires were installed, and I had regained the desired pose I used Tamiya's Extra Thin Cement to glue the legs in place. The extra thin cement seeps into the cracks between the various parts. Very useful in this instance.
6) Priming and painting
I mage some mistakes in the video called part 2, so I had to make a "redux" video to address that:
The AT-AT body:
Very simple. Assemble and paint. The secret is in removing the inner connecting points on the "under carriage" part. This way the main body housing can be lifted up and off with ease allowing easier access to where the wires from the head/neck join the wires coming up the legs. Lots of room for soldering these together.
Lastly I soldered the wires from the head to the wires from the legs, and also I soldered some longer, and thicker, wires to the wires coming out the bottom of the legs. This is so it is easier to incorporate in the rest of the circuit.
A demo of the AT-AT (pre-weathering), skip to about the 12 min mark to get to the demo:
General issues:
So I had some issue with my airbrush where the paint would dry/semi-dry before hitting the surface. This made me redo the whole main body section, but with the legs I think I will have to make do the way they came out. The surface on those isn't too bad, not like the main body which was very sandy and rough. I am hoping this will not pose too much of an issue when I start weathering. If it does, well..then I am scheduled for yet another attempt at the legs..
That's it for this post. If you read this far and you have suggestions to what I could cover in greater detail, or less, please let me know. Also, any suggestions related to the build are greatly appreciated.
Next up I was hoping to do the snowspeeders, but I have to wait for stuff to arrive in the mail. In the meantime I might do some work on the variou ground elements like the soldiers and Shapeways gun turrets/crates.
Update:
Added a video of the priming and painting process as I had to redo that bit.
Attachments
Last edited by a moderator: