Incredible conversion on the wand! I've been itching to pick up a second Spengler wand to do a 84 conversion but it looks like I've waited too long! Since the announcement of the Haslabs pack, the things are sold out everywhere!
You are using an out of date browser. It may not display this or other websites correctly.
You should upgrade or use an alternative browser.
You should upgrade or use an alternative browser.
My Proton Pack build (including Afterlife-to-1984 wand mod)
- Thread starter Indy Magnoli
- Start date
You can preorder them again from most sites. I picked up two more to play with. Should be shipping in the new year. Def don't pay scalper eBay prices.Incredible conversion on the wand! I've been itching to pick up a second Spengler wand to do a 84 conversion but it looks like I've waited too long! Since the announcement of the Haslabs pack, the things are sold out everywhere!
Yeah I saw the pre orders open but do I really wanna wait that long? Maybe...You can preorder them again from most sites. I picked up two more to play with. Should be shipping in the new year. Def don't pay scalper eBay prices.
The benefit of Hasbro Pulse is normal preorder items can be cancelled any time. So you could order the wand and if you find one sooner or cheaper just cancel.Yeah I saw the pre orders open but do I really wanna wait that long? Maybe...
My loom hose finally arrived, so I'm getting close to finishing this up... drilled a 20mm hole in the pack and used dremel to open it to match the hose size:

For the vac hose, I taped a pvc pipe to give me something to glue better into the vac tube:

Drilled another hole into the bottom of my shell (decided not to cut all the way to the edge as I figured this will give better grip to the hose:

I taped another pvc tube piece into the hose (on the inside of the pack) to keep it from slipping. You can also see my temporary red film I taped in until I get my lighting set up:

I connected the hose (about 3.5 feet worth) to my wand using Hasbro's connector piece and added some tape at various points of the tube:

Looking good!

I finally decided to do the final aging. I started by spraying some silver chrome spray paint onto a palette then dry brushing the pack with a 2" brush. I added additional distressing using a brown acrylic wash (just brown paint with a little water) and brushed it into all the nooks and crannies:

And here is my nearly final beauty shot (just need to add lights, which will include cutting the window for the blue LEDs):

For the vac hose, I taped a pvc pipe to give me something to glue better into the vac tube:
Drilled another hole into the bottom of my shell (decided not to cut all the way to the edge as I figured this will give better grip to the hose:
I taped another pvc tube piece into the hose (on the inside of the pack) to keep it from slipping. You can also see my temporary red film I taped in until I get my lighting set up:
I connected the hose (about 3.5 feet worth) to my wand using Hasbro's connector piece and added some tape at various points of the tube:
Looking good!
I finally decided to do the final aging. I started by spraying some silver chrome spray paint onto a palette then dry brushing the pack with a 2" brush. I added additional distressing using a brown acrylic wash (just brown paint with a little water) and brushed it into all the nooks and crannies:
And here is my nearly final beauty shot (just need to add lights, which will include cutting the window for the blue LEDs):
Just posted this to our social media and thought you guys would like to see it too:

I finally managed to get a light kit!

The holes for the cyclotron were already cut and covered with a red thin plastic sheet (as seen above), but I need to dremel out the window for the power cell lights (and cleaned it up with a file):

I had these plastic shelves in my greeblies pile:

Cut one corner off (with my trusty dremel):

Hot glued it into the corner and used some foam to pack in the motherboard (it ain't pretty, but it does the trick):

Since the cyclotron holes already had that red film, I could use the clear plastic shelf to strengthen that area and give a "shelf" for the red lights:

Some pill bottles got trimmed down for the next step:

Hot glued into place:


Finished pack!

I realized half-way through this build that I had set the cyclotron lights into a counter-clockwise and after a little research realized that both ways are accurate... so I guess I've got a Venkman-inspired pack now!
Thanks for watching... this has been a great build and a childhood dream come true!
The holes for the cyclotron were already cut and covered with a red thin plastic sheet (as seen above), but I need to dremel out the window for the power cell lights (and cleaned it up with a file):
I had these plastic shelves in my greeblies pile:
Cut one corner off (with my trusty dremel):
Hot glued it into the corner and used some foam to pack in the motherboard (it ain't pretty, but it does the trick):
Since the cyclotron holes already had that red film, I could use the clear plastic shelf to strengthen that area and give a "shelf" for the red lights:
Some pill bottles got trimmed down for the next step:
Hot glued into place:
Finished pack!
I realized half-way through this build that I had set the cyclotron lights into a counter-clockwise and after a little research realized that both ways are accurate... so I guess I've got a Venkman-inspired pack now!
Thanks for watching... this has been a great build and a childhood dream come true!
I finally managed to get a light kit!
View attachment 1540312
The holes for the cyclotron were already cut and covered with a red thin plastic sheet (as seen above), but I need to dremel out the window for the power cell lights (and cleaned it up with a file):
View attachment 1540313
I had these plastic shelves in my greeblies pile:
View attachment 1540314
Cut one corner off (with my trusty dremel):
View attachment 1540315
Hot glued it into the corner and used some foam to pack in the motherboard (it ain't pretty, but it does the trick):
View attachment 1540316
Since the cyclotron holes already had that red film, I could use the clear plastic shelf to strengthen that area and give a "shelf" for the red lights:
View attachment 1540317
Some pill bottles got trimmed down for the next step:
View attachment 1540318
Hot glued into place:
View attachment 1540319
View attachment 1540320
Finished pack!
View attachment 1540321
I realized half-way through this build that I had set the cyclotron lights into a counter-clockwise and after a little research realized that both ways are accurate... so I guess I've got a Venkman-inspired pack now!
Thanks for watching... this has been a great build and a childhood dream come true!
I love the speed of the lights and the fact you can see the individual bulbs for the power cell. Also excellent use of the pill bottles. Looks great!
METATRON
Active Member
Very nice build! I liked what you wrote about your childhood memories, having a "real" pack on your back after last time playing with a cardboard box. Was the same for me. I build my first pack 1987 from some boxes and parts of a television Antenna and then 10 years ago my first cosplay pack together with friends. Since then every year a month before halloween I do some parts for it. At the moment I´m working on my Ecto Goggles from 3D-printed parts. I did build a accurate 3D model for it and put it here Ecto Goggles Frame Ghostbusters GB1 by MakerGulbi
Another little mod to my wand: the plastic painted tip and banjos always annoyed me. I may replace them with genuine metal parts at some point but, in the meantime, I decided to refinish them with my new favorite method: nail polish powder! You can see more on this method here: Mando Armorer Helmet refinished using Nail Polish Powder!
Here's the factory finish:

Masking the area:

Sprayed with gloss black:

After silver powder applied:


Did the same thing for the banjo pieces (masked off and spray painted gloss black):

After gold powder applied:

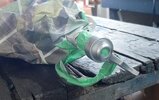
While I was modding this part of the wand, I figured I'd mask off the plastic tube and hit it with some sand paper to give it that striped look of the original:

The sanding effect was quite subtle, but that doesn't worry me. Also I replaced the red tube with a nicer one:

The metallic effect is hard to photograph, but looks MUCH better in person. You can really see the reflective quality of this powder when the light hits it:

These powders are fantastic, super cheap ($2 would do an entire Mandalorian helmet, for example) and has great application for other resin or 3d printed parts for the proton pack!
Here's the factory finish:
Masking the area:
Sprayed with gloss black:
After silver powder applied:
Did the same thing for the banjo pieces (masked off and spray painted gloss black):
After gold powder applied:
While I was modding this part of the wand, I figured I'd mask off the plastic tube and hit it with some sand paper to give it that striped look of the original:
The sanding effect was quite subtle, but that doesn't worry me. Also I replaced the red tube with a nicer one:
The metallic effect is hard to photograph, but looks MUCH better in person. You can really see the reflective quality of this powder when the light hits it:
These powders are fantastic, super cheap ($2 would do an entire Mandalorian helmet, for example) and has great application for other resin or 3d printed parts for the proton pack!
Attachments
thundergod124
Well-Known Member
Nice work on that!! I really dig the look of the tip and the clear tube. I may try to do that on mine. I actually have two of the Hasbro wands, one I used last halloween while the other is still boxed for the Haslab pqck.
Wow, that wand mod is fantastic! I kept mine in the Afterlife configuration, but I also removed the grip "tape", and replaced with actual dark green camera tape. I used a chrome pen to color the side knobs next to the heatsink, as well as the fake button next to the emitter tube. For the emitter tube itself, I added the frosted sections using a little bit of scotch tape, made the bottom black ring chrome with some aluminum foil tape, and weathered it with black and brown acrylic paints using a dry-brush method.
Once my HasLab Pack arrives, I might get a new thrower and try some of your methods for an 80's Pack version!

Once my HasLab Pack arrives, I might get a new thrower and try some of your methods for an 80's Pack version!
Similar threads
- Replies
- 0
- Views
- 454
- Replies
- 2
- Views
- 715
- Sale
- Replies
- 8
- Views
- 1,111