MoeSizzlac
Active Member
My late 2019 project I decided to take on was a Predator Costume like the one from the 1987 movie Predator with Arnold Schwarzenegger.
Updating for files I made/altered: Predator Armor - P1 Style - Hunter - from 1987 Movie Cut up for 8x10x8 Printer Bed. by moesizzlac
Non 3D printed parts:
1) Pleather Amazon.com
2) Cat 5 Cords
3) flash light Amazon.com
4) servos Amazon.com
5) arduina mega Amazon.com
6) mpu6050 Amazon.com
7) Battery Pack Amazon.com
8) momentary switches Amazon.com
9)various latching switches a) Amazon.com b) Amazon.com
10) adafruit audio FX board Adafruit Audio FX Sound Board - WAV/OGG Trigger with 2MB Flash
11) screen door mesh for the eyes
12) belts Amazon.com
13) wood and furniture pads for the feet Amazon.com
14) Net Amazon.com
15)wire 22 AWG Amazon.com
16) solder Amazon.com
17)velcro Amazon.com
18) leather sewing awl Amazon.com
19)bodysuit Amazon.com
20)zipper (for quick bathroom breaks) Amazon.com
21)Chicago screws Amazon.com
22) Snap Fasteners Amazon.com
23) Piano hinges Amazon.com
24) 8/32 nuts and bolts
25)Backer Rod 1" and 5/8" Amazon.com
26) Hard hat ratchet suspension Amazon.com
27) 22 gauge steel for hard hat ratchet system to attach to Simpson Strong-Tie LTB 19-1/2 in. 22-Gauge Galvanized Tension Bridging LTB20-R - The Home Depot
28) Strong magnets for the back plate ane sheet metal to make a hook so that it stays on
29) Vinyl stair tread to make the neck seal ROPPE Ribbed Profile Black 12-1/4 in. x 60 in. Square Nose Stair Tread Cover 60801P100 - The Home Depot
30) Rope Amazon.com
31)small speaker Amazon.com
32) Lasers Amazon.com
33) 85 ohm resistors for the lasers
34)Loom Tubing Amazon.com
36) Spring Amazon.com
36) I'm sure there is more but I don't know of any others off the top of my head

Well not a 1/6th scale costume but rather a full sized one.
I can't make the costume perfect movie accurate because 1) I am no where near the height of the original actor who played the predator and 2) picture perfect is time and cost consuming. This costume was put together for under 500 I believe.
This build will be my version of a similar styled P1 Predator with as many bells and whistles as I can put together.
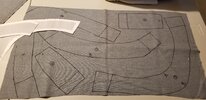
Like all things, we start with the planning. I went to the resources to get a bunch of Pepakura files to start converting for my project. Then I went to Thingiverse to see what they had and grabbed Predator Shoulder Cannon by makerslabcz.
After I had all the files, it was time to get to work and make everything printable. It took about a month in spare time to digitally fix everything up and resize it all to my body.

The backpack:
This model was good for pepakura but not for a 3d print. I first ended up fixing the files and printing it out. This will be the shell to house most of electronics and power bank.


I only used half of this model from thingiverse and fitted it with a spot for a flashlight and a servo and an outlet for the wires to go out the lower back.


Both halves are held together with 8/32 screws and nuts.


Using this tutorial, I grabbed an Arduino Mega, an MPU6050, battery pack and wired everything up with 2 Cat 5 connections (One that goes to the helmet Where the mpu6050 will sit, and one to the left gauntlet for controls and sound)


This is a shot from underneath where the power switch is as well as the recharge port.
Left Gauntlet - Creation, sound and control.
Continuing with the planning, let's start with the pepakura file and add a hinge in the print so that it can flip up if I need it to. I also made a slot for my Phone below the flip plate.

Let's allow holes for momentary switches and latching switches, cat5 connection and audio out on the flip plate:

Now let's get it printed and loaded up:


I wired it up with an adafruit soundfx board and started wiring everything together. The sound out went to a 3.5mm headphone jack which will plug into an external speaker.


It's actually much cleaner inside now.

Final outside picture of the left gauntlet.
Updating for files I made/altered: Predator Armor - P1 Style - Hunter - from 1987 Movie Cut up for 8x10x8 Printer Bed. by moesizzlac
Non 3D printed parts:
1) Pleather Amazon.com
2) Cat 5 Cords
3) flash light Amazon.com
4) servos Amazon.com
5) arduina mega Amazon.com
6) mpu6050 Amazon.com
7) Battery Pack Amazon.com
8) momentary switches Amazon.com
9)various latching switches a) Amazon.com b) Amazon.com
10) adafruit audio FX board Adafruit Audio FX Sound Board - WAV/OGG Trigger with 2MB Flash
11) screen door mesh for the eyes
12) belts Amazon.com
13) wood and furniture pads for the feet Amazon.com
14) Net Amazon.com
15)wire 22 AWG Amazon.com
16) solder Amazon.com
17)velcro Amazon.com
18) leather sewing awl Amazon.com
19)bodysuit Amazon.com
20)zipper (for quick bathroom breaks) Amazon.com
21)Chicago screws Amazon.com
22) Snap Fasteners Amazon.com
23) Piano hinges Amazon.com
24) 8/32 nuts and bolts
25)Backer Rod 1" and 5/8" Amazon.com
26) Hard hat ratchet suspension Amazon.com
27) 22 gauge steel for hard hat ratchet system to attach to Simpson Strong-Tie LTB 19-1/2 in. 22-Gauge Galvanized Tension Bridging LTB20-R - The Home Depot
28) Strong magnets for the back plate ane sheet metal to make a hook so that it stays on
29) Vinyl stair tread to make the neck seal ROPPE Ribbed Profile Black 12-1/4 in. x 60 in. Square Nose Stair Tread Cover 60801P100 - The Home Depot
30) Rope Amazon.com
31)small speaker Amazon.com
32) Lasers Amazon.com
33) 85 ohm resistors for the lasers
34)Loom Tubing Amazon.com
36) Spring Amazon.com
36) I'm sure there is more but I don't know of any others off the top of my head
Well not a 1/6th scale costume but rather a full sized one.
I can't make the costume perfect movie accurate because 1) I am no where near the height of the original actor who played the predator and 2) picture perfect is time and cost consuming. This costume was put together for under 500 I believe.
This build will be my version of a similar styled P1 Predator with as many bells and whistles as I can put together.
Like all things, we start with the planning. I went to the resources to get a bunch of Pepakura files to start converting for my project. Then I went to Thingiverse to see what they had and grabbed Predator Shoulder Cannon by makerslabcz.
After I had all the files, it was time to get to work and make everything printable. It took about a month in spare time to digitally fix everything up and resize it all to my body.
The backpack:
This model was good for pepakura but not for a 3d print. I first ended up fixing the files and printing it out. This will be the shell to house most of electronics and power bank.
I only used half of this model from thingiverse and fitted it with a spot for a flashlight and a servo and an outlet for the wires to go out the lower back.
Both halves are held together with 8/32 screws and nuts.
Using this tutorial, I grabbed an Arduino Mega, an MPU6050, battery pack and wired everything up with 2 Cat 5 connections (One that goes to the helmet Where the mpu6050 will sit, and one to the left gauntlet for controls and sound)
This is a shot from underneath where the power switch is as well as the recharge port.
Left Gauntlet - Creation, sound and control.
Continuing with the planning, let's start with the pepakura file and add a hinge in the print so that it can flip up if I need it to. I also made a slot for my Phone below the flip plate.
Let's allow holes for momentary switches and latching switches, cat5 connection and audio out on the flip plate:
Now let's get it printed and loaded up:
I wired it up with an adafruit soundfx board and started wiring everything together. The sound out went to a 3.5mm headphone jack which will plug into an external speaker.
It's actually much cleaner inside now.
Final outside picture of the left gauntlet.
Last edited:

 )
)