VaughanOTheDead
New Member
Howdy All!

So ever since seeing Adam Savage's Totoro build some 5 years ago I decided that was my dream costume, and I finally landed a stable job in March 2020 and set to work assembling his bones... right as the panini hit and I got 6 weeks off work where I promptly did nothing! it would stay that way until September 2021 when I entered the costume into the Cosplay Masquerade at MCM London due to take place at the end of October. So the build was on!
First off I have to say a big thanks to @wooden-ironman for decoding Adam's measurements off his video. I ended up deviating a little for my own reasons but a great base to get started with
First step was the bones! I, like other totoro builders, had trouble finding rattan or willow cane in order to construct the hoops. after some thinking I realised hula hoops would be fairly cheap and also lightweight as well as already being roughly the right diameter. After missing out on a bulk lot nearby I found these on ebay which are in sections, which make them even more suitable as I can just add/subtract sections to get to my desired diameter. I think I completely cleared out 2 ebay sellers. I also ordered 2 blank lampshade rings in different sizes to become the very top of the costume and hopefully provide some more structure on which I could attach some kind of mounting system
a great improvised stand I made as I don't have access to a fancy stand in order to support the rings as I built
again not having access to foamcore readily I was using carboard spacers to assemble the whole thing.
and then rinse and repeat for all the rings! I think I ended up skipping the last ring as it made it slightly too tight for me to move my legs around and I am also a few inches shorter than adam
You may have also noticed I was for some reason offsetting my tape between layers on the previous build. Don't do this. It ends up twisting the hoops out of shape. So I then went back in (with the white tape) and started reinforcing the joins
and that's as far as I got in 2020, 2 house moves and 18 months later....
Here is my good friend claudia who is an actual proper seamstress and she came over and helped me pattern for the padding and fur as I spent about 3 days scratching my head and making various mock ups that just were not working
Here I am also working out the suspension system. I bought the cheapest backpack with a frame I could find which was maybe not quite strong enough but it has held up so far!
I got super luck at a car boot sale and found this walking stick, which I was able to attach to the ruck sack. bonus it allowed some heigh adjustment as well! I wedged a spare allen key in the top with a butt tonne of hot glue to stop it shifting around to act as a pin to center the whole thing
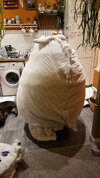
I do sometimes feel for my partner coming home to find me like this, trapped. but its coming together! sitting a bit too high here but its the rightish shape
at this point I looked at fur samples and ordered some 3inch fur. The fur on it's own ended up being over 50% of the total cost of the whole project. however I was stuck on the wadding. turns out wadding is really expensive in the thickness I needed it! after some thinking and browsing on FB marketplace I realised people give away free duvets all the time and those are pretty much wadding. and so I went and found some that weren't too grim and set about sewing them together which was quite the chore. but I did it! also thinking it sort of looks like a giant version of the Alien egg in this stage. which freaked my partner out when they walked in and my arm suddenly shot out the top
my lovely very professional pattern made out of all the measurements I took earlier
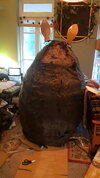
Believe this is the first test fitting of all the pieces. I ordered 5m of fur for the whole thing and this would have been easily enough except I accidentally cut one of the segments the wrong way round forgetting fur has a knapp to it.
starting to mess around with some feature shapes and sizes (way too big)
Tailoring his fur down to a more trim shape
much better!
Ok time to look at some feet! My partner was throwing out some monster slippers which I thought would be perfect! so I liberated them and also picked up the cheapest second hand pair of skate trainers I could find (actually never worn) and set about combining them
This essentially meant cutting the back in half and removing most of the sole. I then hot glued them on (I have since upgraded them to being Contact adhesived on) and then sewn to the shoe at the back. I was only able to sew it through the hell end as I had rather short needles and the suede on the trainers proved very tough, snapping 4 of my needles before I decided that was enough thread
Ok back to patterning! This time the belly
Alot of trimming and holding up later I had something I was happy with
More feature playing. The eyes I ended up copying a maker called Adam who made his eyes from a hard hat and fortunately I had one that didn't need the top kicking around from another project I was completing at the time. The iris was craft foam. Ear and nose mock ups in cardboard. Also I was approaching about a week from the con at this point so the pictures become more and more sketchy
Peepers! With tiny holes drilled in so I could sew them onto his face
I struggled for a while on how to make the ears. The solution I ended up with was a cross section in the right shape covered in fur and then the void stuffed with spare duvet filling. I then was able to obtain some plastic from my work in order to make a plate that would sit inside and using a bolt to sandwich the whole thing together
Ears all sewn up ready to stuffing! ended up a little bulkier than I was hoping but they would do!
The shoes were done so It was time to extend them into legs. Although they only come up to my knees
I would love to pretend there was some complex pattern to them but they were just fur cylinders! I made a floor mat circle to hold the shape out. I then sewed it on for extra strength.
stuck onto the shoe and again had to go through the process of many broken needles to sew it onto the shoe. I saw Adam's were supported inside using a piece of plastic extending up from the shoe, and I believe his originals were pinned to his trousers. Mine would be suspended from a belt like some sexy stockings!
Just had to add the fur to the feet and paint the claws to match and we were done! (well with the legs at least)
It was at this point I finally had to tackle the point of seeing out of the costume. More talented makers than me had gone for one of two options I found;
1) A camera system (generally mounted in the nose)
2) A semi transparent mesh in the smile
Now because I personally liked him without a mouth but I also am completely useless with electronics and also this was becoming easily my most expensive costume at this point, neither of these options would work for me.
So I did what any rational person would do and added some whimsy! after all he is a whimsical character! I was going to see through a periscope! and as an added benefit I realised I could make it retractable just like a submarine in order to hide it for pitcures
I also realised that ugly hole at the top would be entirely hidden by the leaf I had planned to put onto his head! so I hinged it at the back and weighted the front down with some spare nuts in order to make it want to close. The leaf is made out of EVA and some scrap electrical wire. I ended up covering the top half of the periscope in some spare fur scraps in order to help futher disguise it. I can say it worked perfectly as I frequently had people discussing where I was seeing out of as they couldn't see a camera lens or an opening. My handler would then point out the periscope and they would be ecstatic!
Just the last few bits to go now!
Claws! Made from some very nice medical insole material that was going spare at my work! I had originally planned plastic claws but decided the softer the claw the better as I assumed (rightly!) that people would probably want to give him a hug and I didn't want any accidents with small humans eyes either. My partner unknowingly donated their least favourite pair of chopsticks as This was very early morning of the day I had to leave for the convention
Arms! I'm not sure how I had neglected these until now but essentially just long pillow cases! Started off more stuffed but I took some back out as he looked a little too buff!
Nose! I sculpted his nose from paper clay and set a bolt into the back to let it be attached the same way as the ears. I also realised later this was a great reference point when I am inside him for making sure he's pointing the right way. Painted with acrylic very quickly!
TAIL!!!!! I thought I had done all my research at this point. It was 5am. I hadn't been to sleep yet. I was checking over reference for him to make sure I had gotten everything. One thing was his belly chevrons which were easy enough to cut and sew on. but to my horror I discovered he had a tail? and I was fresh out of fur. and then I realised I still needed another arm as well. In a mild panic I suddenly realised I had in fact left some fur behind his white belly fur in order to keep the shape on the front whilst I sewed it on and also to add some extra cuddlyness. I very carefully went in and cut the extra out from behind and had enough to throw together a little tail for him. I also found out at this time the Totoro is a Chinchilla did you know that? Super weird as I used to own a Chinchilla myself and they aren't exactly common pets!
How I felt after pulling an all nighter to finish Totoro....
All prepared to put the main costume on! Under the shirt I am wearing my thinest vest top as even in late autumn Totoro gets HOT inside. despite the best work of my fans (which died right before I went on stage) and my tactical bag of snacks. Note also my "Safety" Ball on my allen key pin as I was worried security might not allow me in as its a sharp object on a metal pole.
I had a small panic going into the con thinking nobody would like him! How wrong I was....... within seconds of putting him on inside the convention I was swarmed by people and wasn't able to move until I took him off to go to judging! and He won 3rd place! which I think for my first ever Masquerade was not a bad result at all! I did almost fall off the stage during my performance but thats by the by.
Any questions I'll answer as I'm able to! Thank you for reading this far!
Next up: Borderlands 2 Hammerlock Build
Attachments
Last edited: