Ktaylor
Sr Member
First off this is an awesome site, such cool and inspiring stuff! So much I decided I was gonna scratch build a MF! Then all of a sudden the Deagostini midel came out and I thought hey maybe I should just build this and mod it along the way instead of just doing it all from scratch lol. Glad I did, this is an awesome model and tracking down all the little discrepancies to the original ESB Studio model is REALLY fun ") So I thought I would start a thread to share my progress and keep track of what I'm doing for myself as well! My hope is to share my work and get some Pro tips from some you more seasoned model masters! So keep in mind that I'm making this up as I go along and if you see something that looks like "the long way around" or maybe could be done in a better more accurate/efficient manner please let me know!!!
So I thought I would start a thread to share my progress and keep track of what I'm doing for myself as well! My hope is to share my work and get some Pro tips from some you more seasoned model masters! So keep in mind that I'm making this up as I go along and if you see something that looks like "the long way around" or maybe could be done in a better more accurate/efficient manner please let me know!!!
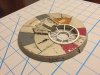
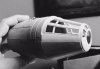
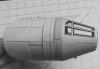
First off... that turret window, wow okay for such a detailed kit with so much ref back to the studio model I'm surprised that its glued in the wrong way, seems like prolly a communications issue with the factory that creates the parts maybe,... but its like that on the blueprint as well, oh well lets fix it!!
I decided to sand off all the little bar details and just redo it all to be a bit more accurate to the original since I had it out not perfect but closer for sure...
Removed all the existing details

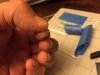
I sanded down the thickness and added this styrene strip around the top to create a second edge ring that more closely resembles the Original, since I sanded down the thickness of the piece first I am more or less back to the original pieces thickness, at least that is my intent. Will sand this added pieces thickness down as well to bring it down a bit.
*the first time I tried this it completely failed, I then pre wrapped my strip of styrene around a magic marker and taped it there in place for about 10 mins, when I unraveled it from the marker it had a perfectly curved radius to it which was MUCH easier to line up glue around the edge keeping the inside track flush with the original.

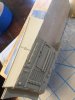
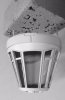
Next I cut out little notches and fed the bars through, which really helped hold them in place while I glued them down, I also found that leaving them longer than needed REALLY helped as well as it gave me little handles to hold them with which could be snipped off later with the exacto-

Then I just bent the long pieces over the top, glued them down with a bit of super glue and cut the final angle at each edge with my exacto knife.

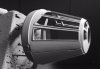
SUPER excited about the final look, feels way closer to the movie prop and i am COMPLETELY addicted to modding these pieces now !!! haha
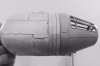
While I was at it and feeling like a styrene master I decided to start looking around and found a bunch of little panels that are missing from the turret!!


ah much better!
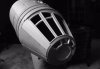
Really excited to prime this all and see how the added detail blends in!!
Hit it with Tamiay Grey fine Primer (rattlecan) seems to work just fine, although I got a kinda fuzzy feel in a couple places I had to knock down with some 1200 grit paper, anyone know if I did something wrong or is this just something that can occur? I almost feel like its overspray drying before it hits the surface or something? Not sure, anyways buffs right down so not gonna worry about it too much...
Looks awesome! I love how all the added detail blends in and really adds alot to the over all look of the piece!! okay if I didn't mention it before I'm WAY hooked on this!!


-Kris
So I thought I would start a thread to share my progress and keep track of what I'm doing for myself as well! My hope is to share my work and get some Pro tips from some you more seasoned model masters! So keep in mind that I'm making this up as I go along and if you see something that looks like "the long way around" or maybe could be done in a better more accurate/efficient manner please let me know!!!First off... that turret window, wow okay for such a detailed kit with so much ref back to the studio model I'm surprised that its glued in the wrong way, seems like prolly a communications issue with the factory that creates the parts maybe,... but its like that on the blueprint as well, oh well lets fix it!!
I decided to sand off all the little bar details and just redo it all to be a bit more accurate to the original since I had it out
not perfect but closer for sure...Removed all the existing details
I sanded down the thickness and added this styrene strip around the top to create a second edge ring that more closely resembles the Original, since I sanded down the thickness of the piece first I am more or less back to the original pieces thickness, at least that is my intent. Will sand this added pieces thickness down as well to bring it down a bit.
*the first time I tried this it completely failed, I then pre wrapped my strip of styrene around a magic marker and taped it there in place for about 10 mins, when I unraveled it from the marker it had a perfectly curved radius to it which was MUCH easier to line up glue around the edge keeping the inside track flush with the original.
Next I cut out little notches and fed the bars through, which really helped hold them in place while I glued them down, I also found that leaving them longer than needed REALLY helped as well as it gave me little handles to hold them with which could be snipped off later with the exacto-
Then I just bent the long pieces over the top, glued them down with a bit of super glue and cut the final angle at each edge with my exacto knife.
SUPER excited about the final look, feels way closer to the movie prop and i am COMPLETELY addicted to modding these pieces now !!! haha
While I was at it and feeling like a styrene master I decided to start looking around and found a bunch of little panels that are missing from the turret!!
ah much better!
Really excited to prime this all and see how the added detail blends in!!
Hit it with Tamiay Grey fine Primer (rattlecan) seems to work just fine, although I got a kinda fuzzy feel in a couple places I had to knock down with some 1200 grit paper, anyone know if I did something wrong or is this just something that can occur? I almost feel like its overspray drying before it hits the surface or something? Not sure, anyways buffs right down so not gonna worry about it too much...
Looks awesome! I love how all the added detail blends in and really adds alot to the over all look of the piece!! okay if I didn't mention it before I'm WAY hooked on this!!
-Kris


.jpg")

.jpg")
.jpg")
.jpg")