This is my second post on the rpf and the journey I will take you on has taken about 14 years. Like a lot of people I came into this hobby by replica props made by company’s like eg master replicas. I then start to watch vids and you tube of talented builders that went much much more in to the real props and what they were made from. I first started by trying to make my master replica dl44 look more like the real prop, removing paint blueing adding weathering to try to sort of match more like the real thing. I no this to some people sounds crazy because I was destroying a valuable prop but after seeing what was out there the master replicas prop start to look and feel wrong. I have since sold this prop but managed to fined a couple of pictures of it to remind me how far I have come.
My Dl44 journey from replica to real parts.
- Thread starter szkoda1974
- Start date
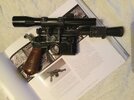
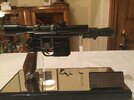
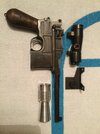
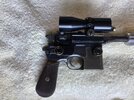
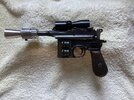
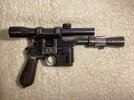
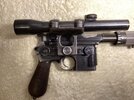
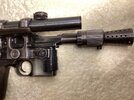
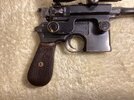
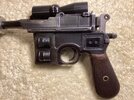
I then decide to collect parts for a build with real parts, the fist step was to fined a c96 mauser for this build,this was much harder than I thought it would be. I spent over a year looking for one that was not pitted and in nice condition I was very lucky and found a pre war c96 in amazing condition. I then need to fined the rest of the parts the hensoldt scope I knew was a very rear part to fined and would have to wait a very long time to get lucky and fined one. I bought a very nice replica one from Todd’s customs who at the time was the only nice replica you could buy at the time. I new at that time I wanted to make this prop the very best it could be, the Todd’s scope mount was not as good as I wanted and after some time was very lucky to git a steel scope mount and flash hider from Dark Energy Creations. These parts I think are by far the very best parts out there the scope mount is just so clean and well machined. So here I was over a year and a half after starting with enough parts to start a build.
Attachments
when I started this journey I was only going to do one build the hero blaster from a new hope as it took me so much time just to collect these parts I did not think it would be possible to do other builds. I then managed with much luck and more time to fined another pre war c96 and a wartime c96 in great condition so this journey entered a second stage. I now had three mauser to do three builds this meant collecting more parts and much more time looking. I needed a m19 scope mounts for the ESB blaster and scope and mounts for a stembridge ROTJ blaster build. I knew that I wanted these to built with the very best parts as well. I had a replica m19 scope off a master replicas prop this was very nice but was missing details from the real thing. This is when I started to think how far would I go to make these builds come to life. I still was looking for a real hensoldt scope and now a m19 scope and again I knew this would take time and much luck to fined them. So I set about working with what I had got , I bought a scope mount and flash hider for the ESB from the blaster factory and a scope mount and scope + flash hider for the stembridge as well. I then started to think about how I could make my m19 more real, the biggest thing missing was the engraving on the scope. I managed to fined some one who could add this to my scope witch tuck it much closer to the real thing. I new for the Stenbridge build the scope was not a real scope so a replica would be fine but the scope clamp from blaster factory was nice but not great. I then read a article on the RPF about scope mounts and tracked down a vintage Parker and hale scope mount much nicer and more in keeping with what I wanted to do.
Attachments
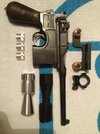
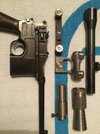
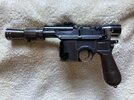
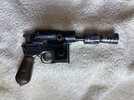
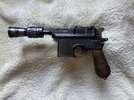
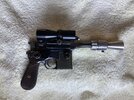
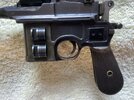
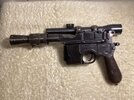
I then started to think about the end result for each build this is when I decided to make these build a little bit diffrant to other builds out there. The mounting hard wear on the original builds was Aluminium and other metrials that were easy to work with to make these props at the time. I now that these props in some parts are quite rough and this is just the way they were made for the film and a lot of the builds out there are done the same way to match. I then looked at the finish and feel of the real Mausers I had collected, the finish and the luck they had was something I wanted the rest of the parts that would be add to match. I then decide that these build would not 100% match the movie props, I decided to make the parts match the finish on each Mauser as if they had been made for real to go on each c96. I took my mounting hard wear for each build and had them made from steel this way they could be blued and weathered to match each Mauser. I new this was beyond my skill to make so started to luck for help to do this I have made many new friends in this journey that made these builds possible who I can not thank enough. I live in Carlisle in England and found a small local company that has been in business for many years called Elliot’s Engineering it’s been here for many years. they remade all my hard wear in steel, scope mount for the new hope and mounting screws, scope mount for ESB and scope mount for the stembridge. in a addition to this the stembridge mount had to be made to fit the vintage Parker and Hale scope ring they all so made me new brass mounting hard wear and steel piston grebles.
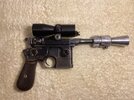
I now had amazing collection of parts read to do these build I then managed to fined a real m19 scope to add to these builds. The master replicas one I had with the new engraving was very nice but this now went in to my spares box. I had a set of grips from blaster factory for my stembridge build I very carefully made the checkered grip finish more real all by hand filing.
Attachments
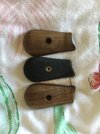
These grips turned out real nice but as you can see in the picture the real vintage grips are on each side I have removed the original pattern from them. I then made the decision to use the original grips on the mauser they came from it seem right to do this so the grips that I had had finished as nice as they were went in to my spares box’s as well. I was then faced with how to checker them the blaster factory grips had the checkering laser engraving on them, all I had to do was to go at it very carefully with a needle file to add more depth. I managed to fine a real gun smith to checker my original grips and they turned out amazing, the look and the feel on the mauser just feel right. As I have said already these builds have had amazing help along the way to make them happen and take the finish to the next level. I have made lots of prop since stating these builds I have already shown pictures of my mando build blaster on here since joining the rpf I always look for the highest finish I can get on my builds to make them feel as real as possible. I new when I start this journey I would need help there are so many talent builds out there with much more skill then me. I have bought many kits and put them together painted and weathered blued and finished my self, but some other talent build has machined and made these kits for use prop makers to put together. I know this thread has probable buy now put you to sleep so I apologise to you we are near the end.
I know this is a long thread and there will be much that I have missed as it would have been better to post as a went a long with these builds. I could not bring myself to drill and tap and put these builds together as the parts and the original mauser had taken many years and cost to collect, what was I going to do. I had the vision of what I wanted to build the very best dl44s I could achieve not 100% screen accurate but something more than that. I had new steel parts machined and blued to match the finish on the Mausers a real mM19 scope, and right at the end of this the crown jewel a real hensoldt scope and a very nice one to. I still need help to put these together I reach out to Scott who does amazing builds but he is in the us so I could not send real mauser to him to put together. So the parts sat for ever looking at me and teasing what they could be I then by pure chance found the help I need from a seller on eBay who had put together a amazing greedo killer that I bought. I then contact him told him what I had collected and could he help and the answer was yes. I want to take special thanks to Jaime for helping to put these builds together this project would not of happened with out him and his amazing help. Like I said at the start I have made new friends and had help from amazing makers and builders along the way so these build are theres as much mine. Thanks to all that help me with these builds special thanks to Jaime who I could not have finished these with out him.
Attachments
-
 IMG_1203.jpeg2.4 MB · Views: 146
 -
 IMG_1204.jpeg1.9 MB · Views: 151
 -
 IMG_1205.jpeg2.2 MB · Views: 131
 -
 IMG_1206.jpeg2.3 MB · Views: 131
 -
 IMG_1207.jpeg2.6 MB · Views: 137
 -
 IMG_1208.jpeg2.5 MB · Views: 121
 -
 IMG_1209.jpeg2.1 MB · Views: 109
 -
 IMG_1210.jpeg2.5 MB · Views: 111
 -
 IMG_1211.jpeg1.8 MB · Views: 150
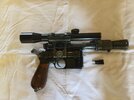
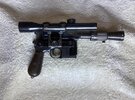
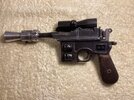
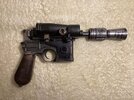
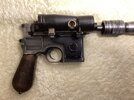
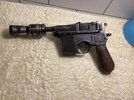
So the idea from the start was to match the mounting hard wear to the finish on the Mausers and real scopes.All the mounting hard wear was made from steel to match the real finish on the Mausers When blued. I could not bring my self to paint the lower on the ANH blaster as the finish on it is amazing and did not add the missing disc on the left hand side. The steel mountings that were hand made give the look and feel like they were made to go with the original finish on these three amazing Mausers . I know this means they are not screen accurate but that is not what I set out to do I wanted a feel and look to these like they were real world found parts on each build. I will take some better pictures as I think these do not do them justice as the feel and look when you hold them in the hand is amazing and I hope you like these builds.
Some more pics
Attachments
-
 IMG_1212.jpeg2.5 MB · Views: 150
 -
 IMG_1218.jpeg1.9 MB · Views: 141
 -
 IMG_1219.jpeg2 MB · Views: 140
 -
 IMG_1213.jpeg2.5 MB · Views: 134
 -
 IMG_1214.jpeg2.5 MB · Views: 124
 -
 IMG_1215.jpeg2.4 MB · Views: 117
 -
 IMG_1216.jpeg2.7 MB · Views: 125
 -
 IMG_1217.jpeg2.3 MB · Views: 121
 -
 IMG_1220.jpeg2.5 MB · Views: 126
 -
 IMG_1221.jpeg1.9 MB · Views: 108
 -
 IMG_1222.jpeg2.3 MB · Views: 151
Thanks for the thumbs up.Some more pics
Thanks.Outstanding builds!
Excellent craftsmanship, both blasters look superb. Great job !!
Thanks that means a lot to me your builds were sort of what started me on this jorney when I started watching your you tube vids. I did contact you years ago about help putting them together but being real Mausers could not send them to you, I end up very luck and found some amazing help to put these together. After years of collecting parts I just did not have the skill to put the parts together drilling in to these Mausers was a risk I did not want to take in case I got it wrong, so again thanks must go to Jaime for this part. I might have to take you up on the stencil thanks again.Awesome collection… your ANH is missing the best stencil evAr for the cross bar and thumb wheels. ^_^
Thanks hope it was not to long just wanted to tell the story of how I got there in the end, and what went in to these builds.Gorgeous thread
ThanksOutstanding builds!
Thanks.Excellent craftsmanship, both blasters look superb. Great job !!
Awesome Stuff - Was an absolute pleasure to work on these. And Yes - let's get Scotts Stencil on them! (might have a spare somewhere...).
Similar threads
- Replies
- 6
- Views
- 506
- Replies
- 8
- Views
- 546
- Replies
- 6
- Views
- 1,737