You are using an out of date browser. It may not display this or other websites correctly.
You should upgrade or use an alternative browser.
You should upgrade or use an alternative browser.
MPC Millennium Falcon Conversion
- Thread starter Archive&Future
- Start date
Archive&Future
Sr Member
Felt I oughta put down some more primer

Gave the service hatches a black wash. The paint I used seemed to dry with a grainy effect?? It's smooth, though just has a strange appearance. But I'm not fussed, it adds to the piece of junk look; it'll all be drybrushed and painted etc anyway

Picked up some paint, not sure what number but I know its XF Deck Tan. Looked alright in the shop but it's a bit too beige. Might be alright mixed with white though, I'll need to test it out

Started mirroring the internal sidewalls

And started the outer mandible wall

Also began to build up the right side service opening. It's a bit inconsistent right now but it'll look fine once it's got pipes in it and primed

Gave the service hatches a black wash. The paint I used seemed to dry with a grainy effect?? It's smooth, though just has a strange appearance. But I'm not fussed, it adds to the piece of junk look; it'll all be drybrushed and painted etc anyway
Picked up some paint, not sure what number but I know its XF Deck Tan. Looked alright in the shop but it's a bit too beige. Might be alright mixed with white though, I'll need to test it out
Started mirroring the internal sidewalls
And started the outer mandible wall
Also began to build up the right side service opening. It's a bit inconsistent right now but it'll look fine once it's got pipes in it and primed
Archive&Future
Sr Member
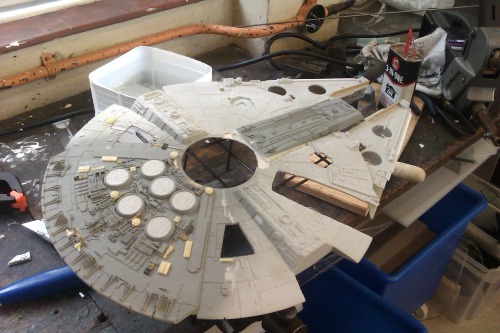
I got the starboard mandible wall about 90% complete before priming it


It doesn't really follow reference that well, but it has the essence I guess. Same as the whole conversion so far to be honest
Here it is in comparison with the Revell. It's finer and more layered but the Revell is more bustling

I also noticed that the plastic cups I use for mixing seem to be perfect dimensionally for docking rings. I might make casts in them or something, then vaccum form some thicker, smoother ones.

Matches the jawbox dimensions to boot

It doesn't really follow reference that well, but it has the essence I guess. Same as the whole conversion so far to be honest
Here it is in comparison with the Revell. It's finer and more layered but the Revell is more bustling
I also noticed that the plastic cups I use for mixing seem to be perfect dimensionally for docking rings. I might make casts in them or something, then vaccum form some thicker, smoother ones.
Matches the jawbox dimensions to boot
Archive&Future
Sr Member
It's coming on well, nice & sharp work
J
Thanks J
If you adjusted the side walls correctly you should be able to use the kits original docking rings.its just the armour around it that needs reducing as it will be too tall.so lob the original off the armor plates and readjust them
")
I'd rather not use the kit rings because they're angled too sharply; the studio model had rings that were only just about conical. When I did the Revell kit, I adjusted the kit rings but you can see that they're not right.
3d-builder
Sr Member
Just looked at this entire thread damn that's a lot of work
but it will be worth it!!!!:thumbsup
but it will be worth it!!!!:thumbsup
Archive&Future
Sr Member
Just looked at this entire thread damn that's a lot of work
but it will be worth it!!!!:thumbsup
Haha thanks 3D, I sure hope so! This is a huge learning curve for me
Archive&Future
Sr Member
Cut the lower jawbox out. Nice n neat

Got my soldering iron out (with an old manky tip, don't want to ruin the nice nibs)


I've been trying to figure out how to hide the seam on the jawbox for weeks now...although my dad is no model maker he suggested that I pour a thickened resin mix into the trench and then file it level. Pretty damn good solution to be honest! I'm chuffed at how well it worked

Just needs evening out (it isn't as messy as the photo shows it to be) and some panels/pipes replacing
Got my soldering iron out (with an old manky tip, don't want to ruin the nice nibs)
I've been trying to figure out how to hide the seam on the jawbox for weeks now...although my dad is no model maker he suggested that I pour a thickened resin mix into the trench and then file it level. Pretty damn good solution to be honest! I'm chuffed at how well it worked
Just needs evening out (it isn't as messy as the photo shows it to be) and some panels/pipes replacing
Archive&Future
Sr Member
I've been designing a photo-etch kit for the old MPC:

As you can see it includes the grilles, baffles, radar dish details and cockpit koolshade. 1 sheet of A4 brass will fit 3 kits on, I'm in the process of negotiating with a photo etch company right now. JY thread here
I've had 5 people interested in a kit, so if anyone else is after one they need to tell me pronto cos it means I'll have to order another sheet of brass
As regards the build then, I searched through the shops looking for plastic cups or lids yesterday. Must've been a strange sight to see a teenager with a pair of calipers measuring all the lids he could find haha


Finally found these cake sprinkle lids, 44mm widening to 47mm
I also bought a domed food container and chopped off a sliver of it for the new radar dish. It's very uneven right now, it needs sanding and filing to shape. It feel like PVC, slightly slightly flexible, not as brittle as acrylic

Went back to work on the rear deck


I think it's done now, might add a couple of bits here and there but over all.
As you can see it includes the grilles, baffles, radar dish details and cockpit koolshade. 1 sheet of A4 brass will fit 3 kits on, I'm in the process of negotiating with a photo etch company right now. JY thread here
I've had 5 people interested in a kit, so if anyone else is after one they need to tell me pronto cos it means I'll have to order another sheet of brass
As regards the build then, I searched through the shops looking for plastic cups or lids yesterday. Must've been a strange sight to see a teenager with a pair of calipers measuring all the lids he could find haha
Finally found these cake sprinkle lids, 44mm widening to 47mm
I also bought a domed food container and chopped off a sliver of it for the new radar dish. It's very uneven right now, it needs sanding and filing to shape. It feel like PVC, slightly slightly flexible, not as brittle as acrylic
Went back to work on the rear deck
I think it's done now, might add a couple of bits here and there but over all.
Archive&Future
Sr Member
I forgot to add these photos, I had some styrene laser cut which reduced the mandible access hole size


The thing is that they're not completely flush with the body, level-wise. Does anyone have an idea on how to blend the styrene in?
The thing is that they're not completely flush with the body, level-wise. Does anyone have an idea on how to blend the styrene in?
Jaitea
Master Member
Rather than attaching the new part to the underside of the part I patched the new sized hole part.
http://www.therpf.com/f11/another-mpc-millennium-falcon-modification-158075/index2.html#post2441543
I cut away the existing hole & matched that shape with the new part
J
http://www.therpf.com/f11/another-mpc-millennium-falcon-modification-158075/index2.html#post2441543
I cut away the existing hole & matched that shape with the new part
J
Archive&Future
Sr Member
Rather than attaching the new part to the underside of the part I patched the new sized hole part.
http://www.therpf.com/f11/another-mpc-millennium-falcon-modification-158075/index2.html#post2441543
I cut away the existing hole & matched that shape with the new part
J
I can't really work out what you did exactly...my one is made of two parts, the styrene bit that goes underneath, and a styrene insert which fits into the old hole. It's a crescent shape but I can't figure how to hide the seamlines because all the crescents are about 0.2mm lower than the mandible level
Sixth Element
Active Member
Use the crescent parts you have to cut some extras out of 2-3 mm styrene sheet and sand to fit. It'll be 3 parts instead of 2.
Archive&Future
Sr Member
Use the crescent parts you have to cut some extras out of 2-3 mm styrene sheet and sand to fit. It'll be 3 parts instead of 2.
As I said before, the height difference between the two is about 0.2mm, that's going into photo etch brass standards of thin. And at any rate I used 1mm styrene...I think what I might do it use a fine putty like liquid green stuff to fill the seam and also cover a fine layer over the crescents.
And then sand THAT back..? I'm not sure really but thank you for the suggestion
Sixth Element
Active Member
The idea is to is to glue in a slightly thicker piece of plastic, then sand it down flush. The problem with using putty to build it up is that the putty is more soft and brittle than the surrounding plastic, and it's tough to get a consistent finish.
Archive&Future
Sr Member
The idea is to is to glue in a slightly thicker piece of plastic, then sand it down flush. The problem with using putty to build it up is that the putty is more soft and brittle than the surrounding plastic, and it's tough to get a consistent finish.
:wacko Everyone said that the MPC is a learning curve... man it really is... I don't know if I can get any sanding implement in fine enough to sand down just the crescents, I'd end up sanding the surrounding detail plates.
I'm thinking that perhaps I should cut some new crescents from 0.25mm styrene, sand them level and then cover the whole thing over with a fine layer of sticky vinyl
Any thoughts on that??
Scratchy
Sr Member
Best would be to redo the crescents either with a thicker sheet, or set in flush with the top. Let the mismatch occur on the bottom.
I'm in agreement with Robn1.
I would clamp a thick piece of styrene, or a small piece of flat rigid piece to the top, insert the crescents and glue from the inside, this way the top surface is flush to the rest of the hull. I would then add new plate detail of the same thickness of the existing plate detail that's molded to the hull, so that it all blends together, shaving off the old or adding to it will be a choice that you'll have to make, if it was me, I'ld shave off the old plate detail and replace with a new piece.... but not without making a stencil of the existing plate detail that's about to be removed.
Good luck, and get back to work.
Similar threads
- Replies
- 2
- Views
- 979
- Replies
- 2
- Views
- 953
- Replies
- 11
- Views
- 1,152