You are using an out of date browser. It may not display this or other websites correctly.
You should upgrade or use an alternative browser.
You should upgrade or use an alternative browser.
Moisture Vaporator Build
- Thread starter bigkidbiggertoys
- Start date
bigkidbiggertoys
Sr Member
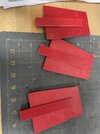
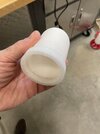
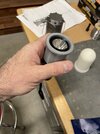
I started making the topper with some scrap sintra and a 3d piece I modelled up. I also printed the marker lights in a translucent PLA and will light these.
Attachments
bigkidbiggertoys
Sr Member
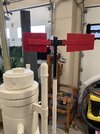
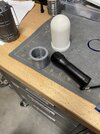
Here is my low tech lighting solution, a bright led flashlight and a couple of pieces I printed up. This should light up nicely at night but I’ll still throw a key light onto it.
Attachments
bigkidbiggertoys
Sr Member
I added a little bit of weathering and I am calling this done at this point. There are a couple of small details that I would like to add but I can always revisit this when I have more time. BTW, this is for my Halloween display this year.
You can see some of my past projects in the background. I built a tactile electric chair that I would strap the tots into and you can barely see the Jurassic Park set I built for a couple of years.

You can see some of my past projects in the background. I built a tactile electric chair that I would strap the tots into and you can barely see the Jurassic Park set I built for a couple of years.
Last edited:
Awesome work going on!
bigkidbiggertoys
Sr Member
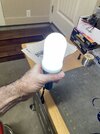
Here is a pic of the prop self lighted. I’ll still throw a warm spotlight on it for Halloween night to really make it pop. My idea is to have it at the foot of the driveway as a marker light to gather interest.

bigkidbiggertoys
Sr Member
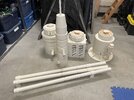
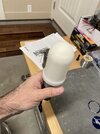
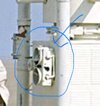
Part of recreating Tatooine in will be adding the items for that lived in look. I have added some miscellaneous containers inspired by Galaxy’s Edge. I have a few more things that I’ll be building as I go so I’ll start individual build threads for these to make it easier to find them.

dbowker3d
New Member
This looks amazing; great job! My only comment would be that it's in a desert, right? The surface would be blasted to a fairly matte finish I'd think. If it were me the final step would be to hit the whole thing with a dull matte clear coat and as it's drying maybe toss some fine grain sand on it here and there.
When it's time for installation it'd great to make a bed of sand around it too. Not sure how practical that step would be, but it'd be a nice touch.
When it's time for installation it'd great to make a bed of sand around it too. Not sure how practical that step would be, but it'd be a nice touch.
bigkidbiggertoys
Sr Member
The finish has toned down since I painted it and it is a satin finish, almost flat with the weathering on it. If I have more time to work on it I’ll go over it with a scotch brite pad and maybe a little more sand color in the crevices.
I could spend hours on weathering this but it won’t show up at night. I do like the idea of the sand base, just have to wrap my head around hue I am going to do that and keep it to a size I can easily store.

I could spend hours on weathering this but it won’t show up at night. I do like the idea of the sand base, just have to wrap my head around hue I am going to do that and keep it to a size I can easily store.
Last edited:
bigkidbiggertoys
Sr Member
I was lucky enough to get some industrial piping for free but you could probably get sono tubes for concrete relatively cheap
russo3j
New Member
That’s what I was thinking but out of stock most places in stores around me. I’m sure I can find something online. Thank youI was lucky enough to get some industrial piping for free but you could probably get sono tubes for concrete relatively cheap
bigkidbiggertoys
Sr Member
If you want to make something lightweight and dirt cheap, look at the method I used for a couple of the rings. I cut some 2” foam rings and wrapped them with paper and Weldon glue. You can give a light texture and paint afterwards.

bigkidbiggertoys
Sr Member
The cost to me was next to nothing as I scavenged for materials. I’m guessing it was less than $100 for glue, paint, the flashlights and misc hardware. I suppose if you had to buy some sono tubes you would probably need to budget another $100
Similar threads
- Replies
- 4
- Views
- 652
- Replies
- 63
- Views
- 5,193