Mk III Baker Sonic Kit Build - Thread

Rassilon

Well-Known Member
Hi all you Who junkies, :lol Have arranged for Inventor 3D drawings and an Instruction Assembly Manual on the Mk III Baker sonic at the following site.Prop Engineering look for the seal of Rassilon 4th Doctors Sonic Screwdriver.wmv - YouTube

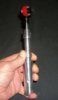
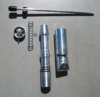
If you have one of my kit build Mk III Baker sonics, place your final assembly here for all to see, as well as any questions that you may have on the build. :thumbsup
 

Attachments

  • so2.jpg
    so2.jpg
    27.5 KB · Views: 412
  • Sonic Kit option 1.jpg
    Sonic Kit option 1.jpg
    92.2 KB · Views: 564
Last edited:
Re: Mk III 4th Doctors Sonic Screwdriver

Thanks for the heads up Organic, I have 12 of the Mk III sonics in my collection, looking into the 7th-8th Doctors sonic next.
 
Re: Mk III 4th Doctors Sonic Screwdriver

Thanks you Who junkies.
Next time I'm in the US I will look ya all up, and show how us Aussies have a drink or 10 but no more than 20 that's it.
 
Re: Mk III 4th Doctors Sonic Screwdriver

If you end up in NYC there's a bar called The Way Station which is Steampunk themed and their bathroom is inside a Tardis.
 
Re: Mk III 4th Doctors Sonic Screwdriver

Oh that sounds like a very nice place to see, never been to that side of the US, mainly on the LA side.
 
Re: Mk III 4th Doctors Sonic Screwdriver

I received one of Rassilon1's kits recently (after being lost in the mail for a month and a half between here and Oz) and I have to say I'm very impressed. His interpretation of the details makes for a very good sonic and the machining is clean with a very good finish. I did a video review on my youtube channel and have attached some build progress pictures.

Rassilon1 Baker Sonic Screwdriver - YouTube
 
Re: Mk III 4th Doctors Sonic Screwdriver

I've since rotated the magnet shaped back of the bullet to up and down orientation instead of left to right. I'm considering moving it to diagonal just to be different. The whole thing game together nicely I have to say.

please-dont-bump-please-dont-bump-ice-cream-hot-babes-sometimes-props-1202111027.jpg-76521d1322847106
 
Oh very nice. I'll post some shots once I have mine completed. I'm having Rassilon1 make me a few custom parts and did paint a few of the others but still need to get some fresh steel wool to buff up the casing.

I decided to use the Rustolium black texture paint for any of the black parts and Rustolium satin burgundy for the emitter halo and set screw that sits inside the back emitter section. It should look really nice when it's done. ^_^
 
Sweet! I'm looking forward to seeing those picutures. I left the body of mine as sent since it looks more like a realization of a 1970's BBC prop to me that way. Not rough or anything just more realistic to me.
 
Sweet! I'm looking forward to seeing those picutures. I left the body of mine as sent since it looks more like a realization of a 1970's BBC prop to me that way. Not rough or anything just more realistic to me.


Well, my plan is to just sooth it out. If I were going to polish it like my others I would use Brill-O and then follow up with Brasso. I'm doing this one dry for a similar effect as you but I want to smooth out a few spots. I'm also considering chipping the paint on the halo for the used look as well.
 
LOL! I did such a crappy paint job on mine it has that "lived in" or "1970's BBC Sci-Fi Prop" look to it already. ;)


It doesn't look THAT bad XD I'm going to use some burgundy paint though. I found that Rustolium is having the best time sticking to the aluminum, especially the black texture paint. To weather it, I'm going to spray the halo, use a razor to chip it around the edges and then sand the paint down to make the paint look worn off instead of just plain chipped. Should turn out well I think.
 
Here's an easier method: paint it up, let it dry and then drag the head along a sidewalk like a match against the striking pad. You'll get some really good "aging" on it that way. Just don't do it too hard otherwise you'll abrade off all the paint and primer.
 
Here's an easier method: paint it up, let it dry and then drag the head along a sidewalk like a match against the striking pad. You'll get some really good "aging" on it that way. Just don't do it too hard otherwise you'll abrade off all the paint and primer.


Yeah I don't think so. XD I'm going to just make it look worn. Probably use a method with acetone I just figured out instead. I ummm, also don't use primer XD I just use a heavy enough grit sandpaper so the paint has something to grab onto.
 
This is the cutting compound that I used on Aluminium parts, called Autosol, it will bring Aluminium to a mirror finish, works well on any surface.

I use the same product on the Rassilon1 Custom Tennant sonic grip & on the brass parts as well.
 
OK guys, I got my custom emitter parts from Rassilon here. Took two tries to get the parts where I like them but I'm happy to say that even though this is custom, it's still an Original Manufacturers Equipment custom. XD

So first thing is the smaller emitter halo. I'm a big sucker for that but I also asked if he could as a bit of thickness to it which worked out well. I only epoxied the pins into the bullet because once it set it locked the ring right on. I used a clear two part epoxy from Locktite that sets in 5-ish minutes and then cleaned up and mess with acetone. Then I masked off the inside for the halo and bullet and sprayed the ring down with six or seven thin coats of Rustolium satin burgundy enamel.

35k7oyd.jpg


Next came the black "transmitter" piece. I had an extra made for a test to see how a wider diameter would look. I think it's 15mm instead of the 12mm he normally uses. If it looks in the end like the wider diameter won't work, right next to it is a standard 12mm piece to use. Both parts are sprayed with a Rustolium black texture paint.

161x6on.jpg


All parts should be completely cured by the end of the week for final assembly but I put the emitter head on just to see how it looks since the satin paint drys faster and so far so good.

25pu2j8.jpg


You can still see some overspray in this pic here that I need to remove from inside the halo. There's also a few spots of epoxy but I'll take all that off after the paint is set.

t9v4gj.jpg


Hope you all like.
 
This thread is more than 10 years old.

Your message may be considered spam for the following reasons:

  1. This thread hasn't been active in some time. A new post in this thread might not contribute constructively to this discussion after so long.
If you wish to reply despite these issues, check the box below before replying.
Be aware that malicious compliance may result in more severe penalties.
Back
Top