Hey there,
sorry guys! I started thinking and prototyping on a small project I'll do, and I totally forgot about the explanations until today!
for any help with the assembly/disassembly of the ZF-1 itself, you can find the assembly videos from Jake linked in his own project run thread:
Hi everyone, My company JCM: Custom Creations Ltd has developed what we believe is the most comprehensive and accurate ZF-1 model currently on the market. We are selling these either in kit or assembled model form. The features of this kit include: Aluminium frame and sub-frames (3mm and...

www.therpf.com
People with an already assembled ZF-1, I'm not sure anymore, as it was several months ago, I know that I removed my shells, but I don't think it's needed to detach the rocket tube from the main barrel. If I'm wrong and the shells really need to be removed, they are not hard to remove, at the time I didn't have Jake's videos and I just found the two screws on the bottom by myself and figured it out easily
")
in any case, the video for the barrel assembly is here if that helps:
for anyone just building a kit from scratch, my parts will just replace the parts from Jake's kit and pretty much assemble the same way, except for the little accuracy variations that I added.
ok, I took some photos and will try to explain a bit when I think it needs explaining. hopefully it will be clear enough.
1 - the two structural back tubes:
so, those go here in case people were wondering:
those are the only parts that don't go in the front. If you have an assembled ZF-1, those are a bit annoying to remove, especially because the screws are glued, but if you have thin pliers or your girlfriend hand in my case, you can hold them securely, then unscrew them.
To re-assemble, it's pretty straight forward, however, you should
use some thread glue or superglue when attaching the screws, and,
don't tighten them fully! if you do, the mechanism will not work anymore of force more than it should as those are rotating points.
- the maglite holder:
nothing fancy here, just two screws to attach on the back from the inside of the frame. I recommend that you attach this one amongst the first weapon tips before it gets too crowded in there as it's easier to have some room for your allen key. You'll need some patience as your allen key might be too long to do full turns, but it's pretty easy to attach.
in case you need to remove the maglites, they are secured by two set screws in the back of the part (not accessible when the whole part is attached to the frame):
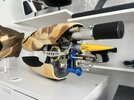
- the clippard and flame thrower:
if you took the full assembly with all clippard parts, it's pretty straight forward, just align the two holes to the frame and tighten the screws:
if you didn't get the MPA-3 part from me, it just threads directly on to the main MJV-3 block, then you can screw the little L fitting at the base with the included sloted hex bolt. The tip of the L fitting should face the back of the assembly as seen in the first photo of this paragraph.
if you want to remove the flame thrower for painting, it just unthreads counter clockwise, just with the force of your hand. make sure you tighten it back until the slots in the front are properly aligned:
for those that need to drill and tap the clippard MJV-3 part themselves (just one person from that run, I drilled all the MJV-3 I supplied, no worries), here is an hopefully clear plan. make sure to measure twice and compare with your own ZF-1 frame! holes need to be 2.5mm and tapped to M3.
- the lateral rocket vents:
nothing special for those. position them and attach the screws without tightening them at first in a cross/engine block patern. tighten the screws when they are all in. The tolerances are pretty tight here because of the 8 holes, that's why it's best not to tighten the screws at first to have some wiggling margin, but they should fit perfectly
- the rocket tube, rocket support and butane torch support:
for the rocket, you need to attach the fins from Jake's kit. the side with the two holes on the tube is the front of the rocket.
if you have an already assembled ZF-1 like I did, the fins need to be removed from the printed rocket first, I just gently put some lateral and twist pressure on them, and working slowly, the superglue cracks eventually. then you just need to clean the fins with acetone.
to attach the fins, the slots on the tube are very adjusted, they might need a little bit of sanding to accept the fins. I used a piece of 220 grit sandpaper double sided taped to a thin piece of brass sheet I had lying around. A nail rasp (pretty sure that's not the correct word here, sorry!) would work as well. just sand a bit the slot on one side and test the fin. in my case, I really didn't sand too much, then pushed the fins by force, pushing them against my workbench starting from an angle of the fin, not the full length of the fin's base. you need to be carefull and not bend them, but on my kit, they are there, without glue, and they are straight and very secure
when you have that attached, you need to attach the rocket to the rocket holder. (I don't have the fins attached on the next photos as I'm using a new kit for the demo, but that's the same) the screw to do that is already attached to the rocket holder, it's the stainless steel one. remove the nut from it, put it on the tip of your index like so:
and present it in front of the slot from the front of the tube and from the inside:
then, just align the screw and rocket holder part to the nut and start threading it from the back of the holder parts:
it might look a bit complicated but it's actualy a 1 minutes job and not hard at all
here from the inside, without the fins again:
for the rocket tip itself, it really depends on what you have, a printed one, a resin one from the deluxe kit or even a real rocket kit. In my case, I just put some tape around the rocket until it was a snug fit. Sorry, there is nothing I could plan specifically for that part as it depends on what you have and Jake's rocket tip wasn't meant for my tube as we didn't reproduce exactly the same movie version of the rocket, his is larger.
to attach this to the frame, there are just two screws, but before tightening the back one, you need to put the Butane torch holder in the front hole, the back screw will lock the torch support with a slot on it's side:
push the support tube until you think the slot is aligned, almost tighten the screw, push on the tube again until it comes in contact with the screw to be at the proper depth, then tighten the screw fully.
- the ice cube system:
this can be attached after the rocket holder is attached or even before in one piece with the rocket holder like showed at the end of this paragraph.
pretty easy to attach, just align the notch on the vertical tube with the screw inside the hole of the rocket holder:
push the rube inside until it touches the screws and tighten the screw a bit.
if you do that before attaching the rocket holder, you get that assembly:
then it's just a matter of threading the 2 screws at the back of the ice cube tube from the outside of the frame
- the red button and yellow button bases:
ok, so those are intended to be glued in Jake's kit, so I proceeded the same here. That means that I turned the pieces to a theorical diameter but since those need to be a tight fit, they might need to be adjusted a bit. Actually, the frame holes might need to be adjusted a bit as it's the easiest way to do it.
if the part is too tight, wrap some sandpaper around a tube of the approximate hole size and sand the frame a bit, test, sand again. it shouldn't be much.
when it's a tight fit, put a bit of super glue or other and push the parts in place.
the yellow button/printed red button themselves needs to be glued to the bases as well.
if you have an already assembled kit, the printed parts all need to be unglued first, it's not very complicated, the only issue is ungluing the yellow button itself, just use caution and be patient about it to avoid damaging the black colar of the button. The button needs to be unplugged from the inside cable first, it's just a quick connect plug there so no issue thanks to Jake's brains
if you get a real red button, remove its nut, put the button in my aluminium base and put the nut back from the inside of the frame/base if not attached. no need to glue the real red buttons, just the base to the frame.
If you have one of the two NOS buttons that I sold, it's even easier, it all threads together without glue. as explained here:
yes, the 800 should be the same ink, they just have a larger tip. I just checked as well, the orange exists even in the 500 series, it's just not sold by amazon in France so I couldn't order it. and there is not that much of a gradient, it's pretty much a bit darker just next to the base, maybe...
www.therpf.com
For the red lenses that I sold. just remove the real red button bezel, and push gently on the red lens until it pops in place. Always be gentle with that part as the white base legs are pretty fragile. When you are done, put the button bezel back in place.
I think that's it. I tried my best to be clear. there is a lot written and I hope it's not too scary, it's all pretty straight forward and easy.
the most complicated is for people that had a pre-assembled kit, like I did, but I did it and it wasn't that hard
Just ask me if you feel lost there, I'll help!
If I missed anything or you are not sure about something, just tell me and I'll try to explain it better
cheers
 supergreenprops.com