jheilman
Sr Member
I recently decided to build a replica of the DL-44 Solo blaster from ANH. That lead me to kpax and deadbolt's amazing thread where they are replicating the most accurate new parts for this blaster.
http://www.therpf.com/f9/anh-hero-dl-44-discussion-118186/
So, I purchased a Denix and began accurizing it. Then...the wait. In the interim I had definitely been energized again toward prop replica firearms. I have several that have been waiting in boxes for years. So, time to build something else while deadbolt and kpax finalize their parts run. First up for me is a Matsuo Galactica blaster from nuBSG season 1.
I'm sure this kit is familiar to many here, but just in case, a short run-down. RPF member matsuo is an incredible manufacturer of replica firearms. His castings don't look like castings. They look like real firearms. Check out his forum for more info.
Matsucorp
Matt created a beautiful kit of the miniseries blaster from nuBSG. He then modified the kit to include the added details seen in season one of the show. Matt was constantly refining as more info came to light. For a time Matt dusted his molds with aluminum powder and also mixed the powder with the resin. While this shortened mold life, the end result was a resin casting with a paper-thin layer of real aluminum that shines up like real gun metal.
Matt later created a true clambshell version of his replica, but the license for the Galactica blaster was secured and Matt ceased production sometime in 2007.
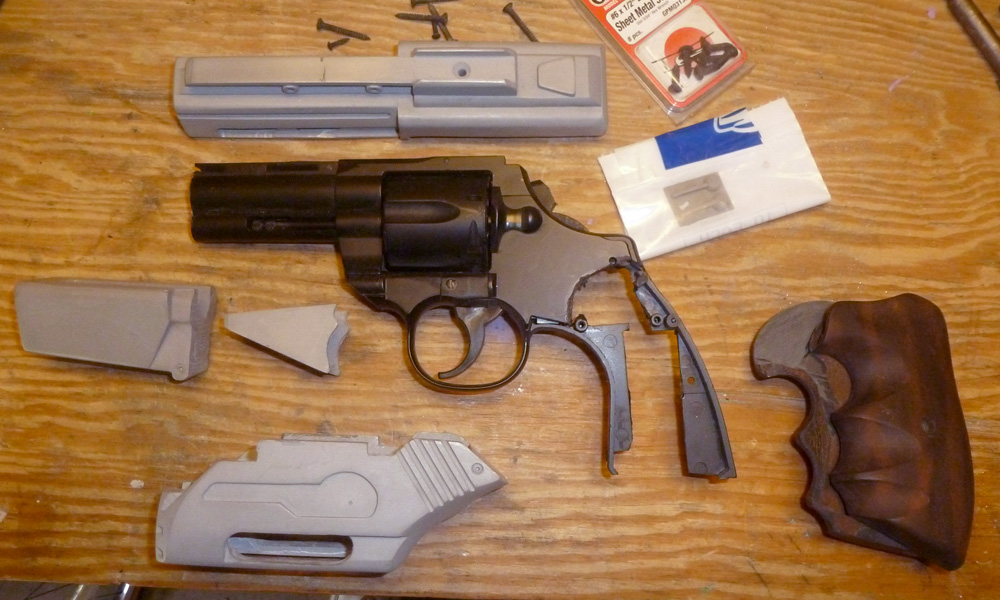
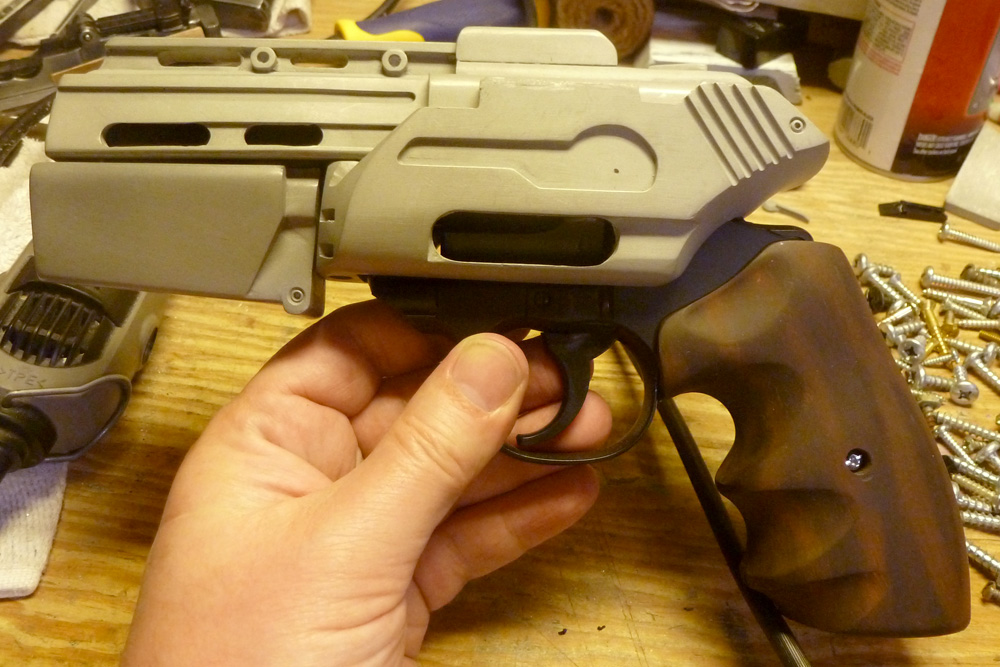
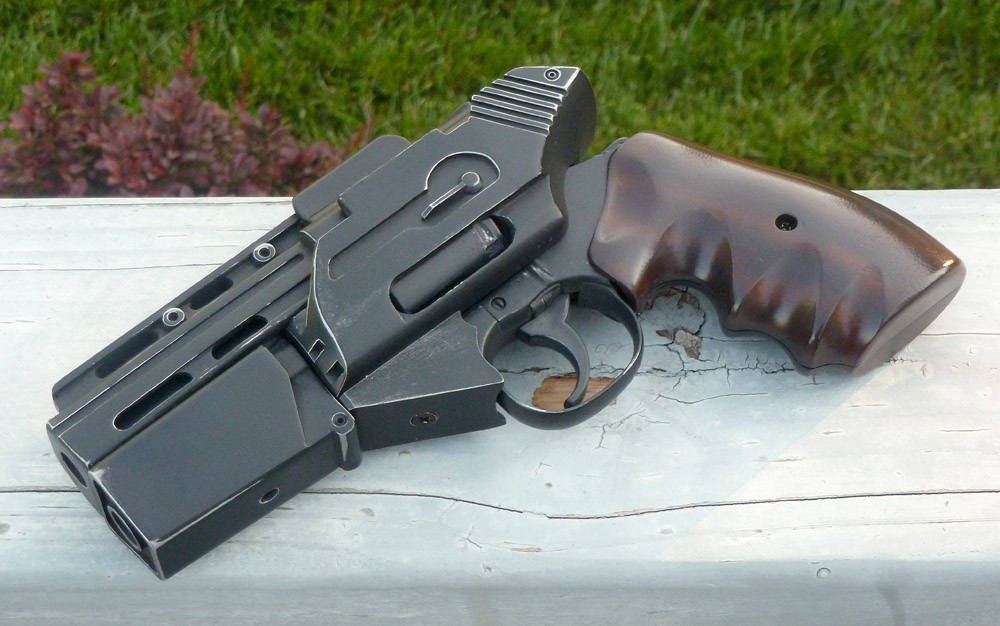
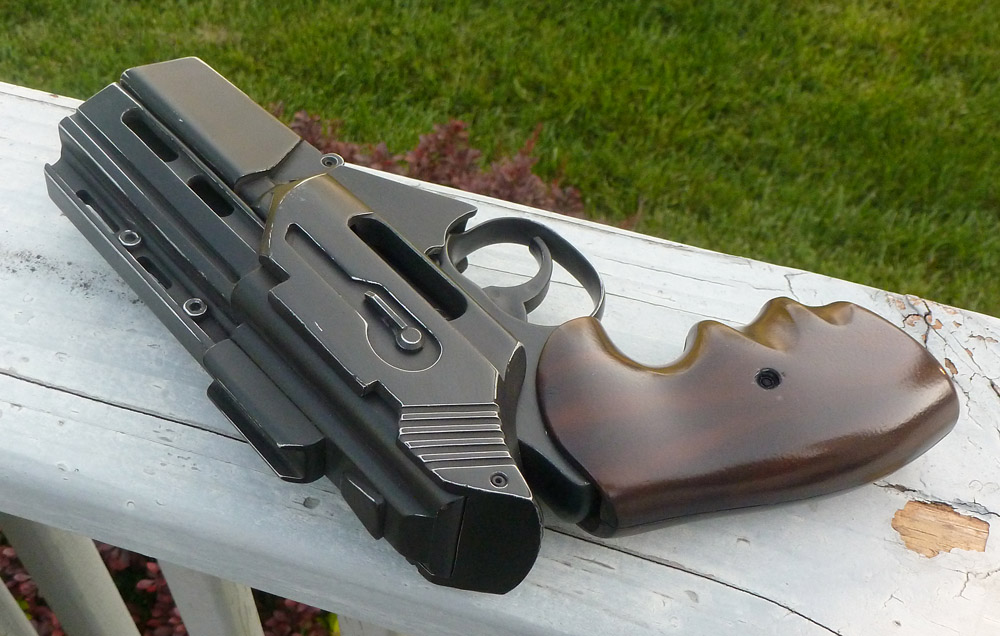
I purchased this kit second-hand from an RPF member years ago. I was thrilled that it was one of the rare versions with the aluminum treatment. It came with a casting of a Colt 357 to use as the interior. I opted to replace that with an airsoft for the trigger movement and revolving cylinder which does show through the opening in the side. The above pic is where I left the kit about 3 years ago. I hacked up the airsoft to make it fit. Chopped the barrel and hammer, sliced off a bit forward of the trigger guard and chopped up the frame in the grip area. This is roughly what it will look like when complete.
I started back in on this kit a couple weeks ago.
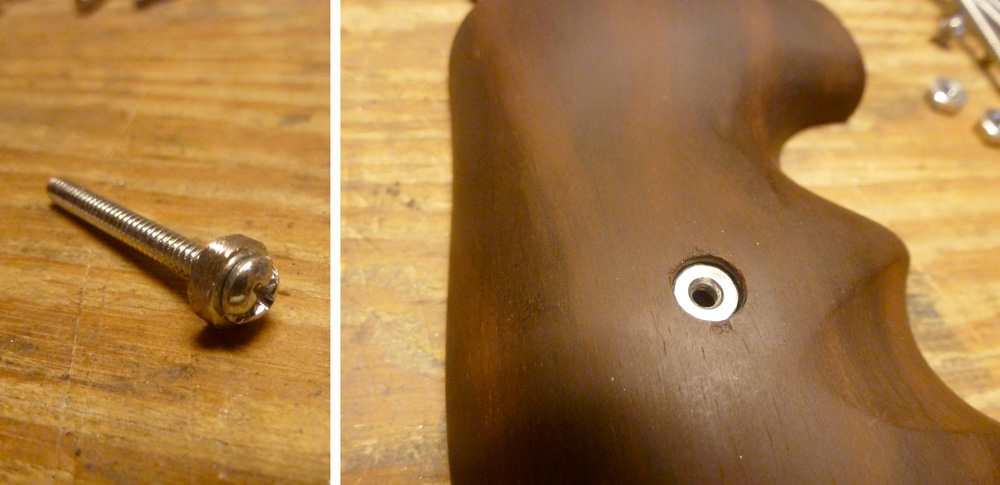
My kit was missing a couple pieces. Matt was kind enough to ship me a pair of replacement safety switches. The hardware to attach the grips also needed replacing. I cut a bolt to the proper length and ground the head down to the proper size. Next I placed a nut snug on the bolt, chucked it in my drill and spun it on a file until round and small enough to fit in the grip like an escutcheon.
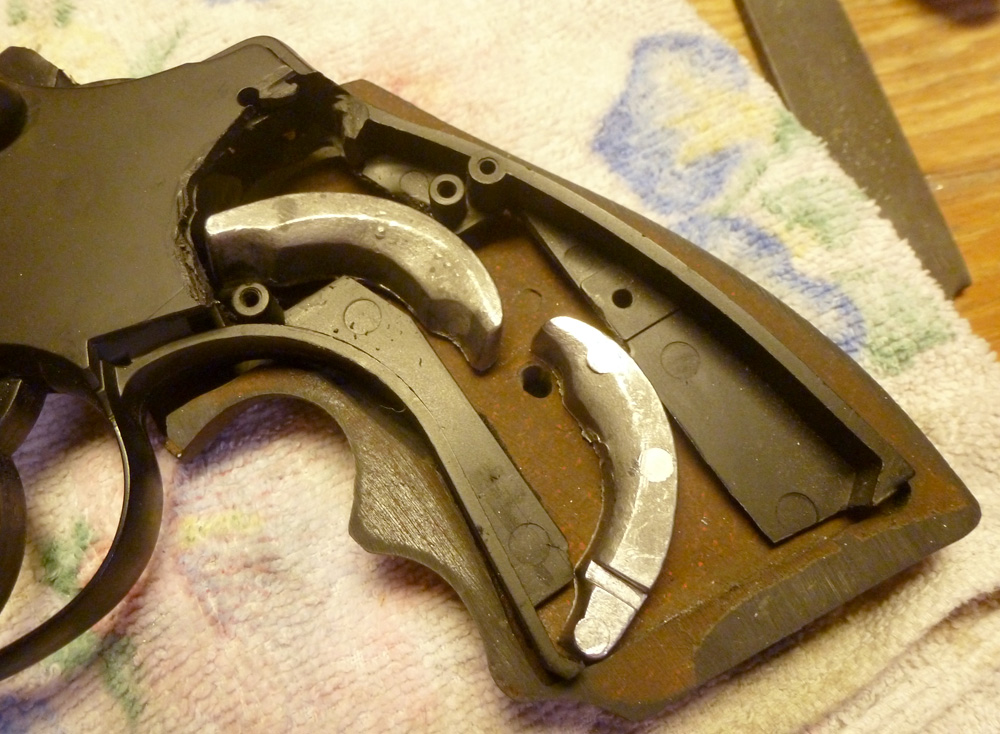
Next step was to test fit the parts. The kit is designed to be held together by screws only. But, it was also designed to use the cast 357 and not my cheapo airsoft. I had to slice off the extractor rod to attach the lower body. The screw would have gone right through it and interfered with cylinder rotation.
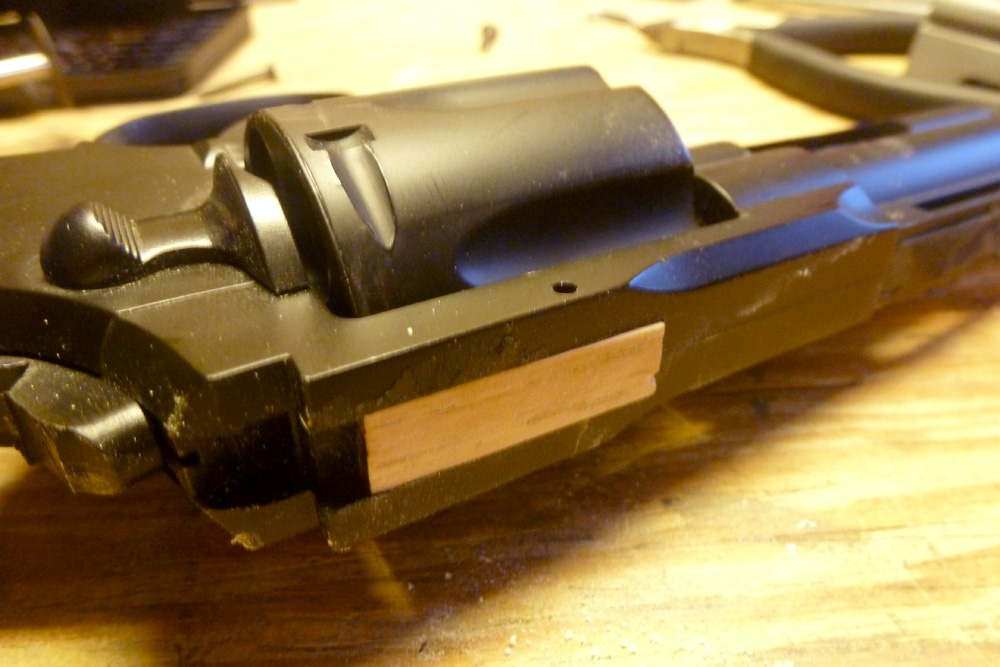
I next screwed on the top piece of the body and abruptly split out a plastic piece on the airsoft. I grabbed a scrap piece of oak molding and fashioned a sturdier replacement.
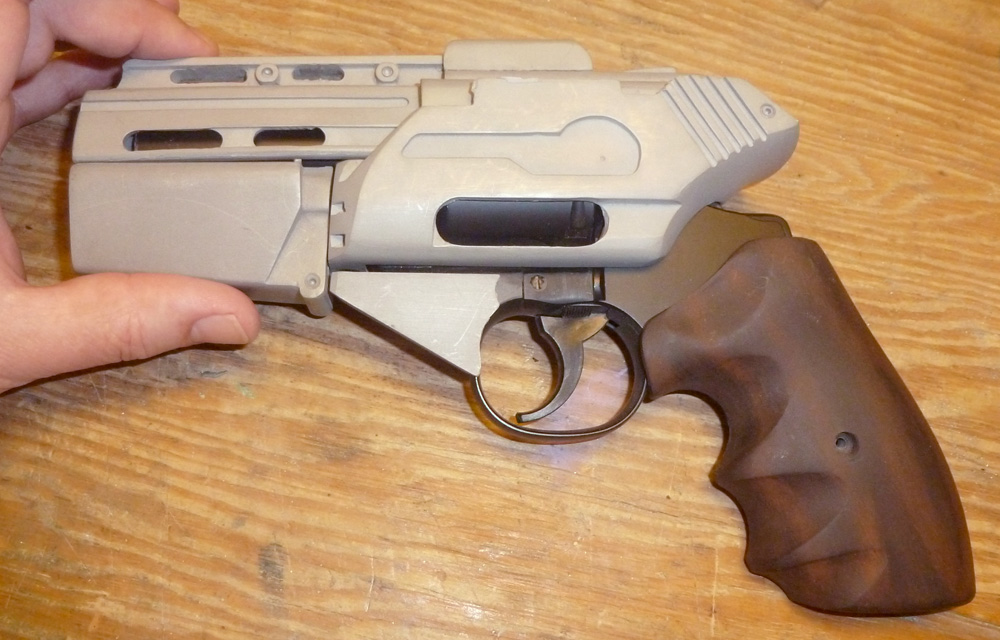
Here's the first dry fit with the five main kit pieces screwed together to the airsoft.
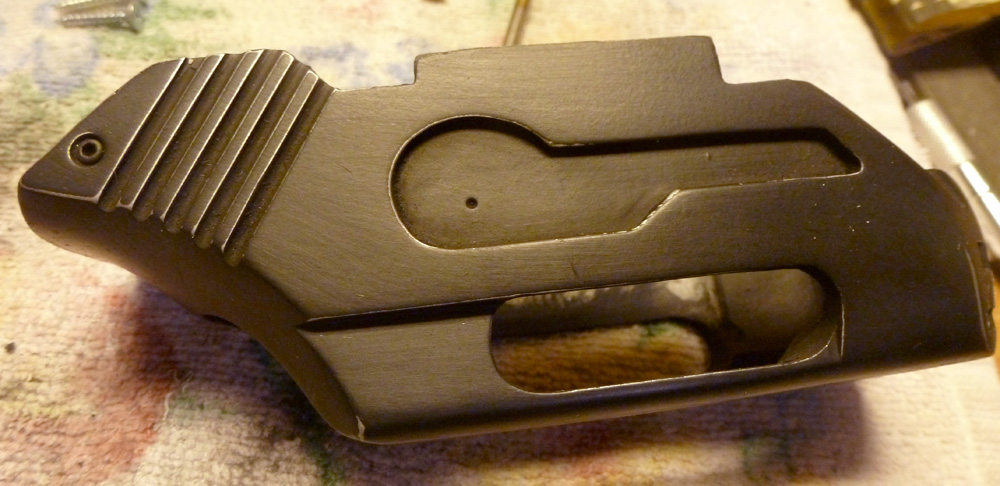
The final test fit revealed a spot where I was overzealous with the dremel. The kit required removal of a lot of material inside to allow the airsoft to fit and its cylinder to spin. At this particular spot on top I went too far and it will be noticeable. So, I fashioned a piece out of aluminum sheet to make up for the missing resin. Cut, ground and sanded to shape, it's seen here with a bit of JB Weld to cover the seam.

The airsoft I used had two large lead weights in the grip area. I sliced the largest weight in two and will add it back into the gun during final assembly for needed heft.
My plan for the resin gun all along was to polish up the aluminum coating, then hit it with a solid coat of flat black and then polish that up with fine steel wool. But, the airsoft is simply black plastic. To replicate the look I shot the airsoft with two coats of metalic silver and a single coat of flat black. Then I hit it with steel wool to add sheen to the paint and reveal some of the silver beneath. Here's the body of the airsoft after the steel wool.
You may notice the barrel has only overspray on it. I totally forgot the barrel would show in the openings in the kit. I hit it with more flat black and steel wool later.
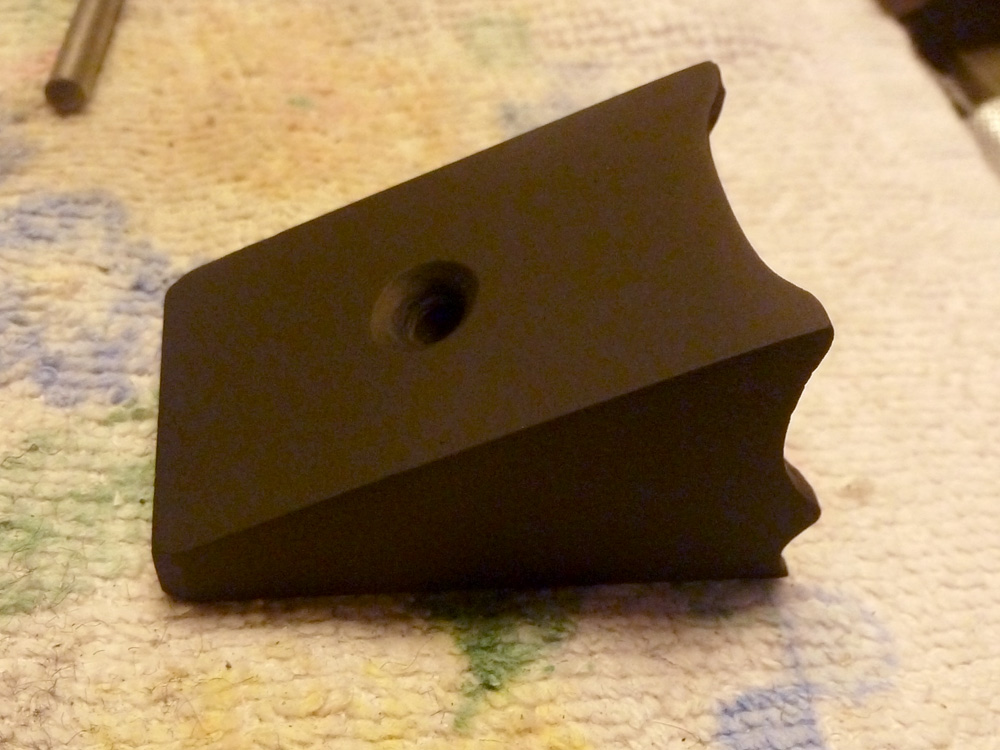
The trigger shroud (that's what I'm calling it) was the last piece to work on. It did not have a hole for screw attachment. I thought about simply super-gluing it in place, but, as someone else mentioned, it's nice to be able to disassemble this kit if the airsoft requires adjustment later. So, I drilled and beveled a hole in the shroud.
Now the fun part. I polished all the pieces with steel wool to bring out the aluminum sheen. Next they were all painted with a solid coat of flat black. After sitting overnight, the pieces were again hit with steel wool. Working slowly, the steel wool smooths the paint and reveals the metallic finish underneath.
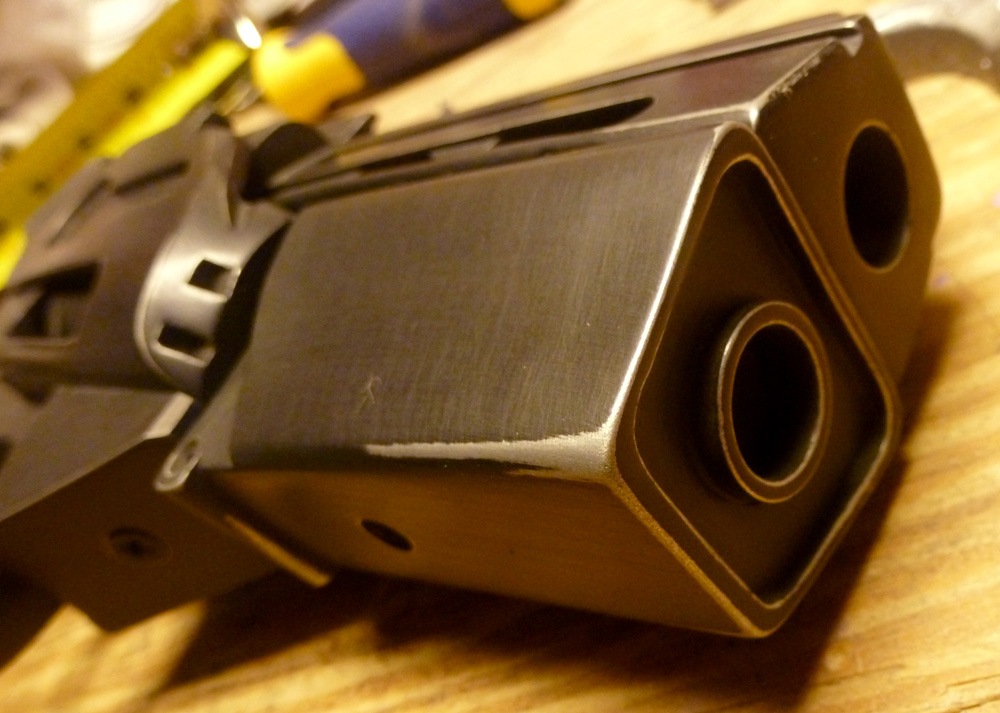
The one characteristic that always impressed me about matsuo's kits is how little they look like kits and how much they look like actual firearms.
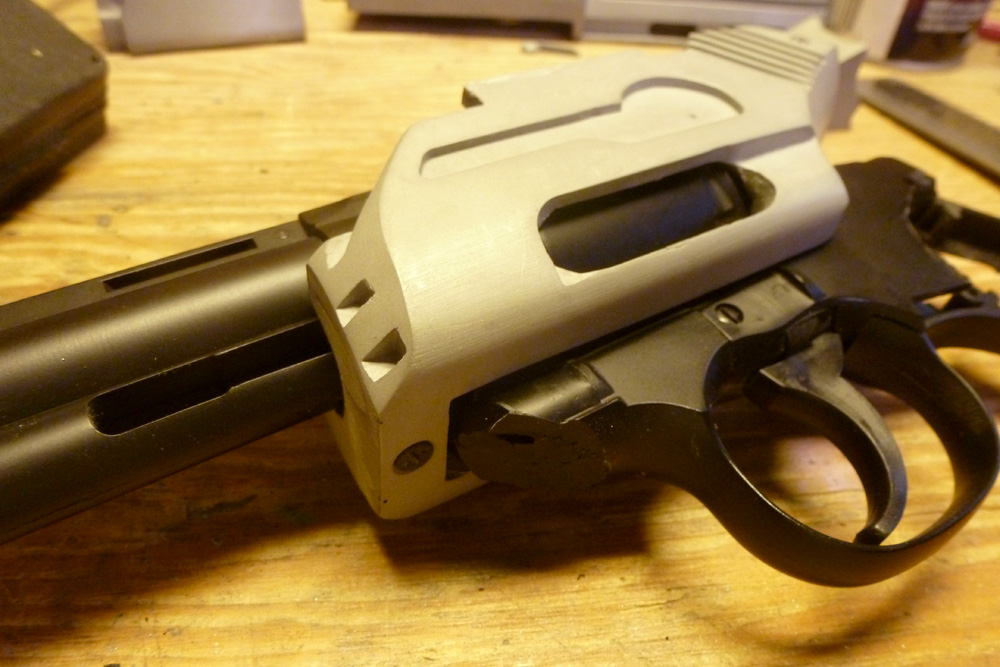
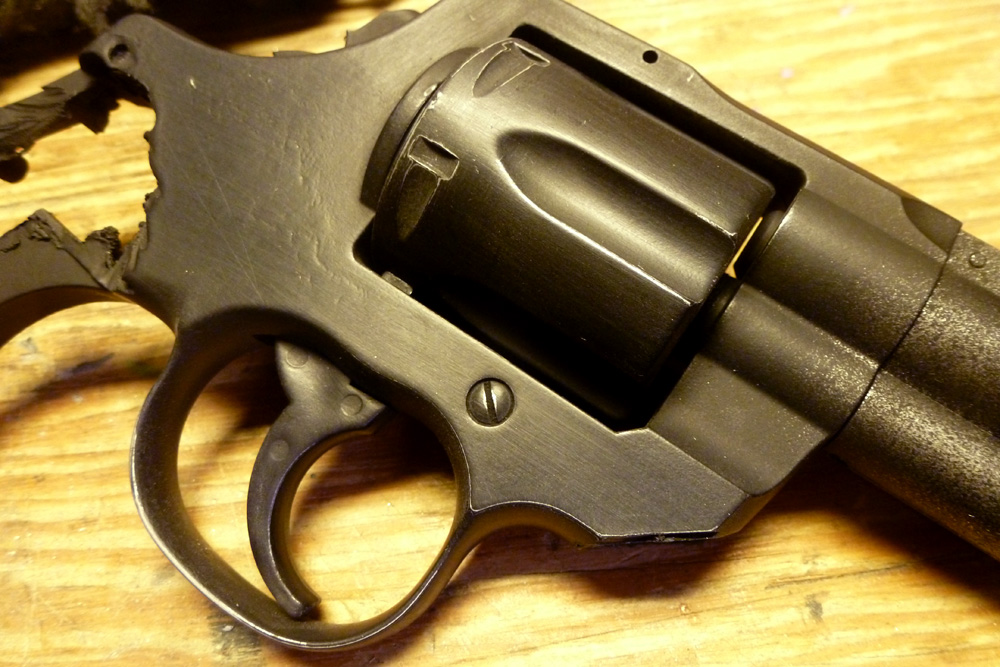
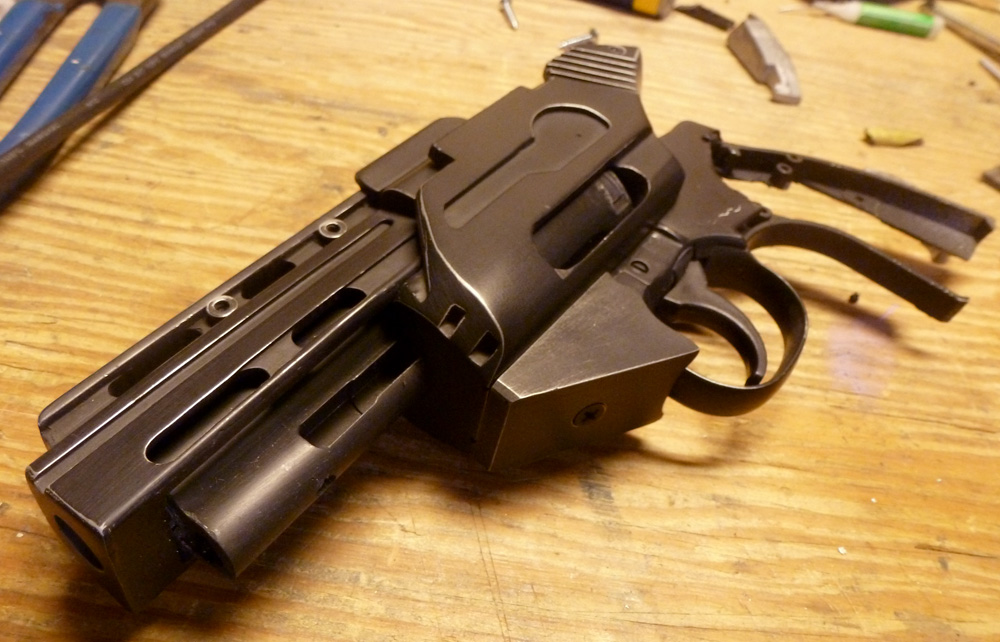
The business end looking good.
The screw attachment holding the explosive round launcher isn't quite right. Even though I adjusted it a couple times, when the screw is tightened, the launcher isn't exactly in the right position. So, I've opted to forget the screw and add a coating of JB Weld to the launcher.
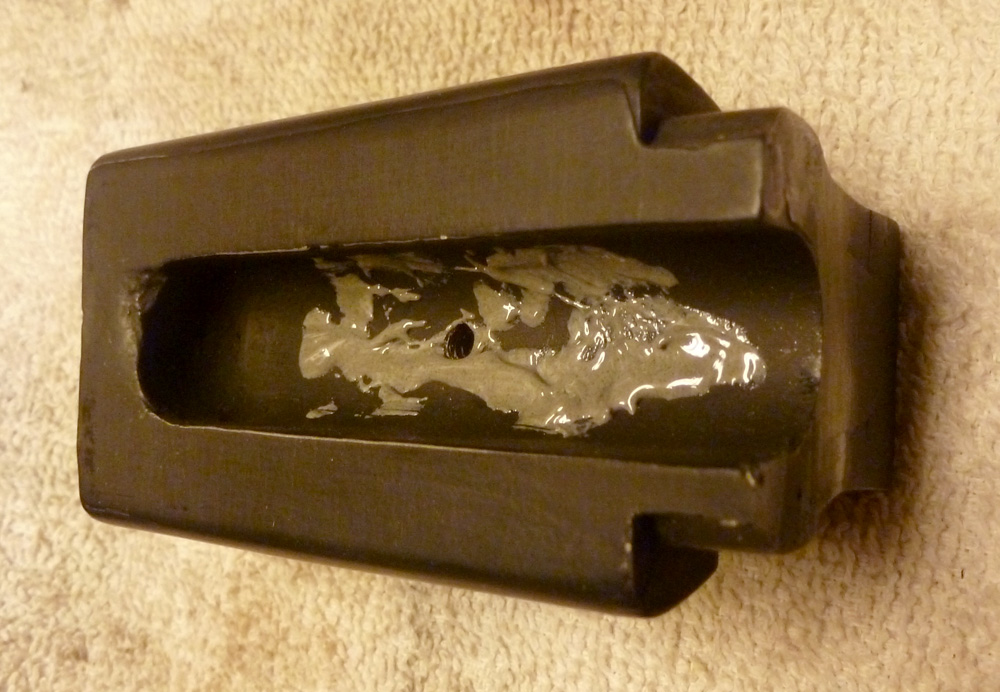
I know this will prevent me from disassembling the kit later, but I feel it's worth the risk to have a tighter fit here. Clamped tight, the launcher will sit overnight and hopefully be secure.
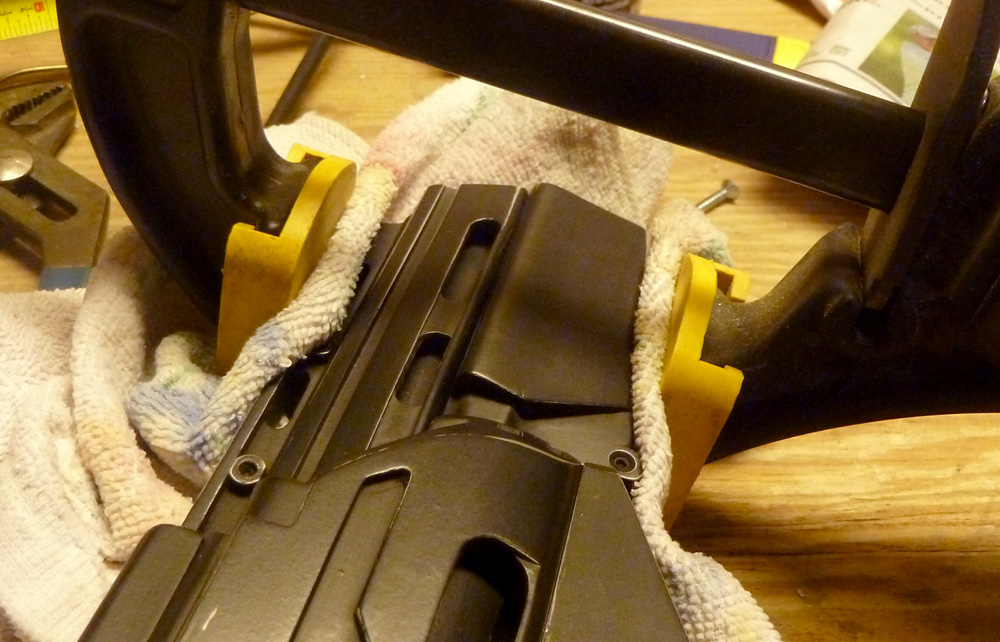
That's all for now. Only a couple items left to complete this beauty. After this, I may move on to matsuo's season 2 blaster. Also have Masterpiece Models' TOS Trek phaser and a nice Logan's Run DS pistol. Decisions, decisions.
http://www.therpf.com/f9/anh-hero-dl-44-discussion-118186/
So, I purchased a Denix and began accurizing it. Then...the wait. In the interim I had definitely been energized again toward prop replica firearms. I have several that have been waiting in boxes for years. So, time to build something else while deadbolt and kpax finalize their parts run. First up for me is a Matsuo Galactica blaster from nuBSG season 1.
I'm sure this kit is familiar to many here, but just in case, a short run-down. RPF member matsuo is an incredible manufacturer of replica firearms. His castings don't look like castings. They look like real firearms. Check out his forum for more info.
Matsucorp
Matt created a beautiful kit of the miniseries blaster from nuBSG. He then modified the kit to include the added details seen in season one of the show. Matt was constantly refining as more info came to light. For a time Matt dusted his molds with aluminum powder and also mixed the powder with the resin. While this shortened mold life, the end result was a resin casting with a paper-thin layer of real aluminum that shines up like real gun metal.
Matt later created a true clambshell version of his replica, but the license for the Galactica blaster was secured and Matt ceased production sometime in 2007.
I purchased this kit second-hand from an RPF member years ago. I was thrilled that it was one of the rare versions with the aluminum treatment. It came with a casting of a Colt 357 to use as the interior. I opted to replace that with an airsoft for the trigger movement and revolving cylinder which does show through the opening in the side. The above pic is where I left the kit about 3 years ago. I hacked up the airsoft to make it fit. Chopped the barrel and hammer, sliced off a bit forward of the trigger guard and chopped up the frame in the grip area. This is roughly what it will look like when complete.
I started back in on this kit a couple weeks ago.
My kit was missing a couple pieces. Matt was kind enough to ship me a pair of replacement safety switches. The hardware to attach the grips also needed replacing. I cut a bolt to the proper length and ground the head down to the proper size. Next I placed a nut snug on the bolt, chucked it in my drill and spun it on a file until round and small enough to fit in the grip like an escutcheon.
Next step was to test fit the parts. The kit is designed to be held together by screws only. But, it was also designed to use the cast 357 and not my cheapo airsoft. I had to slice off the extractor rod to attach the lower body. The screw would have gone right through it and interfered with cylinder rotation.
I next screwed on the top piece of the body and abruptly split out a plastic piece on the airsoft. I grabbed a scrap piece of oak molding and fashioned a sturdier replacement.
Here's the first dry fit with the five main kit pieces screwed together to the airsoft.
The final test fit revealed a spot where I was overzealous with the dremel. The kit required removal of a lot of material inside to allow the airsoft to fit and its cylinder to spin. At this particular spot on top I went too far and it will be noticeable. So, I fashioned a piece out of aluminum sheet to make up for the missing resin. Cut, ground and sanded to shape, it's seen here with a bit of JB Weld to cover the seam.
The airsoft I used had two large lead weights in the grip area. I sliced the largest weight in two and will add it back into the gun during final assembly for needed heft.
My plan for the resin gun all along was to polish up the aluminum coating, then hit it with a solid coat of flat black and then polish that up with fine steel wool. But, the airsoft is simply black plastic. To replicate the look I shot the airsoft with two coats of metalic silver and a single coat of flat black. Then I hit it with steel wool to add sheen to the paint and reveal some of the silver beneath. Here's the body of the airsoft after the steel wool.
You may notice the barrel has only overspray on it. I totally forgot the barrel would show in the openings in the kit. I hit it with more flat black and steel wool later.
The trigger shroud (that's what I'm calling it) was the last piece to work on. It did not have a hole for screw attachment. I thought about simply super-gluing it in place, but, as someone else mentioned, it's nice to be able to disassemble this kit if the airsoft requires adjustment later. So, I drilled and beveled a hole in the shroud.
Now the fun part. I polished all the pieces with steel wool to bring out the aluminum sheen. Next they were all painted with a solid coat of flat black. After sitting overnight, the pieces were again hit with steel wool. Working slowly, the steel wool smooths the paint and reveals the metallic finish underneath.
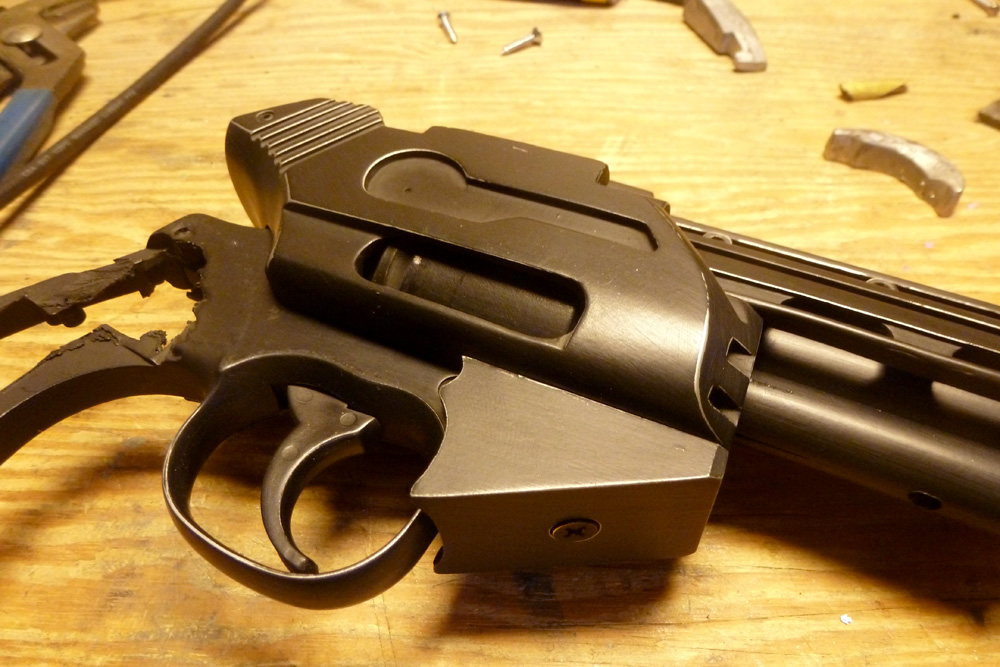
The one characteristic that always impressed me about matsuo's kits is how little they look like kits and how much they look like actual firearms.
The business end looking good.
The screw attachment holding the explosive round launcher isn't quite right. Even though I adjusted it a couple times, when the screw is tightened, the launcher isn't exactly in the right position. So, I've opted to forget the screw and add a coating of JB Weld to the launcher.
I know this will prevent me from disassembling the kit later, but I feel it's worth the risk to have a tighter fit here. Clamped tight, the launcher will sit overnight and hopefully be secure.
That's all for now. Only a couple items left to complete this beauty. After this, I may move on to matsuo's season 2 blaster. Also have Masterpiece Models' TOS Trek phaser and a nice Logan's Run DS pistol. Decisions, decisions.
Last edited:

") thumbsup:thumbsup
thumbsup:thumbsup