IronManiac
Sr Member
With Episode VII coming out in two weeks, I need something fun to wear for the release. I'm loving BB8 from the trailers, but I'm not ball-shaped, so I have to think outside the box.

I started with a styrofoam dome I found at Hobby Lobby for a few dollars. Its a good size for BB8's head. I gave it a light sanding to smooth the foam out. I also got the disc for the underside of the dome, I'll get to that later.

Taped the foam together, to make it a little easier to work with.

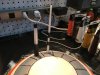
I have a small turntable i use for working on props, so i tape the dome to the turntable to start making my body panel lines. By setting a pencil (without lead) at the right height and turning the table slowly, i got a perfect line all the way around.

All the horizontal lines drawn.

Using some photo references from the interwebz, I free-handed the rest of the lines. I used a roll of masking tape for my eyeball template.

To make the lines at the top, i used a long piece of masking tape as my guide to make the lines.


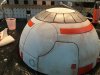
Here's all the lines done. I used some random stuff from around the shop to make the circles. These lines aren't super smooth, because the foam isnt always perfect, but it will work for my purposes. I made a mistake in the front there, i drew that bottom line all the way around dome, but it should have stopped at the panels that go around the eyeballs. I used some Kwik-Seal silicone like a body filler. After a few coats of it, the line disappeared.

I can't use spraypaint on styrofoam, it will eat the foam and ruin everything. So I decided a layer of latex would be best to prime the foam. I had this off-white latex house paint in my garage, time to open it up and mix it.

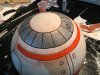
Ready to paint. I put a layer on, let it dry and put another layer down. This will create a skin of latex on the dome, and let me apply acryllic paints.


While waiting for paint to dry, I started on the eyeball. I bought some shatterproof Christmas ornaments. I used the same roll of tape i used to draw the eye on the dome, and traced that circle onto the ornament. Then with a quick trim job with my dremel, it's ready for the next step.
I started with a styrofoam dome I found at Hobby Lobby for a few dollars. Its a good size for BB8's head. I gave it a light sanding to smooth the foam out. I also got the disc for the underside of the dome, I'll get to that later.
Taped the foam together, to make it a little easier to work with.
I have a small turntable i use for working on props, so i tape the dome to the turntable to start making my body panel lines. By setting a pencil (without lead) at the right height and turning the table slowly, i got a perfect line all the way around.
All the horizontal lines drawn.
Using some photo references from the interwebz, I free-handed the rest of the lines. I used a roll of masking tape for my eyeball template.
To make the lines at the top, i used a long piece of masking tape as my guide to make the lines.
Here's all the lines done. I used some random stuff from around the shop to make the circles. These lines aren't super smooth, because the foam isnt always perfect, but it will work for my purposes. I made a mistake in the front there, i drew that bottom line all the way around dome, but it should have stopped at the panels that go around the eyeballs. I used some Kwik-Seal silicone like a body filler. After a few coats of it, the line disappeared.
I can't use spraypaint on styrofoam, it will eat the foam and ruin everything. So I decided a layer of latex would be best to prime the foam. I had this off-white latex house paint in my garage, time to open it up and mix it.
Ready to paint. I put a layer on, let it dry and put another layer down. This will create a skin of latex on the dome, and let me apply acryllic paints.
While waiting for paint to dry, I started on the eyeball. I bought some shatterproof Christmas ornaments. I used the same roll of tape i used to draw the eye on the dome, and traced that circle onto the ornament. Then with a quick trim job with my dremel, it's ready for the next step.