Legacy Falcon Minimalist Customization

After so many attempts at doing the backside of the dish. I give up! I will take the better of the molds I created and make a wee greeble for the extra greebley round end, that seems to be problematic, to be an add-on greeble after shaving off the face on the round greeble, once created.

I found less sticky harder to get details, due to firmness. The lightly sticky gets into the details, but ends up stuck, due to the finest details from 3D printing. Corners and channels are sharp like knives, which help in cutting and breaking away bits that are locked into place. I can do the wee greeble as an imprint with not so sticky mix, and go for a Hasbro look with taming down details. Too much of them with all the new greeble mods will counter the blance of toy and display. I could very well have just painted the dish and other greebles, but wanted toy durability to be primary. The only issue is the quad cannons. Being an amature, I have not enough experience with such intricate complex detail, that requires sectional work to be done to recreate in Hasbro plastic.

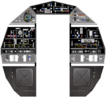
Still awaiting the electronics stuffs for cockpit and game area lighting additions. Will be creating one last round of molds and redesigning the bulkhead, soon.
 
The decal layment on thin opaque mylar sheet is coming along swimingly. Slight areas of moisture, shown through small areas, mostly at the center (uncut doorway). Once all moisture is gone, I will add the second layer of decal, and wait again for it to completely dry. I will wait for the final stages of bulkhead redesign, before I spray a sealer protector to finish up the decal work.

I may start on creating the 57 Chevy sub frame, as most of the parts have been molded. Was too busy with fighting the dish molds, to have completed. Maybe I will cheet and mold a 1/48 scale under carrage and cut out the sub frame sections. Ha! Jesting, as the sub frame should be simple enough to most modelers to make.

Oh I forgot... had to edit and add this... I had a wee left overs of caulk and corn starch. Was a wee less on the corn starch to make the mix like what I was applying. Came out a bit shiney sticky to light touch. I very lightly olive oiled my hands to see how well I can form it without making a mess with creating monster hands. Ha! I did catch, if I had a wee bit of glycerin, I could have added it, which makes me think of helping as a release for fine details. Never tried, so I haven't got a clue. Anyway just a wee bit of info. I will update after it cures, on the progress of my discovery, in making the mixture a bit stickier than needed.
 
Last edited:
Good news! I found by trial with sticky molding technique with caulk/corn starch mixture, that I was able to get pretty good results with the fine detail work that normally cuts and tears the wee bits from the mold. Though it was a test, and I did not expect any perfection, being that it was out of fun. Because of lack of effort, I also created a few wee air pocket, and a slight phase shift with a ribbed wall. Since it is a one time use mold, I can still use it, with a little sanding down the high areas, which are not that difficult to get to.

So unlike all the vids on doing such a mixture, the sticky mix is the way to go. Just have to spray a wee releasing agent, to allow less complication. Just dont over do it. The dish back side phase shifts easily when applying pressure to get the difficult to reproduce center greeble. The mixture is not as soft as most food grade molding puttys. I chose to use the caulk and corn starch method out of costs. They are cheap and easy to obtain, without adding to the carbon foot print. I guess I can do another round of experimenting, since I broke new ground. I may possibley create a perfect mold of the blasted dish. Ha! Basically you want it to be a wee like Silly Putty, but able to hold shape, under its own weight. A slight touch with lightly oiled hands, will leave finger prints. This is what they don't say in the videos. Unlike some 2 part molds, a release agent spray used lightly should do you well.
 
After obtaining a new caulking cartridge, and doing a test run with what I had accidentally stumbled upon, I found something that may bring more light on this type of mold creating, for highly detailed and difficult to mold items.

I checked the labeling on the older one I had and compared with the new one. The old one I used originally in testing, was bathroom, the new one is indoor outdoor. They look the same but this one is much easier on the nose with the vinager smell, and is a wee glossy compared to the bathroom caulk.

Well it solved a lot of issues, so I guess the caulk make up you use does make a differance. I think if I make the a wee change to make it a wee less sticky, being able to mold in hand and have some tacky stick without being a mess in hand, it may work out fine with all the details. As my first attempt with the indoor/outdoor caulk had recreated 95% of the details. Good enough to be on the toy. But I have gone this far, might as well see it through to add to the forum members knowlege.
 
Final update on the home brew molding putty. I think the best consistency, to mold with, is like room temp silly putty. Just have to lotion your hands when applying, as it is a wee sticky. If don't have a release agent spray, I would recommend, adding glycerin. Not a lot, but test a single batch, going from light amount to more in stages, numbering each one on difficult items to verify.

Unfortunately, I seem to make the rear portion come out a bit out of phase, as if the dish is being pressure with finger tips is stretching, though I am not using my finger tips, as the dish is being set in place backside down, firstly. Its to the point of just dealing with some artful sanding down with a nail file. As the issue is with raised details being widened, while skewed. I believe the rear portion, for details away from center, works best without release agent. Something about its curvature, and putty movement as it conforms.

Good news is the difficult greeble at the back center is perfectly reproduced, and the facing side of the dish came out 99% perfect. Such fine details 2 random wee ribs snagged a wee bit of mold detail. Not noticable unless you are up close. Better than any details Hasbro has made, so I can't complain.

Considering the efforts, at least I know what needs to be done with home brew molding putty, as for such details. Of all the wee bits, the dish is complex.

The bulkhead decal is setting nicely. Another day or so, then I will add the second covering decal. By this weekend I should be able to start building the replacement bulkhead.
 
In the words of Rosanna Rosanna Danna... "If it's not one thing, it's another."

I can make a perfect backside, as long as I don't bother with the rear center round greebley greeble. If I want a perfect round greebley greeble, I fore go the nice ribbing of the surface.

So, the round greebley greeble, will be molded from the perfect portion of one mold, and then populated in the not so good portion of the other mold that has the nice ribbing. Some careful cutting will be done to allow proper fitment in the round greebley hole. When the mold is done, the final molded part will have the round greebley greeble incorporated, as if it were part of the mold to begin with.

So if your doing very intracate greebles, the sticky silly putty mix works best. If doing large rounded edged objects with etchings and other bits, the non sticky or lightly sticky mix is best. So that is what it is. This is probably why most do not do putty molds for such items. If you want perfect molds on such difficult items, pour in a liquid mix for molding. As it will conform without pressure to distort, and is viscus enough to get into the nooks and crannys. I figured the dish was small enough to use a putty without fudging about, but there you go.
 
Back to the drawing board... I made a few two part blue silicone molds of items... thinking it would work best. Well, it too has its own issues. Mostly the greebles come out wet shiney after curing... even in the wee crevices. Too waxy and all as if the greebles were silicone, not plastic. I guess it is fine and dandy when painting. For me, in doing the non painted look, I am going to redo my blue molds with home brew. The home brew molding putty comes out more like a Hasbro mold with just the right shine. That's with the lightly sticky to non stick to the fingers. It will have some hold on plastic, that your conforming to, but fingers are free enough to work it in place.
 
Had a wee delay over weekend. The application of the doubled up decal over mylar has taken a bit of time to dry up under the decal. Moisture seems a wee more locked between the two. Have moved the applied decal to a heting register to quicken the dry time. Decal does look good as is, just did not want any lift while triming to fit the bulk head layout. I will patch the entrance way that I mistakenly cut to narrow, and make a mold for pouring Hasbro plastic to work with. The cutom bulkhead would have been done anyway, because of the unwieldy plastic it was made of. Easy to cut away, but nasty to bond with.

Delays on parts still... I wonder if my parts were part of LA train thievery. It's a mess with LA right now, and right in the middle of obtaining parts too!

I did find something interesting. I had a few LCD displays that were broken. i need to find a 4x4 panel or longer, to remove the LED backlight and its Fresnel lens. It would be the cat's meow or the bee's knees to use for back lighting. Thin and evenly effective lighting.

Getting there, at a snails pace. Ha!
 
After a day of looking over the bulkhead decal on its drying. I started nit picking... found a few wee things to tweek. Here is what I am going to change, as for decal layout. The top light bars need the black bar lowered just a wee bit, as they are not of the same distance as of the bottom light bars. I think I did that on perpose, to see how the bars will look being that they were stretched to take up some extra space between panels, due to the Hasbro cockpit design. Now that I see the comparison with light at a distance the bottom bars look best.

Also the same thick metallic bottom section of the black panel to the right, is on the left as well. So there should be a noticabley thicker metallic border done along the top of the ANH switch panel and the panel above.

As for the thick metallic border on the right, the bottom border is a wee thicker. I will thin it just a wee bit, to be the same thickness as the top border.

I may add wee bit of highlight at the box on the lower left, next to the power status light panel, shown in ESB with either Luke or Lea sitting in the cockpit.

Geeze, I feel a wee bit of a perfectionist. Ha! Well, its that I have the power to make things right as they become noticable to me. Some of my confusion is the decals I had looked over. Too many wee differences that mix up what is proper. Some times I must refesh watching clips to get things right... well somewhat corrected. Being a bit of a padiwan to Star Wars. Wife is the Obi Wan of such things. Though she is not that much into being a cockpit panel jedi. Ha! Mostly its for who ever want to use my decal. I am a greedy Jabba.
 
Last edited:
Finished up with the decal and mounted it on opaque mylar sheet, while doing doubled up decals at the same time. I used a wee more soap in my water, to allow better bubble dispersion. The labels obviously allowed placement without bubbles easier with less soap, and dried faster too, which threw me off on the mylar. All things corrected with just a wee change up on decal layout. Ha!

Some may want the original final... so will post this updated decal as an option. Call it V2.
 

Attachments

  • Untitled1.png
    Untitled1.png
    308.4 KB · Views: 60
Last edited:
Was able to mock up how the new bulk head will fit in the Habro Falcon. Its still being worked out. There is the rebuild of the doorway pad rconstuction to do, from wiping out during cutting. Until I cut the doorway, the clear backing will not it flush against the windowed out original bulkhead. Luckily I was able to notice before doing all the cutting, so on side is effected. I plan on making some light boxes to allow light to be one partially from the front to enhance the panel's overall look. Backlighting works, as shown with ambient light from being out in the open. But having a wee bit of fontal light makes with white pop a wee more. Until I am able to create the lighting setup, it is too difficult with what I have for now.

20220122_113733-1.jpg
20220122_113650-1.jpg
 
While I had been doing the cockpit bulk head mod, I did do a bit of trial runs with my molds. Seems like the only good way to mold with existing plastic is to make the mixture into a wee thinned nail polish consistancy. Until I find a wee brush that withstands the harshness of the MEK, I have been using fine needle to apply in the tight and highly defined areas. Mostly to remove any air bubbles that can wipe out detail.

I did do a test run with the blasted dish greeble, and it came out as well as to be expected with it's complexity and first attempt with the mix. It was not the best mix and was poured into the mold. Contemplating another try, this time laying in the spots of complexity, like a poor man's 3D printer, by hand. Ha! Yes, many layers with weak as sauce mix. The nice part, is that the mix is lighter in colour than the plastic when cured, easy enough to know when ready for another layer or when removing. Patched the mandible holes created when removing the oversized greebles. Will post images soon, as they are curing and will have cured bits ready. Hopefully will have dish center back side and front cone greebles done as well.
 
The nose piece is almost done, with seams being cleaned up. Creating side half macaroni to be added, and will close up the holes to the missle launching capabilities.

Here is the manible work done... note the tip is first try with tip mod. It was rushed with the first molds, which I have now changed away from in how they are created with the plastic mix. It is partially in place, to be removed, when final custom tip is created.

Note the patch work. I cut the top out of the F1 greeble and mounted it upside down, in the hole, and sealed with plastic mix.

Almost ready to sand and form the lost areas from the build-up around the seams.
20220125_051239.jpg


20220125_051357.jpg
20220125_051326.jpg
20220125_051423.jpg
20220125_051445.jpg
 
Took a wee break from mandibles and bulk head. Mostly because my brain is locked into the fine details of the 3D printed parts and Hasbro details conflicting. Since I am stuck in details... I decided to move on to finish my nose section, with filling in holes. I did two methods. One using cut to fit panels for the rectangle buttons, and the other being fill in layering for the missile ports. Both work fine, but the buttons are partially surrounded by detail work, and I wanted to keep from disturbing the area around the button holes. The missile ports had various changes to details that were not part of the ANH and ESB, so I was less concerned in keeping Hasbro mods to make the missile ports look good.

Will post a picture soon, waiting on some cure time to allow colour depth to even out. All my troubles are to use no paint what so ever, so trial and error on mixing and application. The original mix I used to apply the large panels on the mandible F1 greeble cutouts, was used up, from my testing application methods, with various greebles. Seems like detail and size requires as much fiddley work as with making molds. Just in the opposite direction of sorts.

The thinned mix method does not work well with large items, which is opposite for making molds. Distortions, like the mad hatter on LSD as it dries. I am thinking, one would need to constantly spray chemical on the skin of the mix to slow down the dry time, to allow less distortion. Sort of like cement, needing a spray of water as it sets up while drying in dry environments.

Anyway, as for now, the nose looks pretty nice with how it's coming along. Never thought it would be dramatic, but having all the wee details corrected added up nicely.

Oh, I just reminded myself... the half macaroni needs to be created, and added to each side of the nose, for completion. Got distracted with one thing or another.
 
Here is a few images of the nose... still layering the missile holes. Sagging and shrinkage shown, since its my first layer. Button holes are bonded in place. Will use a fine injectable to fill seams and blend.
20220126_075518-1.jpg

20220126_075542-1.jpg
 
Here is another image of the nose, mostly after filling low spots (splotches of high areas) after sanding. I had though the plastic cured over night, but wiped out a wee bit of detail, not a problem, as it can be rebuilt. The gloss look as a quick light wipe with MEK. Does the job without residue. Helps blend the mix when filling and helps find high / low spots. Oh you probably wonder what happend to my paint work in areas. Dry ink board pen is water soluble. I used tooth paste to give a natural formed plastic look as a test, which caused the rinse to wipe out inked details. No problem, can be reapplied.

Even though its not finished, looks much better.

20220127_081147.jpg
 
Some how, what I added yesterday is gone! Not going to retype, just condence for now. About to clean up a redo (bad case of curing too fast) on the filling of the cutout panels that once had the F1 greebles on the mandibles and hull sections. Pinching the fill mixture as it cures corrected the air pockets well. Just a bit more time consuming to check periodically as it firms up, til it is flexible, yet very firm. As it compresses out any gasses forming pockets from skinning effect. I will wait a few days before sanding and forming work. Even though under each greeble hides detail, I chose to recreate the missing details not made in the molding process. In a way its like what would be seen if there were never F1 greebles added to begin with.

I figure if it looks good, I can at least move along to finishing up the main component to swap out, and add greebles as I complete them. Since greebles have been a bit of a challenge on how they cure, being that shrinkage and filling is nothing as stable resin or two part plastic bond. Seems like constant fiddling with applied pressure is the key.
 
Still working away at removing micro bubbles from the plastic mixure used in filling. I included a few shots of the 2008 differences from 2012 in the plastic formation in molding. Also the 2008 does have quite a few areas of paint that is more detailed, though I did not compare paint work, just plastic. There is also a difference that us located hidden under the plate of the nose. It has no baring on structure, just 3 radiating arms in an arc.

20220205_065958.jpg
20220205_070117.jpg
20220205_070308.jpg
20220205_070350.jpg
 

Your message may be considered spam for the following reasons:

If you wish to reply despite these issues, check the box below before replying.
Be aware that malicious compliance may result in more severe penalties.
Back
Top