League of Legends Cosplay - Jarvan IV

Tallman50

New Member
I just started working on a full costume of Jarvan from League of Legends, and decided this would be a great place to document and show my progress. So far I have made the Helmet in pepakura, and figured out how i'm going to make the gems, wherever they may be on his costume, including helmet, chest, and his weapon.

My plan so far goes in this order, starting with the helmet and working down.

1. flesh out the basic shapes of everything, using different methods for different pieces, including pepakura, expanding foam, insulation foam, and EVA foam.
2. smooth out the rough shape, and apply the outer shell(most likely smooth cast plastic).
3. sand, prime, sand, prime, repeat until satisfied.
4. paint, and add details.

I gave my self a lot of time to work on this so I have all the time to get it done the way I want, as well as room for mess ups.
My deadline is January 1, 2014
This is because I plan to have it done for Magfest.

I will constantly update this, hopefully weekly, but as for now here is my current progress.

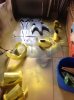
The Pepakura helmet.
photo.JPG

It looks a little big but it just needs to be closer to my face.
976904_10151977019019428_802544286_o.jpg

The clear plastic resin I will be using for the different gems.
1009567_10151987607789428_871399973_o.jpg

Most of the gems are greenish blue so in order to get that look I will probably have to recast, and dye the resin, or have a green backing to the gem. This is just a test cast.

More to come, hope you guys like this!
 
So, I got a little ahead of myself in all of the excitement of working on this project and dove straight into the work. I need to backtrack a little and spend the next week or so working on blueprints for pieces that I will not be making using Pepakura. As for now here is my progress on the outline for Jarvan's Lance.

As seen in-game here.
League of Legends 2013-07-02 20-26-33-08.png

The lance from the front.
image wep.PNG

and the outline.
outline.PNG

For this piece and all others that I am not making via Pepakura, or cannot print myself I will get printed full size at Staples or Office Depot, for the best accuracy.
 
I started working on the back piece, and completed a pepakura model of the chest crest. I am pretty happy with the way the crest is going, and the back piece is starting off nice being made out EVA foam, and was planning on using apoxie sculpt to create the smooth sides of the back piece. Is that a bad idea, or is it ok to uses those two together? Eva Foam and Apoxie sculpt that is.

crest
994193_10152062390519428_135858735_n.jpg

back plate
1002853_10152062390739428_65374954_n.jpg

more to come later! Making the shoulder pads using expanding foam, and sculpting it.
 
Making more progress, I finished up the pepakura model for the looping breastplate/backplate thing. I also did some math for scaling, since I kinda just rushed into making the helm, I kinda fudged the scaling to get myself motivated. So it turns out that the helm was in fact too big, by about an inch. I want accuracy so I scaled it accurately and reprinted it. MORE pepakura!!! Also going to scale and pepakura the arm spikes, crotch plates, and boots to come next.

sorry for the crappy photo, but it's kinda hard to hold everything up, and take a pic without help.

the Breastplate and crest.
IMG_20130730_133112_993.jpg

working on remaking the helmet next and then arms.
And maybe Otakon...maybe.
 
Dude this is awesome. I love leagues and to see people make costumes of lol makes me happy!!!
Thanks man, I'm doing my best to keep the post up at bare minimum once every two weeks. Soon it might be more often though because my final is about to happen and then I'll be free...untill fall.
 
J4 was my first champion, and continues to be my main. I would absolutely love it if you could post the Pep files for me to try to do this as well? I have a lot less experience and very little time, so I seriously doubt I would get it done before you and show you up :p I would love to get it done by Dragon Con NEXT YEAR in Aug/Sept 2014.

If not, I understand, but it would be very awesome!

Or even if not, could you point me in the direction of a tutorial to make my own Pepakura files? Since it seems that is what you are doing, you obviously know more than I do about it. (I have only ever seen ones you can download and use already, never made any on my own)

Yeah I can help you out with the files. I'll put them up within the next week. I just been a little busy lately with finals for summer college classes, work, and starting up with fall classes. As far as making files yourself it just takes Raf Manager, a 3d modeling software(3DS max specifially), a script which allows you to import the 3D models from the game, and pepakura. Then you have to make the unwrap the files yourself, and scale to your body, and print. Ok, so it's not that easy actually, but if you have the time and patience that would be how you do it. I will put the files up when I can, and thanks for the ego boost!
 
Sorry for not updating as recent as I have previously, as I said above it's been a busy week, and as far as progress goes there is not much that is visible, it is mostly working on pepakura, but i do have some progress to show.

Apoxie Sculpt is a great product, and I am glad i tried it. However it is quite expensive and is not idea for budget builds. The fact that I can sculpt it the way I want, and then later find out that it isn't the way I want after it has hardened, and then sand it is super satisfying. That being said here is the smoothing of the edges of the glued eva foam layers for the back piece.

IMG_20130821_113605_987.jpg

I still need to smooth it by sanding it, but it looks better than just layers of eva foam.

More to come, Hopefully I can get up to speed and start pumping out more updates.
 
Yeah I can help you out with the files. I'll put them up within the next week. I just been a little busy lately with finals for summer college classes, work, and starting up with fall classes. As far as making files yourself it just takes Raf Manager, a 3d modeling software(3DS max specifially), a script which allows you to import the 3D models from the game, and pepakura. Then you have to make the unwrap the files yourself, and scale to your body, and print. Ok, so it's not that easy actually, but if you have the time and patience that would be how you do it. I will put the files up when I can, and thanks for the ego boost!

Awesome! Do you have the weapon pep'ed up? Im losing weight so im scared to do the armor right now, but would love to start on the helmet and the weapon :D

Edit, i see that you are not doing pep for the weapon...didnt notice that before. Ill look at your outline, thanks!
 
Last edited:
Made a little progress on the base model, here is a picture of the pepakura left boot.

boot.jpg

Also for those interested in getting pepakura files I have worked on already, here is a 4Shared folder with the pep files as well as the texture file if you want to use it on your pepakura pieces.

4shared ??? - Pepakura
 
Ok so now that I have made the pepakura models for the helmet, chest piece, and legs I am starting to paint the pieces with glue. Why? Well since i'm going to use the technique that uses 65D Smooth-Cast plastic from Smooth-On to harden the pieces I need to prime it, so to speak. Painting it with glue not only provides it with a little more rigidity but also allows the liquid plastic to stick better. I learned this from this link to a website by a fellow member XRobots.co.uk - Plastic coating your Plastazote / EVA / Polystyrene foam / cardboard props and costumes , I just adapted it to this, as well as looking online for good ways to prime pepakura. I also learned that with a lot of things its better to go in thin layers, otherwise your piece will deform or droop. Glue is still a bit wet so even in thin layers it may cause a few indents. I like to make it dry faster by using a hair dryer so I don't have to just let it sit and worry about it deforming.

Anyway this is basically how you fill up a card table fast.

IMG_20130924_114212_781.jpg

After this I'm going to order some plastic, and order some custom prints of the outlines I did for both the shoulders and the lance. While doing this I am also working on the pepakura files for Vi's fists. I told a friend I would help them make this, and I want to do this right too, but I may have bitten off more than I can chew. I do still have 3 more months, but there still is a lot to do. More progress updates and photos within the next 2 weeks, as always.
 
oops, I didn't update on Tuesday, but it's ok I was distracted with birthday things. Anyway I am super happy with the progress I made this past two weeks. Though most of it is just gathering materials, it's pretty exciting to see it all coming together.

Coating with smooth cast 65D for the first time on the crest and pretty satisfied with it.
photo 1.JPG

And templates for both the shoulders and the giant lance.
photo 4.JPG
photo 3.JPG

Now to take the shoulder template and sculpt out two full shoulders with expanding foam, and maybe plastic coat the leg pieces. As for the weapon, I won't be working on that until last because it is an accessory, thought it is an important part of the costume. The clock is ticking and I am stressing, hoping to get more done in the next two weeks.
 
One month later....

and I finally decide to update. The updates are small as I have been busy with work and school, and hope to work more on Jarvan, putting up fewer updates in order to focus on it more. Anyway here is the progress.

I tried making the shoulders off of the template, however forgot that the extended white bit of the template is actually separate from the shoulder which caused me to make it too big(seen on the left). However started on another one and got it right, and will probably remake the first one.
image.jpeg

Speaking of remaking things, I remade the breastplate because it was messed up when applying glue in preparation for plastic. It was the easiest to make so I tried the technique on it first.
image(1).jpeg

May not update until the end, lots to do see you then!
 
I may have cut a bunch of corners, but I did finish by my determined deadline.

after I had finished the sculpting of the shoulders I began to wrap it in Wonderflex to give it a solid shell, as well as smooth it out.
shoulder wonder.jpg

The lance outline was place on top of a piece of pink insulation foam to be outlined.
photo.JPG
and then cutout.
lance outline.jpg

and after that was sculpted out, it also got wrapped in Wonderflex.
lance wonderflex.jpg

Everything got a coat of color appropriate spray paint.
base coat.jpeg
and the details were either taped off and sprayed or done in acrylics.

as for the gems I sculpted one out of sculpey, and used the pepakura template for the other, and made a mold of them.
box mold.jpeg
rubber.jpeg

all the pieces around the waist were eva foam, and the one in the front was covered with wonderflex. The boots were just sheets of wonderflex shaped to my shoes, and the leg pieces were a combination of eva and pepakura with a liquid plastic coating.

anyway here it is
j4 finish.jpg

hope you guys enjoy it, feel free to ask me any questions.
 

Attachments

  • base coat.jpeg
    base coat.jpeg
    583.1 KB · Views: 261
Can I ask an estimate on how long overall it took you? (Number of hours I mean, not number of months)

Thanks! Looks great, btw. I hope mine comes out alright :D
 
I didn't really record the hours, but it took a quite a while. And I'm really bad with guessing. But I'm pretty sure it would be a range of 100-300hrs, really not sure how accurate that is though.
 
This is fantastic and well-done! I'm planning to start a Phoenix Quinn cosplay for Summoners Con 2015 and this is a great representation of the time and work it will take. Thanks for the updates!
 
Back
Top