You are using an out of date browser. It may not display this or other websites correctly.
You should upgrade or use an alternative browser.
You should upgrade or use an alternative browser.
JUSTINIAN'S Halo Mark VI Build
- Thread starter JUSTINIAN
- Start date
Thank you all.
So I spent most of the last few weeks working on building a vac form table.
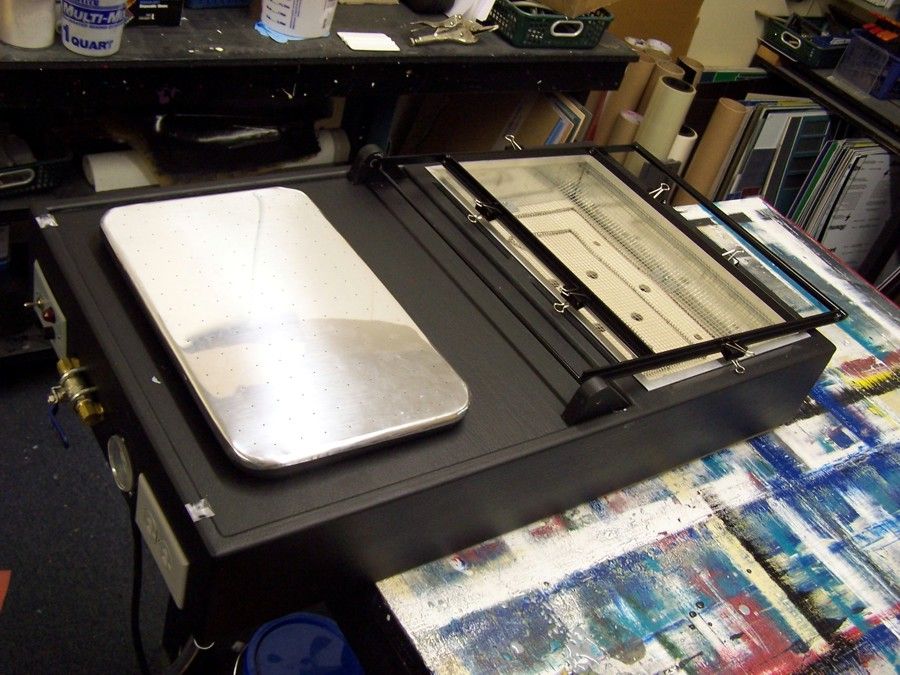
I just finished it yesterday, and will now be able to make visors for my helmets.
I also discovered that I have an obsession...
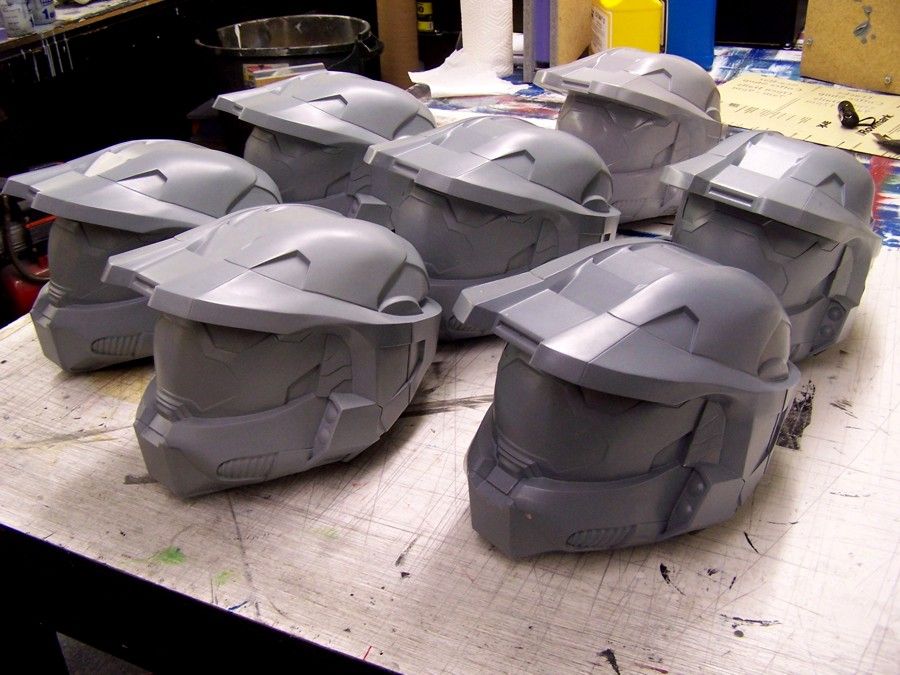
For some reason, I can't make just one of anything. I have to mass produce everything.
So I spent most of the last few weeks working on building a vac form table.
I just finished it yesterday, and will now be able to make visors for my helmets.
I also discovered that I have an obsession...
For some reason, I can't make just one of anything. I have to mass produce everything.
thejakemoore
Well-Known Member
*drooool* I want one :3
Also, that vac-former looks really neat! I'm assuming the right side heats the plastic, and then you just swing it on that arm over onto the buck which sits on the silver perforated panel on the left? Very cool set-up.
Also, that vac-former looks really neat! I'm assuming the right side heats the plastic, and then you just swing it on that arm over onto the buck which sits on the silver perforated panel on the left? Very cool set-up.
rustysprattdesigns
Well-Known Member
First off, the vac table looks incredible Justin! I can't wait to see the visor pulls that come from it.
Secondly, I have one of these helmets and I have to say that it is extremely clean. There is VERY LITTLE clean up involved with these castings before painting. If you are in the market for a Mk. VI helmet, I highly recommend you pick one of these up. You won't be sorry.
Secondly, I have one of these helmets and I have to say that it is extremely clean. There is VERY LITTLE clean up involved with these castings before painting. If you are in the market for a Mk. VI helmet, I highly recommend you pick one of these up. You won't be sorry.
Wow :eek
that is a good thing
Being the same exact height as the Chief this is a costume I've been thinking about for a few years... *sigh* brilliant work, it will look so much better with the correct visor
For some reason, I can't make just one of anything. I have to mass produce everything.
that is a good thing
Being the same exact height as the Chief this is a costume I've been thinking about for a few years... *sigh* brilliant work, it will look so much better with the correct visor

thinkreddot
New Member
man this guy is amazing he must be the real master chief, lol, GREAT WORK, are you selling any of these?
I thought it was time that I got this thread started again. I have gotten a lot of progress done, but just never updated this thread. I'll just start up where I left off.
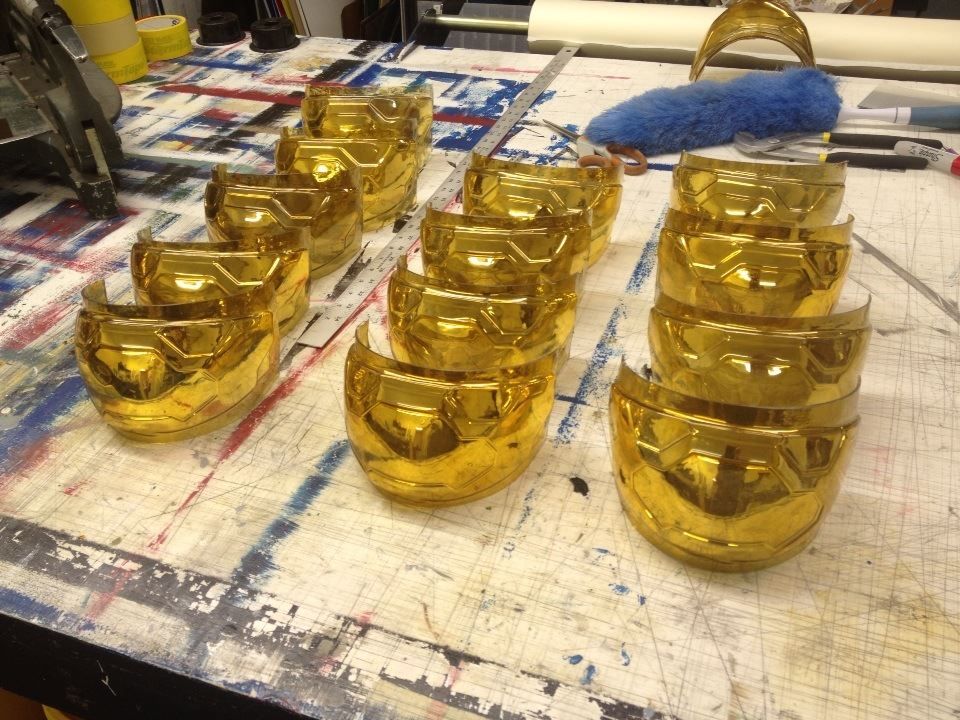
The vac table works perfectly, and it can pull some serious detail. I pulled them out of .100 PETG plastic. I also discovered the best way to chrome plate a visor. Using a real chrome plating system. I made a few tweaks, and was able to make it visible from the inside, but give a perfect mirror finish from the outside.
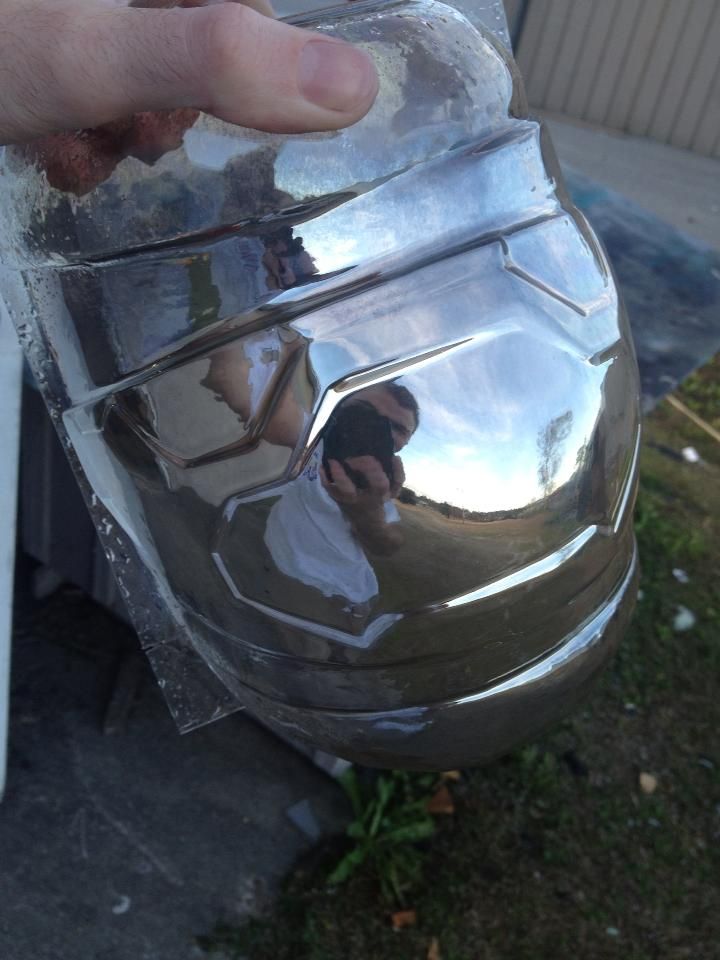
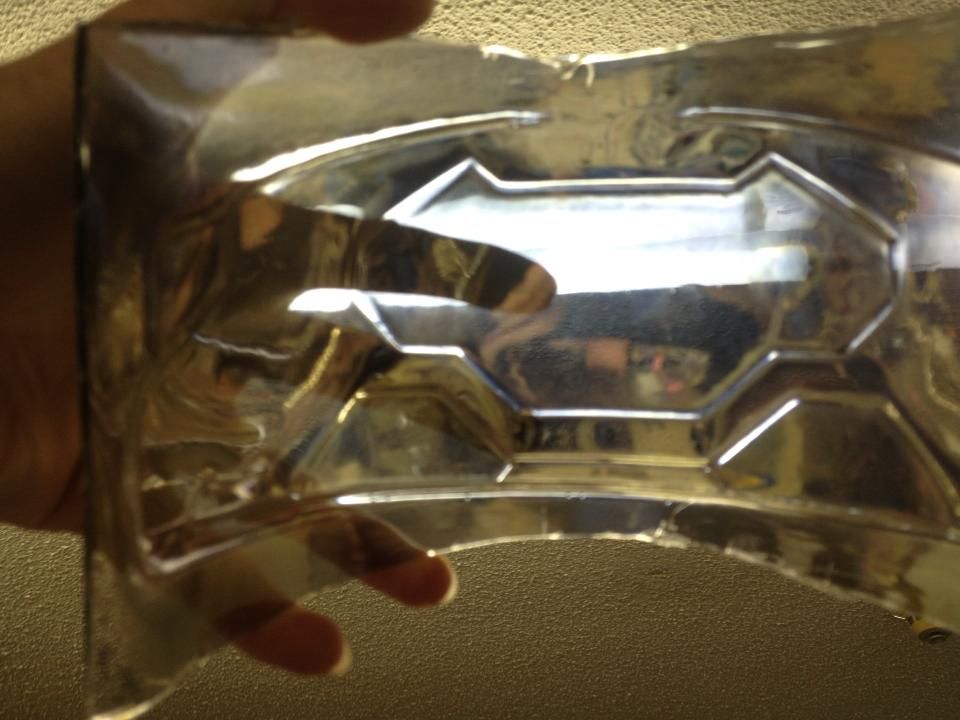
The entire process is very complicated, and requires professional automotive painting equipment. But I used a gold tinted candy clear coat on the outside, to give it the gold look. And as usual I can never make just one, so here is a army in the works.
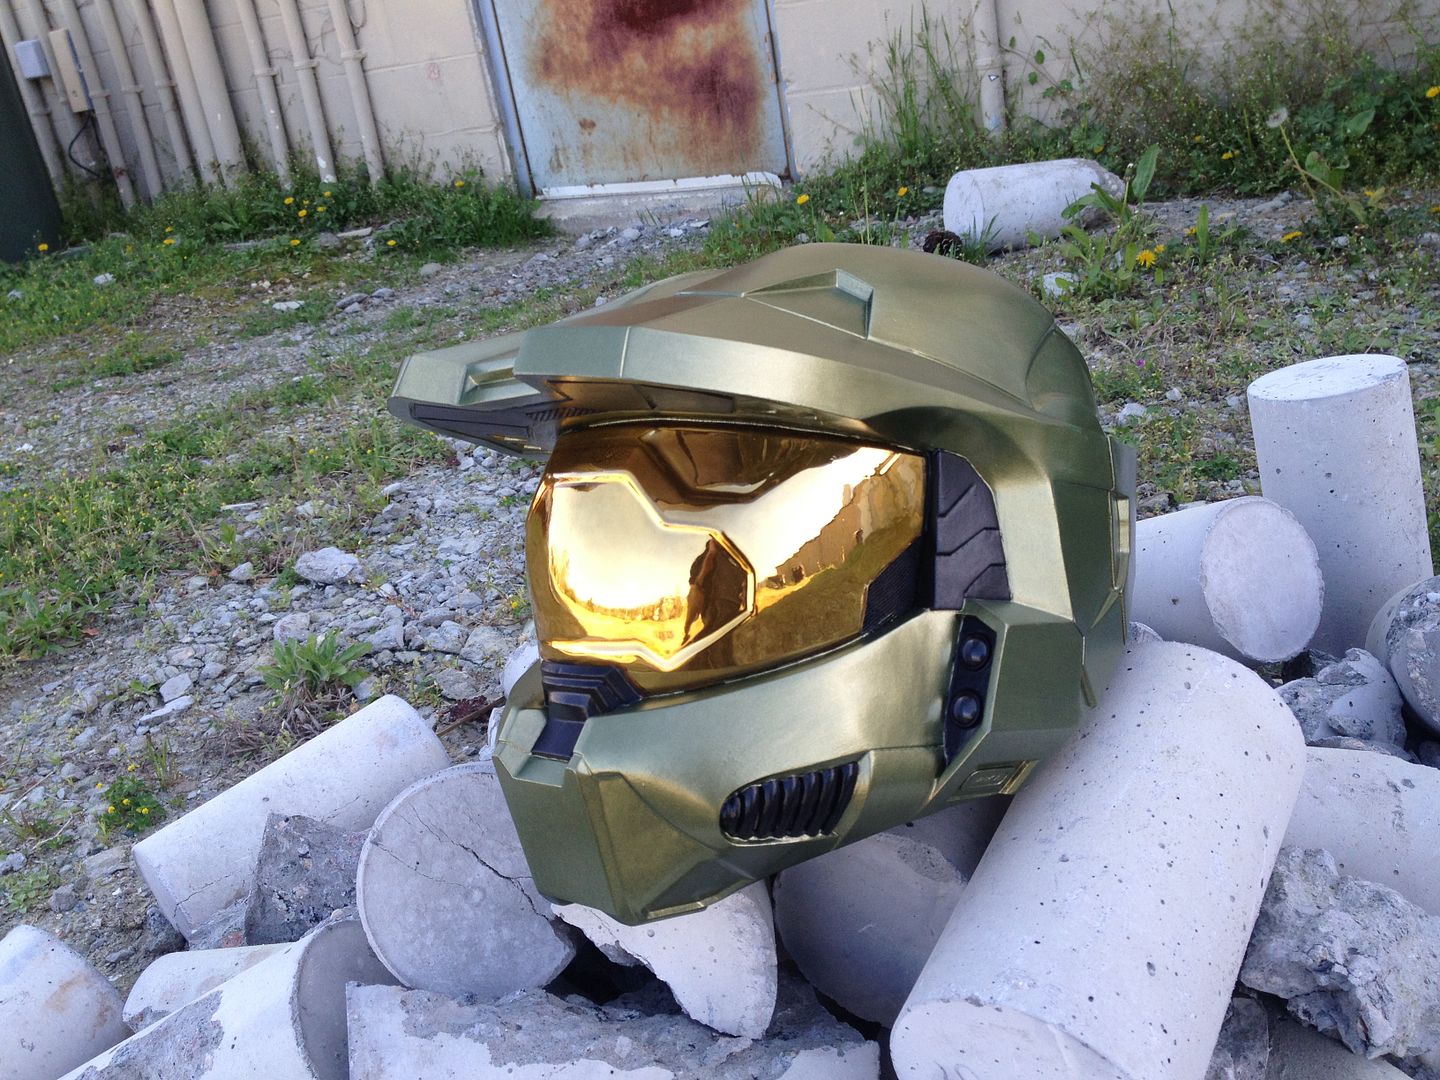
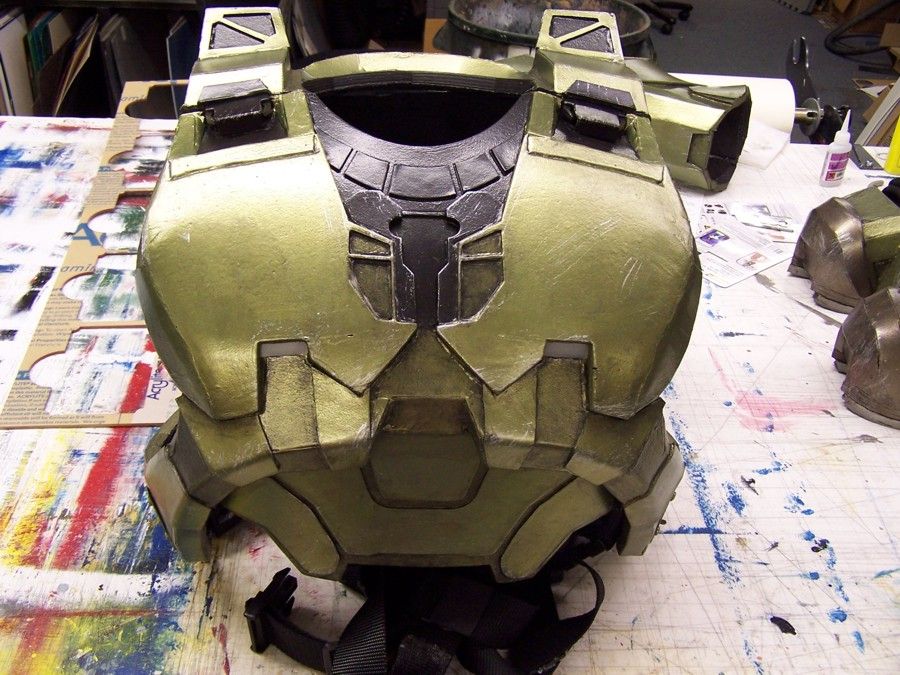
Here is the helmet almost finished. It still needs weathering, but this is good enough for now.
- - - Updated - - -
I got the boots assembled, and a pair of shoes has been installed. Here is my take on the ridges in the center part. Glue some screws to the base.

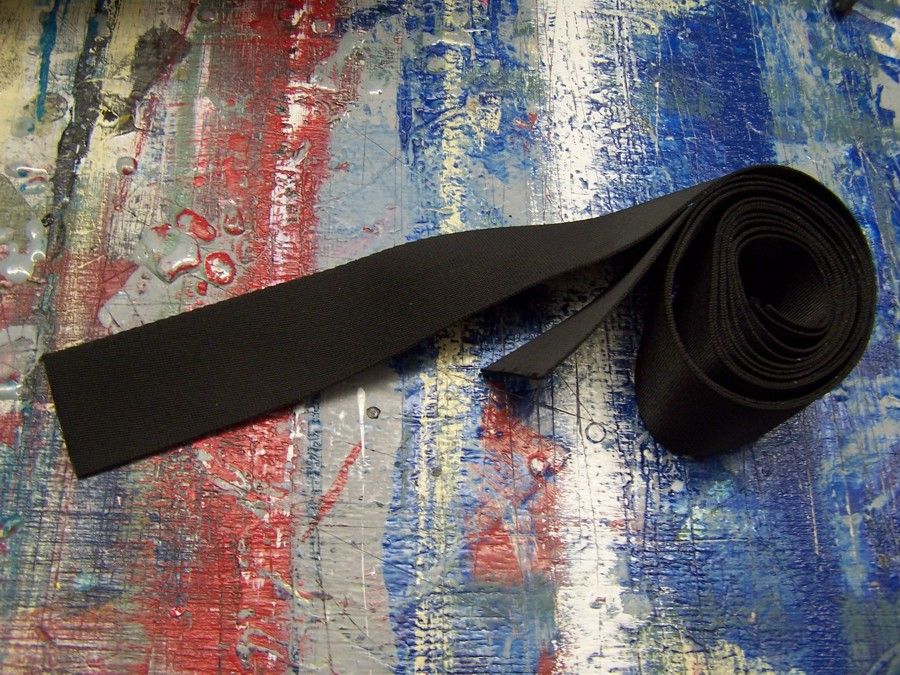
Grab some leftover nylon webbing.
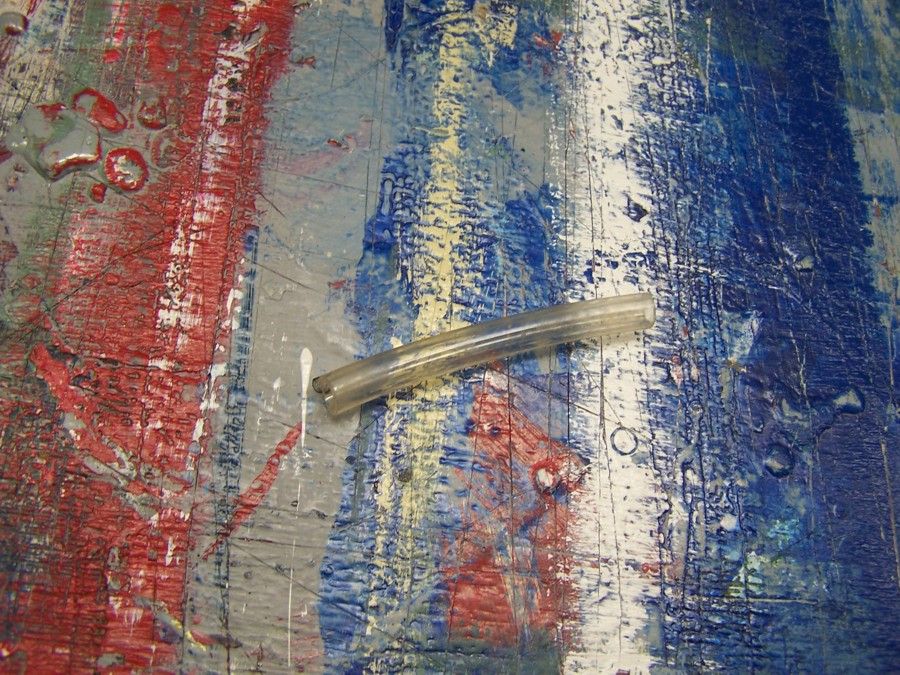
And some clear tubing.
Fold the webbing in half, and staple it closed.
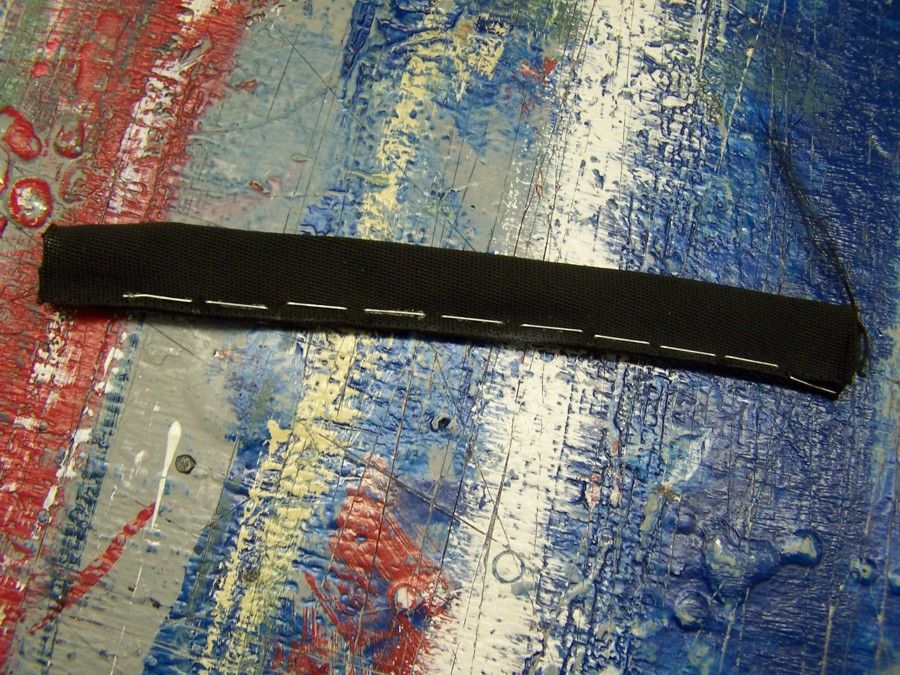
Slide the tubing into the webbing sleeve.

Then glue them to the screws.
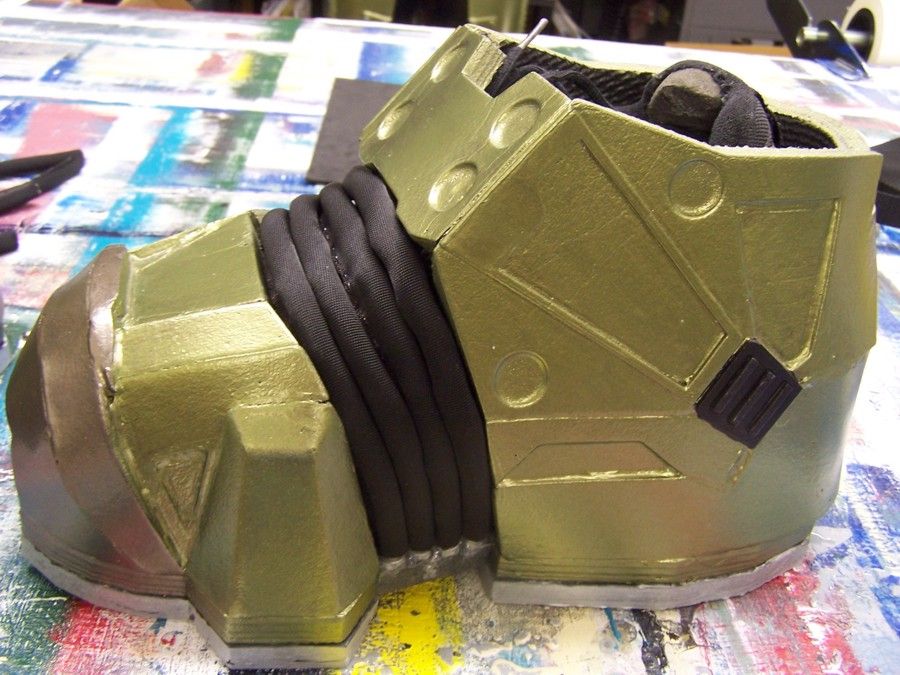
I also made the bottom detail out of silicone caulking. Very durable, and looks cool.

The boots are now finished.
- - - Updated - - -
So I went back through this thread and realized that I have no pictures of the full suit. So here are a few from Dragon Con last year.


Volpin's Needler was pretty awesome. But very heavy.
I was also able to commission Snakepit Studios to make an undersuit for me.


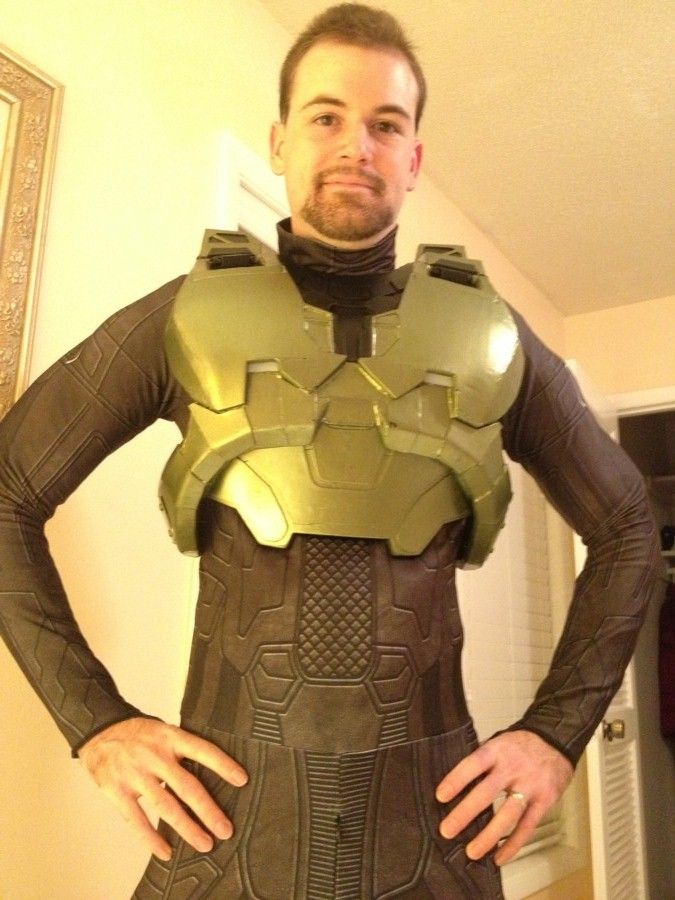

Its a one piece body suit made from a material very similar to under armor. It is dye sublimated, to the detail will not come off. They did a fantastic job on it, I highly recommend getting one.
More updates to come. I lave for this year's Dragon Con tomorrow morning.
The vac table works perfectly, and it can pull some serious detail. I pulled them out of .100 PETG plastic. I also discovered the best way to chrome plate a visor. Using a real chrome plating system. I made a few tweaks, and was able to make it visible from the inside, but give a perfect mirror finish from the outside.
The entire process is very complicated, and requires professional automotive painting equipment. But I used a gold tinted candy clear coat on the outside, to give it the gold look. And as usual I can never make just one, so here is a army in the works.
Here is the helmet almost finished. It still needs weathering, but this is good enough for now.
- - - Updated - - -
I got the boots assembled, and a pair of shoes has been installed. Here is my take on the ridges in the center part. Glue some screws to the base.
Grab some leftover nylon webbing.
And some clear tubing.
Fold the webbing in half, and staple it closed.
Slide the tubing into the webbing sleeve.
Then glue them to the screws.
I also made the bottom detail out of silicone caulking. Very durable, and looks cool.
The boots are now finished.
- - - Updated - - -
So I went back through this thread and realized that I have no pictures of the full suit. So here are a few from Dragon Con last year.
Volpin's Needler was pretty awesome. But very heavy.
I was also able to commission Snakepit Studios to make an undersuit for me.

Its a one piece body suit made from a material very similar to under armor. It is dye sublimated, to the detail will not come off. They did a fantastic job on it, I highly recommend getting one.
More updates to come. I lave for this year's Dragon Con tomorrow morning.
Last edited:
zombienoms
Active Member
Holy cow this is amazing and gorgeous. So clean...
Thank you. I tend to be a perfectionist and keep things as clean as possible.
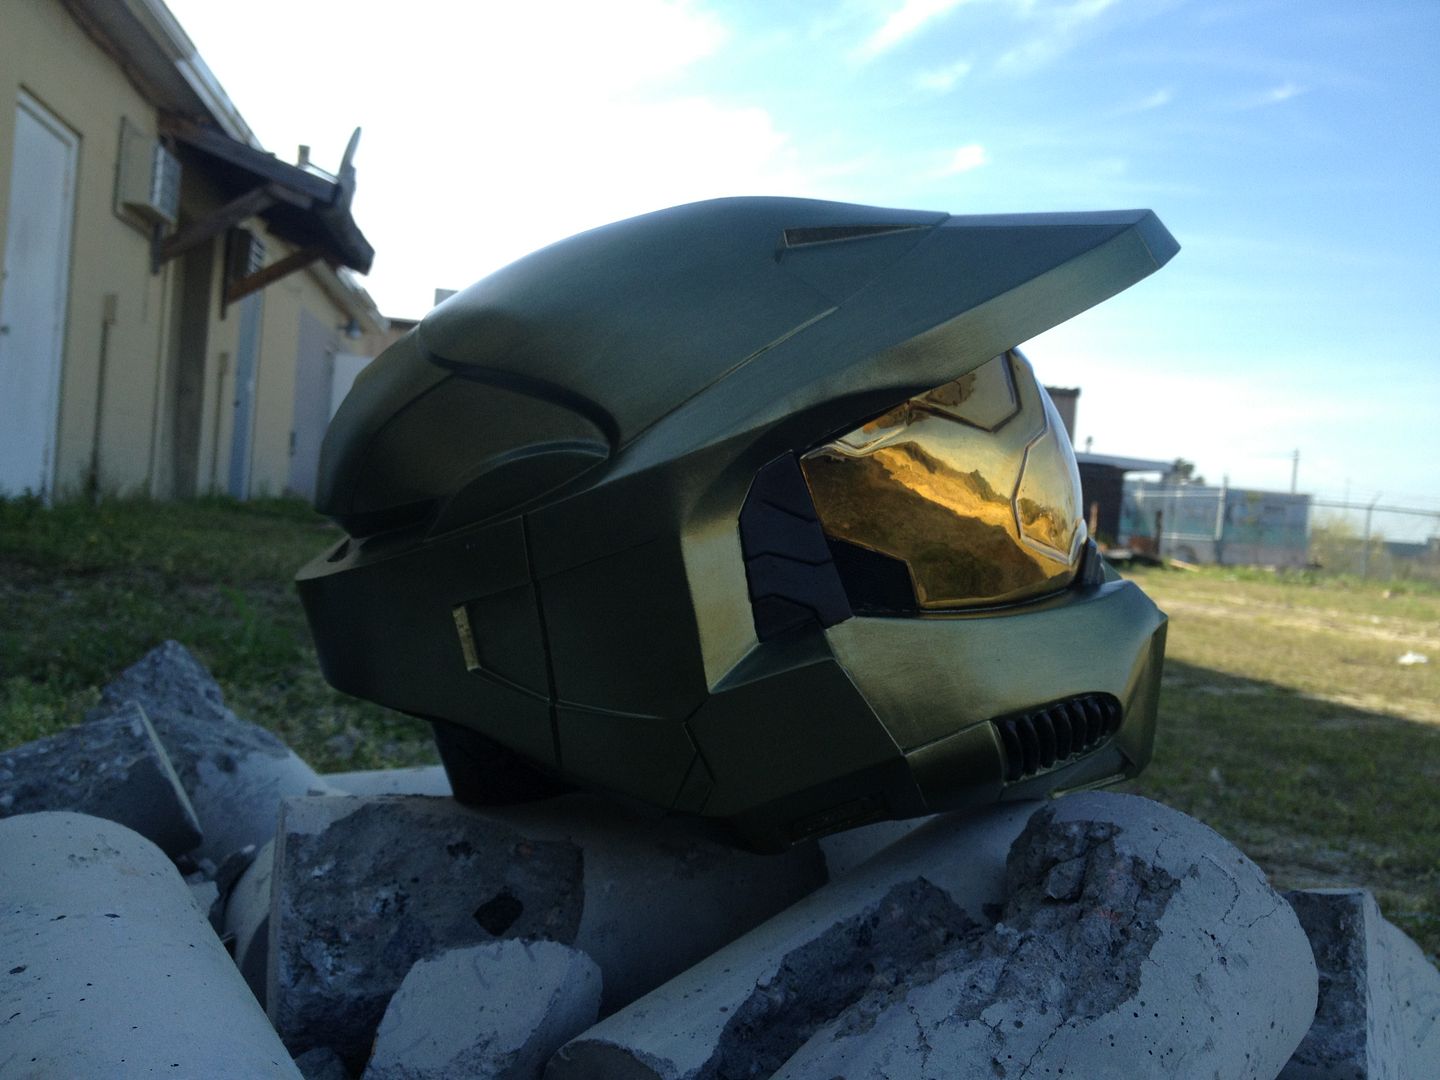
I was able to do some drybrush silver, and a blackwash. I am very pleased with the weathering results.

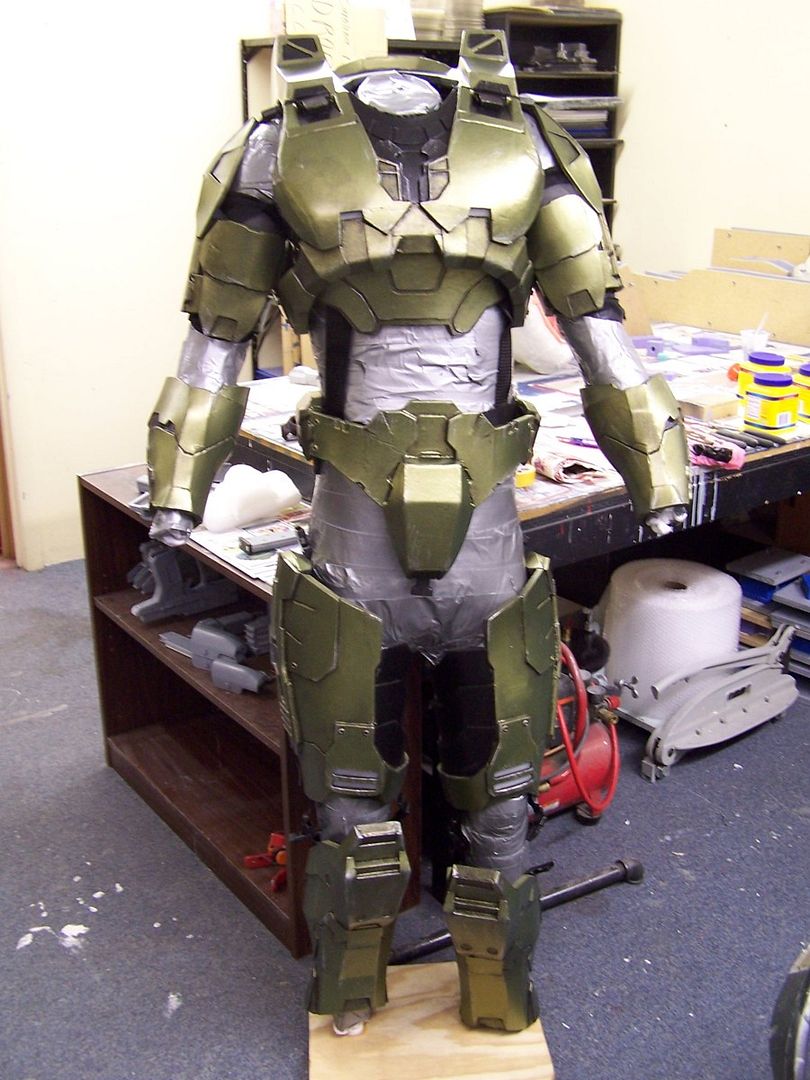
And here it is mounted on my duct tape dummy. All adjustments have been made. I tried everything on, but unfortunately can't take a picture of myself wearing it.
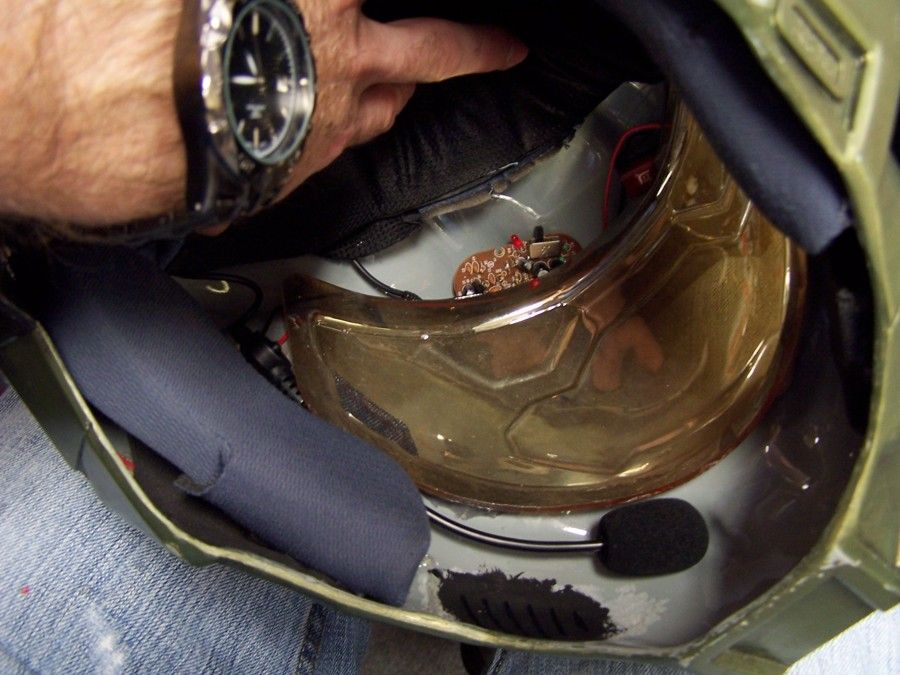
The last upgrade was to get my speaker and microphone working properly. In the past I have tried using the Aker 1506 unit, and it works well, but the headset microphone always gave me issues when taking the helmet off and putting it on. It would never stayed positioned right. So I did some research, and was able to find a wireless transmitter to work with it. Here is the setup.

The microphone plugs into the Memorex wireless transmitter, and sends a signal to the Memorex receiver. The receiver then connects to the Aker speaker. I took the components out of the transmitter, and fit them in the brim of the helmet. All of the components stay in place now. It makes using it so much easier now.
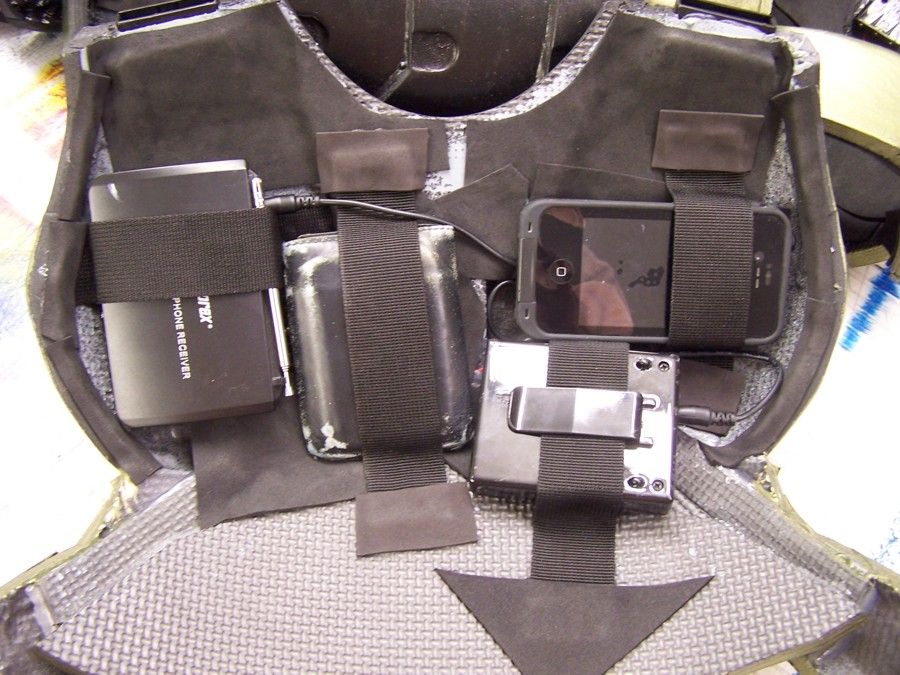
Then I have the receiver and speaker positioned on the chest. It works perfectly now.

I also had to come up with a place to carry my phone and wallet.
Everything is all packed up and ready to hit the road in the morning. Dragon Con, here I come.
I was able to do some drybrush silver, and a blackwash. I am very pleased with the weathering results.
And here it is mounted on my duct tape dummy. All adjustments have been made. I tried everything on, but unfortunately can't take a picture of myself wearing it.
The last upgrade was to get my speaker and microphone working properly. In the past I have tried using the Aker 1506 unit, and it works well, but the headset microphone always gave me issues when taking the helmet off and putting it on. It would never stayed positioned right. So I did some research, and was able to find a wireless transmitter to work with it. Here is the setup.
The microphone plugs into the Memorex wireless transmitter, and sends a signal to the Memorex receiver. The receiver then connects to the Aker speaker. I took the components out of the transmitter, and fit them in the brim of the helmet. All of the components stay in place now. It makes using it so much easier now.
Then I have the receiver and speaker positioned on the chest. It works perfectly now.
I also had to come up with a place to carry my phone and wallet.
Everything is all packed up and ready to hit the road in the morning. Dragon Con, here I come.
jjohnson916
Member
Love it man
RetiredClone
Active Member
Stunning work Justin, absolutely stunning Well done! The visors are masterpieces :thumbsup
Well done! The visors are masterpieces :thumbsupOG Velociraptor
New Member
Oh man, the craftsmanship here is top notch. Brilliant ingenuity and those boots are amazing!
https://warosu.org/data/cgl/img/0076/71/1405335494070.gif
https://warosu.org/data/cgl/img/0076/71/1405335494070.gif
Thank you all for the compliments.
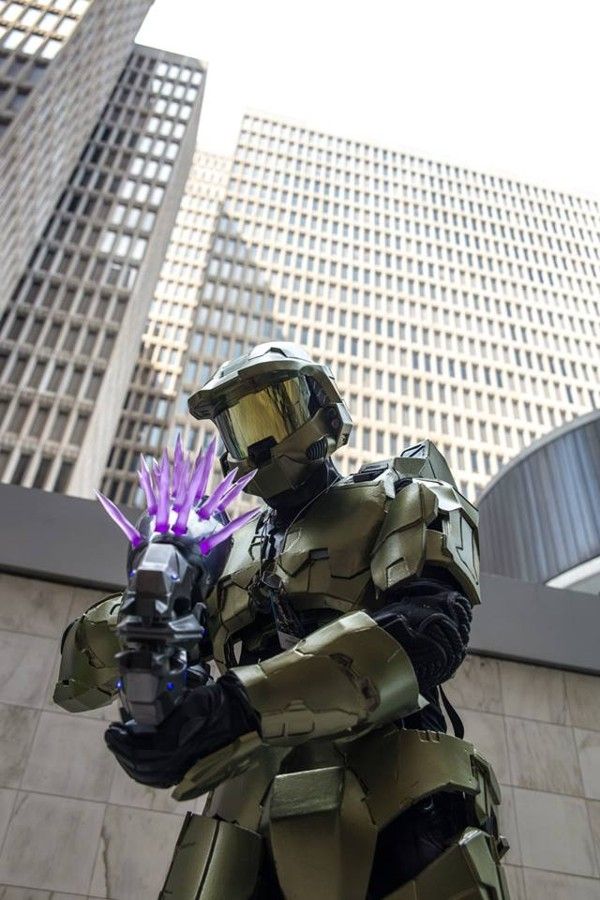
Dragon Con was a success! I got to hang out with a lot of great people, and meet some new people, finally. Here are some pictures that were taken of the suit.
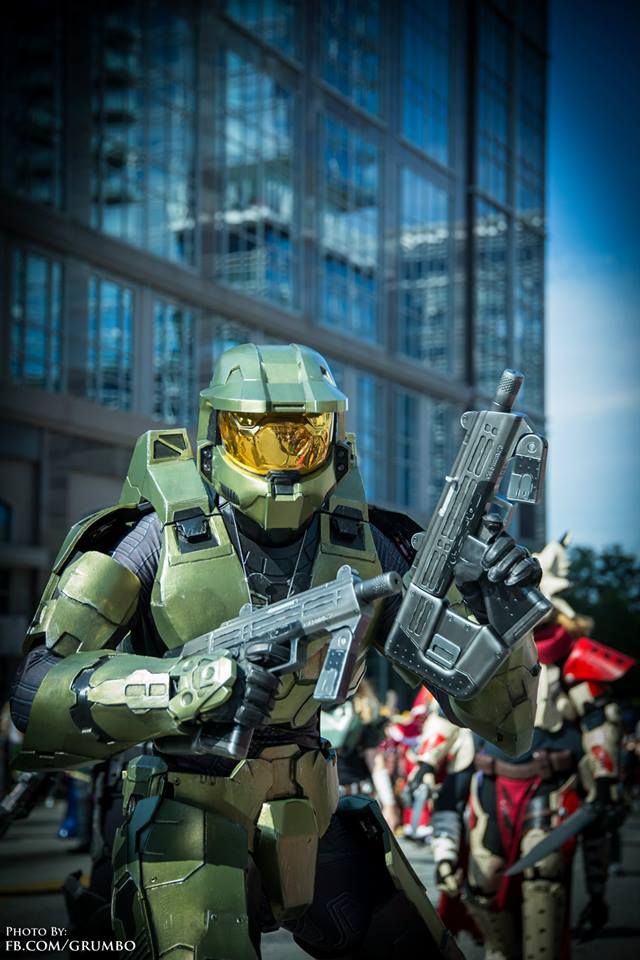
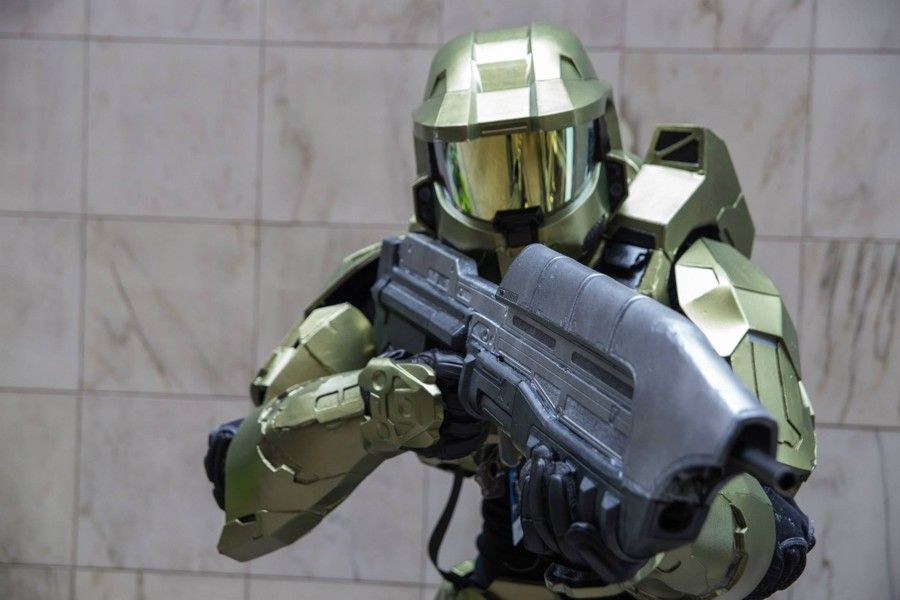
The classic Halo 2 pose.
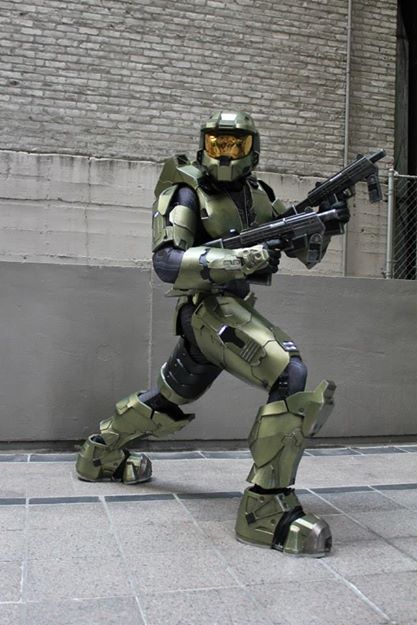
405th photoshoot.
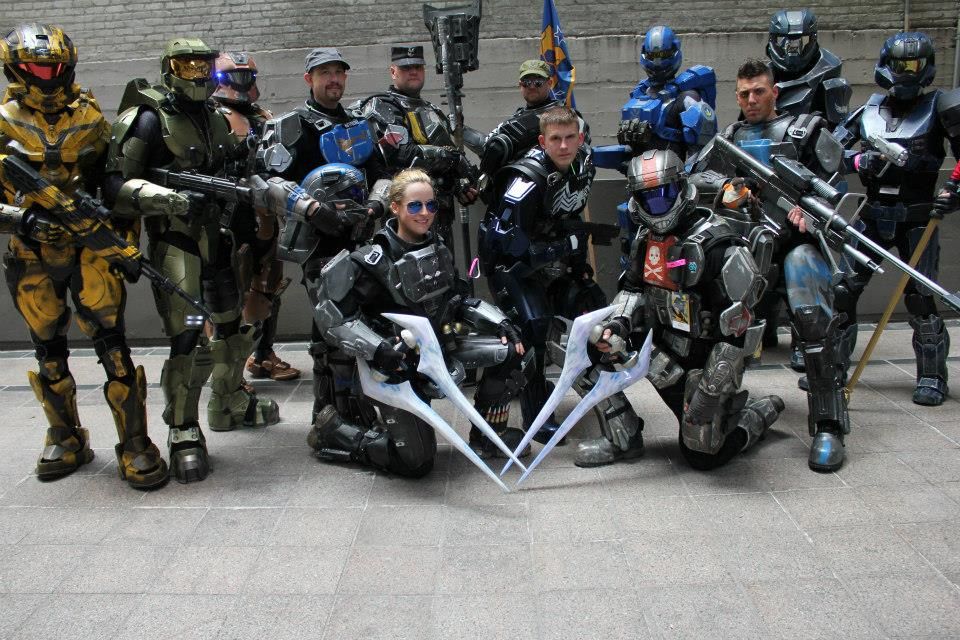
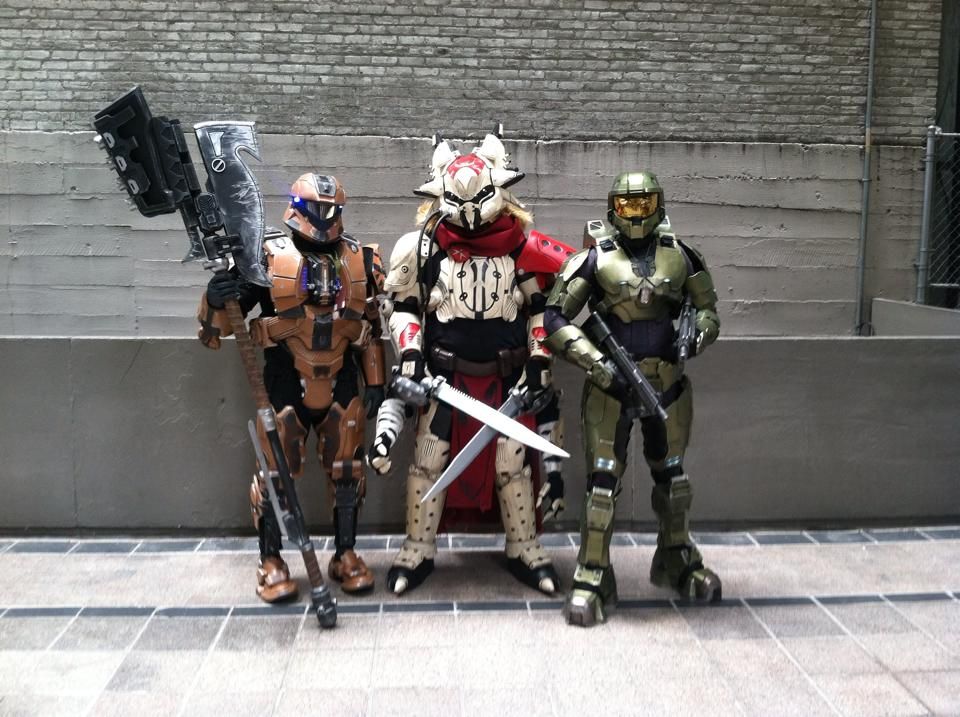
And finally a Stony Props picture. Jim's got the gravity hammer, and Walter has his Destiny suit.
Everything worked out so perfectly, that I may be finished with this build. I think a photo shoot is in order.
Dragon Con was a success! I got to hang out with a lot of great people, and meet some new people, finally. Here are some pictures that were taken of the suit.
The classic Halo 2 pose.
405th photoshoot.
And finally a Stony Props picture. Jim's got the gravity hammer, and Walter has his Destiny suit.
Everything worked out so perfectly, that I may be finished with this build. I think a photo shoot is in order.
Similar threads
- Replies
- 1
- Views
- 439
- Replies
- 0
- Views
- 274