Jurassic Park Jeep #12

dstone

Active Member
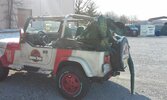
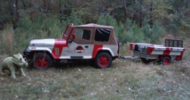
As if I didn't have enough projects, the stars finally aligned and I was able to start on one of my dream vehicles. My uncle sent me a link to a 1995 Jeep YJ that looked to be in good condition and just a few miles from my grandmother's house. A few days later he was able to inspect it and pick it up for me. It's in really good shape for a 25-year-old vehicle. I had a few dents pulled out of the hood and picked up a set of side steps and other accessories to drop on after getting it painted over Fourth of July weekend.

Screenshot-20200606-160848.png


IMG-20200608-114528.jpg


Screenshot-20200606-160856.png


IMG-20200703-130711.jpg


IMG-20200703-130720.jpg


IMG-20200703-194230.jpg


IMG-20200704-125528.jpg


IMG-20200704-163212.jpg


Three crazy days later I loaded it on a trailer and towed it home.

IMG-20200705-171450.jpg


IMG-20200705-171505.jpg


IMG-20200705-171514.jpg


IMG-20200705-171534.jpg


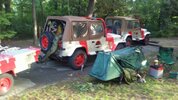
Once I got it home I put it up on blocks in my driveway while the rims were powder coated. I've used the opportunity to change the oil, flush the cooling system and repaint the dash to gray using a vinyl dye. Still need to touch up the mirrors as we got a little excited and painted the arms red, too.

IMG-20200726-173924.jpg


One of my cats decided to inspect the wiring (and the 25 years of filth under the dash).

IMG-20200725-180630.jpg


Found this little glass dinosaur rattling around inside the dash. This conversion was meant to be!

IMG-20200725-215012.jpg


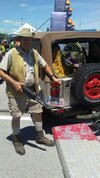
I'm in the process of installing an air conditioner and a bunch of wiring for new speakers, a Bluetooth amp that allows me to retain the factory AM/FM radio, power distribution block and fog light controllers. Found out the wiper controller in the column was broken, that was a pain to replace. Once all that's done I'll install the green carpet. My original plan was to have the seats reupholstered but I stumbled across some original Sahara seats that will work nicely for this build. Once I have the Jeep mobile again I need to swing by an exhaust shop and get the muffler under control (sounds like a jackhammer) then on to a friend's house to get the rear drum brakes swapped out for disc brakes.
 
I had the powder coating shop do the tow hooks and seat frames in addition to the rims.

IMG-20200820-183335.jpg


IMG-20200818-181516.jpg


I ordered a "tire sticker kit" to put the correct lettering on the tires since the Goodyear Wranglers were still in great shape. Looks good but they're a pain to install.

IMG-20200822-191603.jpg


We had storms producing large hail the other night. Knowing they were coming, I slapped on the few remaining parts to get it drive-able to move to my barn.

Installed the air conditioning compressor, new serpentine belt, new coolant reservoir and the remaining tire. Also got the steering column put back together. Went to re-assemble a seat only to find out the sliding rails had been damaged during the power coating process. Doh! So, with no way to mount a seat, I had to get creative.

IMG-20200831-144210.jpg


This was also a really bad time to find out the brakes quit working. Had to pump them like crazy to keep from running in to my mother's Excursion. Found one of the hard lines broke, probably when I was replacing the coolant reservoir. I'm leaning towards replacing all of them along with the brake hoses so I'll be 100-percent certain everything's in good shape.

Took the opportunity to snap a few photos since it was mobile again.

IMG-20200831-165543.jpg


IMG-20200831-165530.jpg


IMG-20200831-165551.jpg


Things left to do on the exterior:

Paint and install the center rim caps done
Install the winch done
Paint the mirror arms black done
Rotate the front fog light grills 45 degrees done
Paint, install and wire the top search lights - painting in progress
Minor touch-ups on the paint
Install the drum brake to disc brake conversion kit done
Replace brake lines done
Fix the muffler done

Things left to do on the interior:

Paint the center console and door panels green minor touchups needed but considered done
Install the door pouches done
Install the carpet done
Run hoses to all the A/C components and charge the system done
Install the seats done
Install the radio done
Wire the switches for the fog and searchlights - fog lights done, ran in to some complications with the searchlight controllers done
Mount the hide-a-sub done
 
Last edited:
I love seeing Jurassic Jeep builds! I've always wanted to do one, but never had the time or money to do it.
 
Thanks, everyone! This has been quite the undertaking and I'm using the opportunity to learn a lot more about automotive repairs. My A/C gauge set and vacuum pump showed up on Saturday and I had to order a new engine thermostat since the old one got stuck. I tore out the old carpet, did some scrubbing on the tub and put the new carpet in.

IMG-20200908-123917.jpg


I relocated the 12v outlet and ashtray (due to A/C install) and modified the ashtray to hide the controller for the new amplifier. Probably should cut some foam or something to fill the little gaps on the top and bottom of the controller. Also finished splicing in the lines for the new audio amp, wired up the fog light switches and started work on the new power distribution block for the fog and searchlights. Once that's done I'll get the wiring bundled up and tucked away.

IMG-20200829-200947.jpg
 
Got the new power distribution block and breaker wired up along with the final tidbits of the hide-a-sub (mounted in the instatrunk) and fog light switches. I'm very pleased with the audio upgrades; I should be able to get decent sound over all the road noise. While fiddling with the fog lights I went ahead and relocated the mounts for the fog light grilles so they are now at the proper angle.

IMG-20200913-191929.jpg


IMG-20200913-191909.jpg


I still need to put a shield in the rear fog lights so they have the correct projection profile. Probably one of those things that nobody will notice but it will make me feel better if it's there. I was able to find two of the original factory switches for the fog lights so I didn't have to use modern ones that would look out of place.

IMG-20200913-162027.jpg


Two-thirds of the dash has been re-assembled and I'll be able to finish off the glove box area once I figure out a solution to the searchlight controllers. The ones included with the lights are nowhere near accurate and the ones that I purchased that were "close enough" don't want to work. Will have to do some further investigating with the multimeter to figure out what's not playing nice.

IMG-20200913-163805.jpg


Two of the seats have been mounted. I'll get the driver's seat put in once I'm done with the center console. These seats are in incredible shape! Mounted them on the risers that I had powder coated and they look like they just rolled out of the factory.

IMG-20200913-162042.jpg


The rings for the searchlights should be here shortly and I'll be able to get those painted and mounted on the light bar. I'm hoping my replacement brake lines will be here this week, that's the last piece that's preventing it from being roadworthy. I get those on, then it's off to the muffler shop for some exhaust work and then a few final mechanical pieces at my friend's house.
 
Juiced up the AC over the weekend and now I have ice cold air. Still have some tidying to do on the cabling for it. While roaming beneath the vehicle I found some split loom that had been melted (looks like somebody had zip-tied it to the exhaust or something) that contained what appeared to be a few melted vacuum lines. I think these might be a part of the 4WD system but I'll have to do some more tracing to be certain. Shouldn't be too much of a problem to repair them.

IMG-20200920-111157.jpg


After working on all that my allergies tried to kill me and brought a stop to the majority of my outdoor work for about the next week. I used the "opportunity" to work on the searchlights to do dry fittings and get them ready for paint. The lights I purchased are knockoffs of the original. They are almost identical but happen to have better motors and are almost a third of the price. Downside is the neck is spaced a little different. The original prop had three bands of automotive molding that wrapped around it - I can only fit two on here.

IMG-20200923-231158.jpg


These are going to look great. I'm having to fight the urge to go stick one on top of the Jeep.

IMG-20200922-230349.jpg


For whatever reason, there's a fake wire that runs between the light housing and the base. Some of the other builders suggested using valve stems and windshield wiper fluid tubing to create it, so that's what I did.

IMG-20200922-203719-01.jpg


Just a little more sanding and cleaning to go, then I can paint and epoxy everything into place.

IMG-20200923-231319.jpg
 
I had the powder coating shop do the tow hooks and seat frames in addition to the rims.

View attachment 1345034

View attachment 1345035

I ordered a "tire sticker kit" to put the correct lettering on the tires since the Goodyear Wranglers were still in great shape. Looks good but they're a pain to install.

View attachment 1345036

We had storms producing large hail the other night. Knowing they were coming, I slapped on the few remaining parts to get it drive-able to move to my barn.

Installed the air conditioning compressor, new serpentine belt, new coolant reservoir and the remaining tire. Also got the steering column put back together. Went to re-assemble a seat only to find out the sliding rails had been damaged during the power coating process. Doh! So, with no way to mount a seat, I had to get creative.

View attachment 1345037

This was also a really bad time to find out the brakes quit working. Had to pump them like crazy to keep from running in to my mother's Excursion. Found one of the hard lines broke, probably when I was replacing the coolant reservoir. I'm leaning towards replacing all of them along with the brake hoses so I'll be 100-percent certain everything's in good shape.

Took the opportunity to snap a few photos since it was mobile again.

View attachment 1345038

View attachment 1345039

View attachment 1345040

Things left to do on the exterior:

Paint and install the center rim caps done
Install the winch
Paint the mirror arms black
Rotate the front fog light grills 45 degrees done
Paint, install and wire the top search lights
Minor touch-ups on the paint
Install the drum brake to disc brake conversion kit
Replace brake lines
Fix the muffler

Things left to do on the interior:

Paint the center console and door panels green
Install the door pouches
Install the carpet done
Run hoses to all the A/C components and charge the system done
Install the seats two of the three installed
Install the radio done
Wire the switches for the fog and searchlights - fog lights done, ran in to some complications with the searchlight controllers
Mount the hide-a-sub done
She is beautiful,my friend. Great job !!
 
She is beautiful,my friend. Great job !!
Thank you!

I'm finally able to get back to work. This stupid Covid garbage really knocked me flat. I got the driver's seat mounted and poked the floor mats in. I really love how the powder-coated seat risers turned out.

IMG-20201007-153837.jpg


I painted the door panels and installed the pouches. The center console didn't turn out how I wanted so there will be a bit more work on that before it goes back in.

IMG-20201008-190300.jpg


Finally figured out what was up with the searchlight controls - one of the joysticks was bad. Got a new one ordered and wired it all up. Still need to come up with a blank plate for the dash (I used the plate off the one with the failed joystick temporarily) and will make the final electrical connections once the searchlights are mounted to the light bar.

IMG-20201009-185737.jpg


What a change to the interior! I'm amazed at how well it turned out.

interior.png


I finally painted the mirror arms back to black and replaced the front left brake lines. The other brake lines will be replaced at a more convenient time.

IMG-20201010-150917.jpg


With it mobile again, I took it out to gas up and give it a good washing. It turned quite a few heads! I can't wait to get the searchlights back from painting and get the winch in.
 
Really looking GREAT and I know how much work it has been firsthand! I built my #18 from a 95 too, which I have heard were the best YJs made from a mechanical perspective. #12 is the biggest challenge, but by far the most impressive when finished. Hopefully we will have another Jurassic Jeep Meet up in Branson MO. again when the next Jurassic World movie premiers. I think we had 45 jeeps from around the country the last time. It was a blast meeting jeep builders from around the country, and shouldn't be too far of a drive for you. Hopefully we'll see you and your jeep, and a few more that have been built since the last meet. Here's mine, with the "half scale" Jurassic Park gateway I built, and a drone's eye view of the Jurassic Jeep and Explorer meet we had in Branson. Are you a member of the Jurassic Park Motorpool on Facebook?
 

Attachments

  • muldoon2 (small).png
    muldoon2 (small).png
    1.3 MB · Views: 137
  • Branson JP Jeep display.jpg
    Branson JP Jeep display.jpg
    103.5 KB · Views: 110
  • Branson display 1.jpg
    Branson display 1.jpg
    36.5 KB · Views: 167
Really looking GREAT and I know how much work it has been firsthand! I built my #18 from a 95 too, which I have heard were the best YJs made from a mechanical perspective. #12 is the biggest challenge, but by far the most impressive when finished. Hopefully we will have another Jurassic Jeep Meet up in Branson MO. again when the next Jurassic World movie premiers. I think we had 45 jeeps from around the country the last time. It was a blast meeting jeep builders from around the country, and shouldn't be too far of a drive for you. Hopefully we'll see you and your jeep, and a few more that have been built since the last meet. Here's mine, with the "half scale" Jurassic Park gateway I built, and a drone's eye view of the Jurassic Jeep and Explorer meet we had in Branson. Are you a member of the Jurassic Park Motorpool on Facebook?

Thanks! The 95 was my preferred choice when I started looking for a base vehicle. I figured the galvanized tub and frame would really help out considering it's a 25-year-old vehicle now. It's been a great platform to build off of. I saw some posts about the Branson meetup, looked like a blast! I'll definitely be at the next one. Those gates came out great and I love the idea of using the banner as stanchions. My father has decided I need a 25-foot tall inflatable T-rex to go with the Jeep and has been scouring the Internet looking at options. It will be interesting to see what becomes of that. I'm currently a member of the Motorpool Workshop and will apply for full membership once I get the lights on top.
 
Last edited:
I think really think you need a Dilophosaurus "Spitter" to ride inside a JP Jeep #12! I made a complete one for my jeep starting out with just a latex mask, which I added taxidermy eyes, teeth, tongue, etc., and the rest of the body out of those green foam sleeping mats that the army uses. We made the life size Dewback Lizard from Star Wars out of the same mats. I am making an 18 foot T Rex now that will stand in the back of my jeep with its little arms hanging on to the light bar. I will post it here on RPF when its finished. The last image is of my hypothetical "Jurassic Park Utility Trailer" in matching jeep colors, which I took to Branson so I could carry extra gear for camping like some of us did there.
 

Attachments

  • 0111161224.jpg
    0111161224.jpg
    975.5 KB · Views: 223
  • 0111161223a.jpg
    0111161223a.jpg
    365.5 KB · Views: 176
  • 0623181359c_resized.jpg
    0623181359c_resized.jpg
    341.9 KB · Views: 92
  • jeepandtrailer.png
    jeepandtrailer.png
    801.6 KB · Views: 237
  • 0623180720a_resized.jpg
    0623180720a_resized.jpg
    550.3 KB · Views: 161
That's a great idea using the mask as a base; I'll pass that along to my sister. She's much better at that sort of stuff than I am.

I don't have any pictures for this update as most everything was mechanical. I finished painting the center console and got it installed, just need to do some touchups now where I managed to gouge it while flailing about inside the Jeep. Found some guitar pickguard material to put over the holes on the blank light control plate that worked out pretty well. The exhaust system has been fixed and it now sounds as it should. Had to replace the tail pipe, muffler and catalytic converter; hopefully it will be good for another 25 years. The rear disc brake conversion kit and remaining brake lines are currently being installed and will hopefully be done in about a week or so. Now I'm looking at a few of the smaller details and kicking around if I want to go through with them - red stripe on searchlight base, white fake cable between searchlight and base, red lug nuts on the wheels (but not the spare), etc.
 
All the brake lines have been replaced and the disk brake kit is now installed. Picked up the winch on Friday and finished installing it today. Swapped out the winch plate with a different one to fix some alignment issues and all is good. Ramsey Winch did a special "JP" edition run of their original REP6000 that was featured in the movie. I'm super pleased with it. Hopefully the searchlights will be completed soon and I can get those mounted.

PXL-20201107-212638929.jpg


PXL-20201107-212628565.jpg
 
Looks awesome! I have one of those winches on the way as well :D

It's my first time seeing this thread, could you tell me more about these "Tire Stickers" I have the new BF Goodrich tires with the wrong lettering on mine. Would love to change that...
 
Looks awesome! I have one of those winches on the way as well :D

It's my first time seeing this thread, could you tell me more about these "Tire Stickers" I have the new BF Goodrich tires with the wrong lettering on mine. Would love to change that...

I ordered the kit from No-Limit Customs (https://no-limitcustoms.com/shop/ols/products/jeep-tire-lettering) and an additional bottle of glue and some of their custom tire shine from tirestickers.com. I used a dual action sander with 80 grit paper to knock down the lettering on the blackwall side then wiped it off numerous times with acetone. The letters arrive stuck to a plastic piece that helps with spacing - I cut them apart into chunks of three letters to help with gluing. Found out the hard way on the first tire that if you try to glue it all at once the edges will curl up and, once dry, they're impossible to get back down.

IMG_20200819_194951.jpg


IMG_20200822_182634.jpg
 

Your message may be considered spam for the following reasons:

If you wish to reply despite these issues, check the box below before replying.
Be aware that malicious compliance may result in more severe penalties.
Back
Top