Judge Lex

Tvayumat

Well-Known Member
A lot of the "build" element has been taken out of it since I got in on the replica armor/leathers deal, but I figured I'd share what progress I have so far on the helmet.

Later on I'll add as the helmet is weathered and finished, and I begin working on the belt pouches and modding the boots.

This is my very first foray into the realm of costuming, so I'm learning as I go. Already I would have done a few things different on this helmet, which is why it will probably be my "Lex Mk I".

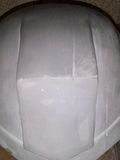
This helmet is built up from the Bluerealm kit, first up are some early photos of modding and smoothing:


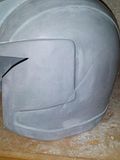
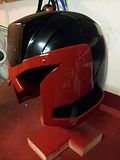
Skipping forward past one failed paint job and sanding it back down to resin, I retouched the lines and details, switched my red, and ended up with:


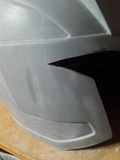
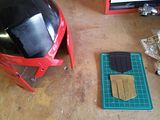
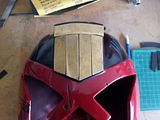
Working on doing the helmet shield in brass. This is a piece I would do differently next time, using a single piece of brass and etching the details rather than assembling it out of separate pieces:


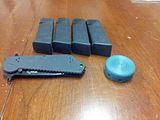
And gathering the necessary belt items:


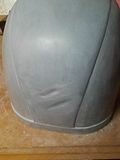
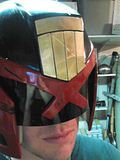
As of now there is a LOT of weathering to do on this thing to make it look like Lex. I hope to have updates soon!

UPDATE 1:
The weathering goes slow, so I've been working on the other parts in my free time. The gauntlet has some final touches yet to do, but all the important parts work!


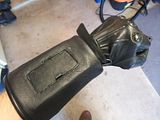
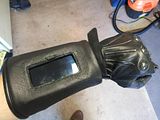
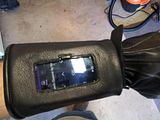
The arm comm was made from the gauntlet that comes with the Leathernext gloves. I tore out the liner and foam, using just the outer leather shell. I prefer it as a separate gauntlet, since it has my phone in it.
 
Last edited:
Re: Judge Lex build

Haven't updated in a while.


Latest development: Lawgiver Holster/Lawgiver

I received my Lawgiver from the excellent Shawn/Joe team. It's hollow rotocast and foam filled, and will see some electronics before I'm done with it.

My holster is at about 90% completion, all it needs now is a liner and hardware attachment points. Thanks to Michael Van Kesteren and Max Replicas for the inside scoop on this prop.

The outside is covered in a 1.5 oz italian calfskin leather.


Helmet:

Still needs more work, but here is a WIP during the weathering process


Gloves:

I purchased a pair of the Leathernext Mk II gloves and a pair of the O'neal Butch carbon fiber gloves and swapped the finger greeblies and knuckle plates out, then plasti-dipped the thumb pad for a more screen accurate look.

Only mod left is to remove the wrist straps and replace them with more accurate, independent straps. They also need to be oriented further down my wrist than the attached strap is.

Filling and covering the stitching holes left by the old finger greeblies was a pain but worked out in the end.


Medpack:


Other:

I've also received and painted my Stumm gas grenade, cast from original prop thanks to Paul Wares


And of course my badge, from Sean Cho
 
Last edited:
Re: Judge Lex *Updated 05/13/13*

That's one of the most awesome personalised JD 3D badges I've seen.
 
Re: Judge Lex *Updated 05/22/13*

Excellent work! Can you give a quick rundown on the techniques you used to weather it? My helmet is due soon and I'm torn between the 'silver undercoat and then sand away the red/black overcoat' method, or the 'paint on weathering (silver, burns etc) over the red and black' method. I'm leaning towards the second one as I've alot of experience in the past with Warhammer and so I'm confident in painting realistic weathering.
 
Re: Judge Lex *Updated 05/22/13*

I initially attempted the ever popular silver undercoat resist method of coloring and weathering but I was not particularly pleased with the outcome. It's a decent weathering technique but I found the results largely unsatisfying for the particularly "old and busted" look of Lex.

1.) Structural damage is all dremeled into the raw helmet (dent on right side of face not really visible in above images, gouges, deep scrapes etc.)

2.) Helmet is primed and painted (ALL rustolem rattle cans, automotive primer, gloss black, regal red) In retrospect I would have gone with a satin black, but the weathering has dulled the gloss almost entirely so it works.

3.) Silver colors are laid into the gouges and scratches, sandpaper is used to muss up the finish and create broad scrapes, which are then colored with silver leaf rub'n'buff. Sandpaper is also used on raised edges to give them a slight texture so that rub'n'buff can be rubbed along them for that worn edge look.

4.) Blackening and dirtying are a series of acrylic paint washes thinned with water in a few combinations of black and brown. Washes are also applied over all silver areas to give them a more natural look.
 
Last edited:
Re: Judge Lex *Updated 05/22/13*

Small update. Progress is slow at the moment with a lot of things hovering close to finished, hoping to hit the threshold in Mid-June when everything starts coming together.

In the meantime, I went ahead and lined my holster with suede, and wanted to show it off :D

 
Last edited:
Re: Judge Lex *Updated 05/22/13*

Continuing my work on belt kit, I've got the first of my medpacks assembled at long last. The plastic portions are just primed, and most of the flesh/edge of the leather is untouched to allow for color-matching it to the rest of the belt kit. Still not completely finished but I'd say 95%.

Construction techniques followed what notes I could squeeze out of the South African prop guys.

 
Re: Judge Lex *Updated 06/25/13*

Lapsed in updates for a good long time.

Time to post up some images of me at Alamo-City Comic Con this past weekend.

1378045_10151958053829430_1401735646_n.jpgDeadpool2.jpgLex and harley Quinn!.jpgLex2.jpgLex4.jpgLex5.jpgLex6.jpgLex8.jpgLex9.jpgLittle Hellboy.jpg
 
Re: Judge Lex *Updated 10/29/13*

FANTASTIC! I love the look of the been-around-the-block Lex helmet. Killer job!!! All the details are well done, really dig the Lawgiver and holster. Really impressive stuff.


Your pics came out great! Love me some Harley Quinn lol... :D

 
Re: Judge Lex *Updated 10/29/13*

Since the topic of Reel Images/Struss vests and the necessary mods have come up, I'll share the images I have from my reconfiguration last year.

I received one of the "version 1" vests, which needed a complete overhaul in time for ACCC 2013.

20130913_235224.jpg

Here we see the internal strapping after corrections. Long straps replaced with correct elastic, seatbelt webbing adjusted in height, all nylon straps replaced with heavier cotton/nylon blend.

You can also see where I was removing the included adjustable attachment points.

For the neck roll, I had to cut it open along the center seam, remove the foam, and shape it to fit my neck and not stick up off my shoulders. Once resewn, I went about removing the front webbing attachments and replacing them with a vinyl strap that stitches to the vest on either side of the zipper, as seen here:

20130914_163109.jpg20130914_163058.jpg20130914_191431.jpg

ALL the vest plates, front back and shoulders, were removed, the strange fabric edging removed, the edges of the plastic trimmed more cleanly, holes redrilled, and finally everything was hand-stitched back into place.

The original black plastic zipper was swapped for one in brass, the included belt loops were replaced with sturdier and more accurate versions, and all the straps were stitched in place to fit rather than left adjustable.

20130924_082751.jpg20130929_121817.jpg

The majority of the detail on the shoulders is an illusion. Layering and shading made up for what was basically smooth plastic.

20131009_162705.jpg

First test fit here.

The elastic straps make a HUGE difference in fit on the shoulders, as does re-configuring the neck roll.

I also discovered upon digging into my neck roll that it was vinyl, rather than leather. RI has promised that this will be fixed whenever the current run is completed.
 
Last edited:
Absolutely BADASS! I am in utter shame that I missed your thread the first time around.
You did a bang up job :thumbsup
 
Back
Top