Ironman Arc Reactor build up from my kit. [IMG heavy + timelapse video]

IMG_20121025_203937_251-1.jpg


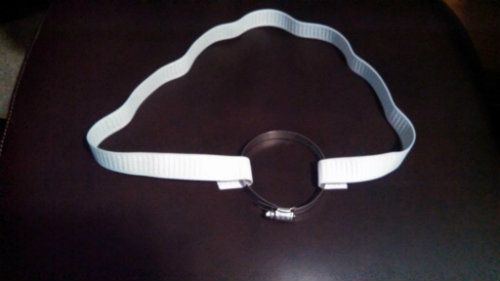
Easiest harness ever. Wear under shirt. Push arc reactor though front of shirt. Done.

Material:
1. Elastic band
2. 3-4" adjustable hose clamp

Just sew the ends of the band around the clamp and you're good to go. You don't necessarily even need the elastic band, it'll just prevent the reactor from lifting off your chest with your shirt. Depending on how you rig your batteries I suggest using a shirt you don't care about snipping a tiny hole in so you can run the wire through to your batteries.
 
Also SGM if you could explain more on how you setup the magnets to work/power it or post more pics that would be extremely helpful! :]

Seconded. :thumbsup

I'm really contemplating using magnets as the connection to the batteries, and making two setups. One on a desktop display (with a switch) and one to wear on the chest. It would be great to be able to remove the arc from the display and pop it on my chest piece and having it light up instantaneously.

I think you could use a reed glass magnetic switch. If i remember correctly they're quite small and if a magnet is placed against one it closes the circuit.
 
Hey Guys just one question (im a little nervous because I already had to go replace LEDS (burnt them out)

For that last LED thats on the outside are you just running a positive/negative wire onto another LED?

Is it okay to have multiple LEDS connected to one led if you use wire?

I just don't want to burn out any more LEDS and have to redo al my hard work :p
 
I need to buy some LEDs, i have the choice between:

  • diffuse 80 degree LED 3mm
  • 25 degree LED 3mm
  • 90 degree LED 3mm
What's the one i should go for to get the best results, also should i get a bigger one for the center LED or just get the same 3mm?

EDIT:
i can also get some 5mm LEDs that are pre-wired with resistors, seems like a better option. don't know if they'll fit since i haven't received my kit yet. the options for these are 120 degrees and 25 degrees.
12v_led_kabel_led_leds-buy_6.jpg
 
Last edited:
Because of the ring made out of sign plastic, I don't really think the viewing angle on any of those will matter much when put in place.
 
a thought on fastening the reactor to your chest - I tried just sticking it to my bare chest with some doublesided tape and wore it for around an hour and a half or so before I took it off again. No problems whatsoever keeping it in place since it is such a light build. Batteries connected via wire and worn in my pockets. Simplest solution possible in my opinion.
 
For those asking, more info on my magnet setup:

The wires coming from the arc reactor should not be too big of a deal to figure out, you'll have that no matter what, but I left quite a bit of extra to work with. I stripped a lot off the ends and wrapped the wire in a spiral to get a lot of surface area. Then I took that spiral of wire and taped it to the back of a magnet. Then used epoxy to glue the magnet/wire combo to the back of my reactor. The reason I used a piece of tape is so that glue did not get between the wire and magnet disturbing the connection. You may want to use hot glue, as it is easier to remove and re-do if something goes wrong and your connection is lost.

A note on magnets: I got magnets from my local hardware store. They are nickel plated neodymium (rare earth) magnets. They do conduct electricity quite well, so if the wire is connected to the back of the magnet, having a bare connection on the front will ensure a connection. Please test your magnets to make sure that they are conductive before you do anything.

I think that's pretty clear for the positive and negative leads and how they are connected and attached to the reactor. Make sure you keep track of which is positive and which is negative.

I then glued down another magnet to the reactor, with no wires attached to it, for better alignment and strength. When all 3 magnets are attached they should be roughly equidistant from each other, forming an equilateral triangle.

Now the hard part. You have to make sure that the magnets on your harness or stand or whatever are exactly the same distance apart, and are in the exact same formation as they are on the arc reactor. I attached wire to the back of my positive and negative magnets the same way I did with the reactor, then I placed my harness magnets on the arc reactor magnets. I put some epoxy on the back of them and simply set my harness on top. When the Epoxy drys, lift the harness up with magnets attached and everything will be perfectly aligned.

**Important: You will want to test the polarity of your magnets so that the positive and negative leads are of opposite polarity. That is, when you attach a magnet to the positive lead, it should be repelled by the negative lead or vice versa. If you do this correctly, you will never have to worry about attaching the arc reactor backward, all you have to do is get it within an inch or two and it will align perfectly every time. This should be planned out before you glue anything down. I marked each side of all of my magnets with a marker so I knew what the polarity was before starting.

Sorry for the wall of text. I took a ton of pictures, but I took them each time I completely finished a step, so none of them were useful in describing this. Ask questions and I will happily answer them.
 
Hey Guys just one question (im a little nervous because I already had to go replace LEDS (burnt them out)

For that last LED thats on the outside are you just running a positive/negative wire onto another LED?

Is it okay to have multiple LEDS connected to one led if you use wire?

I just don't want to burn out any more LEDS and have to redo al my hard work :p

If all of your positive leads are connected, and all of your negative leads are connected you should be able to connect them however you see fit. It will be fine to connect multiple LEDs to one if you want, and it is fine to connect the last middle LED do another one, as long as the positive/negative leads are connected together.

LED's most often burn out for a few reasons, they get too hot (if you are soldering them this can happen). They are in user for a very very long time (LED's last for hundreds of hours when supplied with the correct voltage). OR The voltage is wrong. These LED's need 3.2-3.6 supply voltage. 2 AA batteries only supplies 3V so they will be a little dim with just 2 AA batteries, but if you use 3 you are supplying 4.5V. That's too much, and you will burn them out fast. If you used 6V some of your LED's would probably explode forcefully.

Make sure your connections are all good and in the right places, don't over heat them with a soldering iron, and make sure you are using the correct voltage and you should be fine.
 
When I first powered mine up using two AA batteries, the whole kit seemed really nice and bright. A few days later after I wrapped everything up and tried it again to make sure everything still worked, it seemed much dimmer (at least half as much).

Two AA's will make them light up, but be a little dim. Two AA's is 3V, these are rated for 3.2-3.6V. If the batteries are dying, or if one of your connections is not completely secure you will also see a drop in brightness.

1) Any idea how long this setup should last with just the two AA batteries? With LEDs I would expect a long, long time - which is why I find it odd.

They should last for a very very long time. An LED is technically not even a bulb, it's a diode, so it it will never "burn out" in the traditional sense. They will get dimmer over time though. That being said, the LED's in this set up should *almost* never burn out if they are wired correctly.

2) If I switched to higher voltage, what would be the limit before blowing them out? E.g. if I wanted to use a 9volt it sounds like I would need to add a resistor? How much? And then does the higher voltage really buy anything? I assume the fact that they are wired in serial makes a difference?

Higher voltage, within the 3.2-3.6 volt range will make the LED's brighter. The LED's in this build would most likely be wired in parallel if done like TC and others did them. Series would be another way, but it's more difficult, it's best not to think about it. :lol With LED's wired in parallel, if you want to use more voltage, you need to put a resistor on one of the leads. It will do it's job on either, so don't worry about where it goes except that it must be between the battery and the LED's. If you were going to use a 9V battery you need a 27ohm resistor. I used the formula for calculating resistance, but I wont explain it here, you can look it up if you want.

Edit: Make sure that you always round up with resistance. If you can find a 27ohm resistor go with 30ohms.
 
Last edited:
I am in the process of building a stand for my desk using the magnets to attach it, and I had a thought. I am going to use an old USB cable to power the stand. USB is 5V, so with a 10ohm resistor in the cable it will work fine. You can plug into any computer to power it. Then there's no need to replace batteries. And no need have a power converter and the complicated setup required for wall power.

If anyone else wants to steal the idea, just wire red to positive and black to negative, cut the white and green leads short and ignore them.
 
Back
Top