Iron Man MkVII Foam Build - Engineered for comfort & ease

Time to resume after vacation...

Cod

I wanted the cod to be flexible, as the cod and abs are the key to my mobility and comfort factor of my build. The technique I'm using for these flex pieces is to build the individual pieces out of thinner foam (2mm in this case) and cover them with shiny fabric using contact cement, then attach all the pieces together to form the cod. The technique I learned watching Emmabellish's great Youtube video.


The fabric I'm using is a 4 way stretch vinyl, the color was 'wine'. It matches almost perfectly to the paint in the naked eye.

Here are some of the pieces laid out on the fabric. I adapted the model a bit for this purpose, and I had to leave the front 'flap' detachable for bathroom breaks.
cod1.jpg

Here is work in progress (this is actually for a different piece, but the idea is the same):
cod3.jpg

Some raw pieces. Once they dry I hot glue around the inner edges, fold the flaps of fabric over the glue, and snip off the excess fabric.
cod2.jpgcod4.jpg

Once all the pieces were finished, I used 3mm foam to form 'joints' between the pieces on the inside (using hot glue).
cod5.jpg

Here is the opened cod. You see the front flap, which attaches to the side 'arms' via velcro. Right now the whole 'inner thigh' section is still foam/fabric. I may eventually cut away some of this and replace it with strapping for additional comfort, depending on how it ends up fitting with the thigh pieces on.
cod6.jpg

Here is the closed piece from different angles.
cod7.jpgcod8.jpgcod9.jpg

The final piece is very wearable, although the fit is weird until I get the abs completed.

I'm making the abs in a similar fashion... they will wrap around and connect at the front (sort of like a corset). The front ab 'plates' will be a separate piece that connects to the chest and covers the front of the ab wrap. The cod and ab wrap will share a common spine, and will have additional connections up front... which should help the cod stay on when I detach the front flap for bathroom breaks.
 
Biceps

A simpler piece.
bicep1.jpg

Again, I used velcro for inner seams.
bicep2.jpg

The elbow I'm dealing with separately, so here is my 'elbow joint'. I used Caster Cups (for furniture)... they were a bit smaller than the scale, but I liked the look versus the attempts I made trying to replicate this shape in foam.
bicep3.jpg

I made the inner joint pieces out of 2 layers of foam.
bicep4.jpg

Here it is painted with the joint assembled.
bicep5.jpg
 
It's looking great so far. Nice crisp looking edges and good looking pieces overall.

I'm interested in the technique you used for the cod. Does the 2mm foam have enough strength in it to hold up to movement by itself or does the fabric layer add to it? Having a think about how best to do it myself at the moment and your way looks like a good option.

Thank you! The fabric is a stretch vinyl, which is basically a stretchy (but good strength) fabric with a shiny vinyl coating. Combined (with the edges hot glued) the pieces have a lot of flex but feel very durable. The 2mm foam by itself probably wouldn't not be strong enough to withhold much pressure... in my original thigh piece I used 2mm for the inner thigh velcro panel and I ended up tearing it when I pulled on it too tight. But the stretch vinyl is pretty resilient for pulling/bending/etc. It feels more durable than spandex plus the surface is pretty much waterproof, so you can clean it with a damp paper towel.

I should also share that my first few attempts with the contact cement were hit and miss. I discovered my mistakes... so here are a few tips..

1. When they say to let the surfaces dry before attaching them together, they mean it! I was impatient and had to redo most of my early pieces because they started bubbling up in spots (meaning it didn't adhere to the foam). Even a few wet or overly sticky spots can leave to bubbles under the vinyl.

2. Don't overapply the contact cement, but also make sure you've covered the entire surface. If you do have a spot that seems to stay wet, you might be apply to 'spread it out' to make it dry faster.

3. It is a good to keep 'finessing' the pieces after you attach the fabric to the foam, meaning every 15 minutes or so I would go back and press the fabric down to the foam across the surface. I just sort of pinch it all over, running my fingers along the surface and the edges, pinching it together along the way. Doing this a few times while the glue is setting led to much better 'adheres' for me.

4. If it starts to really bubble up in places after you've stuck the fabric on or if you realize you have some bad creases -- too much to really finesse out -- you have some time to peel the fabric off and readjust. I've made major adjustments a half hour after I initially stuck the fabric on,.

For the cod itself, I've also since reinforced the seams (inside the cod) with additional fabric panels (not vinyl, just cheap fabric and a lot of hot glue -- this seems to be a good way to keep flex but provide additional strength) and caulk. I should note that hot glue does not adhere very strongly to the shiny vinyl surface, so when wrapping the edges of the vinyl around the back of the foam pieces, don't overdo it because you want to leave some bare foam surface on the backsides to have something to stick to.

I've also done the neck and my lower torso in this same technique... I'll be posting pics when I'm done with those pieces.
 
Neck

The neck wrap was done similarly to the cod.

First, I created the 'spine' section in 5mm foam. Note: a majority of the pieces I'm doing are in 5mm.

neck1.jpg

The front pieces I made from 2mm foam, covered with the stretch vinyl as I did on the cod.
neck2.jpg

I hot glued the pieces together with a slight overlap.
neck3.jpgneck4.jpg

I connected the front to the spine on one side by a big piece of 3mm foam.
neck5.jpg

Then, for the opening/closure on the other side I used a magnetic purse closure. I should note the spine part is actually painted (Duplicolor) and not covered with stretch vinyl. But as you can see, the colors match fairly well.
neck6.jpg

Here is the 'final' product closed. The gap is a little looser than I want on the closure, so I may have to adjust that. I may also add a second snap above the first to improve alignment.
neck7.jpg

It wears pretty comfortably (as comfortably as having something wrap around your neck can be, at least) and has good flex for mobility.

The idea is to have the neck, ab/spine, and cod be connected by a common spine.

Here's a sneak peek at the ab 'wrap' I'm working on.
abs.jpg
 
Last edited:
Nice work on your boots, that's the same principle I use for 'bottomed' boots:

https://www.mediafire.com/convkey/d3d1/ek1td7l6361e2g34g.jpg

It helps to also get some silicone caulking and run a bead around the inside joins between the sole and the sides of the boots, essentially sealing the bottoms on from the inside. Even with the hinged toe, I noticed on early builds that the flexing and compression of the boots can cause the hot glue joints to break down a lot faster. I fixed this by running a heavy bead of caulking around the inside angles, smoothing it over with my finger. A fat bead of hot glue could work to I suppose, I just trust the flexibility of silicone more. Looks great so far!

Those look familiar.
 
Ab Wrap

Okay, so this was the tricky part. I wanted to make the abs into a two part system. The plates will fall over the front of the piece, while all the other ab detail would be a flexible 'corset' type piece. So I employed a similar technique as I did with the cod. I cut out each individual piece and covered them with fabric. The red pieces were done with the same stretch vinyl I used on the cod, while the gold was a gold shiny spandex.
ab1.jpgab2.jpg

I overlapped the pieces just enough (tricky) and reinforced the back with a lot of hot glue and fabric, since just the hot glue on the edges would not hold, especially on the stretch vinyl.

ab3.jpg

Assembled side, it curves okay.
ab4.jpg

I made my spine pieces and connected them on a piece of strapping. Unfortunately, I discovered I had measured my waist wrong (or I ate too much since September) and the piece wouldn't wrap as I wanted. Disappointing, but I didn't have time to redo it all so I decided to make some connector pieces between the sides and the spine. I connected them all to make this bat looking thing.

ab5.jpg
The tab of strapping at the bottom is where I connect the back of the cod to the ab wrap. This will help keep my cod on when I remove the front flap for bathroom breaks.

So the front is connected with this zipper panel.
ab6.jpg

And here is the whole piece assembled and zipped.
ab7.jpg
Note I made extension flaps to the front as well, but these mostly will not be seen. In this pic one flap is sticking out kind of weird, but that's just the way I'm holding it... when I'm wearing it it lays more flush to the body. I may trim some of it off if I deem it unnecessary. When I finish the ab plates, they should cover the zipper panel and most of those extension pieces, so that will determine what gets cut.

The original plan was to connect this whole piece to the neck as well (hence the long strap in the 'bat' pic), but I realized that would limit mobility and I may accidentally choke myself, so I thing I'm scratching that plan. I was thinking it would help hold the ab/cod piece on, but it stays up pretty well on its on, so I don't need it.

I also need to build extensions for my cod, as I realized that since they overlap the ab wrap the circumference needs to be considerably bigger. This will take away from accuracy a bit but hopefully I can find a way to do it stealthily.
 
Just a suggestion on your ab/cod piece, but you can put in 'suspenders' to hold that section up using either webbing and parachute buckles, or just velcro strapping. On free-hanging torsos I've used webbing with the parachute clips right on the chest for easy adjustment (not a good example pic but you can see the straps hanging out on the right:


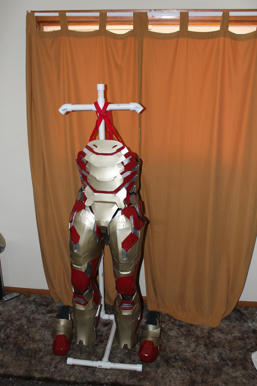
....On regular IM ab/cod combos, where they already kind of want to stay up but they could sag, I buy the lightweight velcro 'tape'. They sell that stuff at Walmart/Amazon/etc, anyways I glue it in just like suspenders again, and trim it so it's adjustable at the chest. It glues well to foam with hot glue and is really easy to adjust. Here's some of the velcro in red installed on an ab section; the straps have just been criss-crossed on the PVC mannequin to keep it up:
 
  • Like
Reactions: DRG
That's a good idea. Once I get the cod adjusted I'm going to test walking around in it for longer lengths of time to see if any additional support is needed. The good news is I haven't cut my back strap off yet so I could just make it a Y connection in the back with the two 'suspender' straps coming up over the shoulders.
 
A new piece and a few updates...

Elbow

In the name of mobility, I wanted the elbow piece to be 'floating' as opposed to having one connected full arm piece. This was I can move my forearm around independently from the bicep/elbow. To accomplish this, I simply made sleeves out of metallic red spandex (these double as a way to fill in the gaps under the armor) and the elbow piece from 5mm foam.
elbow1.jpg

I simply glued the foam elbow to the backside of the spandex sleeve (with a little foam platform I added onto the spandex). It works surprisingly well!
elbow2.jpg

Unibeam

I wanted to go with the actual bright unibeam look versus the detailed arc reactors I see some do. My unibeam is pretty simple. I created a front from the bottom of a Powerade bottle, which I sprayed the inside with Rustoleum Frosted Glass spray to diffuse the light a bit. The screen effect in the center is clear perforated plastic (craft store variety) and I just used part of a condiment container lid to form the ring between the two. The ring is white, because I needed it to hide the seams and edges of the other two pieces. It's not the most accurate, but I like the effect when lit.
unibeam.jpg

The light source was an 'angel eyes' LED ring.
unibeam2.jpg

I also finished the ab plates on the chest and attached the shoulder bells. Here is the painted chest with the unibeam and abs in place.
chest10.jpg

The bottom three ab plates are vinyl covered foam, and it's attached to the chest piece with snaps if I need to remove it.
chest11.jpg

A closer look of the unibeam in place.
chest12.jpg

And with the light on. There is a cool effect with the lights that doesn't show up in pics, unfortunately, that looks more 'unibeam-ish'.
chest13.jpg
 
Forearms

So my forearm I made using the same inner split/velcro approach.

arm1.jpg

I wanted the forearm to rotate with my wrist, rather than my arm rotating inside it while it sits in one place. This is another reason I separated out all the arm pieces.

So what I did was make wristbands out of strapping (with velcro to attach on flip side) and mounted magnetic purse clasps with a foam piece. The magnetic clasps have metal 'legs' in the back, so I pressed them into the foam to leave an imprint, then made deeper cuts in the foam with an Exacto knife, then anchored the clasps into the foam with superglue. I glued this piece to the straps with a Loctite flexible glue.
arm2.jpg

I then aligned the female clasps onto that piece, then pressed that into another foam piece to make an imprint, etc. Then I glued this inside the forearm just a bit back from where the handplate meets the forearm.
arm3.jpg

So I put on the wristband first, then slide it around until the magnets click into place. I used two clasps on each to improve alignment.
arm4.jpg

Also, my handplates were attached as so.
arm5.jpg

So now my arms can maneuver and swivel pretty well, at least as good as a G.I. Joe figure with swivel arm battle grip. :) It also is great for repulsor poses, flexing, and other dynamic poses.
arm7.jpgarm8.jpg

The only limit to my arm mobility is where the biceps meet the chest... for example I can drink out of a tall bottle with it all on, but a can or cup I can't quite reach to my face.

Having done a test fit, I realized linking the abs and cod just isn't working, so I've split them. I also had to revise my front flap.. I'm using mini-strap fasteners (like on dog collars) instead of velcro now. I also tried magnets and snaps, but I needed something that would hold if I bent a weird way, and all those other choices either dislodged themselves with minimal pressure or, worse, tore right off the piece.
 
Awesome work!
Glad to see somebody else uses those magnetic clasps; I use those on all of my swivel joints (elbows and knees) in place of chicago screws. I get the same range of motion, and I can pop my joints apart easily rather than needing a screwdriver.
 
Back
Top